Our 20 Best Router Tips and Tricks


Rout dead-center dadoes
This guide helps you center a straight bit of any width on the centerline of your dado. Start by ripping two strips from 3⁄4 " plywood or medium-density fiberboard, to the dimensions shown below. With the edges butted tightly together, connect the pieces with hinges. Next, mount in your router a straight bit the same diameter as the thickness of the stock going into the dado. Adjust the bit for the depth of the dado.
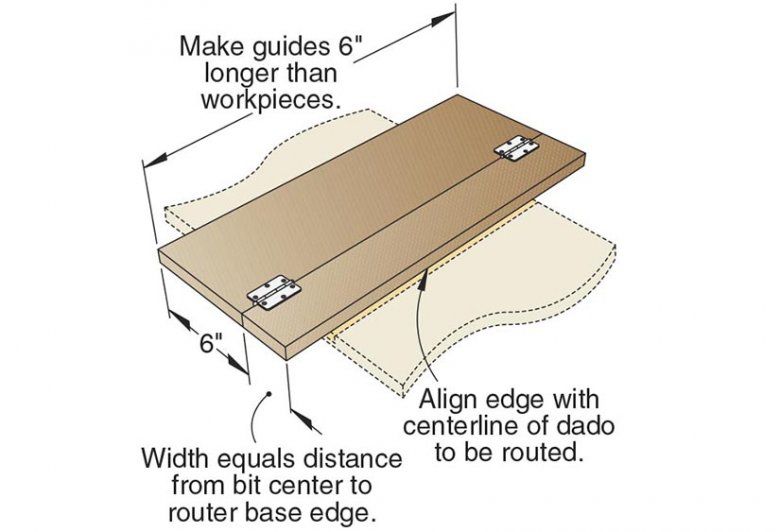
Now, mark the center of each dado on your workpiece. Align the flip-up gauge edge with a dado mark, and square up the jig to the workpiece, as shown below left. Then clamp it in place.
Flip the gauge up over the fence and use the fence edge to guide the router as you dado-cut, as shown below right.

Reset a fence
Two-piece rail-and-stile bits use the exact same fence setup for both bits. But that perfect fence location must be disturbed to swap bits. Save time resetting your router-table fence flush with the bit bearing and parallel to the miter slot with this handy gauge. After adjusting the fence flush with the bit bearing and parallel to the miter slot, install the jig in the miter slot. Slide the gauge blocks up to the fence, and tighten the wing nuts to secure the blocks. Then remove the jig, and make your first set of cuts. After you move the fence to change bits, remount the jig in the miter slot. Slide the fence against the blocks, and tighten it in place. If your router table lacks a miter slot, lengthen the gauge blocks so the hardwood runner rides against the front edge of the tabletop.

A pair of paths to precise plunges
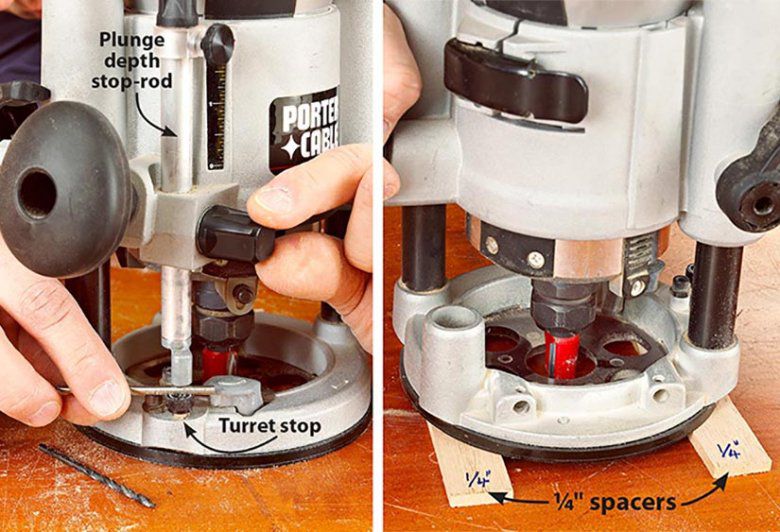
You can fuss with rulers and depth gauges all you want, but here are two quick and easy ways to precisely set your plunge router cutting depth.
The method shown below left uses different drill bit thicknesses to exactly set a router's plunge depth. First, place the router on your bench and plunge the bit until it touches the benchtop. Then lock it in place. Loosen the depth stop-rod, and sandwich a drill bit of a diameter equal to the plunge depth between the turret stop and rod. Then tighten the rod in place. Unlock the plunge mechanism, and you're ready to plunge into your project.
The method at below right uses spacers planed to the same thickness as the depth of your plunge cuts. Place the router on a pair of spacers, and plunge the bit until it touches the benchtop. Then lower and tighten the stop-rod.
Tape your way to tighter dadoes
Adjusting a jig or straightedge to widen a dado just a hair can create more problems than it solves. Instead, leave your guide in place and add strips of tape along the router base edge, as shown below. That nudges the bit away from the guide when you recut. Four layers of blue painter's tape equals about 1⁄64 ".

Gauge blocks simplify bit setups
Have you ever painstakingly set a bit height, only to find that you needed to return to it later? Making individual gauge blocks for rail-and-stile, raised-panel, finger-joint, and profiling bits saves setup time. You can rout them from medium-density fiberboard or hardwood, but ultra-high molecular-weight (UHMW) polyethylene, shown below left, makes a more stable block. (Assortment no. 143291, from Woodcraft, 800-225-1153 or woodcraft.com.)
From stock planed to the same thickness as your project parts, cut blanks at least 4" wide and 6-8" long. Next, set up the bit in the router table and make test cuts in scrap to fine-tune the height. After routing project parts, rout the same profile on a gauge-block blank. Repeat for the mating bit, if needed. Then rip the gauge blocks to about 11⁄2 " wide, and label them with the bit profile and stock thickness.
To use the gauge blocks, chuck a bit into a table-mounted router and raise it to roughly the correct height. Place the gauge block with the mating profile beside the bit. Then raise or lower the bit until it slides into the routed profile on the block, as shown below below right, and lock the height. You'll still need to test-cut scrap for a dead-on fit, but the gauge blocks will make that go a lot faster.

Parallel passes
Whether you're routing dovetail slots, as shown below, or T-slotted wall storage system panels, here's a time-saving jig for you. It indexes from the previously routed slot to ensure evenly spaced dadoes, dovetails, and grooves.
From scrap 1⁄2 " plywood, cut a subbase to fit your router and project. Then rout a dado on the subbase bottom where the distance between the dado and the bit equals the spacing between the slots. Make the dado as wide as the bit profile at the workpiece surface. Attach a matching hardwood guide in the dado. For grooves deeper than 1⁄4 ", make progressively deeper cuts. For dovetails, rout first with a straight bit, and then finish with a dovetail bit for efficient chip removal.

Rout stopped cuts with stopblocks
Edge cuts, such as chamfers, and surface profiles, such as flutes, sometimes need to start and stop precisely and uniformly. That's the time to use simple, customized stopblocks to control where the profile starts and stops on each workpiece. Measure from the point where the cut will stop to the end of the workpiece, subtract the bearing radius, and cut the stopblock to that length from scrap at least 3⁄4 " thick. Clamp the stopblock to the edge of the workpiece as shown.

Get a grip on small parts
Small parts can drop through oversize router-table inserts or instantly tug fingers into the bit. To solve both problems, first drill a hole slightly larger than the bit diameter in a piece of 1⁄4 " plywood, and clamp it to the router-table top for near-zero-clearance support. Then keep your fingers safe by gripping the part with a handscrew. The jaws of these clamps can be angled to firmly grasp odd-size parts and hold them flat against the zero-clearance top.

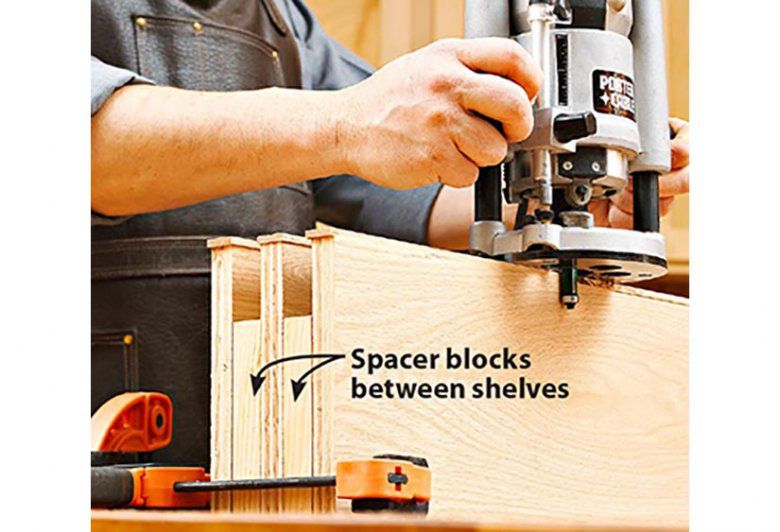
Shelf-help for trimming edges
Perching a router on a shelf edge to flush-trim solid-wood edges can turn ugly if your machine tips. Give it stability by clamping together the shelves on edge. Cut spacer blocks from 2x4 scrap and place them between the shelves at both ends. Then clamp the spacers and shelves together. (We clamped one of those clamps to the bench for added stability.) Then rout each edge with a flush-trim bit. If the router wobbles on the edges of the outside shelves, move those pieces to the inside, reclamp, and finish routing.
Rout round-overs, not tip-overs
A tipping router can ruin the edge of a finished project, so keep that base stable. If you need to round over the outside edges of an assembled box, tip the project on edge and use the front, back, and sides to support the router base, as shown below left To rout inside round-overs with equal ease, clamp a 2x4 auxiliary support onto the outside surfaces, as shown bellow right.

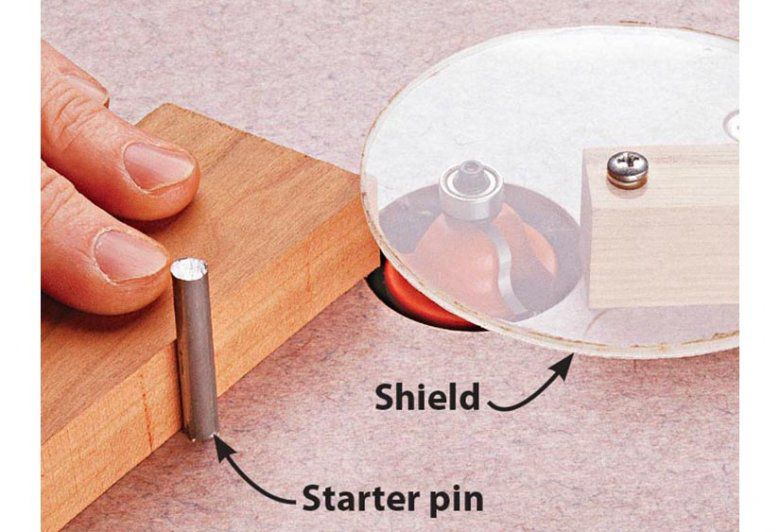
A starter pin keeps fingers safe
The toughest part of freehand routing is easing the workpiece against the bit. To help you guide parts safely, make a starter pin from a hardwood, brass, or aluminum rod, and securely mount it to the table about 2" from the bit. Brace the workpiece against the starter pin; then slowly rotate it into the bit and bearing. Grip the workpiece close to the pin, and use the technique for small parts on slide 8.
Enlarge holes in two easy steps
Maybe you need to enlarge a hole, or make a dead-on round hole larger than your largest Forstner bit. Do either using a rabbeting and a flush-trim bit.
To enlarge a hole's radius by 1⁄4 ", first rout a 1⁄4 "-deep rabbet the width of your cutter while keeping the bearing against the edge of the hole. This creates the "step" shown below left.
Next, turn the workpiece upside down and install a flush-trim bit. Adjust the cutting depth so the bearing rides along the cut made by the rabbeting bit and rout away the step, as shown at below right.

Master complicated curves
Templates needn't always follow straight lines and simple curves. They also handle more complex shapes as long as the template corners aren't tighter than the diameter of your router guide bushing.
This reversible template lets you rout mirror-image patterns, as on this shelf bracket. With a different pattern, you could rout matching tambour-door tracks in the inside faces of a rolltop desk or a countertop kitchen appliance holder. There's only one requirement: The workpiece should have at least one straight edge to align the template.
Make templates from 1⁄4 " plywood or veneered medium-density fiberboard, leaving an extra 3⁄4 " of material on two adjacent edges. Size and shape the template to allow for the diameter of the guide bushing. With the template in position on the workpiece, trace the reference edges of the workpiece onto the template bottom.
Then flip the template over and, along each line, drill two 1⁄4 " holes so their edges just touch the line. Then cut four 3⁄4 " lengths of 1⁄4 " dowel and insert them into the four holes. Dowels should fit snugly enough that they don't fall out, but not too snug to tap through the template. For a tight fit, moisten dowels and allow them to dry before inserting them in the template.
Next, choose a bit that creates the pattern you want, and attach a guide bushing sized to accommodate the router bit diameter and the desired offset from the template. Tap the dowels flush with one side of the template before you clamp on the template so the dowels register against the workpiece. Rout the pattern, as shown below left. Then flip the template over, tap the dowels flush with the opposite surface, as shown below right, and rout the mirror version of the first path.

Rout corners consistently
Rounding over corners by hand-sanding produces uneven results. Instead, use a round-over bit with the radius you want for your corners. With the bit chucked on a table-mounted router, raise the bit height until it cuts a quarter-round profile in scrap without leaving a shoulder. Then position the fence flush with the bit pilot bearing. To prevent chip-out and keep the frame square to the fence and router-table top, clamp it to a 2x4 backer block, as shown below.

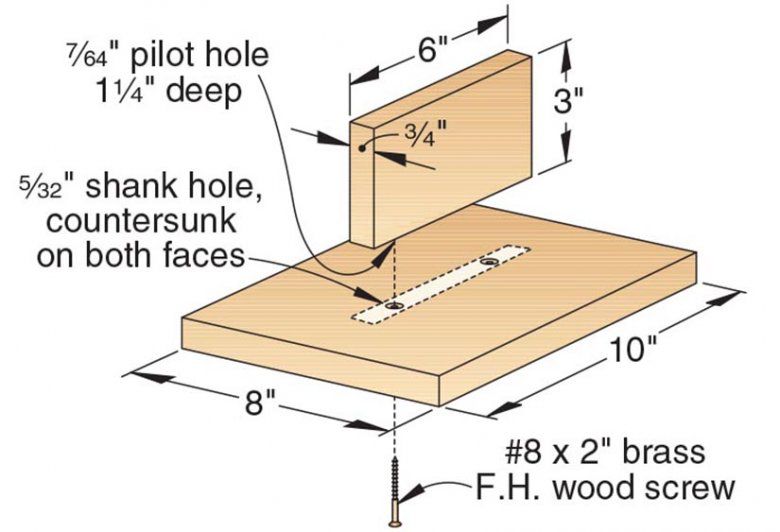
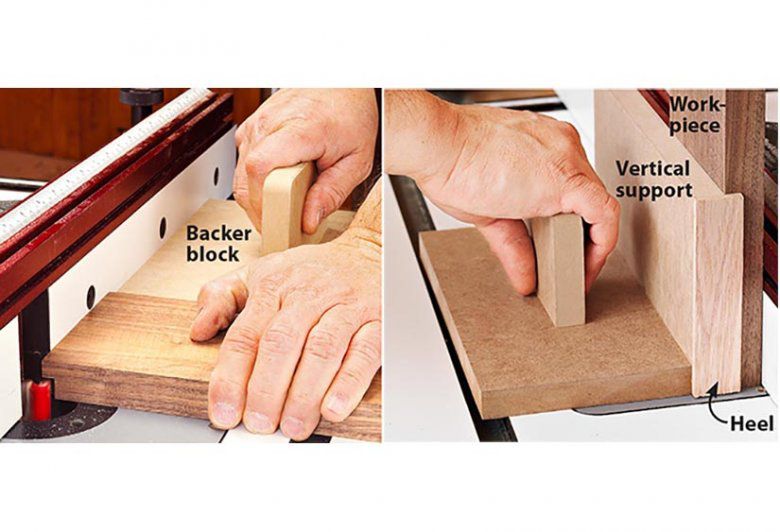
To wipe out tear-out, call for backup
Backer blocks not only reinforce router-table cuts, they also double as miter gauges for keeping parts perpendicular to the fence more reliably than a miter gauge. Use the drawing below to assemble a backer block from 3⁄4 " scrap sheet goods, or customize it to suit your needs. One advantage of a base this size is that you can trim away the routed edges and use the block again with a different profile. You also can modify the block to cut tenons on end by gluing on a vertical support to steady the workpiece and a heel to push it into the bit.
Rout precise shelf-pin holes
The downside to making adjustable shelving is drilling the shelf-pin holes consistently. With this template, however, you can bore clean, precise holes time after time using a plunge router with a guide bushing and straight bit.
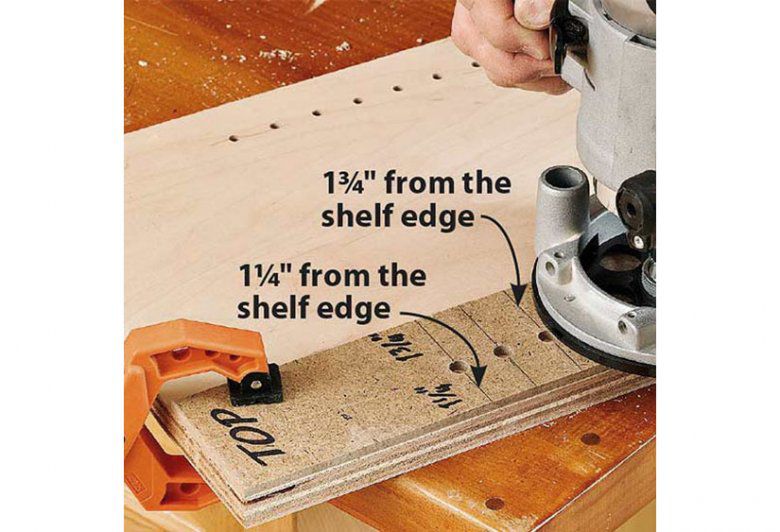
Make the template from a strip of 1⁄4 " tempered hardboard that's smooth on both sides. Vary the strip width and length to suit the placement of your shelf-pin holes. For example, the holes in the 3"-wide template right are offset to rout shelf-pin holes 11⁄4 " from the shelf edge on one side and 13⁄4 " on the other. Then use a drill press with a brad-point bit to bore evenly spaced 3⁄8 " holes. (If you're off a hair, referencing the template from the same end of the workpiece every time ensures stable shelves.) Then clamp the template onto the case side.
Next, mount a 3⁄8 " guide bushing onto the router base. (If the bushing extends past the template bottom, file or grind it flush.) Then install a 1⁄4 " straight bit into your router, and set the plunge depth to allow for the thickness of the jig.
At each hole in the template, insert the guide bushing and plunge-cut a hole. Then move to the next hole and repeat until you're finished.
To see a video on using this template, visit woodmagazine.com/shelfholes.
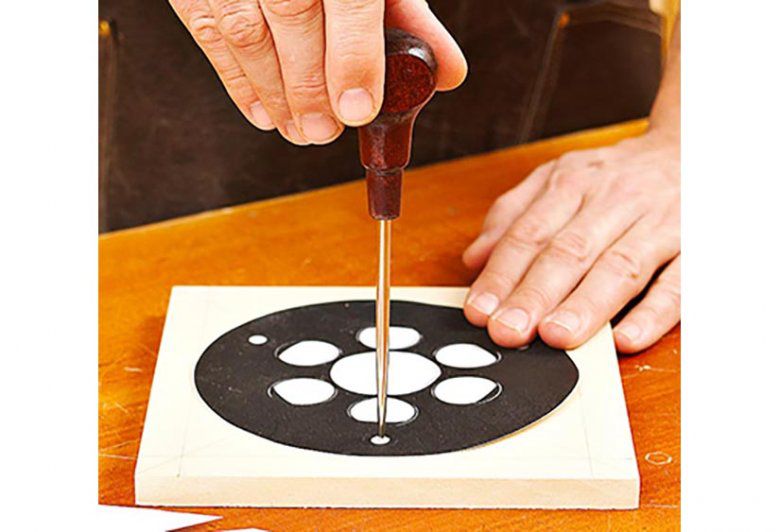
Here's an idea you can copy
Mounting jigs or subbases onto a router, as shown in Tip 6, requires precise mounting holes. Make that job easier by photocopying the router base and using the copy to mark and drill mounting holes. Check the copy size against the base size in case the copier is off slightly, and reduce or enlarge it as needed. If you have a computer scanner, you also can scan the base and file the scan for future printing.
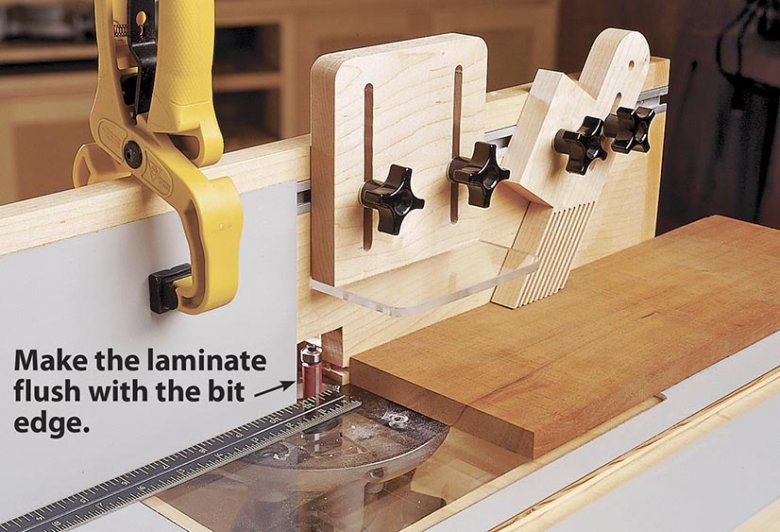
Joint boards on a router table
No jointer? No problem. Plastic laminate clamped to the outfeed side of your router-table fence works the same as the outfeed table on a jointer. Cut laminate to fit the left side of the fence; then sand a chamfer on the edge nearest the bit to avoid snagging your workpiece.
Use a straightedge to adjust the fence until the laminate is flush with the cutting edge of your installed flush-trim bit raised to cut the full width of the workpiece edge. Start the pass by pressing the workpiece against the right half of the fence; then slide it from right to left. As it clears the bit, shift pressure to your left hand to press the trimmed portion against the laminate to finish the cut, which trims about 1⁄16 " with each pass.
Spacers divide raised panel cuts
Routing raised panel edges in one pass produces tear-out and it's risky. Spacers taped to a router-table fence let you rout gradually without constant adjustments. First mount a panel-raising bit onto a table-mounted router set to its lowest speed. Test-cut scrap the thickness of the panels to set the final profile.
Then make eight spacers from 1⁄8 " or 3⁄16 " plywood, and double-faced tape four on each side of the router-table fence. Rout all four edges of each panel, starting with the ends; then use a putty knife to pry off a spacer from each side, as shown below. Repeat for each panel, removing pairs of spacers until the panel rides against the fence on the final pass.

Rout away extra edge-banding
Balancing a router with a flush-trim bit along a workpiece edge as you remove excess iron-on edge-banding can ruin a shelf with the slightest tip. But a router with a 1⁄4 " straight bit and this jig trims edging without risking gouges. To make this jig, cut an 8" square base from 1⁄2 "-thick medium-density fiberboard (MDF) or plywood. Then cut a 1⁄4 "-deep kerf centered on the bottom. From 3⁄4 " plywood or MDF, cut a 315⁄16 x8" fence, and glue it to the base flush with the kerf, as shown right. Using a 3⁄4 " plywood scrap to stabilize the base, drill a 3⁄4 " centered hole with a Forstner bit.
Next, insert a 1⁄4 " straight bit in your router. With the bit centered in the hole (and the kerf), mount the router to the jig with double-faced tape. Then adjust the bit depth so the tip comes to just below the bottom surface of the base. Test the setting on plywood scrap to make certain the bit doesn't leave score marks on the surface.
To trim edge-banding, clamp the workpiece into position, as shown below. Push the jig base firmly against the workpiece surface and edge with the surplus edge-banding inside the kerf. Turn on the router, slide the jig along the banded edge, and trim off the overhanging edge-banding. Edge-banding still proud of the surface can be sanded away with 180-grit abrasive.
The heat from the spinning bit may reactivate some of the edge-banding adhesive, causing it to stick to the bit. Remove it immediately with a blade and bit cleaner, such as Empire Blade Saver (866-700-5823 or empiremfg.com).
