4 Easy Oak Finishes
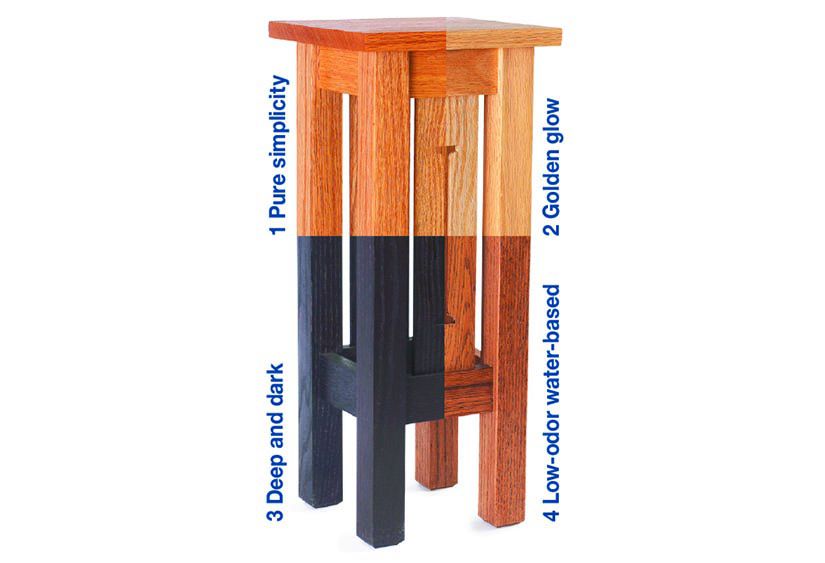

Attractive finishes don't always have to be difficult. Sometimes, you can get the look you want in a couple of simple steps. To demonstrate these four easy finishes, we tried them on four small, red-oak tables. Except where noted, we followed these basic finishing rules:
✔ We sanded all parts to 120 grit prior to finishing, then vacuumed and wiped them free of dust.
✔ Dyes and water-based stains dried for four hours, and oil-based stains dried overnight before we applied any topcoats.
✔ We waited two hours between coats of water-based finishes, and overnight for oil-based finishes before recoating.
✔ Between each topcoat, we scuff-sanded with 320 grit.
Now, let's start with the easiest finish:
1. Pure simplicity
Have we got a no-flaw finish for you: boiled linseed oil followed by wipe-on polyurethane. This combo gives wood pores subtle emphasis, and the surface a natural look that protects the wood against moisture and abrasion. What's more, you'll have no problem finding or applying both of these inexpensive finishes.
Ingredients and application. First, flood the surface with generous amounts of boiled linseed oil. Reapply oil anywhere it's absorbed by the wood, then wipe the surfaces dry. As oil dries, it may bleed from the wood pores and harden on the surface. Wipe away these deposits every hour until you no longer notice them. Allow the project to sit four to seven days while the oil dries.
■ Topcoat: Mix two parts polyurethane with one part low-odor mineral spirits, and stir. With experience, you can increase the percentage to three parts polyurethane to one part mineral spirits for thicker coats with each application.
■ Topcoat application method: Use a clean cloth to wipe on this finish. Remove any excess before it runs or puddles.
■ Number of topcoats: Apply at least three coats.
Speaking from experience. Compared with brushing on straight or lightly thinned poly, this technique avoids a host of problems with dust nibs and brush strokes.
■ Take your time. If you rush the first coat of poly before the boiled linseed oil dries, the added mineral spirits will reactivate the oil and cloud the finish.
■ Project parts, such as the vertical panels in the table, can be finished before assembly for consistent color.
■ This film finish builds slowly, partly because you'll scuff-sand (and wipe clean) the already-thin coats between applications. Then, consider adding two additional coats where needed to protect the project: the top, the outside of the legs, and any surfaces likely to be marred or scratched.
■ Cover up minor scratches by lightly scuff-sanding the damaged area and wiping a coat of poly over it.
■ As always with boiled linseed oil, lay oil-soaked rags flat on an non-flammable surface to dry before discarding them.
2. A one-step finish with a golden glow


Here's a novel look for accent furnishings, small projects, or part of a larger project. Pearlessence (see Sources), a translucent finish shown below, adds a subtle gold sheen that also reduces the contrast between oak's pores and the surrounding wood.

Ingredients and application.
■ Surface preparation: Sand bare wood to 180 grit for a smooth surface. Wipe the surface with mineral spirits to check for flaws that will be exposed by stains or reflected on a Pearlessence surface.
■ Stain/dye: Although none was applied here, any shade can be used.
■ Topcoat: Pearlessence.
■ Topcoat application method: Brush or spray on both the Pearlessence and any optional clear topcoats.
■ Number of topcoats: One coat of Pearlessence for color and shimmer. An optional two coats of semi-gloss water-based finish add wear protection.
Speaking from experience. Although it dries as quickly as other water-based film finishes, Pearlessence left few brush marks.
■ Stain colors beneath this finish make a big impact on the final color and amount of surface shimmer. Golden oak stain plays up the metallic sheen, as shown below, while red oak stain mutes it.
■ Stir the coating well before and during application for a consistent sheen.

3. Deep and dark, but not difficult

Going just one step beyond a basic stain and topcoat produces an elegant ebony finish. The secret? Start with an application of water-soluble ebony dye followed by a dark oil-based stain. Unlike black paint, this finish still reveals red oak's grain lines as a matte color that contrasts against the smooth surrounding wood.
Ingredients and application. Because missed spots stand out against a dark finish, dye, stain, and finish parts before assembly.
■ Surface preparation: Sand to 150 grit, then raise the grain with a damp towel, and lightly scuff-sand to remove raised nibs. Tape off joint areas before finishing each part for a solid glue bond.
■ Dye: Mix ebony dye (see Sources, below) at 2 tablespoons of black dye to 6 oz. of water. Generously apply dye using a cloth or sponge brush. Allow the dye to dry, then remove surface dye residue with a clean, dry cloth.
■ Stain: With a cloth, apply a dark walnut stain in a circular motion to fill the pores. Wipe away excess stain with the grain.
■ Topcoat: Brush on semi-gloss water-based poly to seal the wood, followed by two topcoats.
Speaking from experience. Vary the dye concentration and choice of stain to customize the color from all black to a medium chocolate color. The dye and stain should be roughly the same degree of darkness for best results.
■ The color may seem bland after applying stain over dye. But the film finish will bring it to life and give it depth.

4. A low-odor choice for indoor finishing

An indoor workshop gives you a welcome retreat from winter—that is until it's time to apply a finish. Your only choices seem to be either wait for warm weather to use solvent-based finishes outside or spread finish fumes throughout your house. You have a third choice, though: water-based stains and film finishes.
Ingredients and application. We used the same materials and technique to finish the table shown above.
■ Stain: General Finishes Early American water-based stain in semi-gel form.
■ Stain application method: Wipe stain on with a soft paper towel; then remove it immediately with a clean towel, as shown below.

■ Topcoat: ZAR Ultra Max water-based satin finish.
■ Topcoat application method: Brush on or spray on with a touch-up sprayer for less overspray than a full-size spray gun.
■ Number of topcoats: One coat to seal, followed by two topcoats.
Speaking from experience. Water-based stain can be a challenge to apply. Leave it on a few seconds too long, even under ideal conditions, and it quickly dries. Dry air only exacerbates the problem.
■ Sanding up to 220 grit reduces blotching. But the smooth surface traps fewer stain pigment particles for a lighter color.
■ Work quickly in small areas, but keep overlaps to a minimum to avoid lap marks. Stain long project pieces, like the legs on the display shelf, using generous amounts of stain in long strokes.
■ To slightly darken light spots, remoisten the towel used to apply the stain, and gently wipe the light section until it matches the surrounding area.
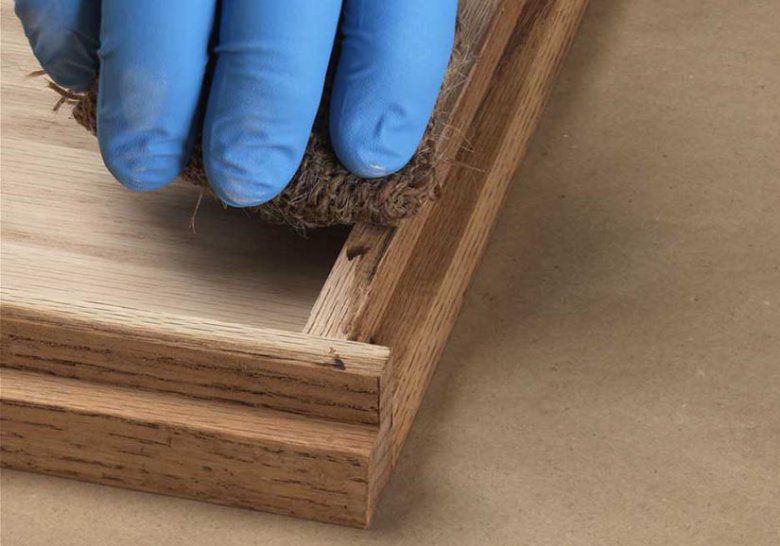
■ To remove dried excess stain, make a couple of passes with a moistened coarse cloth, such as burlap, as shown below, until the color evens out.
■ Take care when staining projects that mix veneer plywood and solid oak. The plywood may require additional stain applications because it absorbs less stain, producing a lighter color.
■ Should the stain raise the grain slightly, make three light passes over the stained areas using 320-grit abrasive. Do not sand through the stain.
■ Water-based finish dries quickly, even inside a spray gun. Clean spray equipment between coats to prevent finish from clogging the sprayer.
Sources
Stains: Early American water-based stain, call General Finishes at 800/783-6050, or visit generalfinishes.com. Varathane dark walnut (No. 269) oil-based stain, call Varathane at 800/635-3286, or visit varathane.com.
TransTint black dye: No. 128490 from Woodcraft. Call 800/225-1153 or visit woodcraft.com.
ZAR Ultra Max water-based satin finish: United Gilsonite Laboratories, call 800/272-3235 or visit ugl.com.
Olympic Pearlessence: PPG Architectural Finishes, call 866/321-9090 or visit olympic.com. (Available at Lowe's stores nationwide.)
Table plans: The tables used to demonstrate our finishes are modified versions of the smallest of a set of three mission nesting tables from the plans found here.