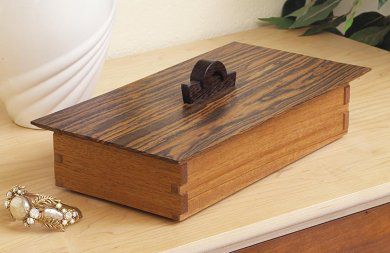
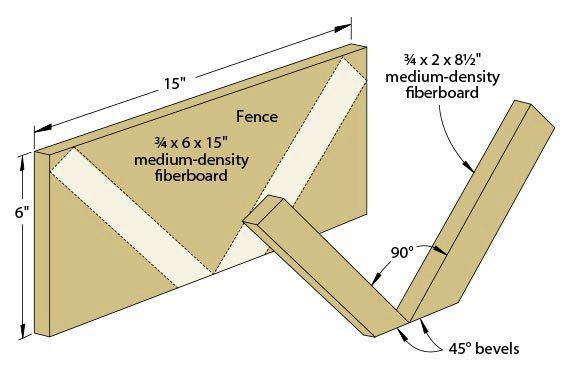
4 simple, no-hinge box tops that rock


Box lids can be made as complex as you like, but you just can't beat the simplicity of lift lids requiring no hinges, locks, or stays. Doug Stowe specializes in crafting wooden boxes with lids and has developed a host of simple techniques for making your lids stand out. Try your hand at these four designs.
Note: All of Doug's designs have rabbeted edges, so the lids nest securely inside the box, and are finished with several coats of wiped-on clear Danish oil.
1. Use a simple slab
A top made from one piece of highly figured stock (below) can be as beautiful as a complicated multipiece design. Some craftsmen will warn that a wide slab of solid wood—particularly a highly figured one with lots of inherent stress—should be ripped and reglued to ensure it remains flat. But Doug says, "I'd rather take my chances with possible warp than disturb the figure with kerf lines."

To make this style top, begin by planing the stock to thickness. Doug planed the maple for this lid to 9⁄16 " thick, jointed one edge, and then ripped and crosscut the lid to size—allowing for a ¼" overhang on each side.
Stowe's Suggestion:
A relatively thick top may feel heavy when opening the box, but resists warping better than a thin top.
With the top cut to size, cut rabbets in the lid's bottom face [Photo A, below] so it nests into the top edges of the box. Although Doug used a tablesaw to cut the rabbets in this lid, given the large amount of material being removed, a router table and straight bit works, too, but may require multiple shallow passes.


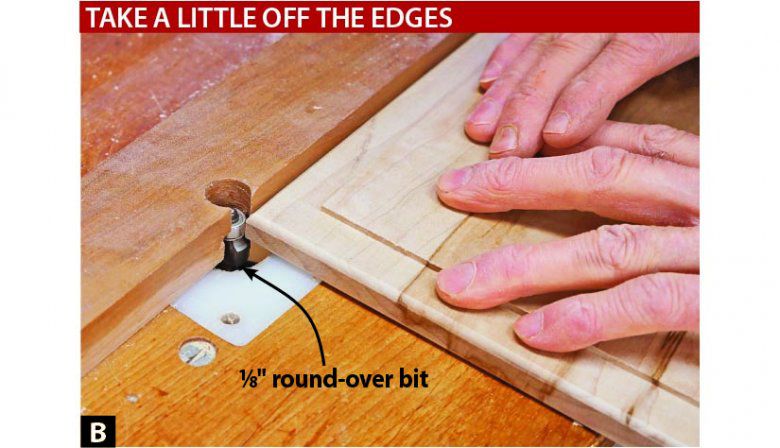
Round over the top's edges [Photo B, below] and sand it to 220 grit. Apply a finish. Then, further embellish this simple top with an interesting or unusual pull. Doug found this one at the hardware store—sold as a kitchen cabinet pull. He liked its delicate appearance and how it fit the scale of the box.
Stowe's Suggestion:
On a small box, a delicate pull works fine as a two-finger lift, but for larger boxes and heavier lids, a larger pull or a two-handed approach may make more sense.
2. Incorporate a rustic element
If you like the eclectic look of contrasting surfaces, try implementing a piece of roughsawn stock, such as this weathered red oak barnwood.

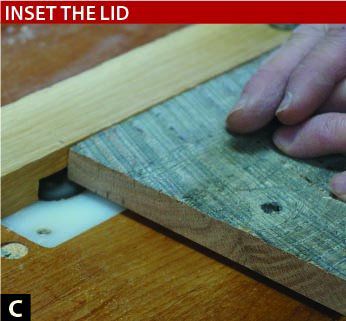
When preparing your stock, plane only one face, and reduce the thickness to 5⁄8 ". Then, cut the piece to size. In this case, Doug made the lid 1⁄4 " smaller than the box's outside dimensions so, rather than overhanging the sides of the box, it nests within the box's perimeter. Next, cut a rabbet around the lid's bottom face [Photo C, below]. To lighten the look of this heavy top, bevel its edges as you would a raised panel [Photo D, following]. Sand all but the weathered part of the top to 220 grit.

Stowe's Suggestion:
Use an extra-fine synthetic steel-wool pad to polish the roughsawn surface smooth to the touch without losing any of the patina.
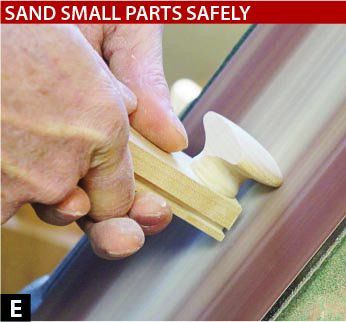
For this lid's handle, save time by using a stationary belt or disc sander to remove an equal amount of material from opposite sides of an inexpensive, round wooden drawer pull such as the one shown below, found at most home centers [Photo E, below]. Doing this gives it a handcrafted appearance. Secure the pull with a countersunk screw.
3. Get fancy with a frame-and-panel lid
This design offers more woodworking challenges and plenty of visual details. Make the floating panel, splines, and lift tabs from a species that contrasts with the rest of the box (walnut and maple shown).

Begin by miter-cutting the frame pieces to length on the tablesaw [Photo F, below]. Dry-assemble the frame and tape the corners together. Measure inside the frame and add 3⁄8 " to these dimensions to determine the size of the panel; then, cut it to size.


To make a tight-fitting tongue-and-groove joint between the frame and panel, set the saw blade 3⁄16 " above the table and adjust the distance from the blade to the fence to equal the blade's kerf. Test your setup by cutting a kerf along the edge of two pieces of scrap stock. Check their fit [Photo G] (above) and adjust the fence accordingly. Cut grooves along the frame's inside edges [Photo H, below]. Then, without changing the blade depth or fence location, cut matching grooves on all four edges of the panel. With the grooves cut, bevel the panel's face [Photo I, following] and sand the bevels to 220 grit. Then, glue the panel in the frame [Photo J, beneath]. After the glue dries, bevel the frame [Photo K, bottom].


Build the jig shown below and use it to cut centered kerfs for splines in the lid's corners [Photo L, following]. Set the blade height so it won't cut into the panel. Cut stock for splines to fit the kerfs, glue them in place, and trim and sand them flush with the top's edges. Then, rabbet the underside of the lid so it fits the inside dimensions of the box as was done with lids 1 and 2.

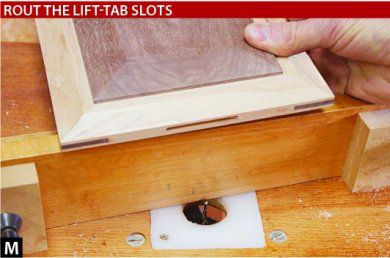
Rather than clutter this lid with pulls on top, Doug added walnut lift tabs at each end to indicate where to place hands when opening the box. To install these, first use a 1⁄8 " spiral upcut bit in your router table to cut centered slots for the tabs [Photo M, below]. Then, cut 1⁄8 ×5⁄8 ×2" stock for the lift tabs and fit them to the slot [Photo N, following]. Glue the tabs in place and sand the entire top to 220 grit.

Stowe's Suggestion:
Use a disc sander or bandsaw to give the tabs a simple pentagonal shape, emulating the bevels cut in the raised panel lid.
4. Rock a stone-accented top
As woodworkers, it's easy to think wood can be our only medium. But other materials—coins, seashells, or smooth stones, for example—add eye-catching contrast to woodworking projects.

To build this lid, Doug used two pieces of 3⁄8 "-thick stock: one sized to fit the box's inside dimensions (the lid's base) the other cut 1 1⁄2 " longer and 1" wider than the box's outside dimensions (the lid's top). Arrange the stones on this larger piece; then hold each in place as you trace around it [Photo O, below].

Stowe's Suggestion:
Snap a quick photo of the stones' orientation so you'll be able to position them exactly as you had them laid out originally following the cut.
Scrollsaw away the marked areas, cutting the lid's top into two pieces. Rout or sand a 1⁄16 " chamfer on the top inside edges of the two pieces, and then glue them to the top's base [Photo P, following]. While the glue dries, create a template from 1⁄4 " scrap to use when routing the handles. The single-sided template ensures identical handles centered on each end [Photo Q, beneath]. Finally, epoxy the stones inside their cutouts.

MORE RESOURCES
* Find a FREE keepsake box plan.