6 must-have turning tools and how to use them


Ever feel confused about which turning tools you really need? Fancy, specialized tools abound; but, thankfully, you can craft a variety of turned projects with just a basic set. For advice on this topic, we turned to our old friend and professional turner Phil Brennion of Chino Valley, Arizona. Here's his advice about which tools you should buy, and how to use each one.
Four rules that woodturners live by
Before getting into the specifics of each tool, keep in mind these four basic selection and usage guidelines.
RULE 1: Purchase tools with high-speed-steel blades.
Why? They hold an edge better, giving them more life than less-expensive carbon steel. We purchased the Artisan brand we purchased (from Craft Supplies USA, 800/551-8876).
You'll find most turning-tool dealers offer prepackaged sets that carry a slightly lower per-tool price. Most sets, though, are sold as a "spindle-turning set" or a "faceplate-turning set." You're likely to dabble in some of both types of turning, and buying two sets means you'll get some duplicates, yet may still lack a few of the tools we recommend. So buy tools individually to get just what you need and nothing else.
RULE 2: Start with smaller tools.
Most turning tools come in a variety of sizes, and the bigger ones don't cost much more than the smaller ones. So, you may think, unless you are creating small details, that buying bigger tools makes more sense. Sure, a bigger tool removes stock faster, but it's harder to finesse and more likely, at least in a beginner's hands, to catch unexpectedly in the spinning wood.
Phil Brennion notes many cases of students struggling with a 1⁄2 " bowl gouge. When he hands them a 3⁄8 " bowl gouge instead, they have much more success controlling the tool.
RULE 3: The tool must remain in contact with the lathe's tool rest.
Make sure you firmly plant the tool's blade on the rest before the cutting edge touches the wood. Fail to heed this rule, and the spinning workpiece will yank the tip down and throw the handle upward.
Be sure, also, to always grasp the tool firmly, and make light cuts as you learn its characteristics. Time and practice will teach you how to use each tool in more aggressive and complex ways.
RULE 4: Study turning books to learn more about each tool.
Every woodturning tool is designed for a specific primary task. As you master this basic use, though, you'll discover other tricks the tool can perform. To learn more about the tools, read two of our favorite books: Woodturning, A Foundation Course by Keith Rowly, and Richard Raffan's Turning Wood. Both are available through bookstores and woodworking suppliers.
Now, the basic woodturner's toolbox
Catalogs are packed with dozens of specialized tools you may think you need for lathe work. Eventually, you might want some of these woodturning widgets if you get into a particular type of project, such as turning deep, hollow vessels. But rest assured that you can create almost any type of turning with just the following six general-purpose tools.
3⁄4 " ROUGHING GOUGE


* Description:
This straight, deep-fluted tool has a square tip and broad cutting surface.
* Presentation and cutting:
When using the roughing gouge, approach the workpiece with the tool's flute facing up, the handle down, and the cutting end elevated above the handle's height. This is a bevel-rubbing tool, meaning the bevel on the tip should contact the wood before the cutting edge.
Once the tool bevel rubs the workpiece, raise the handle until cutting begins. Start cutting near the center of the workpiece and work toward each end. As the stock becomes more round, rotate the tool (to about 10 o'clock or 2 o'clock) toward the direction of cutting travel.
* Tool-rest height: At centerline.
* Other uses: Creating shallow coves.
3⁄4 " SKEW CHISEL


* Description:
A flat-bladed tool with bevels ground on both faces of the angled tip.
* Presentation and cutting:
The skew rides the tool rest on edge, tipped at about a 45° angle. The cutting edge meets the turning stock at a 45° angle, well above the centerline.
Starting near one end of the workpiece, present the skew so its bevel rubs the surface of the workpiece. Now move the handle away from the workpiece (toward you) until the cutting edge bites. Then, push the skew toward one end of the workpiece with the bevel continuously in contact with the wood.
* Tool-rest height: Just above centerline.
* Other uses: Cutting beads and V-grooves.
3⁄8 " SPINDLE GOUGE


* Description:
This tool features a round blade with a shallow flute. The tip has a rounded profile, and a beveled edge.
* Presentation and cutting:
This also is a bevel-rubbing tool, presented to the wood at or slightly above centerline. Push the spindle gouge along the stock, and rotate the tool as shown.
* Tool-rest height: Just below centerline.
* Other uses: Producing shallow hollows on faceplate turnings.
3⁄16 " DIAMOND-SHAPED PARTING TOOL

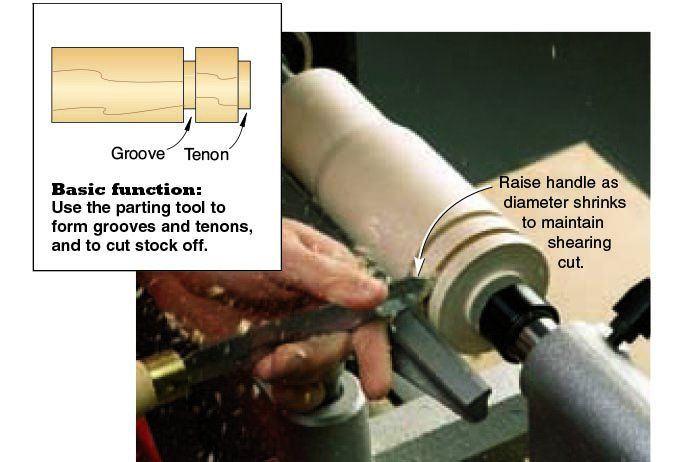
* Description:
The parting tool's straight, narrow blade features faceted faces and a steep chisel point, which combine to create a "diamond" shape.
* Presentation and cutting:
Place the parting tool on edge atop the tool rest. Push it against the stock at an angle of approximately 90°. As the tip makes contact and begins cutting in a scraping fashion, lower the handle to start a shearing (slicing) cut. Push the tool forward and simultaneously raise the handle to continue cutting as the workpiece diameter decreases.
* Tool-rest height: At centerline.
* Other uses: Rolling small beads.
3⁄8 " BOWL GOUGE


* Description:
This tool features a round, deep-fluted blade and a tip with a rounded or sharply pointed "fingernail" profile.
* Presentation and cutting:
Like other gouges, the bowl gouge's bevel should contact the workpiece first. After the cutting edge contacts the workpiece, rotate the tool in the direction of the cut and push it to shape the wood.
* Tool-rest height: Below centerline.
* Other uses: Creating ultrasmooth cuts on bowls and spindles by using as a shearing scraper.
1" ROUND-NOSE SCRAPER


* Description:
The scraper has a thick, flat blade with a rounded, beveled tip.
* Presentation and cutting:
Push the scraper into spinning stock with the longer face of the beveled blade up. The handle stays elevated slightly above the height of the cutting tip.
* Tool-rest height: Below centerline on spindles, at or just above centerline on faceplate work.
* Other uses: Nonaggressive smoothing.