6 steps to perfect stock


Ever wind up with a cabinet door that won't rest flat against its frame? Or do you find yourself sanding, sanding, and sanding a joint that you just couldn't make flush? To avoid these frustrations, I recommend you take the time to make your lumber flat, straight, square, and of uniform thickness before you start each project. Follow the steps shown here even if you buy wood with two straight edges and a surfaced thickness of 25⁄32 ", as sold by many home centers. Or, use this procedure to even
1. Bring home the best.


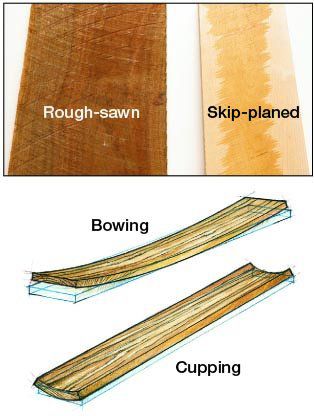
No matter where you buy your lumber, sort through it relentlessly. Look down the edge of each board to spot bowing, and sight along the face to find cupping. You don't have to come away with absolutely perfect stock, but buy the best you can find. At a sawmill, you might come across rough-sawn boards or skip-planed boards. You can work with either type; skip-planed boards give you a better idea of the wood's true color. Always keep the stack neat so the sawmill will welcome you back the next time.

2. Start breaking it down.

Back in your shop, remove any staples, and crosscut at least 1⁄8 " from each end of each board. It's likely to have grit embedded in the end grain after all the hauling and stacking it's been through, and that material will dull your sharp tools. Cut off more, as necessary, to get rid of checked or discolored ends.
Next, figure out how you're going to use each board. Mark the basic outline of project parts in chalk, avoiding knots and other flaws while showing off the grain to best advantage. A cardboard "window," cut to the approximate shape of a given part, helps you select goodlooking grain.
Crosscut the pieces a couple of inches longer than needed; crosscutting makes it easier to deal with bows and other imperfections in the following steps than if you left the boards long. Finally, rip the pieces 1⁄4 " over width.
3. Flatten one face at the jointer.
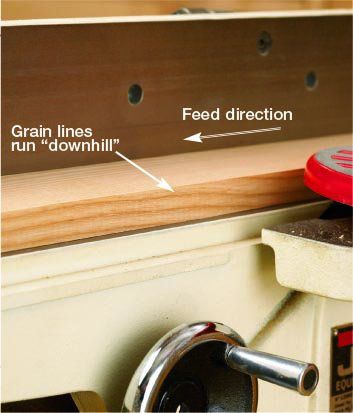
Study each workpiece to determine the best feed direction for preventing tear-out. Orient the edge-grain lines, as shown above, so that the jointer knives slice through the fibers instead of prying them up.
However, ray lines, which are less prominent than grain lines, sometimes run in a different direction and in some cases can determine the smoothness of a jointed or planed surface. For this reason, check the results after the first pass, and flip the workpiece end for end if you find tear-out.
If the piece has a slight bow, place the concave face down, and use pushpads to apply pressure at the ends only. Also put the concave face down if the workpiece is cupped. Set your jointer for a light cut (about 1⁄32 "), and work on one workpiece at a time, making as many passes as necessary. When you hear a consistent cutting sound all the way through a pass, lay the jointed face on a flat surface, such as your tablesaw, and check it for flatness.
4. Now, head to the planer.

The jointer produces a flat face, but it takes a planer to make the opposite face parallel to the jointed one (jointing both faces could produce a tapered workpiece). Again, examine the edge grain of each workpiece to find the best orientation. Stack the sorted boards next to the planer, arranged so that you'll naturally pick them up in the correct orientation. Keep organized with a second stack for the boards as they come out of the planer.
Set your planer to remove no more than 1⁄32 " from the thickest workpiece in your stack, and send each workpiece through the machine at that setting. Check the results for tear-out, and flip the workpiece end for end if necessary. Reset the planer and repeat the process until the upper faces are flat. If the workpieces are still thicker than 3⁄4 ", continue to plane them, but flip each workpiece end for end between passes; removing equal amounts of material from each face helps to keep wood stable. For most purposes, make your stock 3⁄4 " thick, a dimension that looks good and keeps calculations simple.
5. Square up one edge.
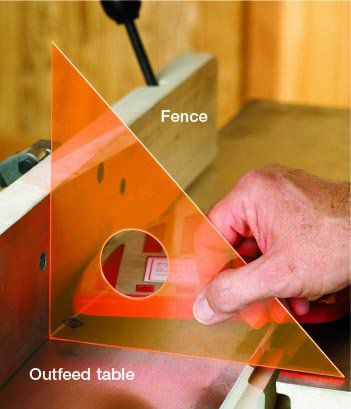
Now it's easy to joint one edge 90° to both faces. First, check your jointer with a square or drafting triangle to make sure that the fence sits at a right angle to the outfeed table. Then, check face-grain direction instead of edge grain, orient your boards correctly in a stack, and proceed to joint one edge of each workpiece with light passes.
6. Rip, joint, and you're done.

It's time to bring each piece to its finished width. Install a sharp blade in your tablesaw, and for each piece set the fence to the finished width plus 1⁄32 ". Make the rip cut, and then return to the jointer to clean up the saw-blade marks. Set the jointer to remove 1⁄32 ", and make one pass on the sawn edge. This pass produces the desired width and a smooth surface at the same time. Now you're ready to start building; just cut each piece to length when you need it.