7 Ways to Customize Cabinets


Building your own shop cabinets isn't rocket science (See More Resources, bottom of page, for cabinet-building tips). But if you'd rather buy than build, start shopping for inexpensive unfinished or ready-to-assemble cabinets at a home center. (We found a 12"-wide unfinished wall cabinet for $35, for example.) Most you can finish and install for all-purpose storage—if they don't buckle under a stack of stoneware dinner plates, they'll hold your tools. You can also modify them for special uses, such as tool stands.
If you're on a tight budget (or no budget), ask kitchen remodeling pros if they'll let you haul away old cabinets they remove. Or shop recycled building-material stores, such as a Habitat for Humanity ReStore (habitat.org).
Up against the wall
New or used, most stock cabinets follow standard dimensions, making it easier to mix cabinets from more than one source. Base cabinets measure 24" deep and 341⁄2 " tall. Wall cabinets measure 12" deep and either 30" or 42" tall. And cabinet widths vary from 9" to 36" in 3" increments.
To install a row of base cabinets, use a level to find the highest point of any slope on the floor. Position the first base cabinet there and shim the bottom edges until the cabinet is level from front to back and side to side (below). Then screw the back to the wall studs.


Now position the second cabinet next to the first one and shim it level and flush at the front and top. Attach this cabinet to the first one and then to the wall. Repeat for the remaining cabinets. Then, fasten on a countertop (plywood or MDF work great) and go to work.
To install wall cabinets—usually the same widths as your base cabinets—assemble two 17"-long temporary supports, like the ones shown below, and two 1⁄2 "-thick spacers to fit under them. Rest each support on a spacer and place the first cabinet on the supports and against the wall. Adjust the cabinet position and screw it to the wall studs. Then repeat for the remaining cabinets.

Create a sandpaper storage cabinet
Cabinet manufacturers design their wall units to accept one or sometimes two shelves, but you may want more than that for shop storage. Ready-to-assemble (RTA) cabinets that disassemble quickly give you the easiest opportunities to add more shelves. But any cabinet wide enough to accept a drill and bit can be modified to add enough shelves to create a sandpaper center.
To disassemble RTA cabinets like the one shown, first remove the screws attaching the back and slide the back free of the case. Then loosen the fasteners holding the sides to the top and bottom and the face frame to the case.
Cut a perforated-hardboard drilling guide to fit between the top and bottom dadoes in the cabinet sides. Clamp the guide to the cabinet side and drill shelf-pin holes 1" apart along one edge of the cabinet side, as shown below. Repeat for the opposite edge and other cabinet side.
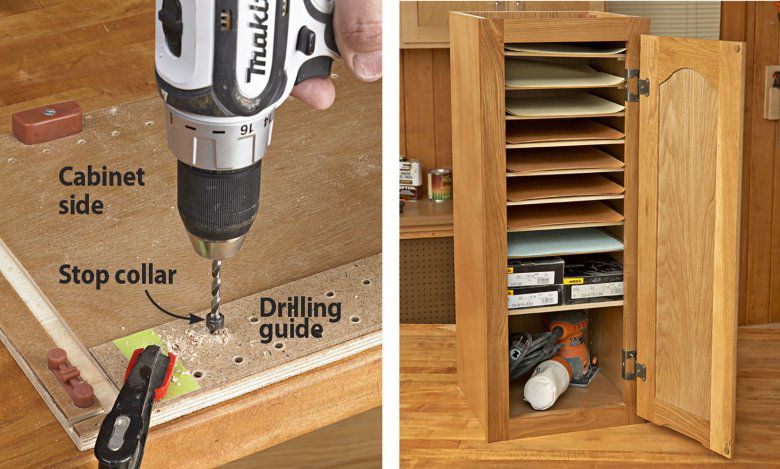
Reassemble the cabinet except for the back. Cut additional shelves and insert shelf pins, slide the new shelves in from behind, and replace the back.
Build in custom touches
Often, cabinets need a little help to make them more shop-friendly. To boost the storage capacity of preassembled cabinets, screw metal shelf standards to the sides, middle of the back, and inside the center stile to hold extra shelves. For another way to add shelves, see "Create a sandpaper storage cabinet," above.
Then make any cabinet more useful by adding accessories, such as these seven options. (For help with modifications, see More Resources at the end of this story)
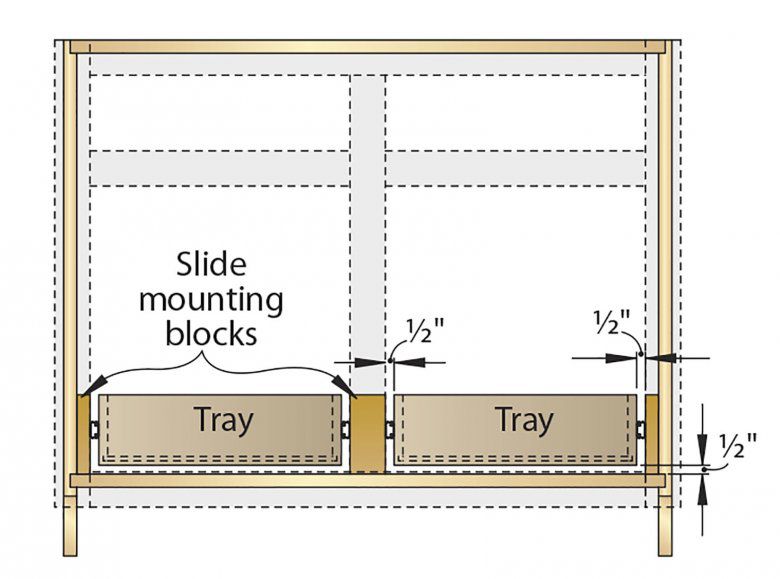
1. Install pull-out trays.
Reaching to the back of a base cabinet can be a pain, but pull-out trays bring the contents to you. Modify the tray plans below to fit the width and depth of your cabinet opening. Size the tray 1" narrower than the face-frame opening and 1" shorter than the interior depth of the cabinet.

To mount drawer slides in face-frame cabinets, block out the cabinet sides to bring the slides flush with the face-frame stiles, as illustrated below. For cabinets with a center stile, plane a center slide-mounting block to the width of the center stile and rip it 1⁄2 " wider than the height of the tray sides.

2. Mount see-through doors.
To take the mystery out of a cabinet's contents, replace the original doors with clear acrylic-panel doors. To build simple frame-and-panel doors, see More Resources.

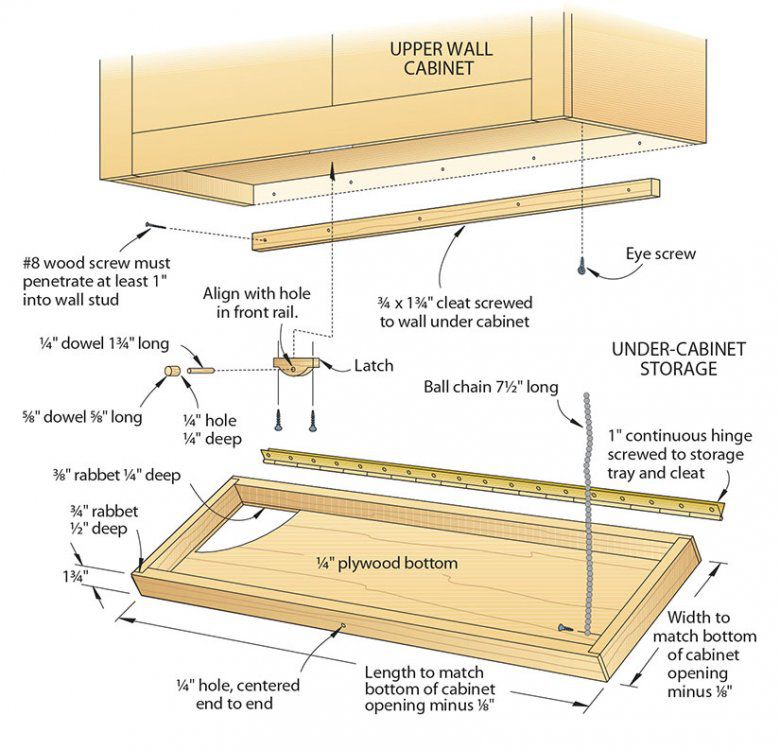
3. Attach drop-down tray storage.
We've used trays like these in the WOOD® magazine shop for more than a decade. Adapt the size to fit under your wall cabinets and customize the interior layout to organize your tools.

4. Transform a cabinet into a mobile tool base.
Adding a set of casters (see Source) to a cabinet turns it into a rolling tool stand. To start, choose a cabinet based on the height you need and how you'll use the cart. For example, a 42"-tall wall cabinet on casters would place a benchtop drill press at the right height. Use a narrow wall cabinet to mount a bench grinder.
A 30"-tall wall cabinet measures about the same height as a base cabinet with the toekick removed. Turning a base cabinet into a portable mitersaw stand takes advantage of the base unit's depth and drawers. Choose casters with wheel diameters that produce a comfortable cabinet height.
To customize a base cabinet for casters, first remove the toekick area beneath the cabinet bottom. This lets you mount casters closer to the cabinet corners for added stability. Depending on your cabinet, cut the sides and back using a jigsaw and a straightedge. Then use a handsaw to remove the rest of the toekick, as shown below.

Now, install mounting blocks for your casters. We cut these from 3⁄4 " oak about 1" larger than the caster mounting plates. Drill mounting-screw pilot holes in each block, then glue and clamp the blocks to the cabinet bottom. Wait two hours for the glue to dry, then attach the casters, as shown below.

5. Add blade and bit organizers.
Protect carbide cutting edges by securing saw blades and router bits inside cabinet drawers. Use spindles to hold saw blades in place, then separate them with lift-out dividers that keep blades apart, as shown below.

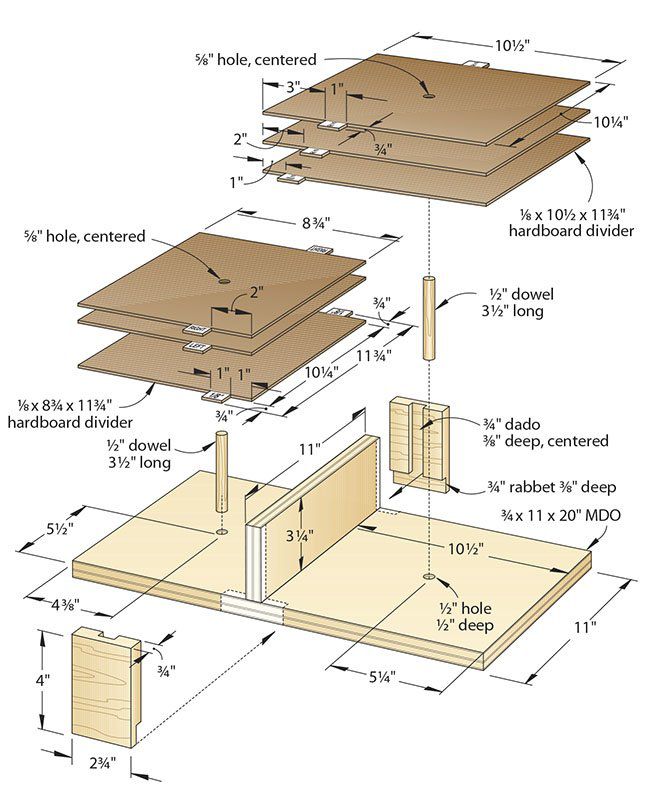

Next, give each router bit in your collection its own holder. Cut blocks in three sizes to hold router bits and accessories with different shank and cutterhead sizes ( bottom).


6. Top base cabinets with a flat worksurface.
For an inexpensive, durable, and flat counter or benchtop, it's hard to beat two laminated sheets of 3⁄4 " MDF. Most countertops measure 25" deep to allow a 11⁄2 " overhang, but you can get by with 24"-wide counters to use 4×8' sheets efficiently. To dress up the tops, edge them with 1⁄2 ×11⁄2 " hardwood strips to match your cabinets. Then, center the top on the cabinet and mount it in place using the cabinet's existing mounting corners or stretchers.

7. Add lift-out organizers.
Designed to be 1⁄4 " narrower than the drawer width, the tray shown below can be lifted free to use at your workbench. Suspend it inside the drawer on 3⁄4 "-thick spacers attached to the drawer sides with double-faced tape for double-decker storage. Customize trays to hold hardware, tool sets, and accessories, such as drill bits, box wrenches, chisels, and layout tools.


Source
Casters: Locking 5" swivel casters no. 37138, $47 per pair, and 5" swivel casters no. 39507, $35 per pair, Rockler, 800-279-4441, rockler.com.
More Resources
* Check out these 11 must-have cabinetmaking tools: woodmagazine.com/11cabinettools
* For a guide to making flawless frame-and-panel doors, see woodmagazine.com/frameandpaneltips.