Accent On Woodburning


In the early 1800s, artisans did woodburning with the tips of iron pokers that they heated to red hot in an open fire. The problem was that they could only burn small sections of a design before the poker cooled. It wasn't until the latter part of that century that someone adapted a medical cauterizing tool for woodburning. But the tiny fire that heated the tip had to be fueled constantly by benzene fed by a squeeze bulb. In those Victorian times, woodburners slowly and painstakingly decorated everything from furniture to boat oars and fireplace mantels with intricate designs. It wasn't until electricity came along that woodburning (often called pyrography) became easier and more popular.
She puts the burn to wood


Vicki Schreiner discovered woodburning 15 years ago. "The minute I touched the hot tip to the wood and smelled that wonderful, campfire-like scent, I was hooked," wistfully recalls the Springfield, Missouri, craftswoman (shown at left). "And I'm still going strong at it. Although I've learned to complement it with color at times, there's just something about the rustic, natural look of a woodburned piece that keeps me fascinated."
In fact, we were plain lucky that Vicki could fit us in to pass along some basic techniques to WOOD magazine readers. She's usually busy demonstrating woodburning at national craft events, designing and making new projects to sell, or writing how-to books.
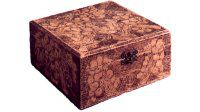
Below, you'll find the country-style photo frame that she designed and crafted. Click here to download the pattern. It's fun to make with the techniques shown and explained in this article. But don't limit your newly acquired woodburning skills to this project. Use the techniques to decorate and accent other items from your workshop, such as boxes, turnings, trays, and even wooden kitchen spoons. You'll find endless applications for this timeless art.


Heat up points in a pen
Woodburning pens come in various styles. And price tags range from the inexpensive craft type used in this article to the variable-heat detail burners decoy and bird carvers employ. Vicki prefers using a basic pen called the Creative Woodburner, (see the Buying Guide below). "It develops a 900-degree tip temperature, which causes the wood to burn quickly," she points out. The pen also features a comfortably balanced handle with flow-through ventilation that keeps the fingers cool and relaxed. To burn the wood, the pen has a number of different, interchangeable points available. (For the techniques described in this article, we only used the first three points listed in the following descriptions.)
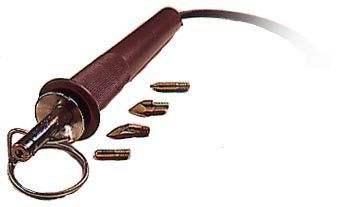
Here are the more popular woodburning tips you can buy, along with Vicki's suggestions for using them:
- Cone point—Used to burn fine lines, tiny dots, curves, small details, and outlines.
- Shading point—For creating even shading with a light touch or to fill large areas darkly.
- Universal point—Employed for allpurpose woodburning; a good tip for short, straight lines.
- Flow point—Makes large dots and curves, also for outlining.
- Mini universal point—A smaller version of the flow point that makes the wood burn faster and darker.
- Mini flow point—Does dots and curves on a smaller scale than the larger ones; and makes outlines.
- Texture 'n Tone point—Creates many fine woodburned lines with one stroke.
- Calligraphy point—Forbasic calligraphic styles.
All tips have threads that allow you to screw them into the pen. Note: Always change tips with the woodburner unplugged and cool. Tighten tips with a needle-nose pliers.
Choose your wood
Woodburning craftspeople like Vicki understand that softer wood burns more easily than harder wood. "That's why the favorite canvas for woodburning is American basswood," she says. "Yet white pine works well, too, if you're selective. The piece should be kiln-dried, evengrained, and without knots." (See the Buying Guide for the basswood used in this article and the project.)
With that advice in mind, you might choose for woodburning some of the same species that carvers favor. Those would include cottonwood, jelutong, tupelo, sugar pine, and butternut. According to Vicki, you can burn harder wood, like cherry or walnut; it just takes longer for the surface to heat up.
And be sure to prepare your wood well before burning it. You want to sand it extremely smooth so the points will move evenly.
Transfer your pattern
To get good pattern transfers to wood, Vicki prefers graphite transfer paper (available at art-supply stores) over carbon paper. "It's better for photos and illustrations out of magazines, or off old greeting cards. It's also the best for transferring actual printed patterns. In woodburning, the carbon from carbon paper tends to bubble under the extreme heat of the woodburning pen and run onto the wood," she cautions. "With graphite paper, I use a ballpoint pen to trace all of the design lines, but with not enough pressure to dent the wood. All you really need is a light image."
Vicki also has found two other ways to get designs onto wood. One is plastic stencils, available at craft stores.
"Simply trace around the stencil pattern with a #2 pencil," she says. The other is the rubber stamps sold by craft stores. "They come in a wide variety of sizes and designs. But for woodburning, you can't use just any ink pad with them because some kinds of ink run into the wood. I use Fabrico Multipurpose Craft Ink pads in pale tones and put down a light image with gentle pressure. However, if you get too much ink on your wood, just let it dry, then sand it down with fine-grit sandpaper."
Tips for beginning woodburners
Woodburning looks easy, and it is enjoyable, but follow Vicki's advice before you begin.
- Always have bright light on your work area.
- Secure the pen's wire holder to a heatproof surface, such as a cookie sheet, with masking tape, and place the pen there when not in use.
- Never touch any of the pen's metal parts when it's plugged in.
- Woodburn in strokes toward you or to your left or right. Never push the tip away from you. This causes the tip to unevenly bump across the wood for incomplete lines.
- Use slow, short strokes rather than long continuous ones. The slower you go, the darker your strokes will be.
- Don't use heavy pressure; let the heat do the work.
- Practice on scrapwood or the back of your project.
- Turn your wood as needed to achieve the best burning angle.
- Occasionally clean accumulated residue from the points by dragging them across 320-grit sandpaper. This maintains even heat flow.
Outlining, the first burns
After you have transferred your pattern to the wood with graphite paper, you begin woodburning with a stroke technique called outlining. This defines your design and makes it stand out on the wood. After outlining the design, you go back and apply the details that give the image texture.
"Outlining is a great technique to start with because you can get comfortable with the burning tool," explains Vicki. "For this, I use the cone point, but the flow point or mini flow would work as well."
Hold the pen in the position that allows you the best control. Turn the wood and angle the pen so the point's tip makes even contact with the wood, as shown in the Photo below. Then, proceed to trace the point along the outside of the entire pattern. Work with short, slow, sketching strokes that give the point time to darken the pattern line. Try to avoid going over and over the same area because you want an even burn.

Add lines for accent
To "line" with a woodburning point means to fill in or accent small areas with closely spaced, fine lines parallel to each other, as shown in Photo below. "Because other tips produce wider lines than needed, I do all my lining with the blade edge of the universal tip," notes Vicki.

The cleanest lines come from holding the pen at a 45° angle to the work and letting only the tip and about half the blade touch the wood, as you can see in the photo. "Do not press down as you draw the blade toward you," she says.
Stippling gives texture
"Stippling is the addition of a series of spaced dots to a design to provide texture (as in Photo below). Depending on the size of dot you want, you use either the cone point (for the largest dot), flow point, or mini flow point," Vicki explains.

"To stipple, hold the pen upright and use a tapping motion to burn each dot," she continues. "The slower you tap, the darker your dots will appear. If you do the dots in different degrees of darkness, you'll get a more textured look." You also can use the stippling technique for shading. The fewer dots you make in an area, the lighter the resulting shading.
Now, make shade
Shading gives a woodburning depth, dimension, and warmth, according to Vicki. And it can be smooth and even-textured or graduated in tone.
To shade, switch to the flat, spoonshaped shading point. The shape of the tip allows you to burn a subtle transition from dark to light, as you see in Photo below.

"You'll get the best results by using small lifting strokes with the forward half of the tip," Vicki notes. "Release pressure on the point at the end of each stroke to feather or lighten the woodburning. To make the shading the desired darkness, overlap the strokes. And remember, the longer you leave the tip on the wood, the darker it will burn."
"You can use the shading point for textured shading, too" she adds. "Just touch the front half of the tip to the wood in a tiny circular motion at irregular speeds. Combine slow movements of the tip with faster movements to produce different degrees of darkness for a textured effect."
CATCH OF THE DAY
If you're hooked on doing some woodburning after reading the text above, try your hand at this fisherman's photo frame. It's easy to make, and the design lets you try several pyrographic techniques.
Prepare the blank for burning

1
Referring to the Frame drawing below, lay out the picture opening, a centered 41⁄4 x53⁄8 " rectangle (or one to fit your particular photo), on a 3⁄4 x111⁄4 x13" piece of basswood. (For the frame shown, we used a natural edge blank. See the Buying Guide for our source.)
2
Download the link to the full-size patterns, at the bottom of the page, for the fish and the rod, and lay them out on the blank where shown on the Frame drawing. Place the top of the fish stringer and the end of the pole so they run off the top edge of the blank.The width of a natural-edge blank may vary from the measurement shown in the Frame drawing. If your blank is wider or narrower than 111⁄4 ", do not follow the pattern-placement dimensions shown. Instead, simply center the straight portion of the fishing pole between the frame opening and the right edge of the blank. Center the stringer of fish between the opening and the left edge of the blank. If the blank is so narrow that the fish pattern crowds the space between the opening and the edge, you can reduce the width of the opening to improve spacing.
3
When you're satisfied with the pattern placement, cut out the frame opening. To do this, drill a blade start hole inside the outline, and cut the opening with a scrollsaw or handheld jigsaw. Sand the blank's face smooth.
4
Transfer the patterns to the frame face. To transfer a pattern, position the photocopy on the blank. Tape one edge to the wood, and slide a piece of graphite transfer paper under the pattern, coated face toward the wood. (We prefer graphite transfer paper, available from art-supply or crafts dealers, instead of ordinary carbon paper because carbon paper's waxy marks are usually harder to clean off the wood.)
With a pencil or ballpoint pen, trace around the pattern outline on the photocopy. Press hard enough to make a visible line on the wood, but not hard enough to dent the wood's surface. A straightedge and French curve will come in handy for following the pattern lines. After tracing the outline, remove the photocopy and graphite paper. Check the pattern, and erase any extra lines.
Pick up your pyrography pen
- While your woodburning pen heats up, review the procedures for outlining a pattern above.
- Woodburn the outlines of all the design elements. Darkly burn the lines on the fish, except for the thin fin lines; then the chain. Next, carefully outline the rod, reel, line, bobber, and lures. Burn in the small lines that give dimension to the rod handle and reel. Strive for uniform line darkness. Now, unplug the woodburner and let it cool. Change to the flow point, and solidly fill in the eyes on each fish. Also fill in the dark parts of the fishing reel, including the hole for the line. Fill in the rod.
- Next, add the detail lines, employing the universal-tip lining technique described in the woodburning article. Burn all of the small lines on the fishes' fins, starting at the leading edge of each fin and working outward from the body. Refer to the pattern for detail lines on the pole, reel, bobber, and lure.
- Stippling comes next. Review this technique in the woodburning article, and install the cone point. To stipple the fish scales, work across each fish, burning the dots in a stripe pattern. Then, go back and burn stippling dots along the fishes' backs and bellies. Turn your burning tool to the rest of the design, and add a few dots along the bobber's edges. Stipple a large area beneath the lures and around the rod and reel. Take the texture around the butt of the pole and the lures to the right edge of the frame.
- Complete the woodburning with graduated shading. Again, review the technique article for procedures. Shade the fish with lifting strokes along the outer edges, directly on top of the stippling dots. Add shading along the areas where one fish overlaps another and under the gills. Also shade the outside edges of the fishing reel and handle, and the bottom of the bobber. Finally, use the entire flat surface of the shading point to completely darken the inside of the photo cutout in the middle of the frame.
Now, finish the frame
- Apply a clear sealer, to the three fish, the fishing reel, the pole handle, the lures, and the bobber. Brush on the sealer carefully, staying inside the burned lines. Do not apply sealer to the fishing rod, the stringer chain or clips, the fishing line, or the stip-pled area around the lures on the bottom.
- After the sealer dries, stain the frame. (For the frame shown, we applied Minwax Wood Finish, no. 210B golden oak, with a sponge brush, and immediately wiped it off.) The stain will not stick to the sealed areas, highlighting the woodburned pattern. Stain the edges and back.
- Spray on two coats of clear finish.
- Tape the photo to the back of the frame. Cut a piece of kraft paper or construction paper to cover the back of the frame, and staple it in place. Install a sawtooth hanger at the top center of the back.
Buying Guide
Natural-edge blank, supplies. Creative Woodburner pen and four points, catalog no. 5570; basswood country plank, 11x13", catalog no. 3510; graphite transfer paper, 12x24", catalog no.1095. From Walnut Hollow, 1409 State Road 23, Dodgeville, WI 53533. Call 800/950-5101; www.walnuthollow.com