Add Some "Glam" with Plastic Laminate


Colorful, durable, and easy to apply, plastic laminate transforms any project's appearance. Make a medium-density fiberboard (MDF) tabletop look like granite or quartz. Use light-colored laminate to brighten the interior of a cabinet, or add eye-catching color to children's furniture. Here's what you need to know to apply this versatile covering.
Laminate 101
Buy plastic laminate from a home center, countertop fabricator, or cabinet shop. The two most common grades, standard (.050" thick) and post-forming (.042" thick), work well for countertops, tabletops, and shelving. (When heated, post-forming grade can be flexed around curved edges.) Vertical grade is thinner (.030") and more likely to chip, dent, or crack, so avoid it.
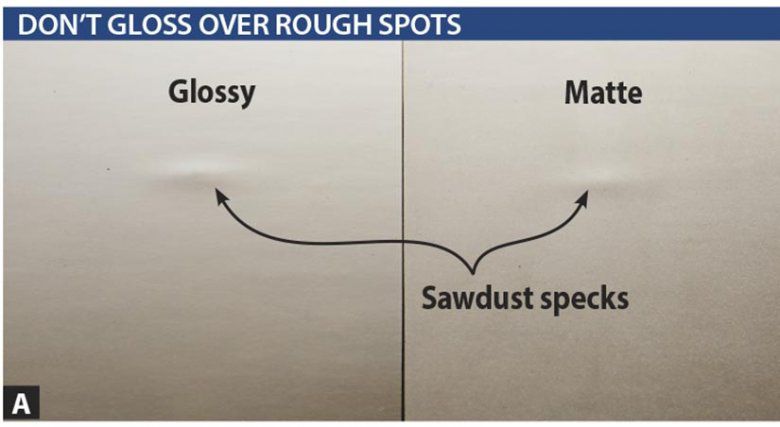
As you choose from almost limitless colors and patterns, keep in mind that solids and dark shades show scratches more readily than patterns and light colors. A glossy finish also emphasizes blemishes [Photo A].
Laminate comes in 3'-, 4'-, and 5'-wide sheets up to 12' long and ships rolled up in a coil about 2' across. You may want a helper to assist you as you unroll it the first time to keep it from springing open uncontrolled.
What lies beneath
Plastic laminate requires a smooth substrate, such as MDF or high-density particleboard, because any texture or irregularities in the substrate surface telegraph through [Photo B]. Find either material at home centers.

After cutting the substrate to size, give the faces and edges a quick once-over with 150-grit sandpaper on a sanding block to remove any nubs; then vacuum the surface. Also, clean your worksurface to remove debris that could stick to the adhesive and end up under the laminate.
Cutting laminate
Because it's made of paper pressed together with resins, plastic laminate cuts easily using one of several methods. Precision isn't required because you cut the laminate oversize, and then trim it flush after adhering it to the substrate. Just work carefully to avoid unintended cracks or chipping.
For small pieces, curved cuts, or interior cuts, use tin snips [Photo C]. Make straight cuts by scoring the laminate with a utility knife guided along a straightedge [Photo D]. Use this method when the cutline doesn't run parallel to an edge or to cut a large sheet down to a size manageable on the tablesaw.


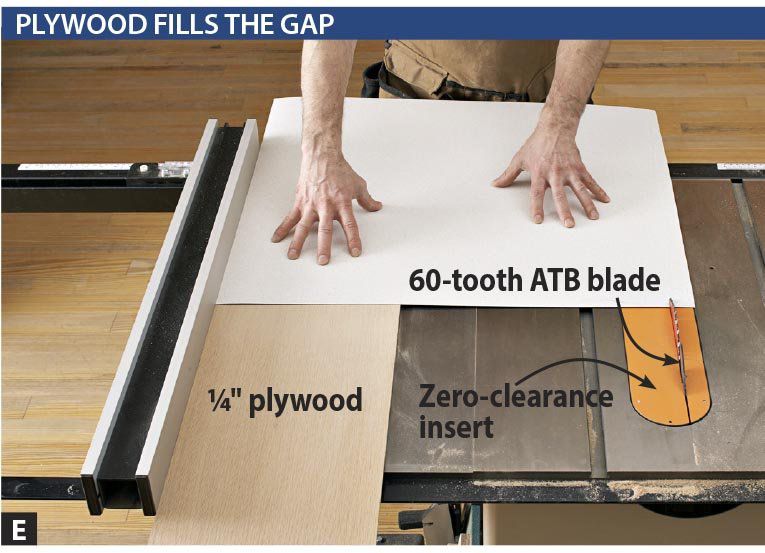
To cut laminate on your tablesaw, use a sharp 60-tooth alternate-top bevel (ATB) blade and install a zero-clearance insert in your saw [Photo E]. Place the good face of the laminate up to reduce chip-out, and press the laminate firmly to the table to prevent it from chattering during the cut.
Using contact cement


To join plastic laminate to a substrate, choose a water-based contact cement, left. You'll find it at home centers and hardware stores. Solvent-based adhesive poses a greater fire risk than water-based, but it dries in less than half the time, so professional shops choose it to speed assembly. We prefer water-based cement because of the reduced fire hazard, lower odor, and easy cleanup.
Contact cement works differently than wood glue. Instead of coating one or both pieces, then joining them before the glue dries, with contact cement you coat both pieces, then wait until the adhesive dries to the touch (about 30–60 minutes for water-based cement).
As the name says, it bonds on contact—you get one chance to position the pieces correctly. For that reason, cut the plastic laminate about 1" longer and wider than the substrate it will cover (1⁄2 " for edging) to provide some "fudge factor." After pressing the laminate to the substrate, assure a good bond by applying pressure with a hand roller. Then trim the excess laminate with a flush-trim bit in your router. Keep the bit moving to avoid marring the laminate.
Give yourself an edge
The edges of the substrate need covering first (with one exception as noted under Step up your edging, below), typically with plastic laminate or wood. The top laminate overlaps the edging, preventing dirt or liquids from getting behind it.
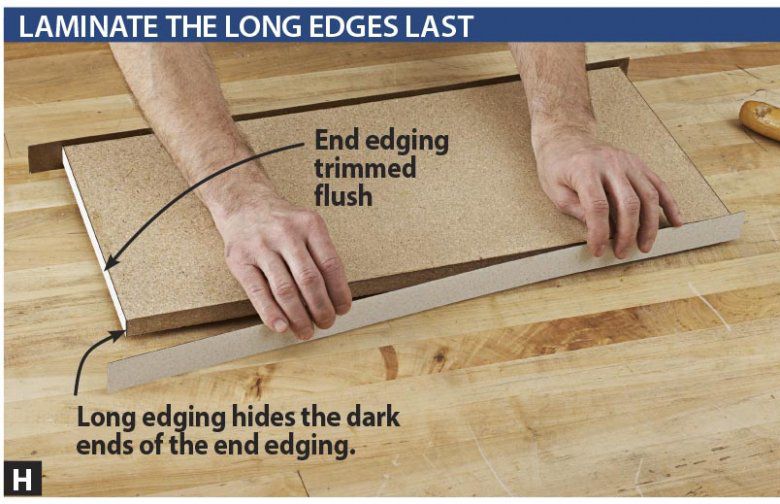
When applying laminate to the edges, the first pair of opposite edges covered will show dark, narrow lines on each end when you finish; the other two will not. So on a shelf, for example, apply and flush-trim the end edging first [Photos F, G]. The dark ends of the two remaining pieces of laminate [Photo H] face the ends of the shelf, hidden from view. After flush-trimming the edging, sand the top surface [Photo I] before applying laminate to the top.


Step up your edging
Adding wood edging instead of, or in addition to, laminate creates numerous options for dressing up a panel.
Wood-only edges: Add the edging before the laminate to leave only the front and bottom faces of the wood visible [Photo J]. Sand the top of the edging flush with the substrate before applying the top laminate.

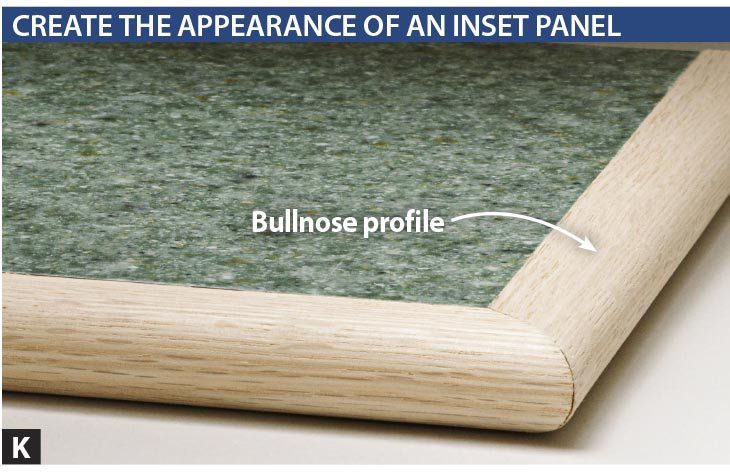
Add wood edging after the top laminate to create a fully exposed profile [Photo K]. Finish-sand this edging before applying it to avoid scarring the laminate.
Wood-and-laminate edges: For a routed profile that reveals a decorative strip of wood along the top edge [Photo L], glue the wood edging to the substrate, apply laminate over the edging, adhere the top laminate, and then rout the edge. Keep in mind that the profile of a routed edge should intersect the laminate and wood on both faces at a 45° angle or greater. For example, a round-over [Photo M], as it transitions between the colored laminate and the wood, reveals a wide, unattractive strip—the dark, lower layers of the laminate.


Tips for laminating large surfaces
After choosing an edge treatment and preparing your laminate and substrate, apply the laminate to the top surface following the steps shown inPhotos N through Q.


After flush-trimming the laminate, sand the edges gently to ease the sharp edges, being careful not to mar any laminate on the edges of the panel.
Caring for plastic laminate
- Though durable and resistant to spills, laminate is not indestructible. Follow these simple care instructions:
- Don't set hot dishes on it; that can scar the laminate or dissolve the contact cement.
- Wipe up spills quickly; grape juice, coffee, and tea can stain.
- Clean with mild, bleachfree, nonabrasive cleaners, using damp paper towels, a sponge, or a soft cloth. Powdered cleaners, stiff brushes, and scouring pads will scratch the surface.
Inside jobs call for a panel-pilot bit


The pointed end of a panel pilot bit pierces laminate to begin an interior cut, such as when cutting out the center of the game-table tabletop shown left. Without a bearing, the smooth guide surface between the point and the cutters tends to heat up, so move the bit quickly to avoid burning or marring the substrate or edging.

Countertop pros use only a panel pilot bit because the bearing on a flush-trim bit clogs with adhesive after extended use. If you go with a panel-pilot bit, lubricate the edge laminate with a light coat of petroleum jelly to prevent scarring.