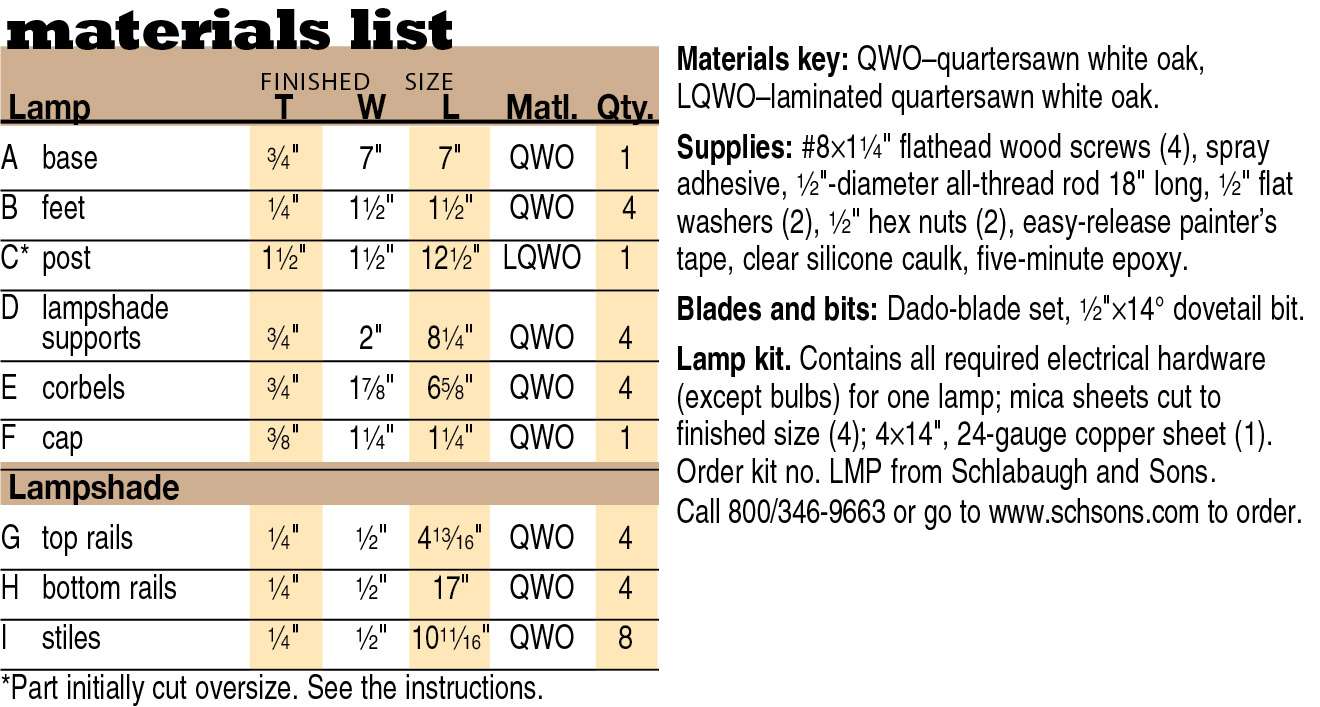
Arts & Crafts Table Lamp Woodworking Plan
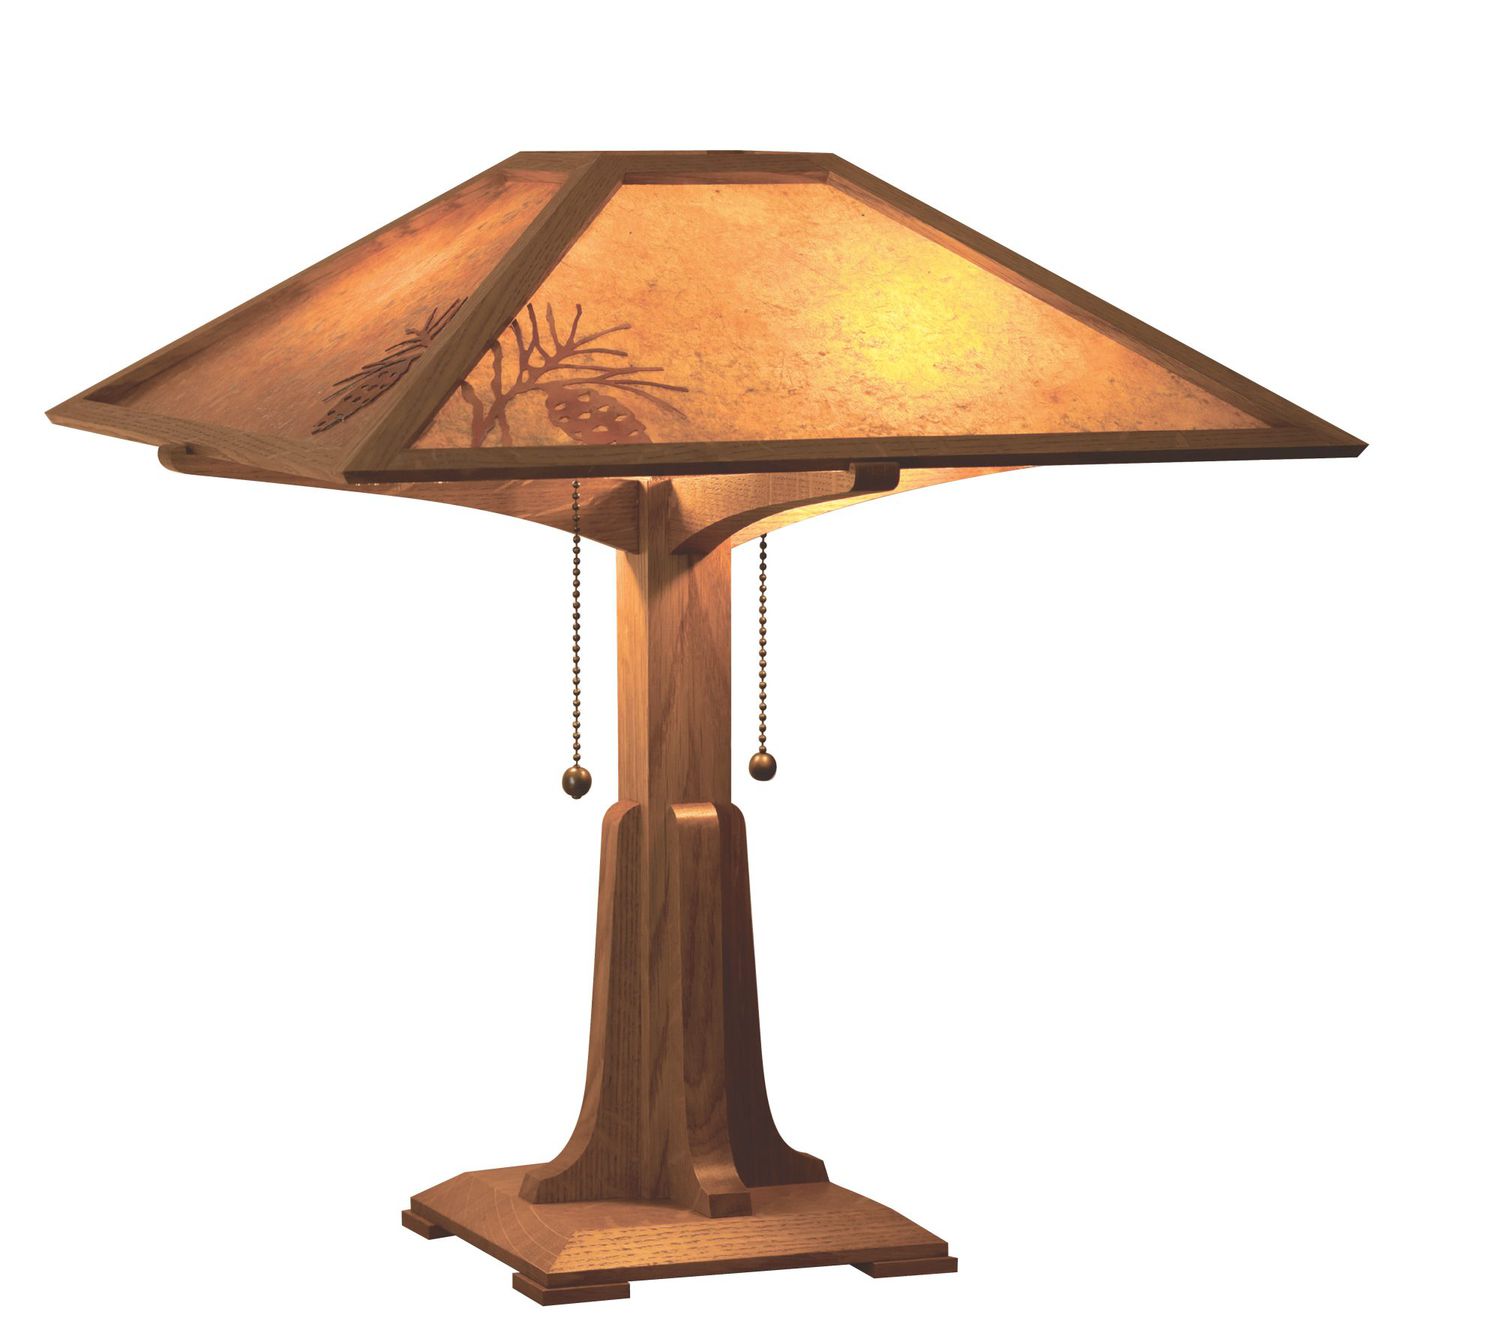

Mica panels in a wooden framework, accented with copper pine-cone motifs, make this a lamp that gets noticed. You'll be surprised at how easy it is to cut and assemble the half laps in the lampshade's streamlined framework. Purchase a hardware kit containing the harder-to-find parts so you only have to worry about the woodworking.
Start with the base
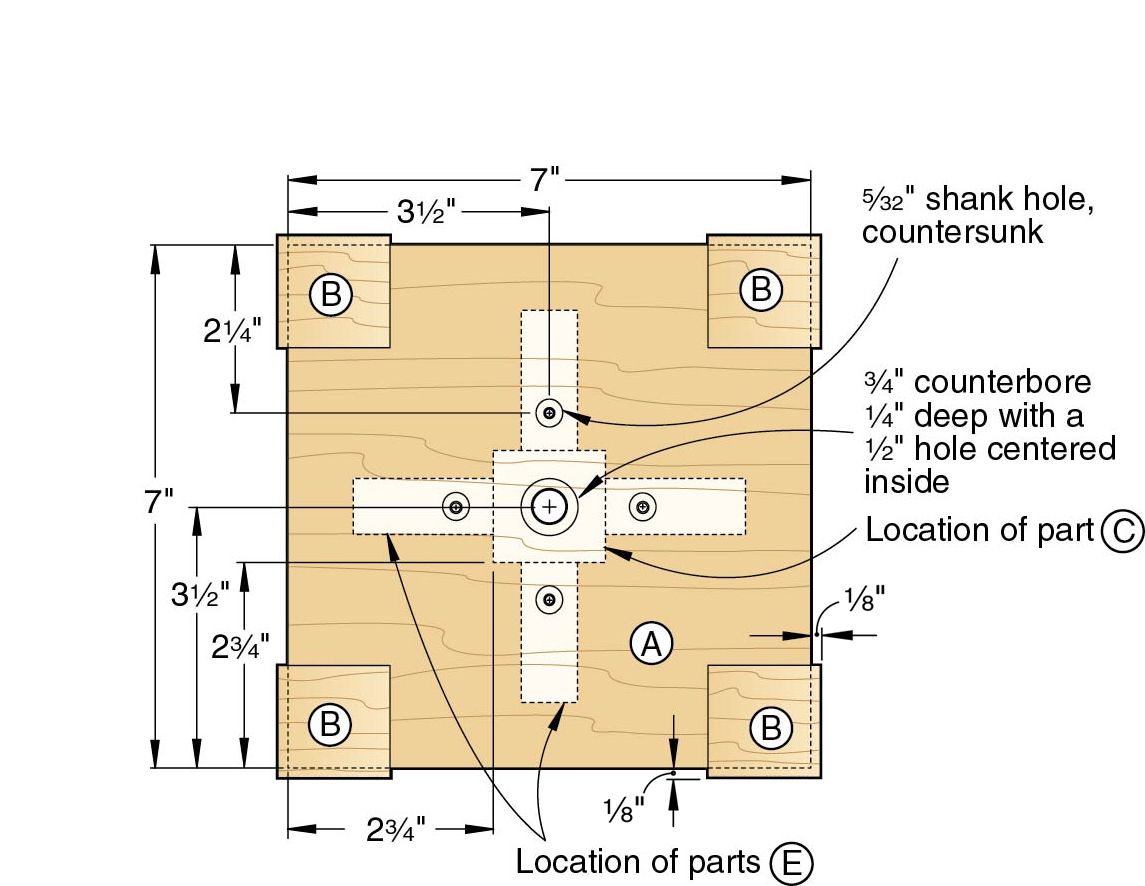
1 Cut the base (A) to the size listed in the Materials List. Mark the centerpoints for the hole locations on its bottom, where dimensioned on Drawing 1. Drill the countersunk shank holes and the counterbore with the 1/2" hole centered inside, where shown. To ensure that the base fits flush against the post (C), see the Shop Tip, below.

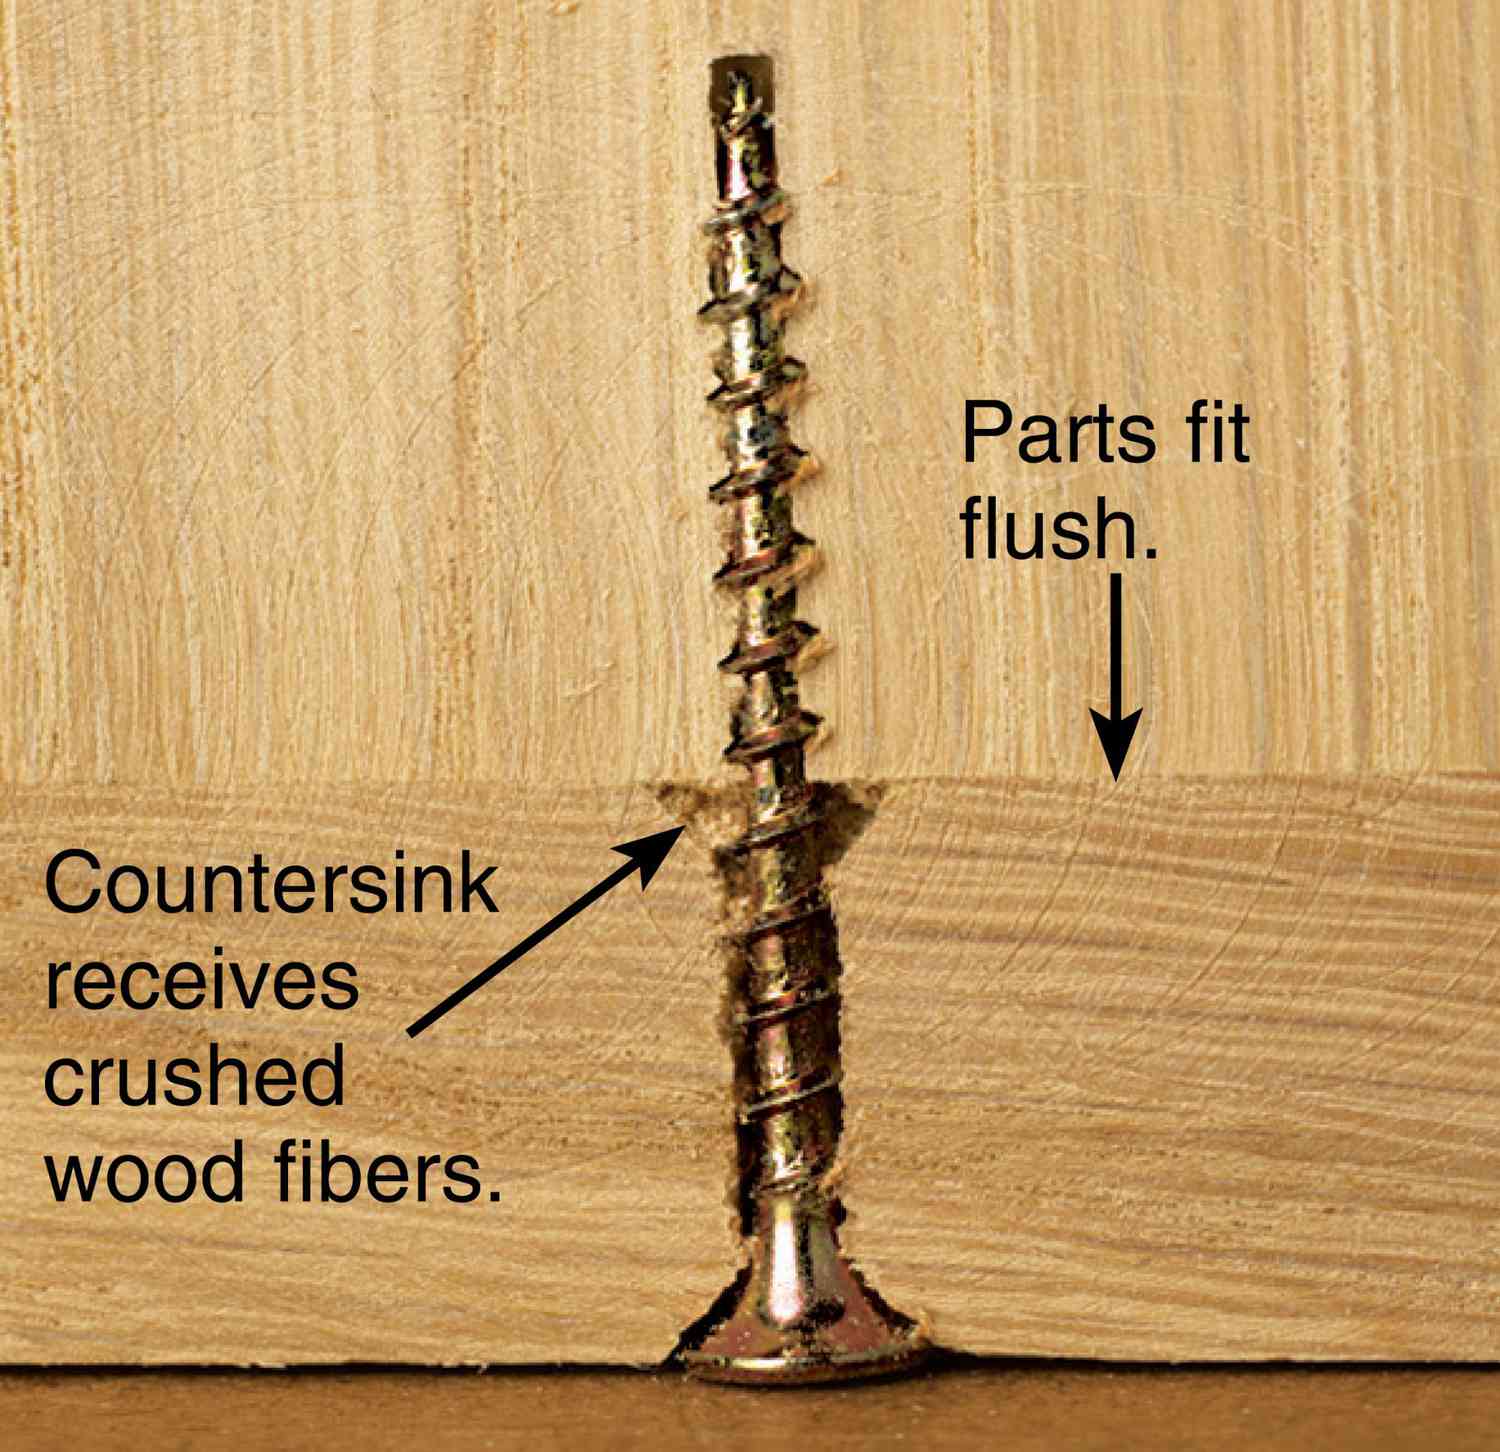
Shop Tip: Countersink for a perfect fit.
Here's a simple way to make certain parts mate tightly when screwed together. After drilling the holes in a part, such as in the lamp base (A), countersink the holes on the opposite side. This removes any raised material around the holes, and it provides room to receive wood fibers crushed and pulled out when driving the screws.
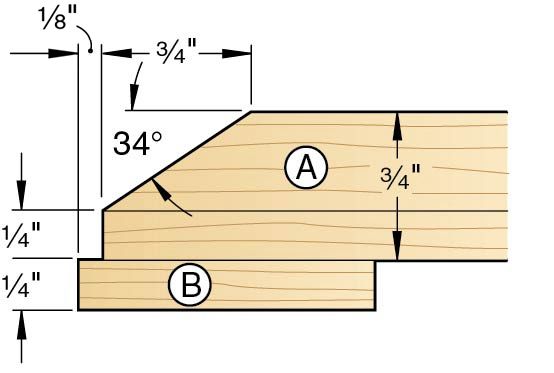
2 Attach a tall auxiliary fence to your tablesaw fence, and install a zero-clearance insert. With the base's bottom flush against the auxiliary fence, bevel-rip the base's ends, then edges, where dimensioned on Drawing 1a. Sand the base to 220 grit.
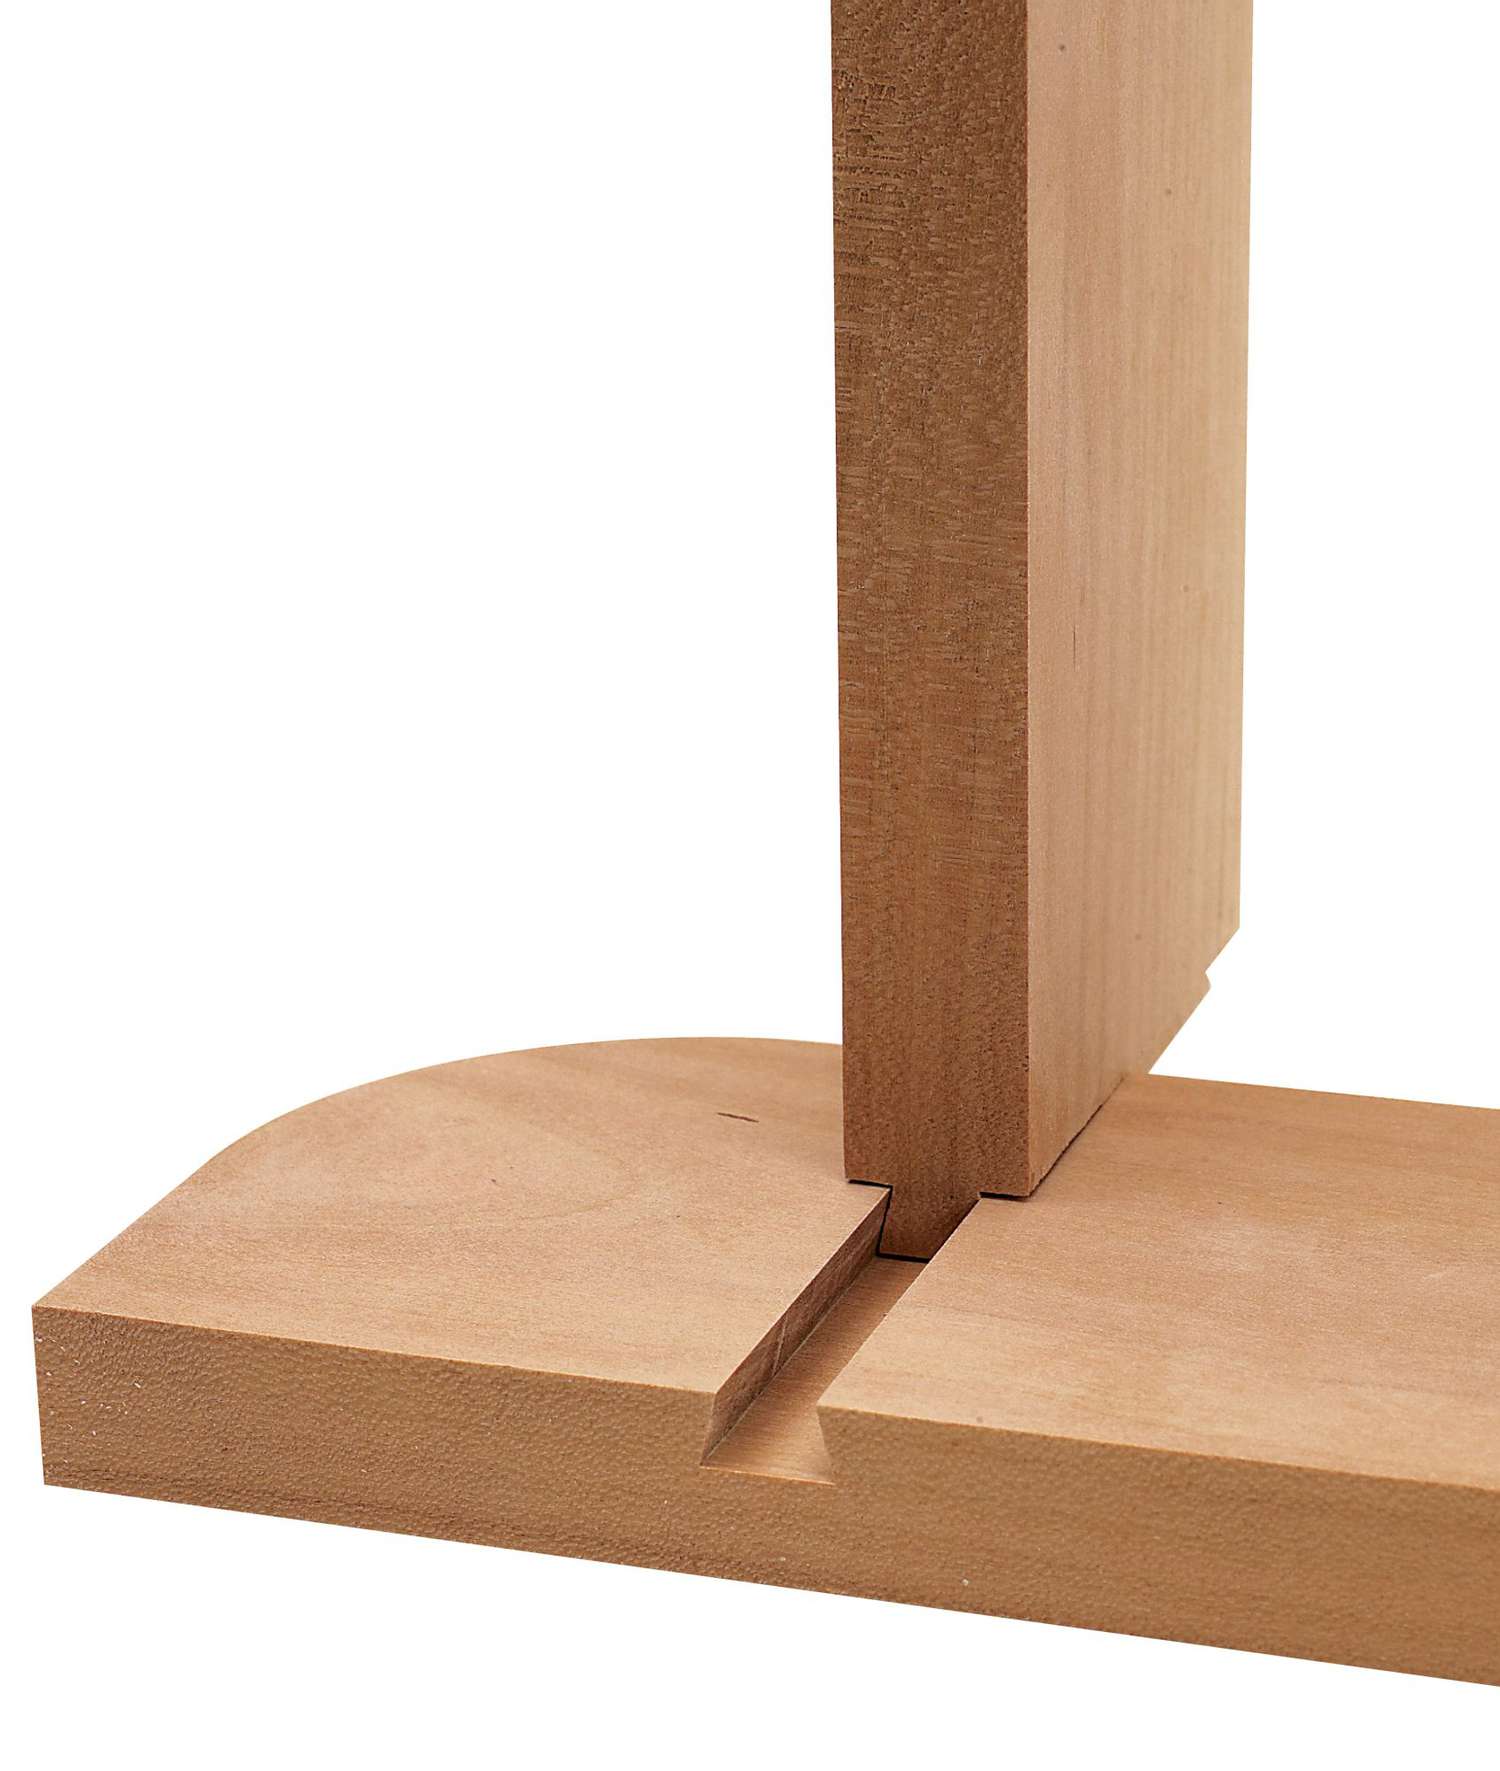
3 From 3/4"-thick stock planed to 1/4" thick, cut the feet (B) to size. Sand the feet. Align the grain on the feet with the base's grain. Glue and clamp the feet to the base, overhanging its perimeter 1/8", where dimensioned on Drawings 1 and 1a.
Fashion the post and lampshade supports
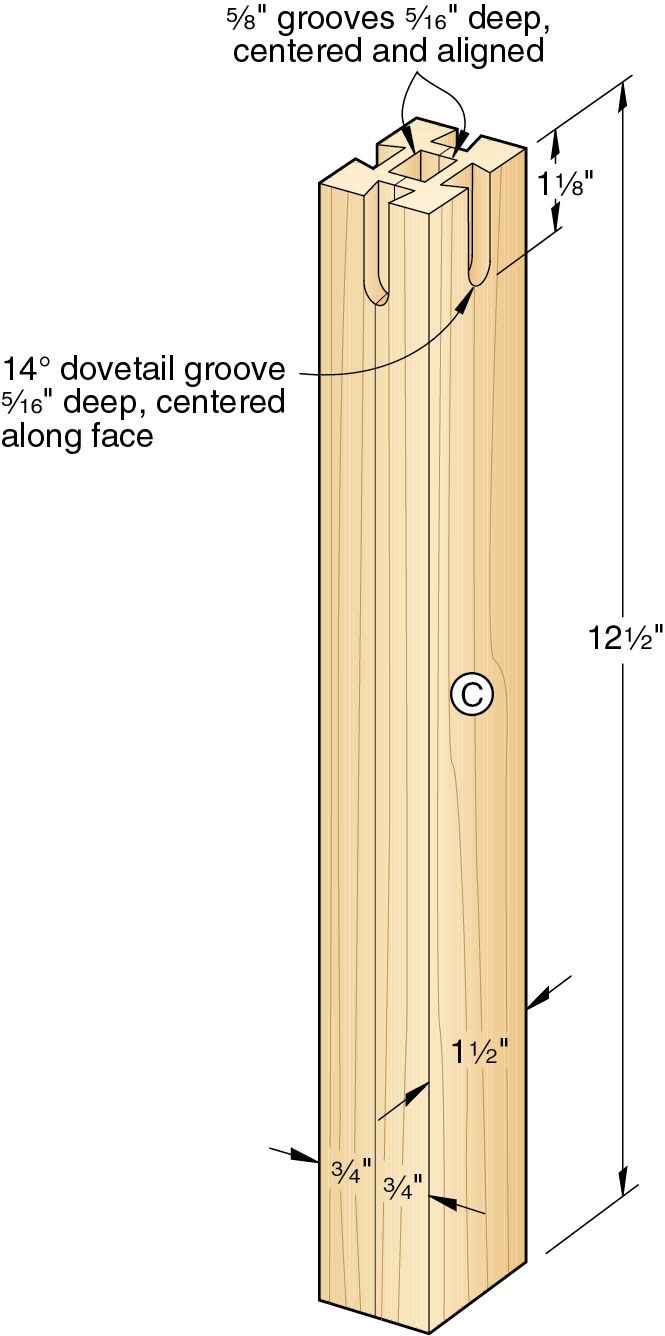
1 From 3/4"-thick stock, cut two 1-5/8"×13-1/2" pieces for the post (C). Using a dado blade in your tablesaw, cut a 5/8" groove 5/16" deep centered along the inside face of each piece, where shown on Drawing 2. Glue and clamp the pieces' grooved faces together, keeping their edges flush. Joint one edge of the post. Then, with your thickness planer, plane it to the finished width of 1-1/2", removing equal material from both edges to keep the groove centered. Trim the post to the finished length of 12-1/2".
2 Chuck a 1/2"×14° dovetail bit in your table-mounted router. Referring to "The Never-fail Sliding Dovetail " section below for help on making sliding dovetail joints, rout a 5/16"-deep, 1-1/8"-long groove centered on all four faces of the post, where shown on Drawing 2.

3Cut the lampshade supports (D) to size. These pieces must be the same thickness to ensure their dovetail tenons fit snugly in the post's grooves. Make four copies of the full-size lampshade support pattern. Using spray adhesive, attach a pattern to each support. Form the dovetail tenons on the supports' ends, where shown on the pattern.
4 Bandsaw the supports to shape. Using a fine-tooth saw, cut off the bottom 1/4" of the supports' tenons, where shown on the patterns.
5 Dry-fit the supports in the post's grooves, and verify you can make them flush with the post's top. If not, trim the bottom of the tenons as necessary to achieve a flush fit. Sand the supports smooth. Then, glue them in place.
Add the corbels and cap
1 Cut the corbels (E) to size. Make four copies of the corbel pattern. Adhere the patterns to the corbels. Bandsaw and sand them to shape.
2 From 3/4"-thick stock planed to 3/8" thick, cut the cap (F) to size. Using your drill press, drill a centered 1/2" hole through the cap. Chamfer the cap's edges, where shown on Drawing 3, by hand-sanding.

Simplify building. Add our Lamp project kit which includes electrical hardware and mica sheets.
Download Full Size Patterns Here

Assemble the base, cap, and corbels to the post
1 To ease assembly of the lamp, cut a piece of 1/2"-diameter all-thread rod to 18" long. Install a 1/2" flat washer and a nut on an end of the rod, and thread the nut approximately 4" onto the rod. With the rod vertical, clamp 2" of the rod at the nut end in your vise.
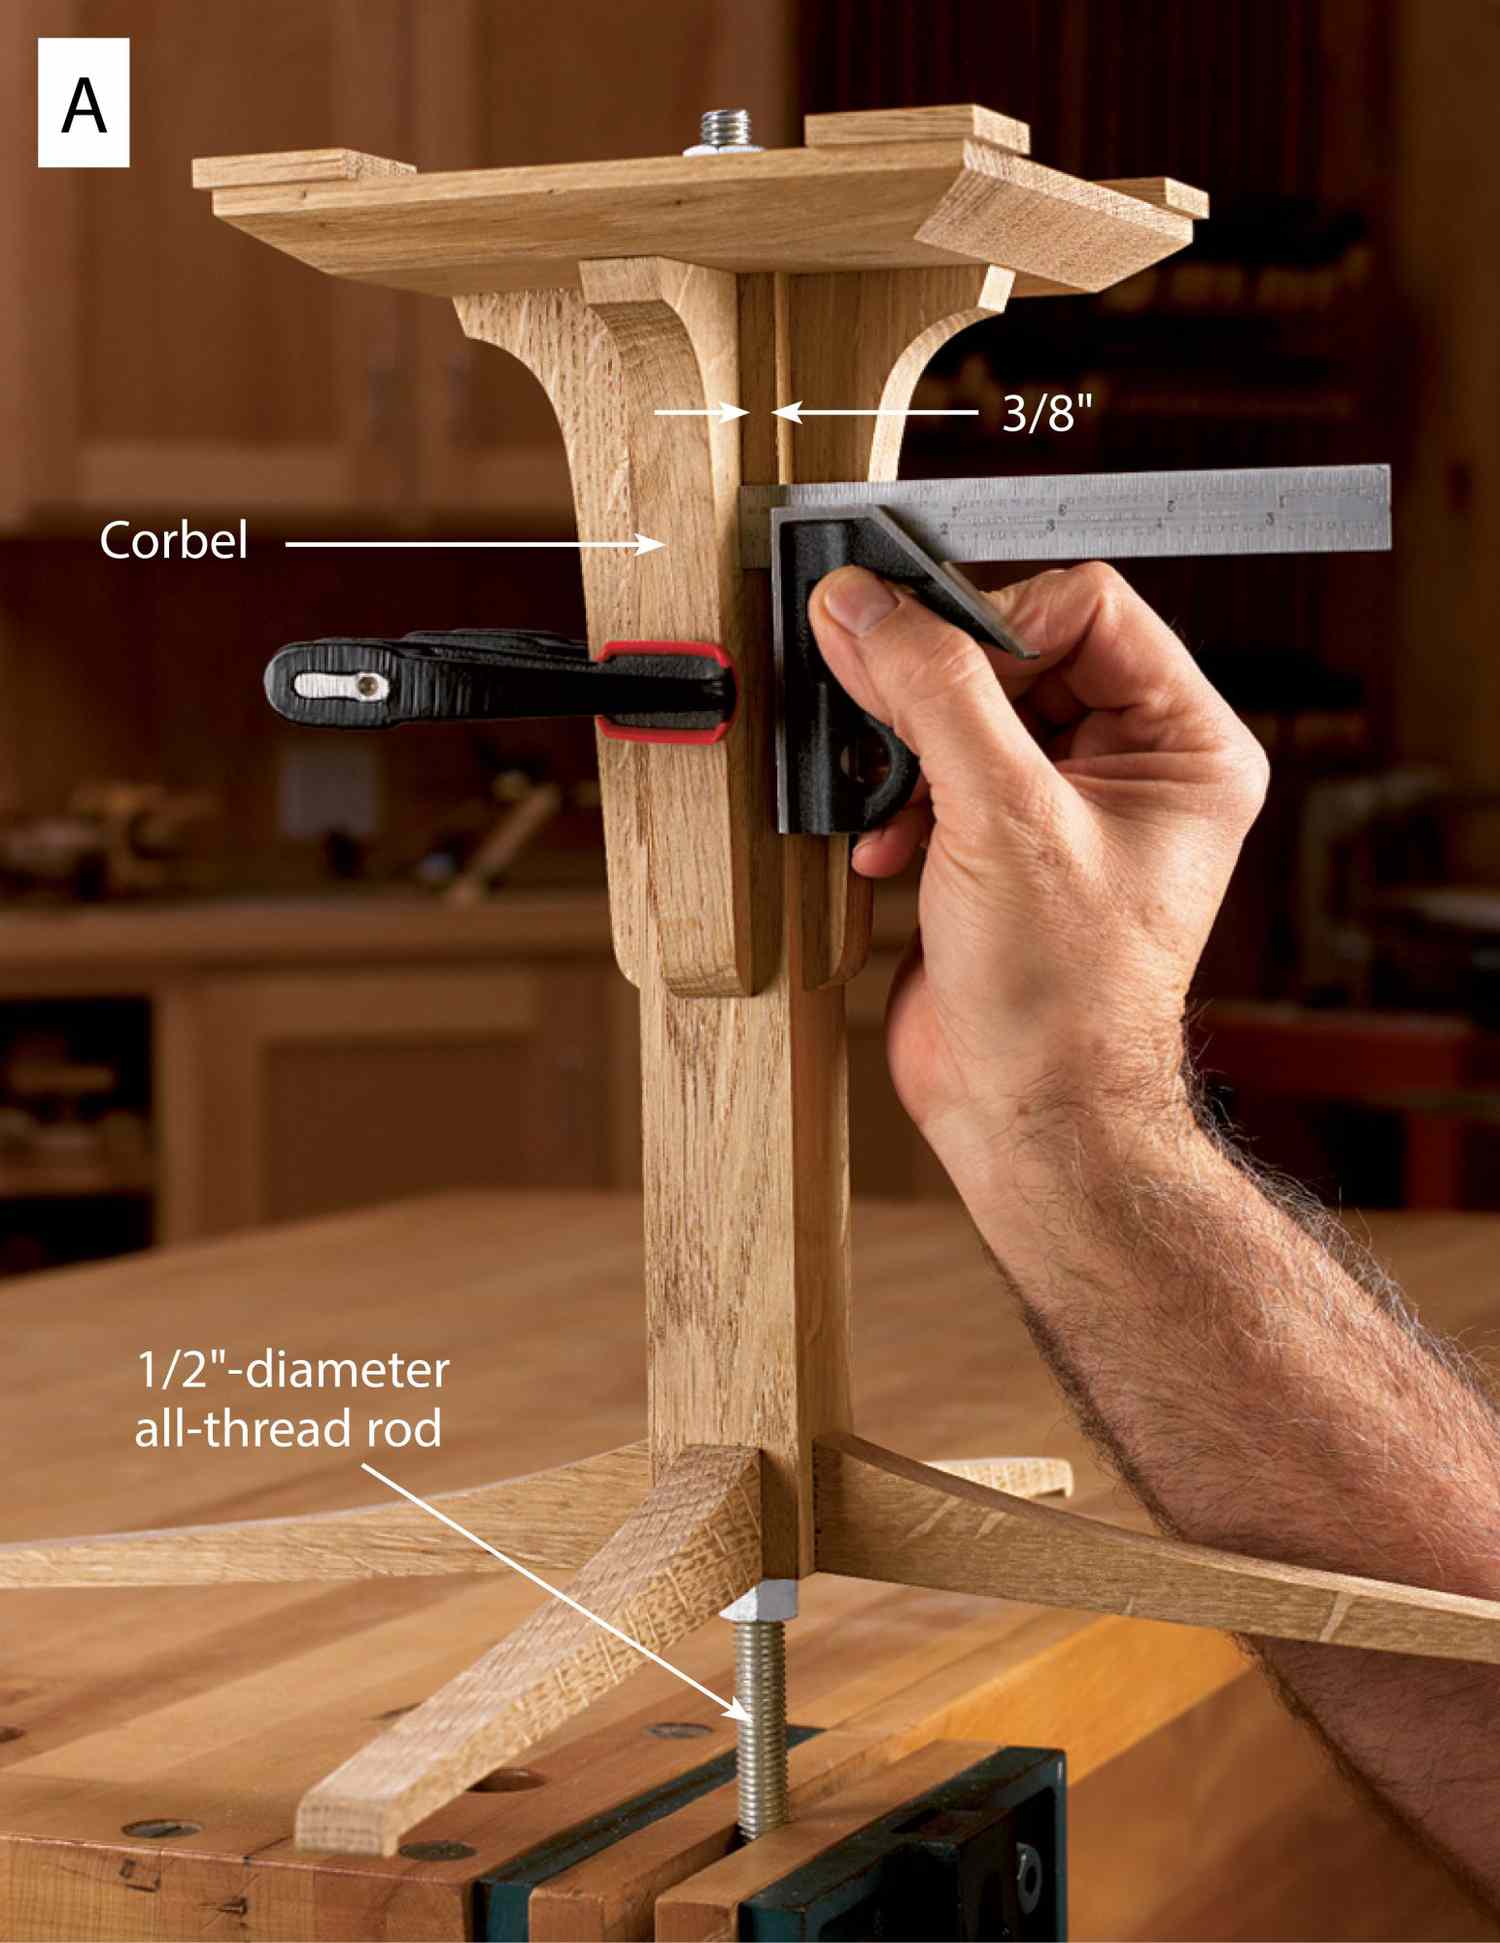
2 Holding the post assembly (C/D) with the top down, guide the assembly onto the rod and against the washer. Position the base/feet assembly (A/B) with the feet up, and install it on the rod, followed by another washer and nut. Center and square the base to the post, and tighten the nut. Now, glue and clamp the corbels (E) to the base and post, centering them as shown in Photo A.
3 Using the holes in the base (A) as guides, drill 7/64" pilot holes 1/2" deep into the corbels (E). Drive the screws.
4 Remove the nut, washer, and post assembly from the rod. Invert the post assembly, and place it back on the rod. Apply glue to the bottom of the cap (F). Slide the cap down the rod and onto the post. Square the cap to the post. Clamp the cap with the washer and nut at the top. When the glue dries, remove the assembly from the rod.
Move on to the lampshade frames
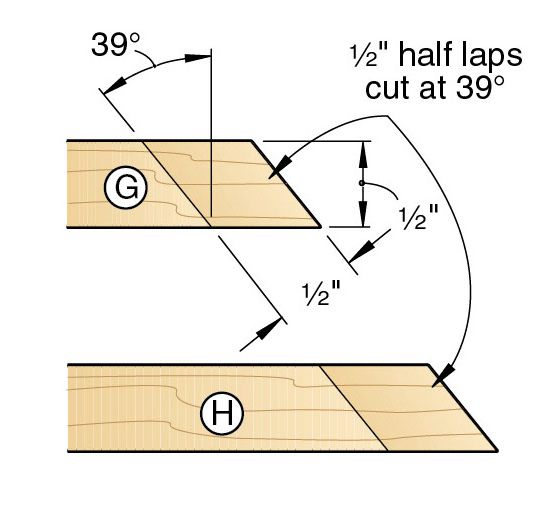
1 Cut the lampshade top rails (G), bottom rails (H), and stiles (I) to size, and form the mitered half laps on their ends, where dimensioned on Drawings 3 and 3a.
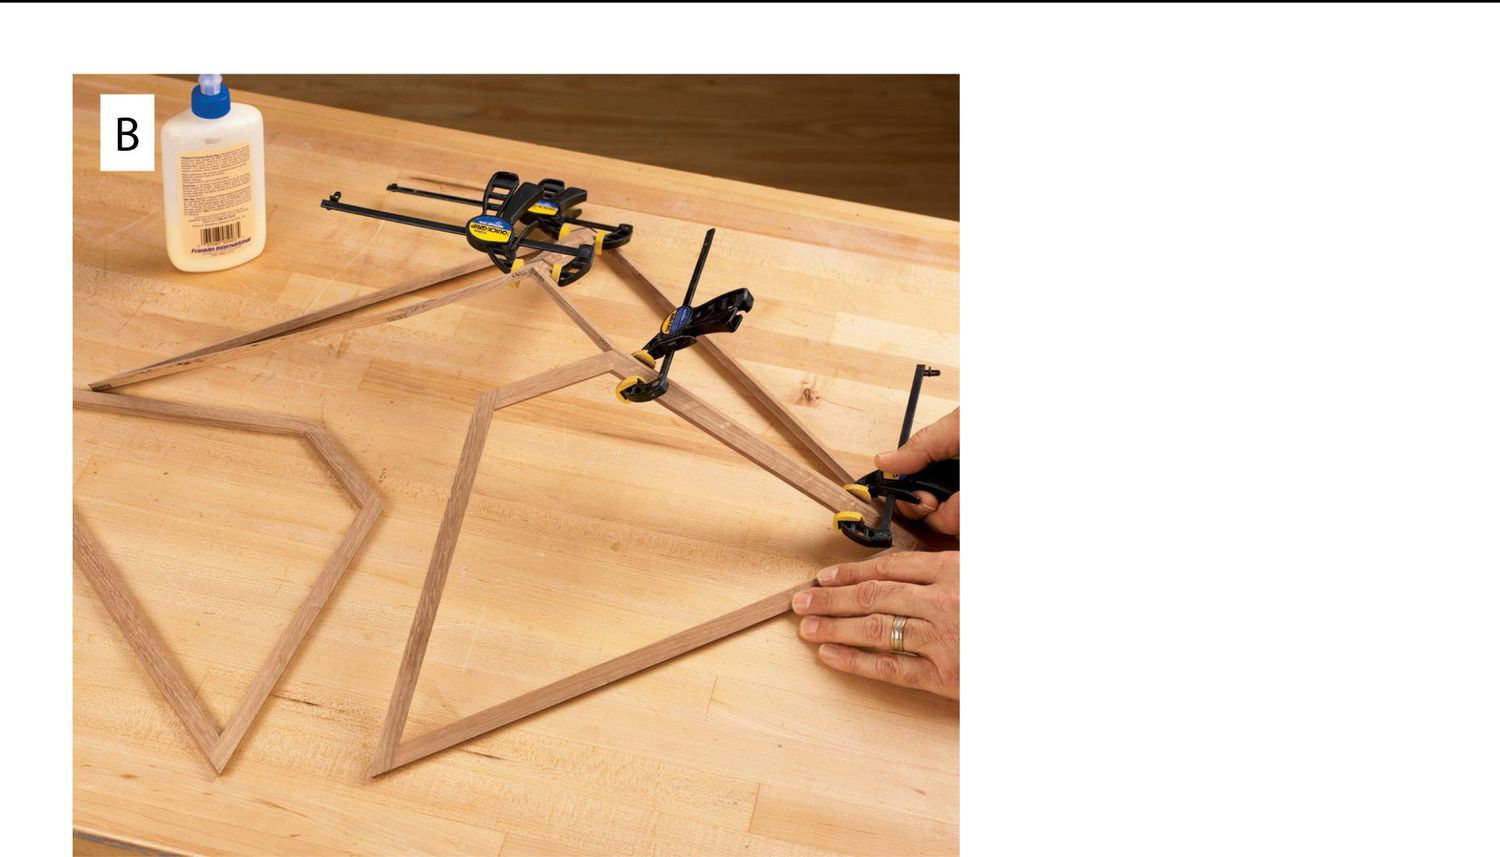
2 Glue and clamp the top rails, bottom rails, and stiles together, forming four flat frames. When dry, sand the joints smooth.
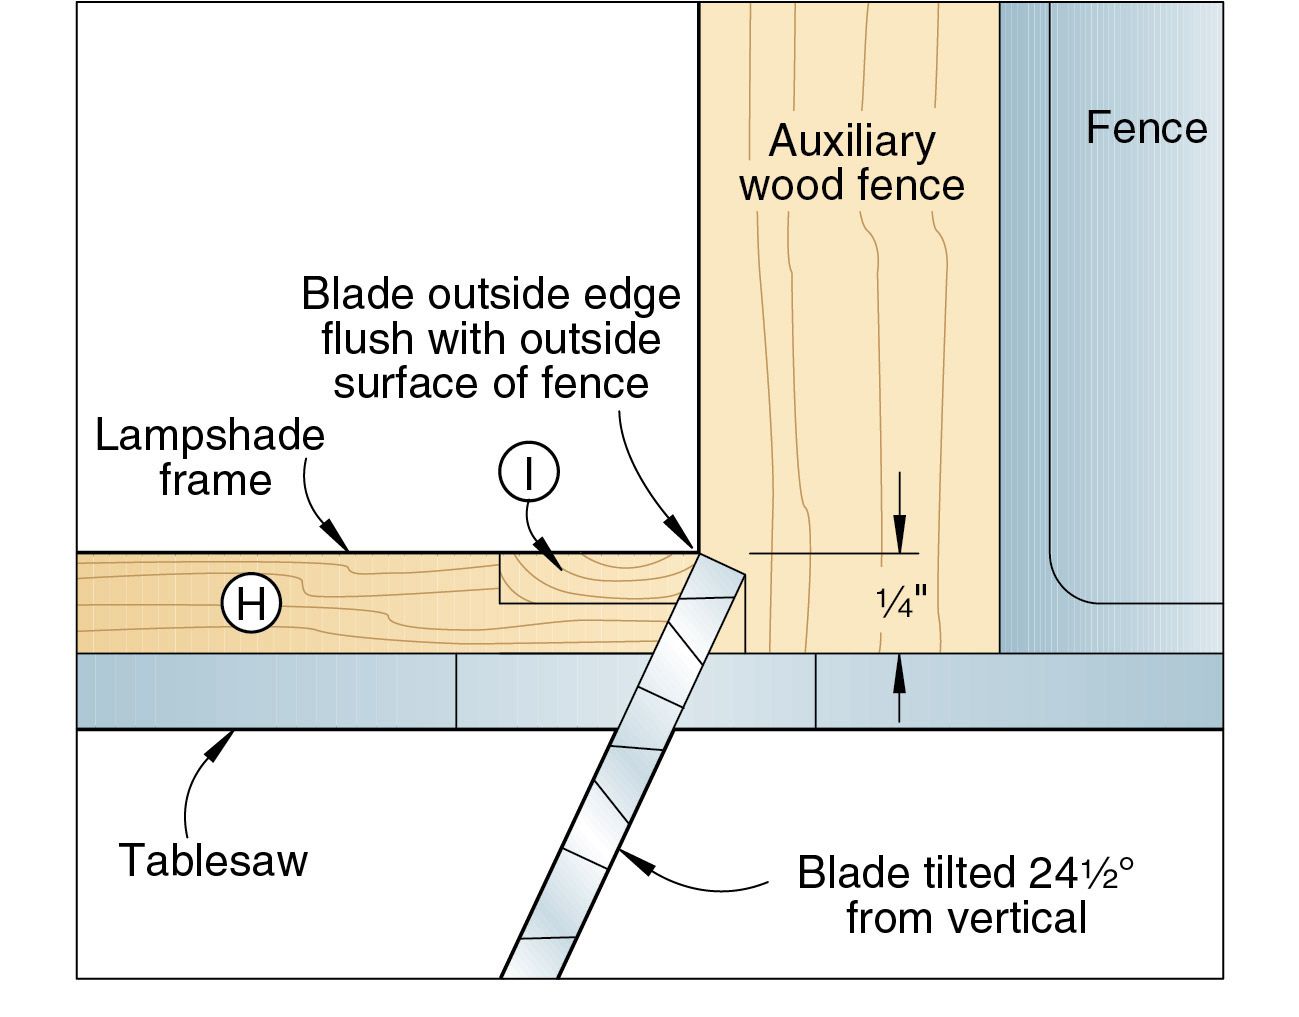
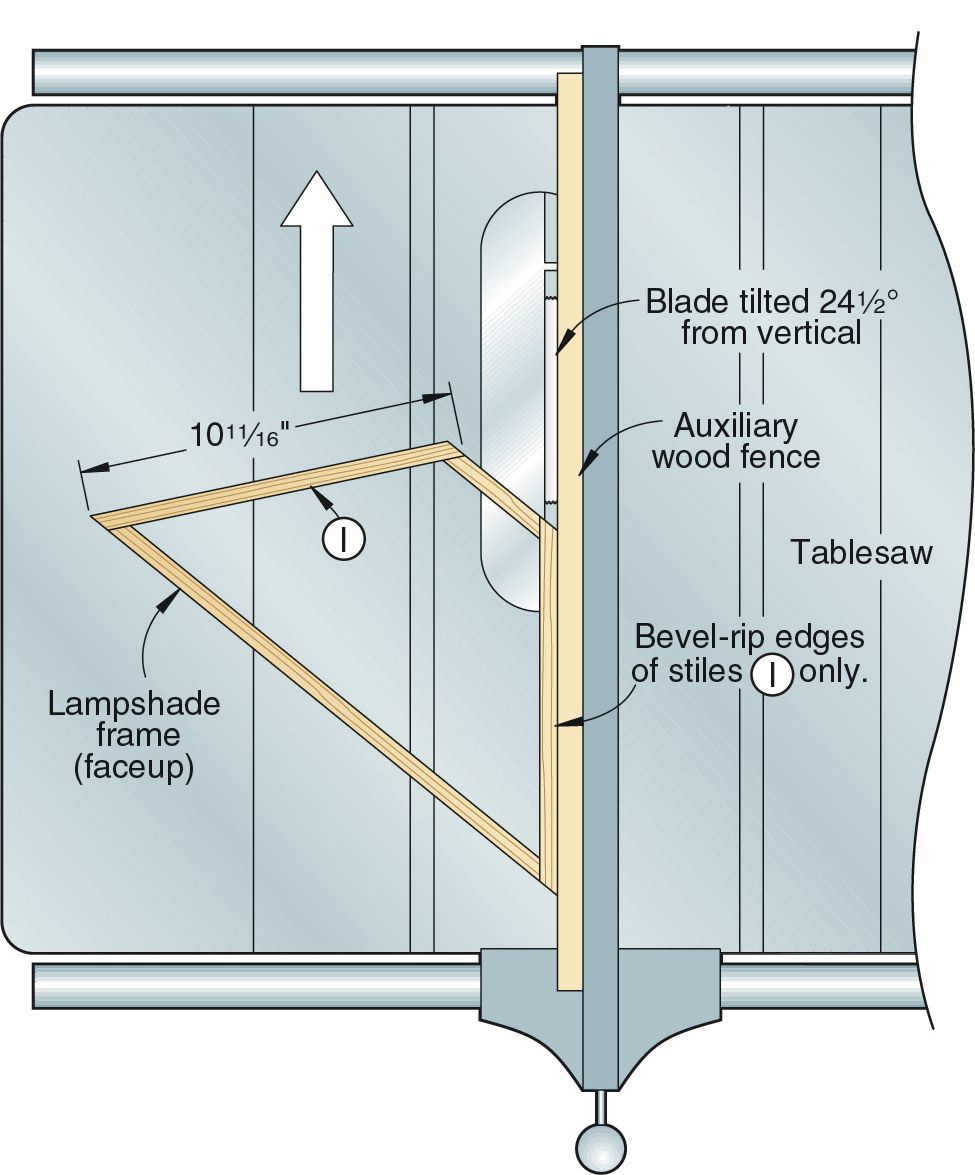
3 Referring to Drawing 4, attach a sacrificial auxiliary wood fence to your tablesaw fence. Angle the blade as shown, and set it below the table surface. Position the auxiliary fence over the blade where shown. Start the saw. Slowly raise the blade, cutting into the fence. Adjust the blade height and fine-tune the fence position, as needed, to place the blade's outside edge flush with the wood fence, where shown. Place a frame faceup on the saw, as shown on Drawing 4a. Bevel-rip the edges of both stiles (I). Repeat for the remaining frames.
4 Apply a thin coat of glue to the stiles' beveled edges. On a flat surface, assemble and clamp the frames together, as shown in Photo B. If you have only a few small clamps, don't worry. You can glue the lampshade together in stages, assembling one corner at a time.
Time for the finish
1 Look over the post assembly and the lampshade frame assembly, and sand any areas that need it.
2 Apply a stain if you wish. (We used ZAR's Oil-Based Wood Stains, no. 116 Cherry for the cherry lamp and no. 114 Provincial for the oak lamp.) Apply three coats of a clear finish, sanding to 320 grit between coats.
Complete the lampshade
1 On an 18×36" mica sheet, lay out four lampshade panels to the dimensions shown on Drawing 3. Cut the panels to shape on your bandsaw or tablesaw. Or purchase a project kit with the mica panels already cut to size.
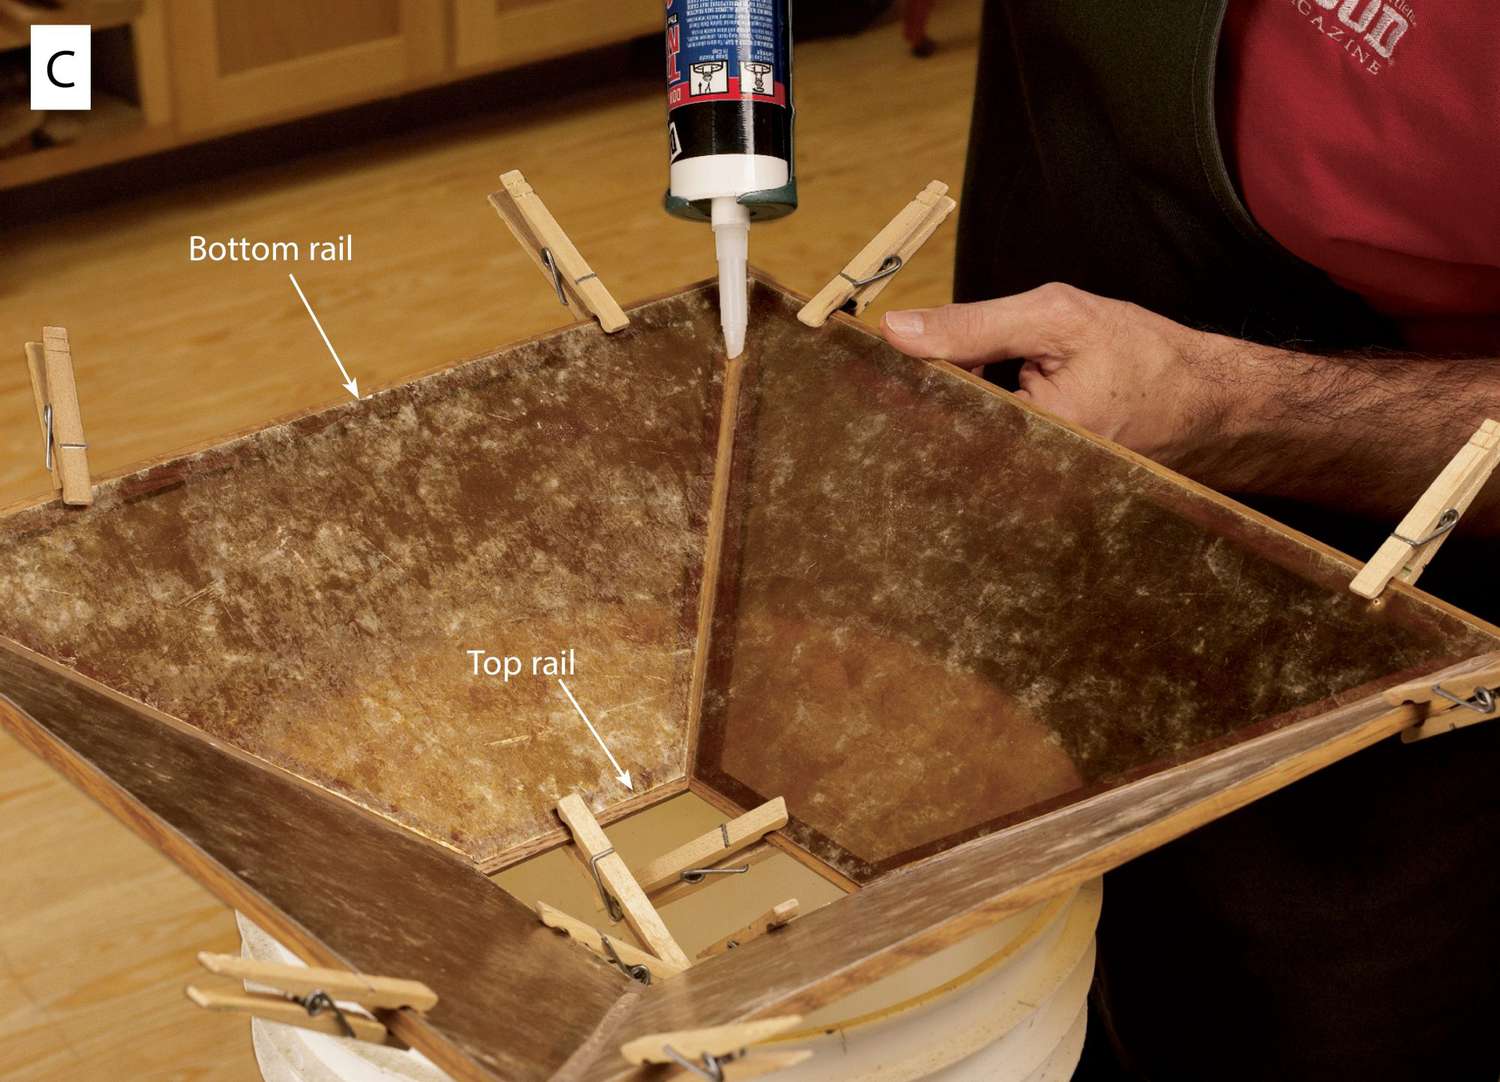
2 Place the lampshade frame assembly bottom up on a 5-gallon bucket, as shown in Photo C. Position and secure the mica panels to the inside of the lampshade frames, as shown. (Do not use tape as it will damage the mica when removed.) Apply a thin bead of clear silicone caulk along the corners formed by the adjoining stiles (I), as shown. Smooth the bead so it overlaps the edges of the panels about 1/16". Let the silicone cure overnight.
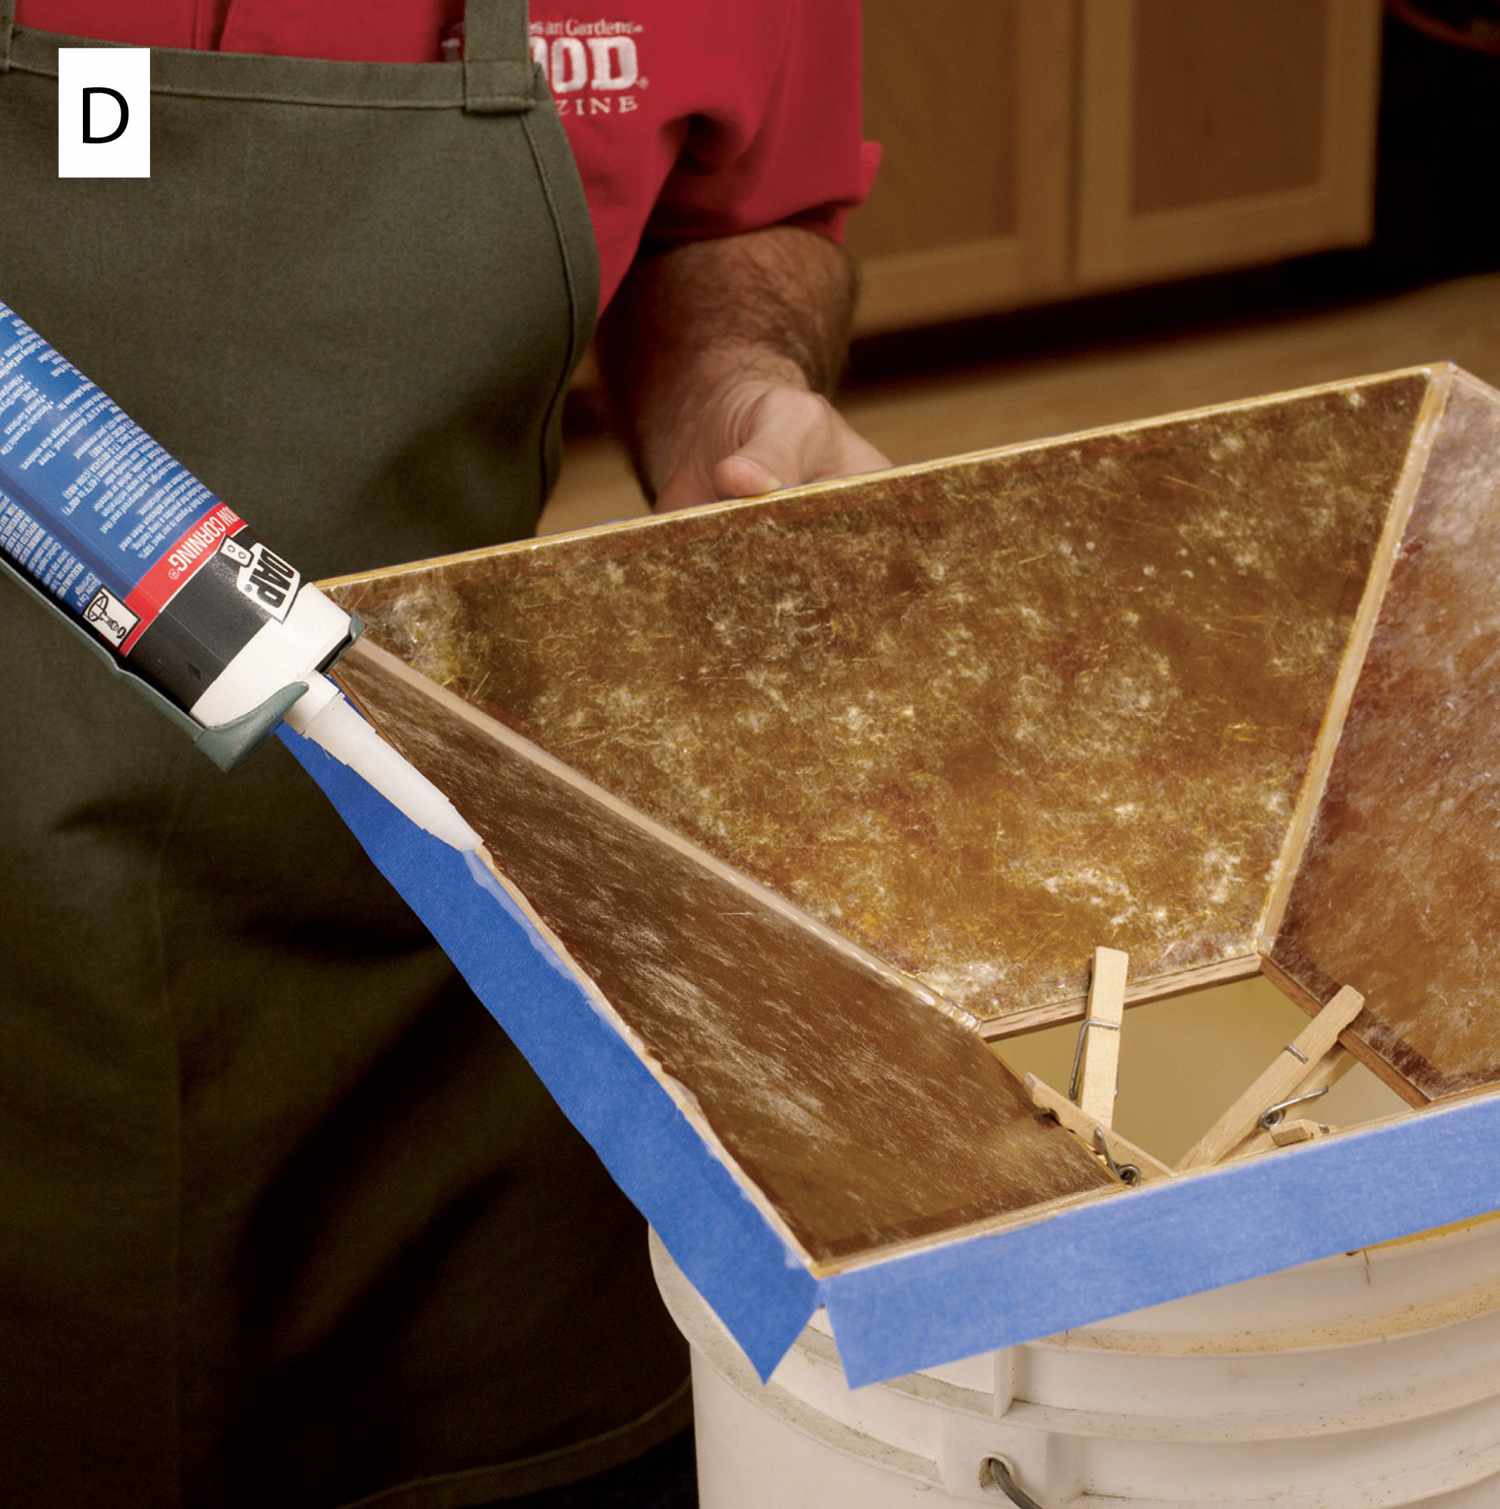
3 Mask the bottom edge of the bottom rails (H) with easy-release painter's tape. Caulk along the inside of the rails and smooth the bead, as shown in Photo D.

Immediately remove the tape, and run your finger along the edges to remove any stray silicone. If needed, reattach the clothespins to keep the panels flush to the frames. When the caulk cures, repeat the process for the top rails (G).
4 To cut the optional copper pine-cone onlays for the lampshade, see Copper Motifs, below. Using a glue brush, apply five-minute epoxy sparingly to the back of the onlays. Press them onto adjacent mica panels at opposite corners of the lampshade, positioning them where shown on Drawing 3.
Why mica? It looks great, and it's safe.
Wire the lamp
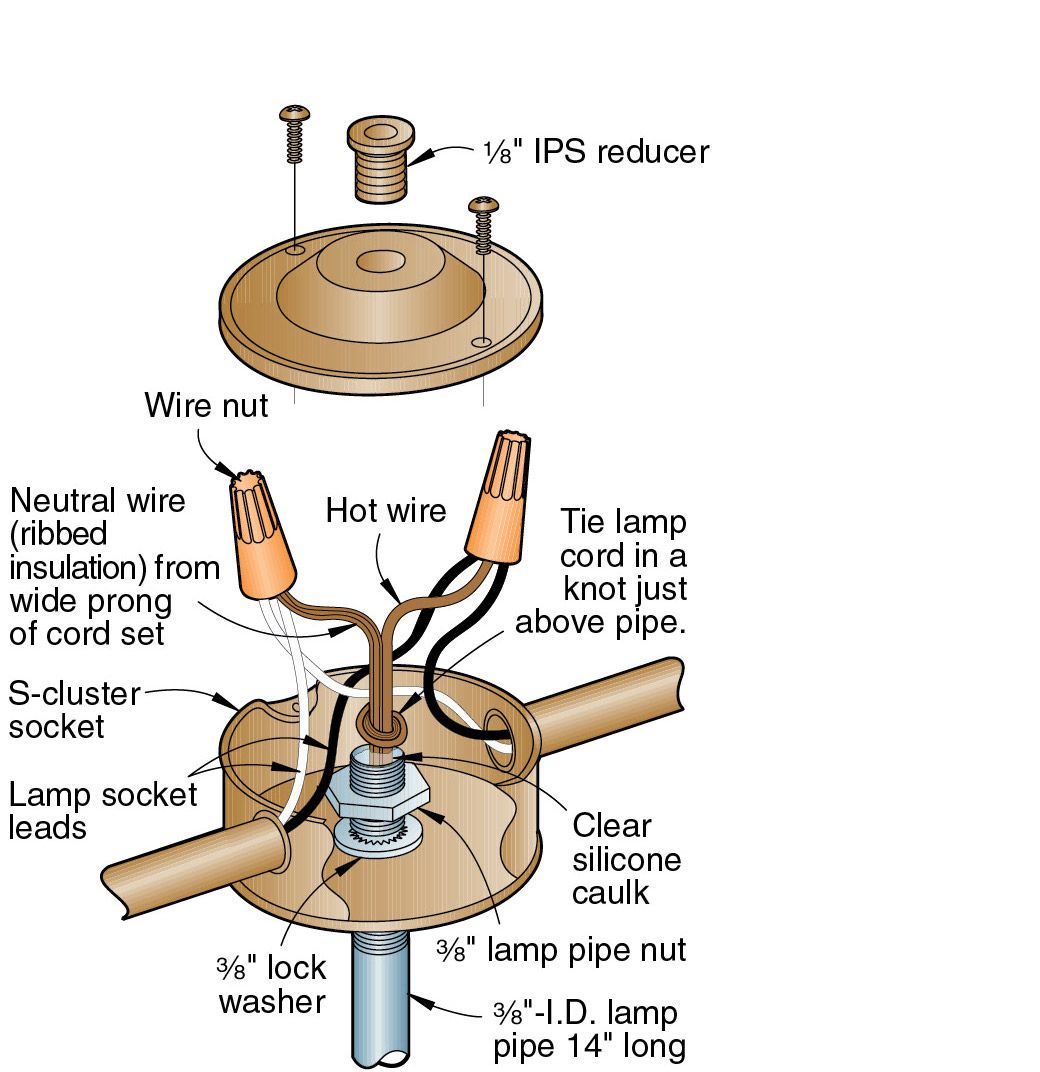
1 Referring to Drawing 3, insert a 3/8"- inside diameter, 14"-long lamp pipe through the post's groove. Position the pipe flush with the bottom of the base (A). Install a 3/8" lock washer and 3/8" lamp pipe nut on the pipe's bottom. Remove the cover from an S-cluster socket. Thread the socket onto the top of the pipe, flush against the cap (F). Secure the socket with a lock washer and lamp pipe nut, where shown on Drawing 5.
2 Feed the free end of an 8'-long cord set through the pipe's bottom. Use a cord with a polarized plug. Wire the lamp in the configuration shown.
3 Apply a small dab of silicone caulk in each end of the lamp pipe to protect the cord set. When the caulk cures, tuck the wires into the socket's base, and replace the cover. Thread a 1/8" iron pipe size (IPS) reducer in the cover. Screw two bulbs into the sockets, and place the lampshade on the supports. (We used 40-watt bulbs for a soft-light effect.) Finally, plug in the cord, turn on the lamp, and admire its warm glow and your craftsmanship.
The Never-Fail Sliding Dovetail
If you use dovetails only to build drawers, consider adding the sliding dovetail to your repertoire of joint-making skills. We'll show you how to apply its exceptional strength to concealed drawer-face joints, shelving units, or a specialized connection like the one shown in the tabletop lamp.
You'll learn how to make through sliding dovetails and two variations of stopped sliding dovetails. To get started, you'll need a router mounted in a table and a standard dovetail bit. You can choose among dovetail bits with cutting diameters from 1/4" up to 3/4", and with cutting edges angled from 7° to 18°. A steeper angle adds reliability in softwood, and narrow stock calls for a narrow bit. We use a bit with a 1/2" cutting diameter and a 14° angle to make sliding dovetail joints in 3/4" hardwood.
When you need a dovetail groove longer than 6", use a tablesaw or a straight bit in your router to plow a groove down the center of the planned dovetail joint. Make it 1/8" wide and nearly as deep as the dovetail groove will be. This step avoids the problem of sawdust packing tightly into the dovetail groove as you rout it.
Through sliding dovetails
1 A through sliding dovetail extends from one side of the joint to the other, leaving the distinctive dovetail shape visible at both ends of the joint. It's the quickest sliding dovetail joint to make, and adds both visual interest and strength to projects such as display shelving.
To make a typical through dovetail, set the bit to cut a groove 5/16" deep. Adjust the router-table fence so it stops the workpiece to help you cut the groove the desired distance from the end of the workpiece. Make sure the fence sits parallel to the miter-gauge slot by clamping a ruler or piece of scrap to the gauge and checking to see that it contacts the fence along its full length.
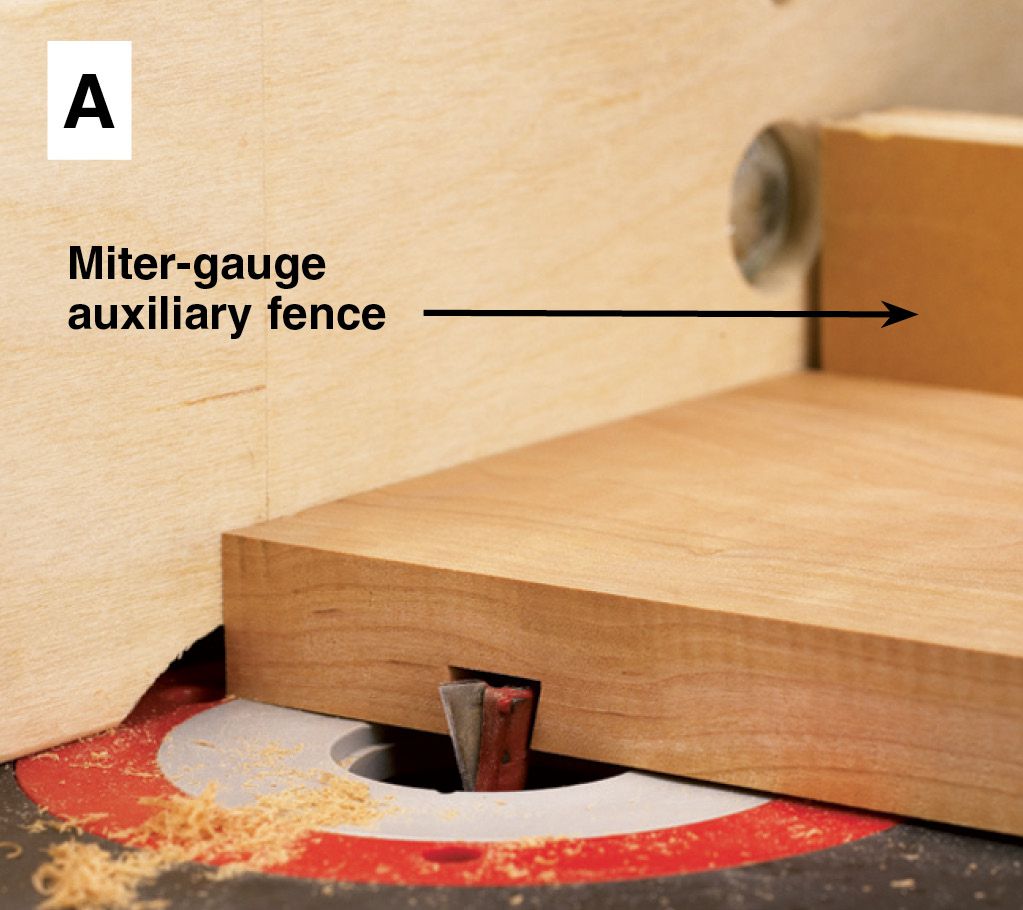
Attach a wood auxiliary fence to the miter gauge, and turn on the router. A smooth sliding dovetail depends on a perfectly straight groove, so hold the workpiece firmly down on the table and against both fences. Make the cut as shown in Photo A, allowing the bit to pass through the auxiliary fence.
If you want to place a matching dovetail at the other end of the workpiece, leave the router-table fence unchanged. Flip the board around with the same side down, butt it against both fences, and rout again. To make dovetails in a pair of stiles for a series of shelves, cut a groove in each stile at one router-table fence setting, then adjust the fence for the next pair of grooves.
Now that you've established the size of the groove, it's time to cut a dovetail tenon that matches precisely. Leave the dovetail bit height unchanged, but adjust your router-table fence.
If you have a split fence, bring the two halves of the fence as close to the bit as possible without contacting it, leaving only the outside portion of the bit exposed. If you have a single-piece fence, attach a sacrificial auxiliary fence to it. Turn on the router, and carefully move the fence forward to recess the bit. See Drawing 1 for details, but remember that the proper fence setting depends on the thickness of the workpiece.
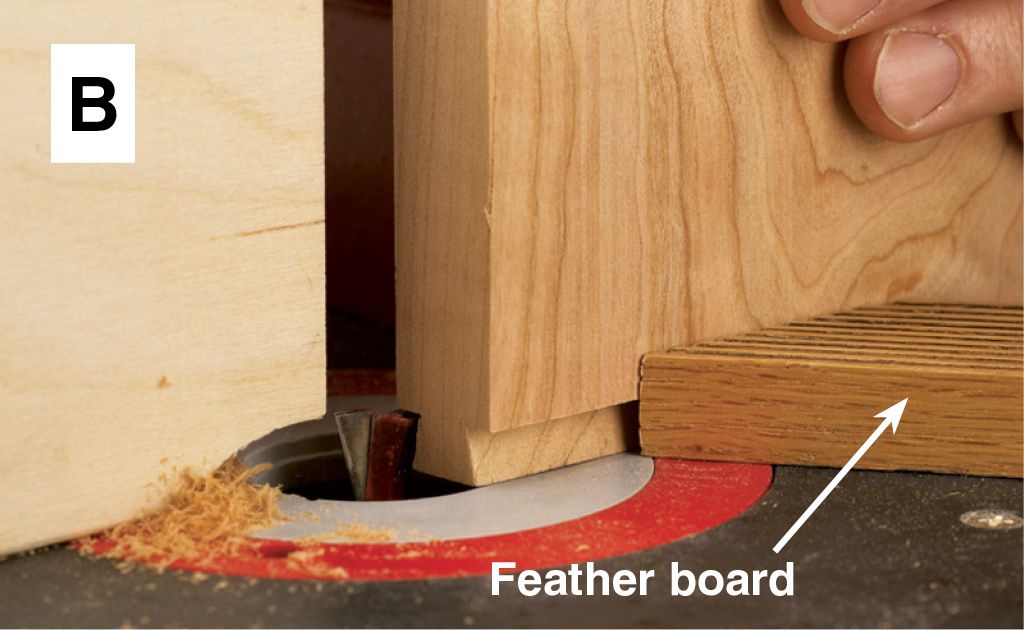
With a piece of scrap that's the same thickness as your workpiece, make a trial cut with the aid of a feather board, as shown in Photo B. Cut one side of the tenon, flip the workpiece around, and cut the other tenon side. Test this sample in the groove and adjust the fence until the tenon slides into the groove snugly but smoothly. When it does, cut your tenon on the workpiece.
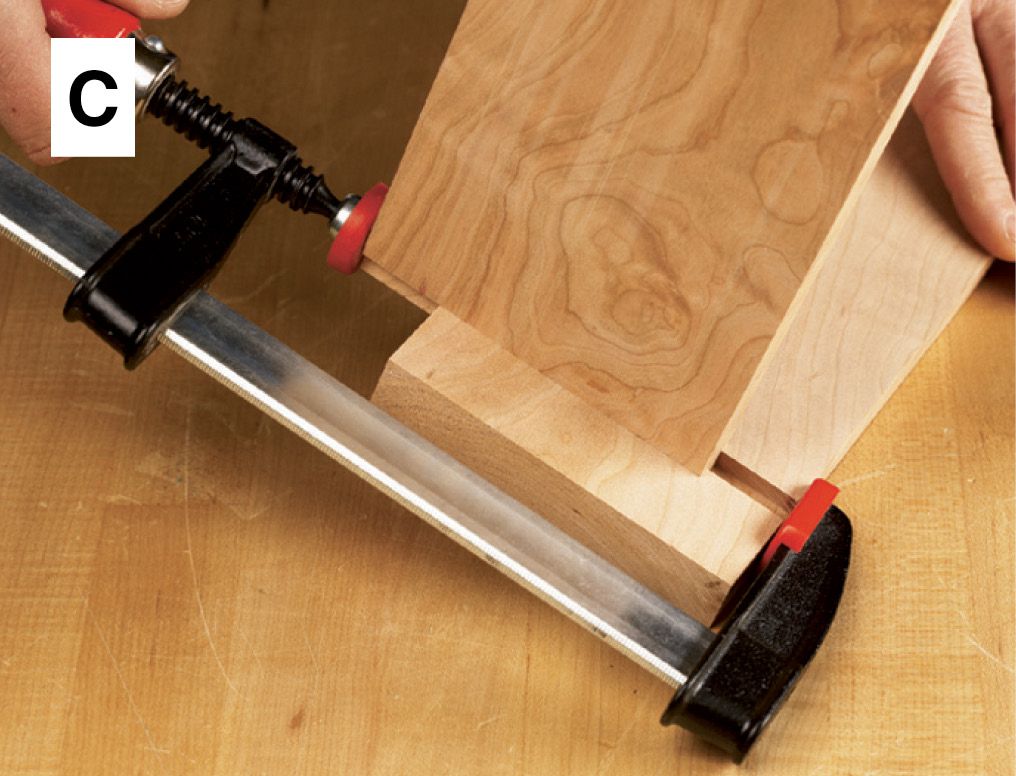
Begin to assemble the joint by spreading a thin coat of yellow glue in the groove. The longer the joint, the more likely you'll need extra pressure to put it together. You can use a dead-blow mallet, but see Photo C for a better way. A well-fitted dovetail joint doesn't require clamping while the glue dries.
Stopped dovetails in drawer fronts
2 Choose a stopped sliding dovetail, visible at only one end, when you want to hide the joint or you can't make a through cut. But a problem arises when you need to cut a stopped dovetail at each end of a workpiece, such as a drawer front. Safety requires you to work from right to left on the router table, but the typical table has only one miter-gauge slot. Here's the solution.
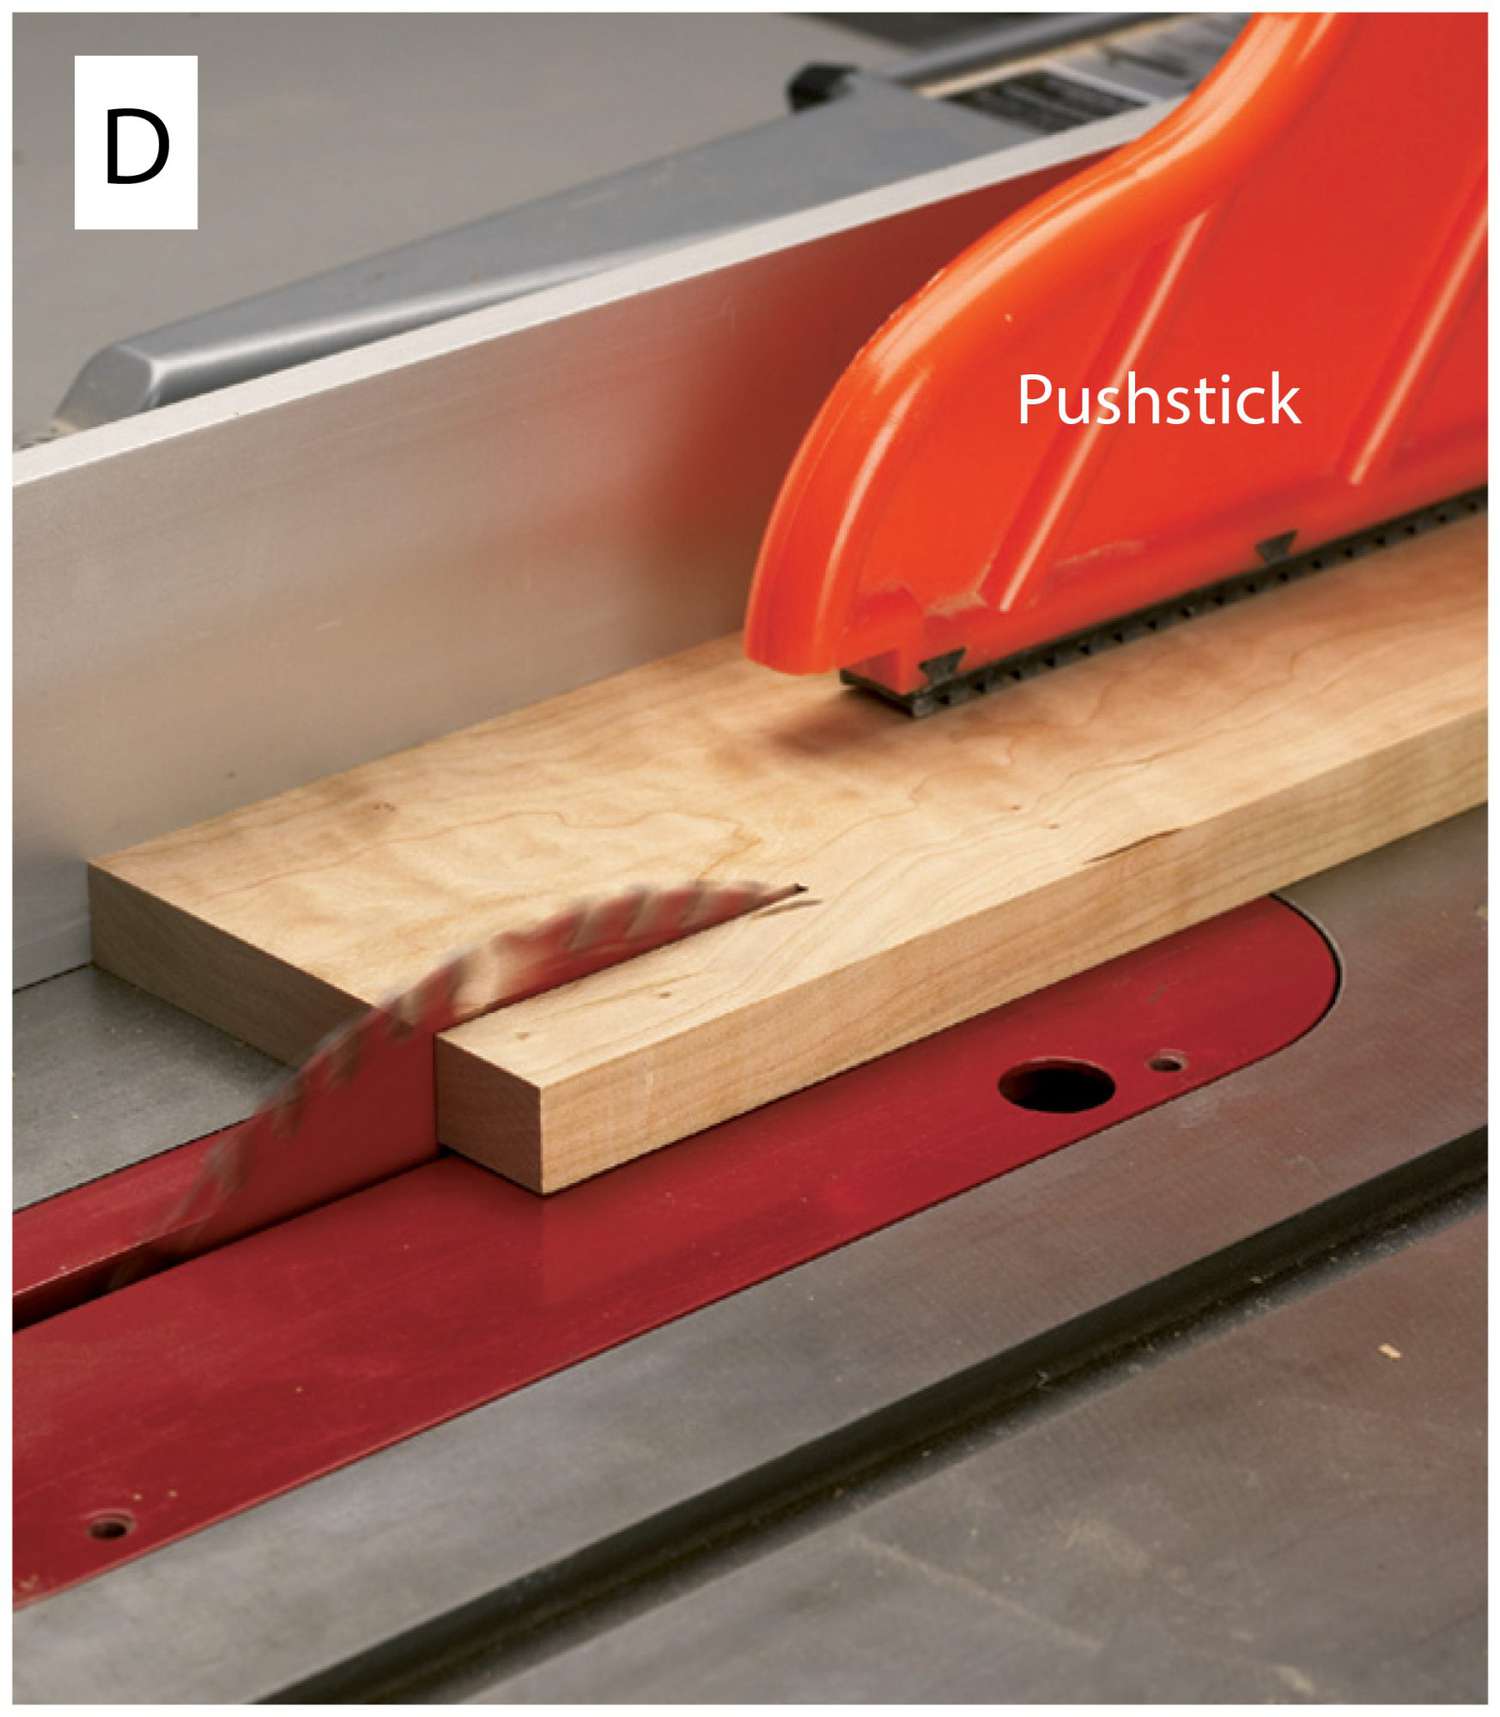
Make your drawer front at least 3/16" over its final width. Then, rip away the top 1" at the tablesaw, as shown in Photo D, and remove the saw blade marks at the jointer. Now, cut a pair of through dovetail grooves.
Glue the top piece back in place, as shown in Photo E, creating two stopped grooves. Trim the drawer front to final width. Finally, make dovetail tenons on your drawer sides, trim off one end of each tenon as shown above, and slide them into place.
Stopped sliding dovetails
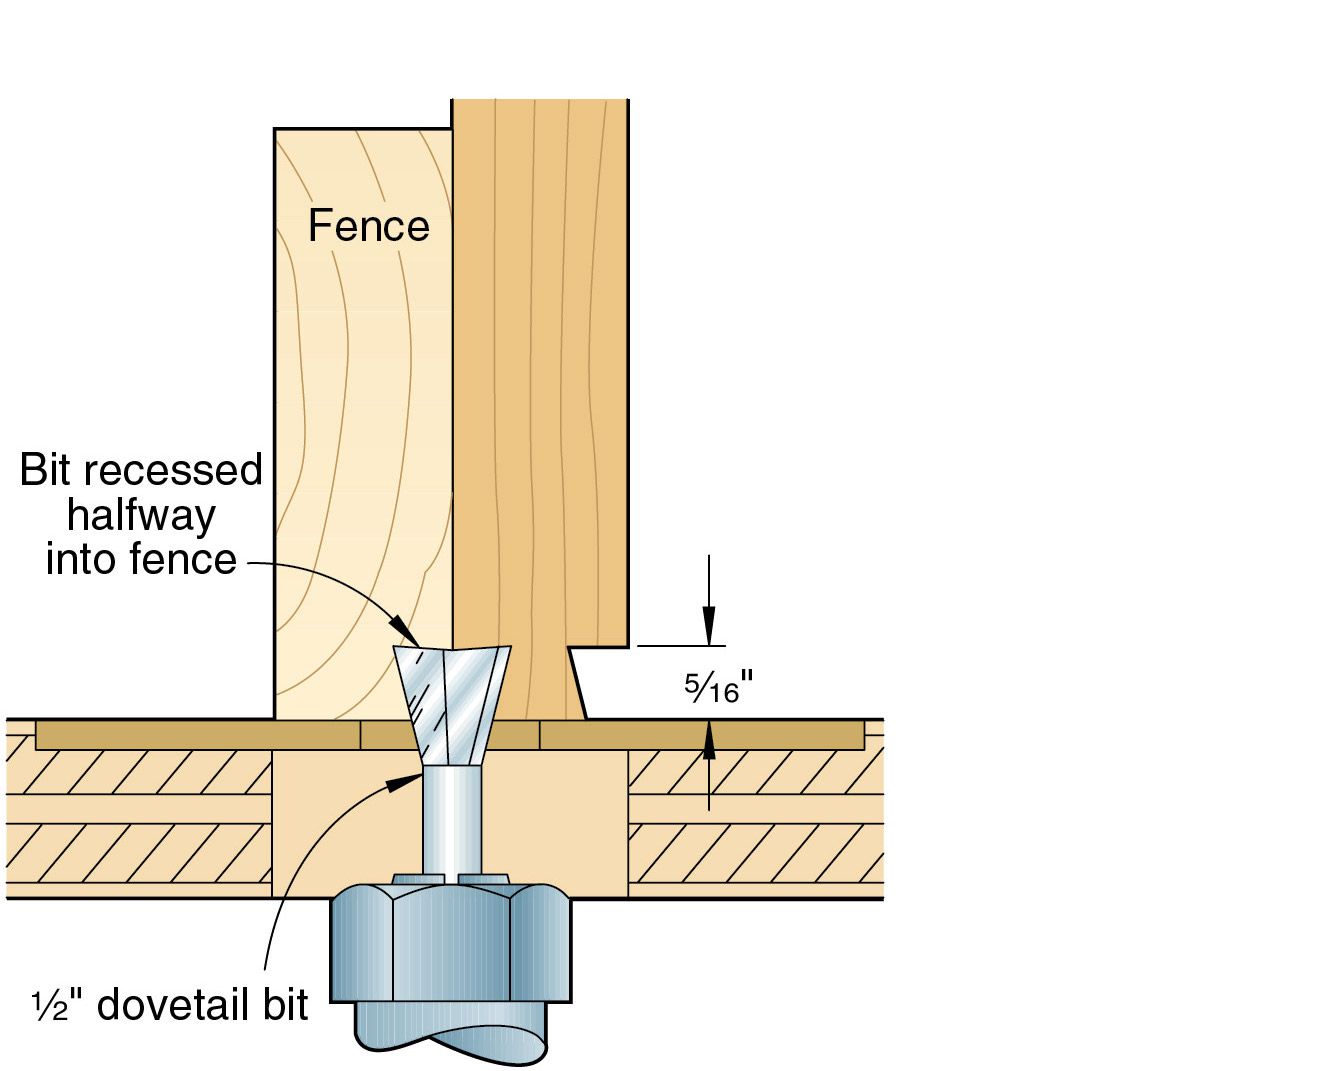
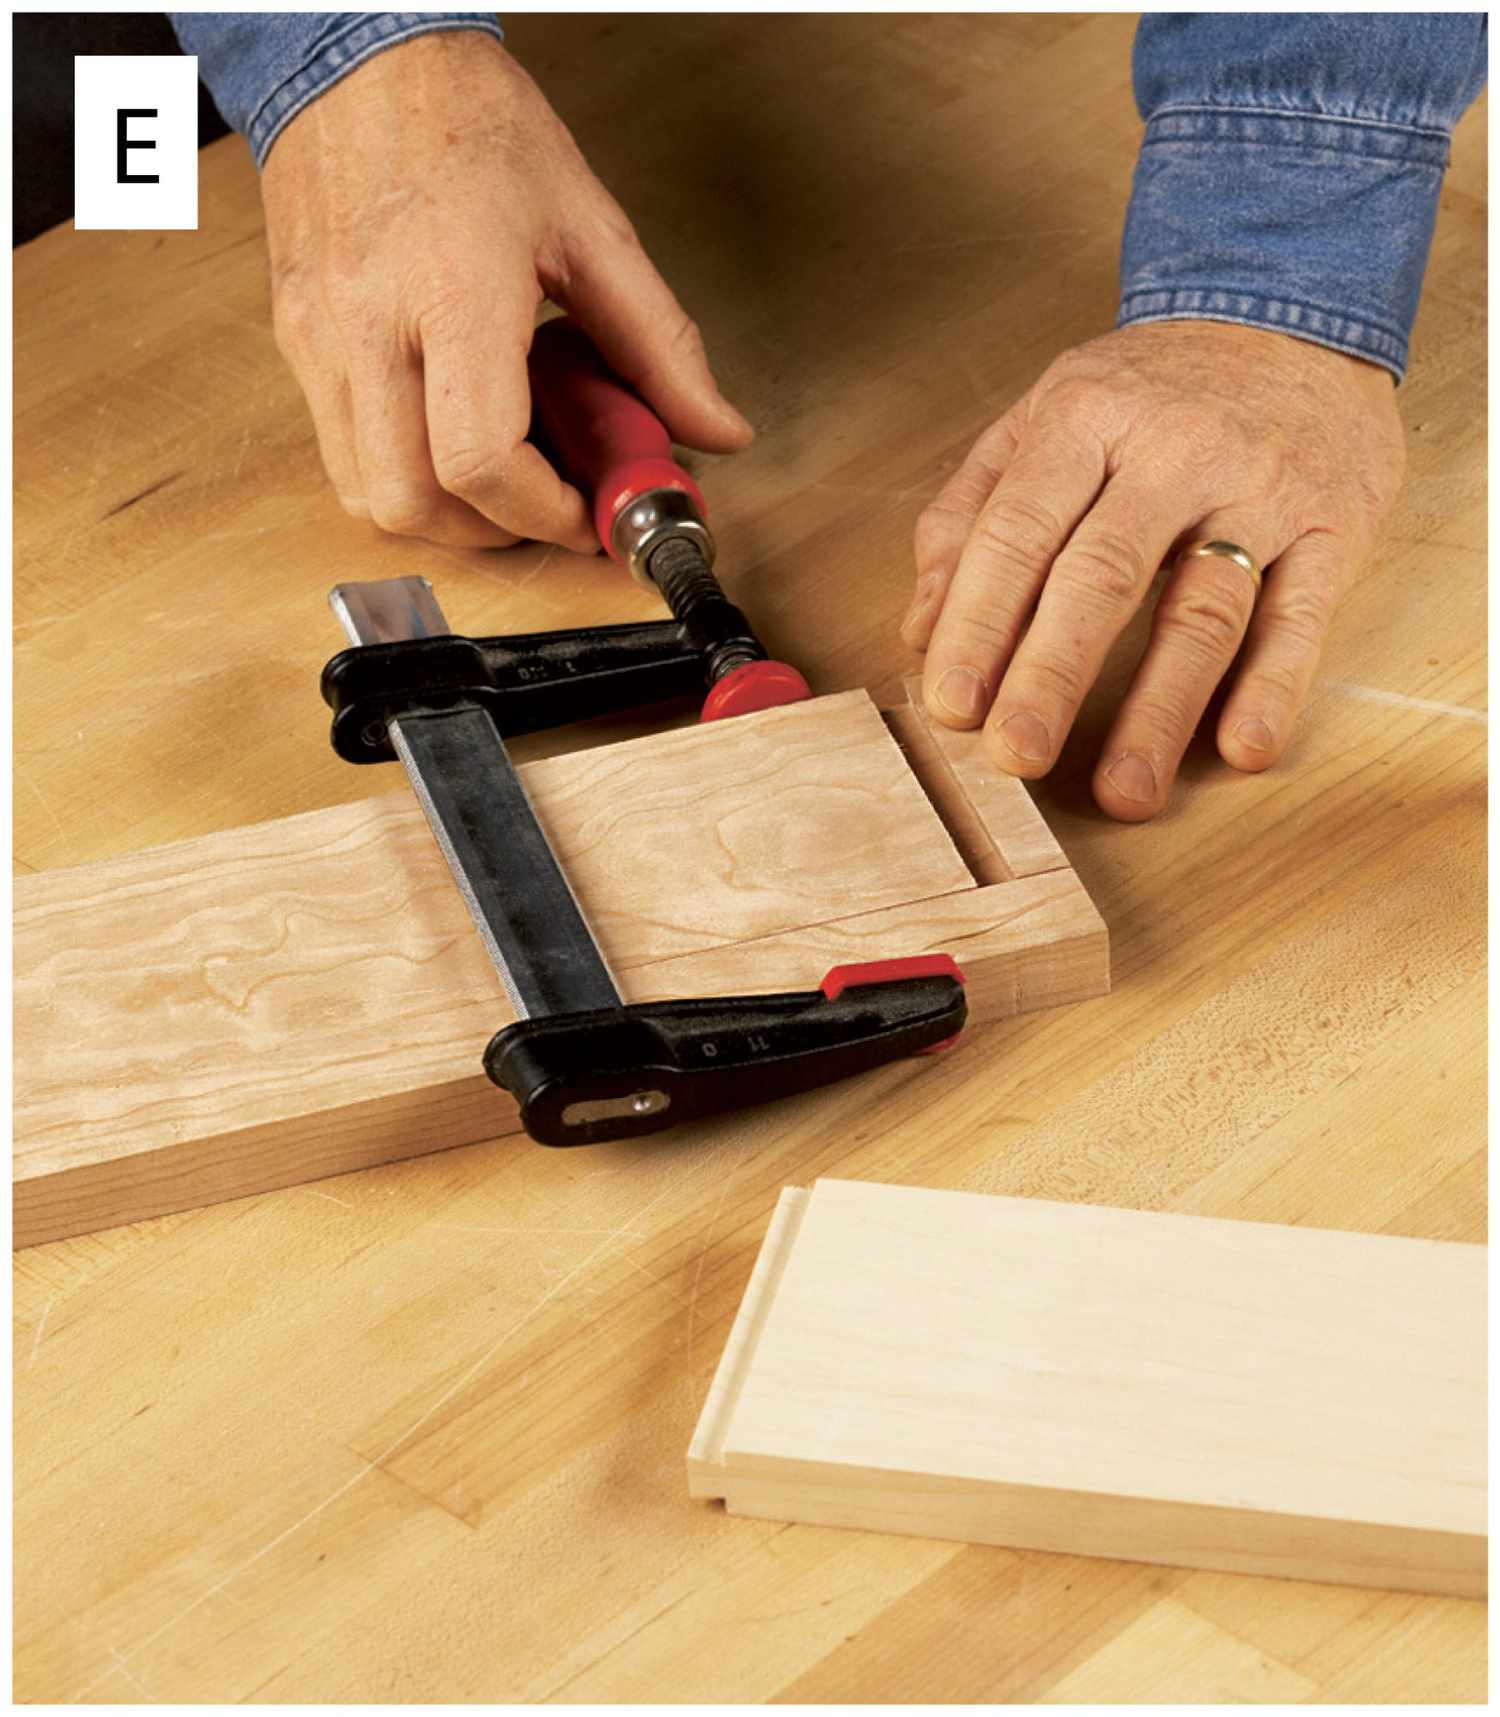
3 The table lamp calls for a sliding dovetail joint with a stopped end. We'll use that project for our example of this joint, but the same principles apply in other projects, such as pedestal tables.

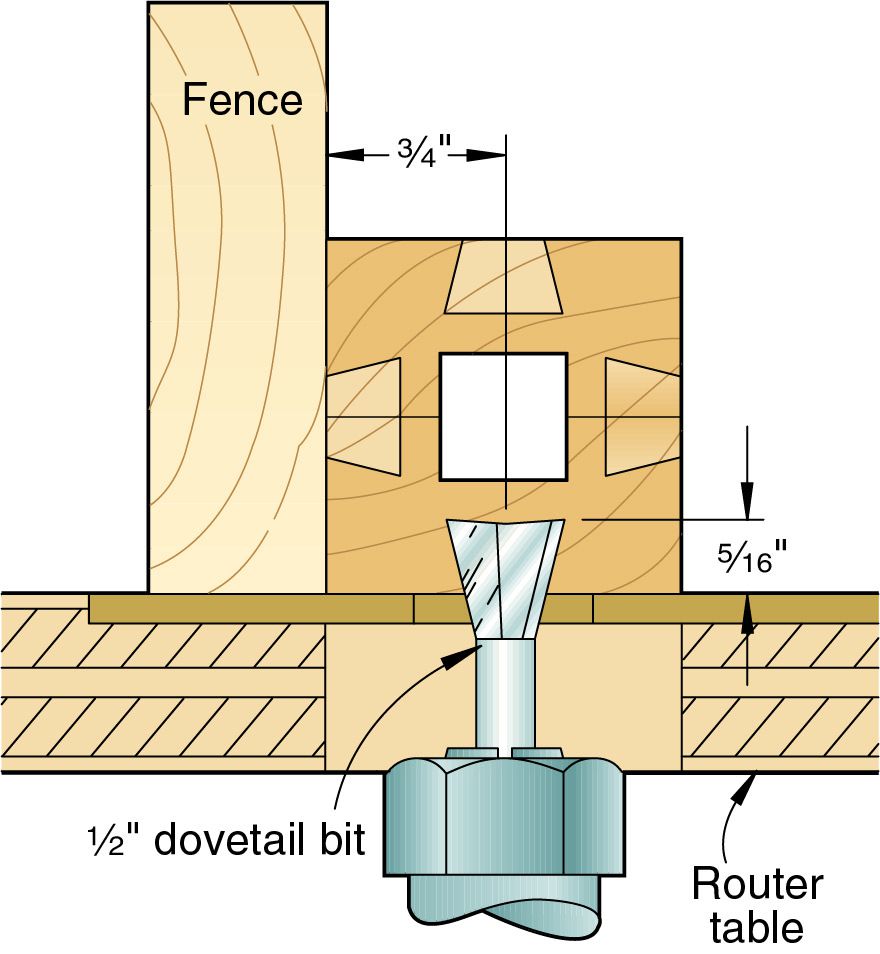
Set your router-table fence to center the dovetail bit on the post, as shown in Drawing 2. Clamp a stopblock on the outfeed side of the fence 1" from the bit's center. (This will result in a groove roughly 1-1/8" long.)
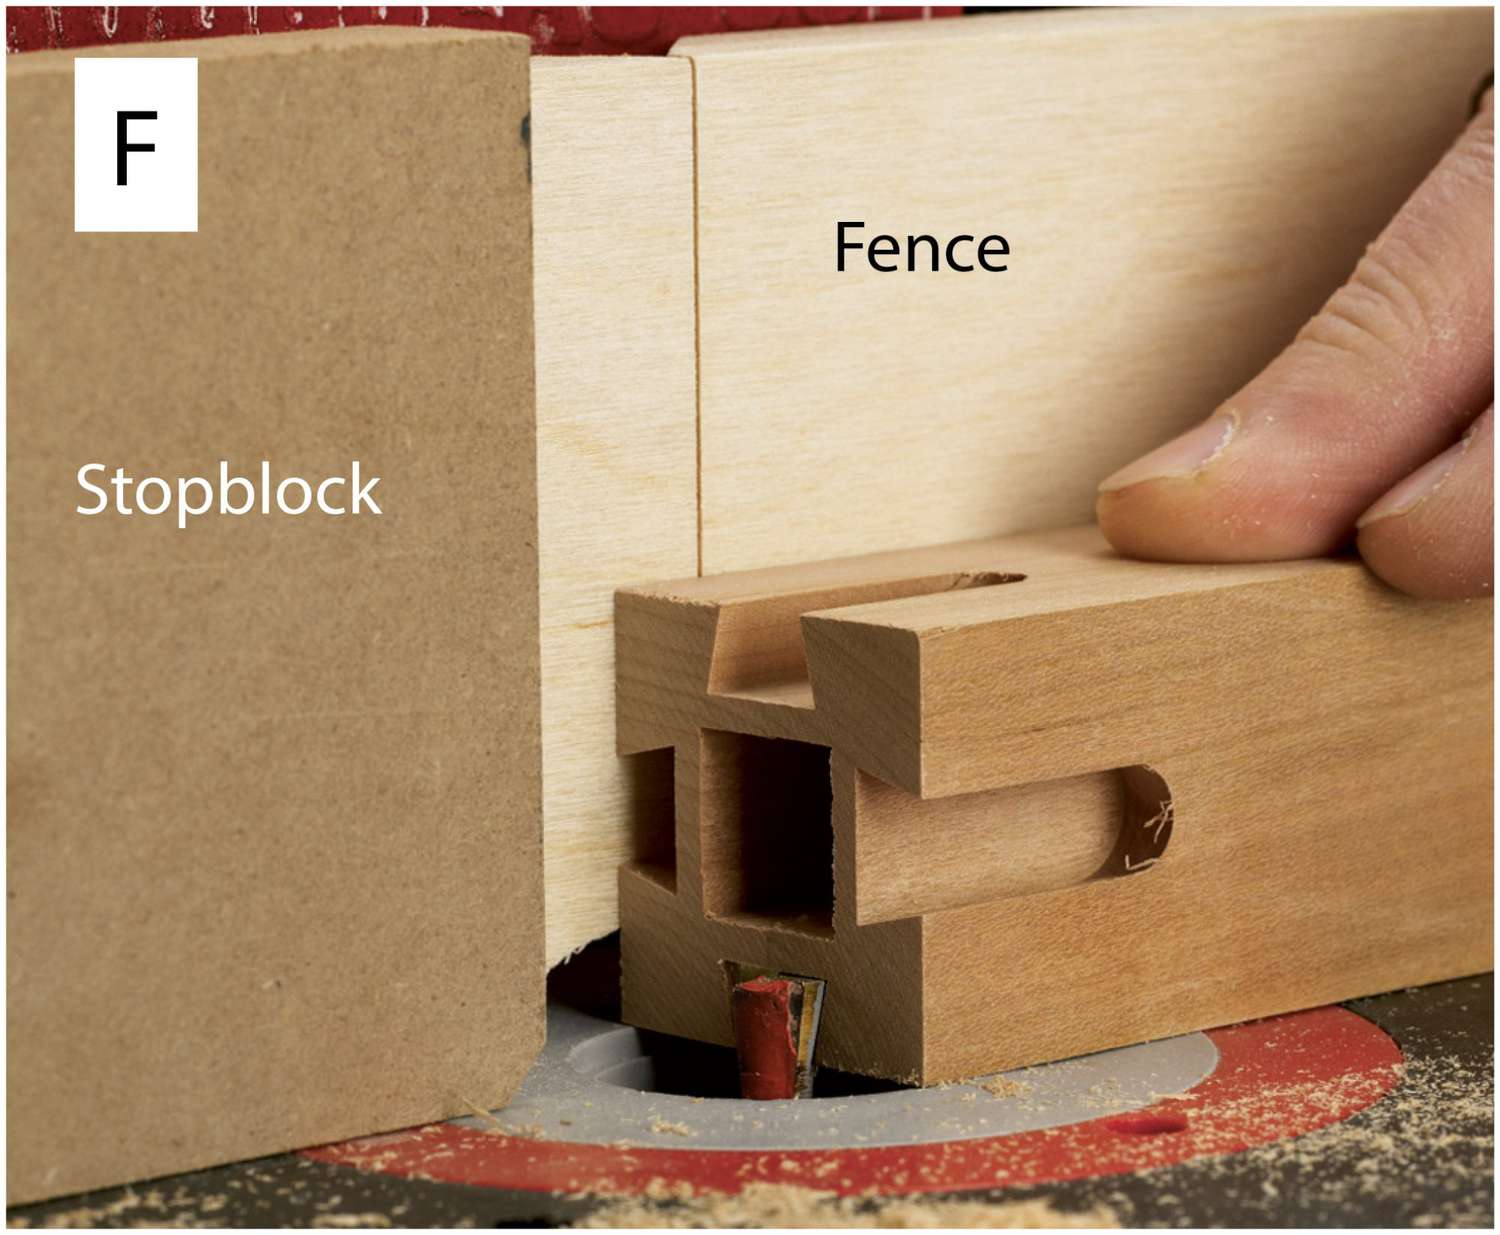
Now, rout the groove on all four sides of a test piece the same dimensions as the post, as shown in Photo F, always holding the workpiece firmly against the fence and the table. When you're satisfied with the test sample, make your cut or cuts in the workpiece. At the end of each cut, switch off the router and wait for the bit to stop before sliding the workpiece back, if your switch is easily accessible. If not, carefully slide the workpiece back, holding it tightly against the fence, while the bit continues to spin.
Leave the bit height unchanged. Now, form a dovetail tenon on a test piece, as described Above in step 1 sliding dovetails.
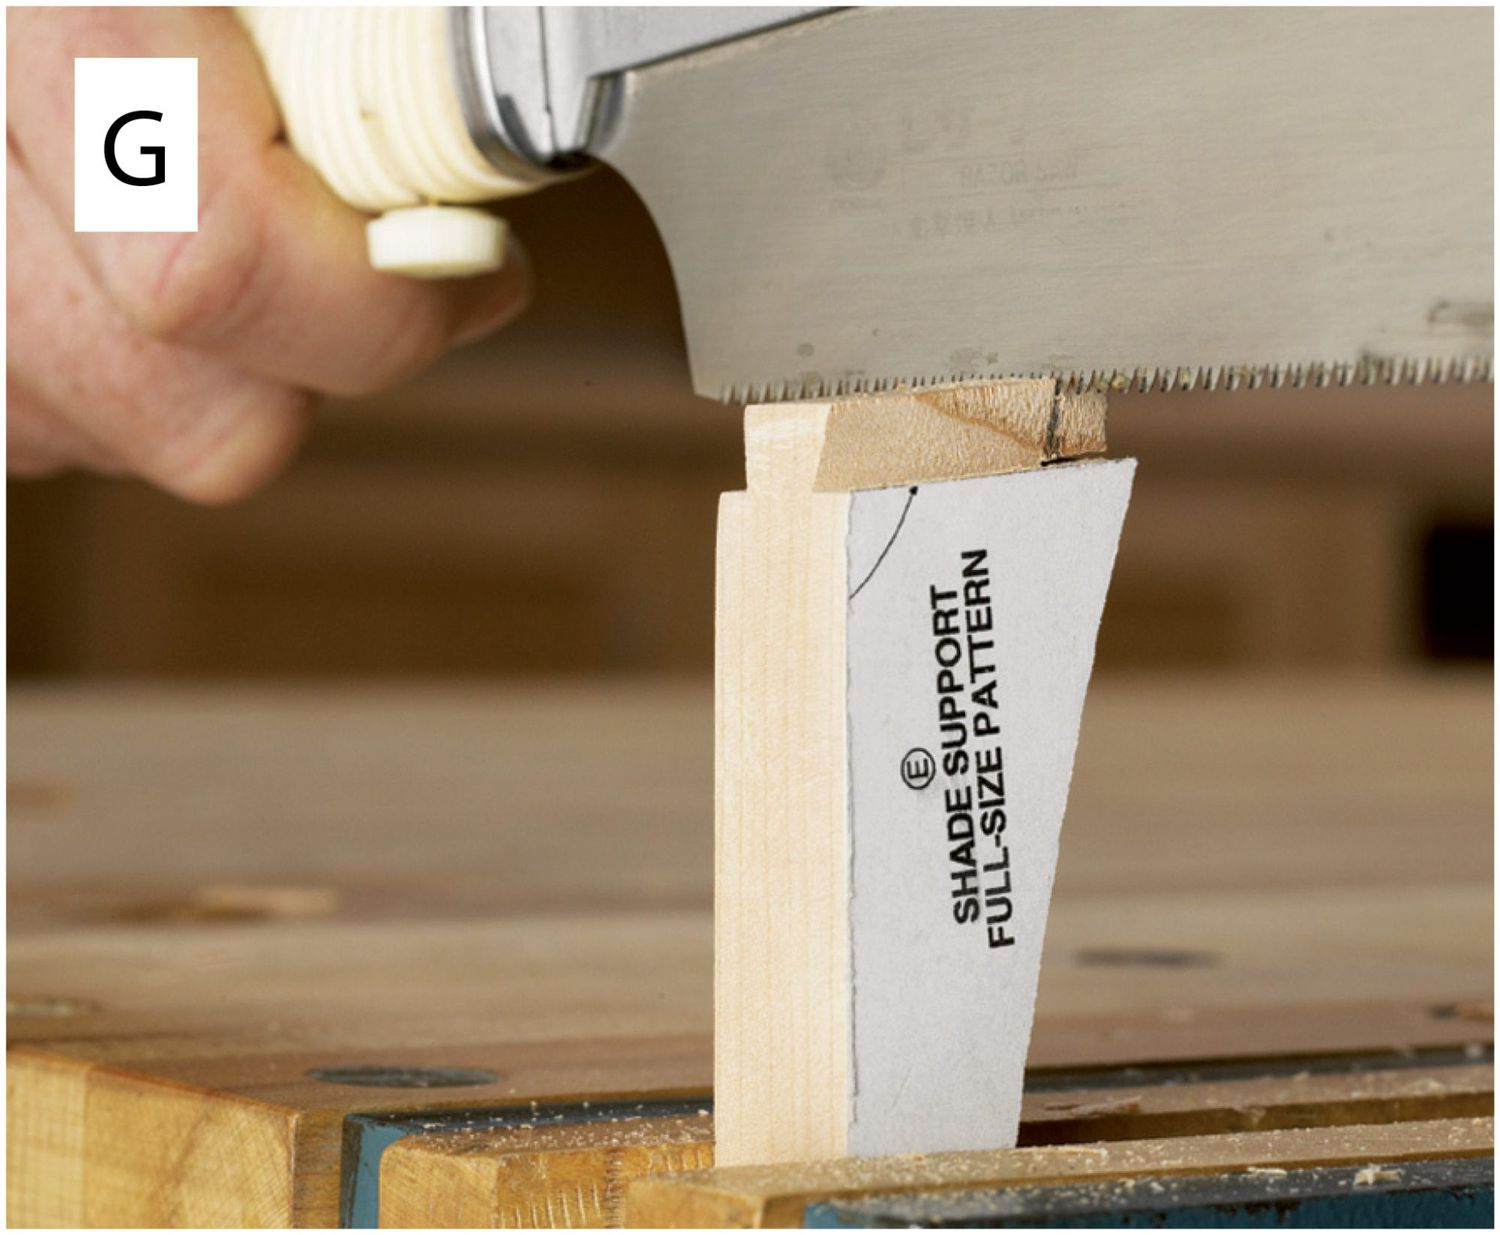
Now, because the groove is shorter than the width of the shade support, you need to trim the tenon to fit. Measure and mark the tenon, and then remove the waste with two handsaw cuts, as shown in Photo G.
Copper Motifs
Here's an easy way to "metal" with a woodworking project and add to its styling.
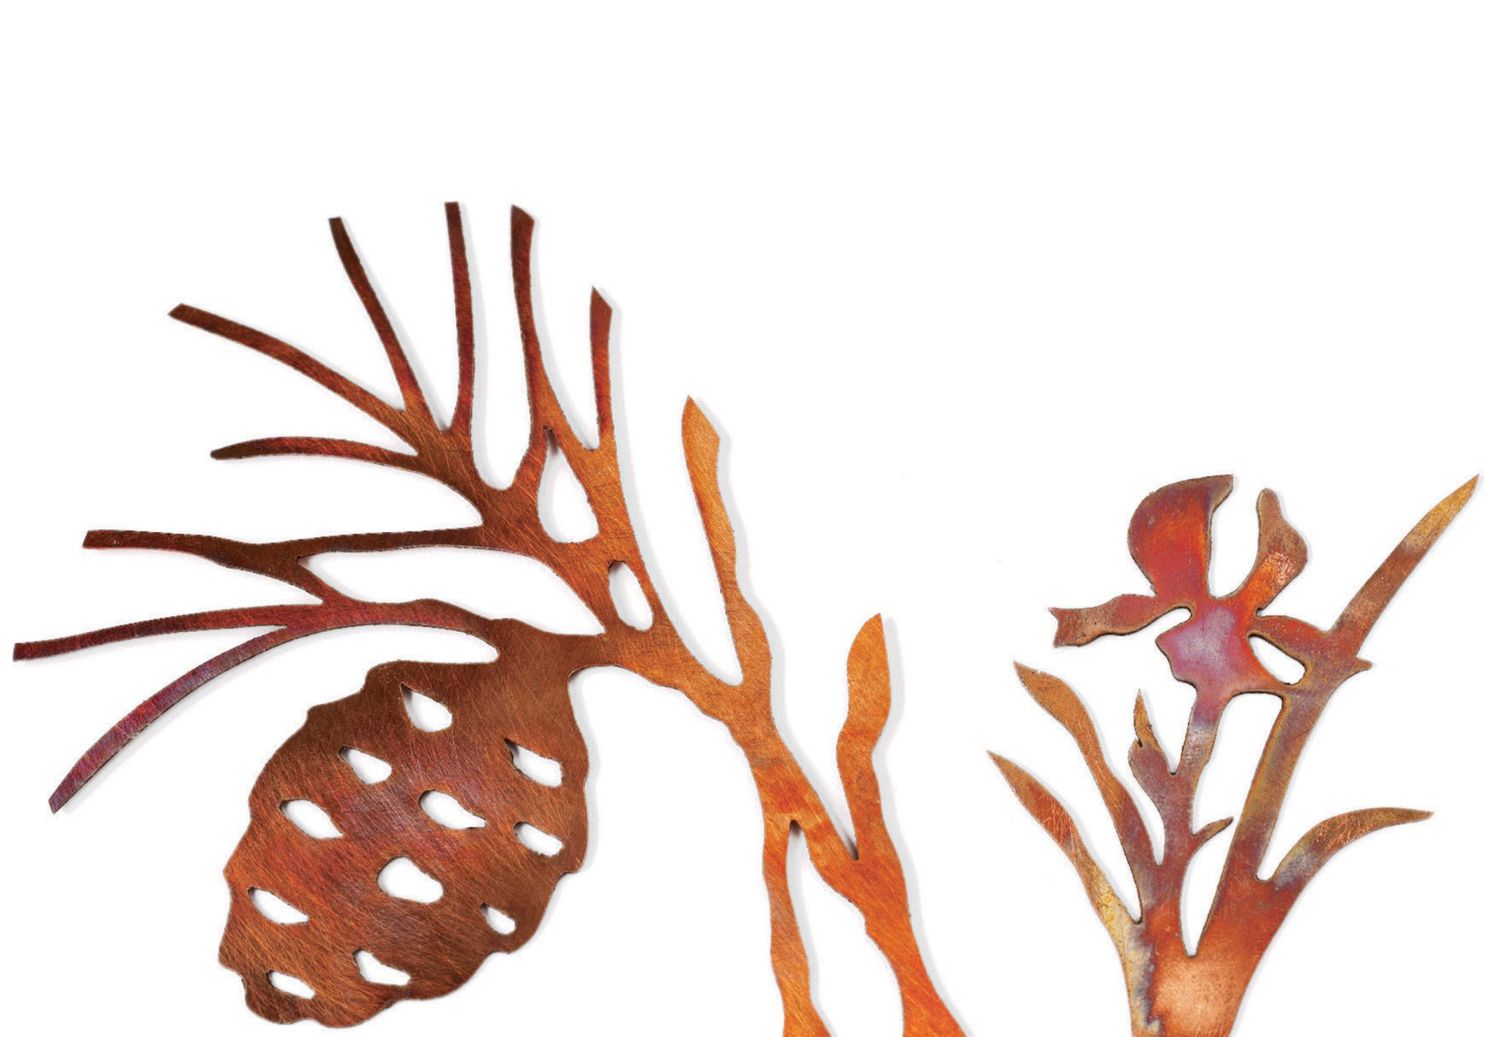
Take a minute to see how the pine cone and iris accents above greatly enhance the appeal of the table lamp. As you'll soon discover, there's no mystery to making them. For materials, you will need 24-gauge sheet copper, available at home centers, or hardware, crafts, and hobby stores. You'll also need a paper pattern, spray adhesive, 1/8" hardboard scrap, and the simple three-step process described below.
Cut the pattern
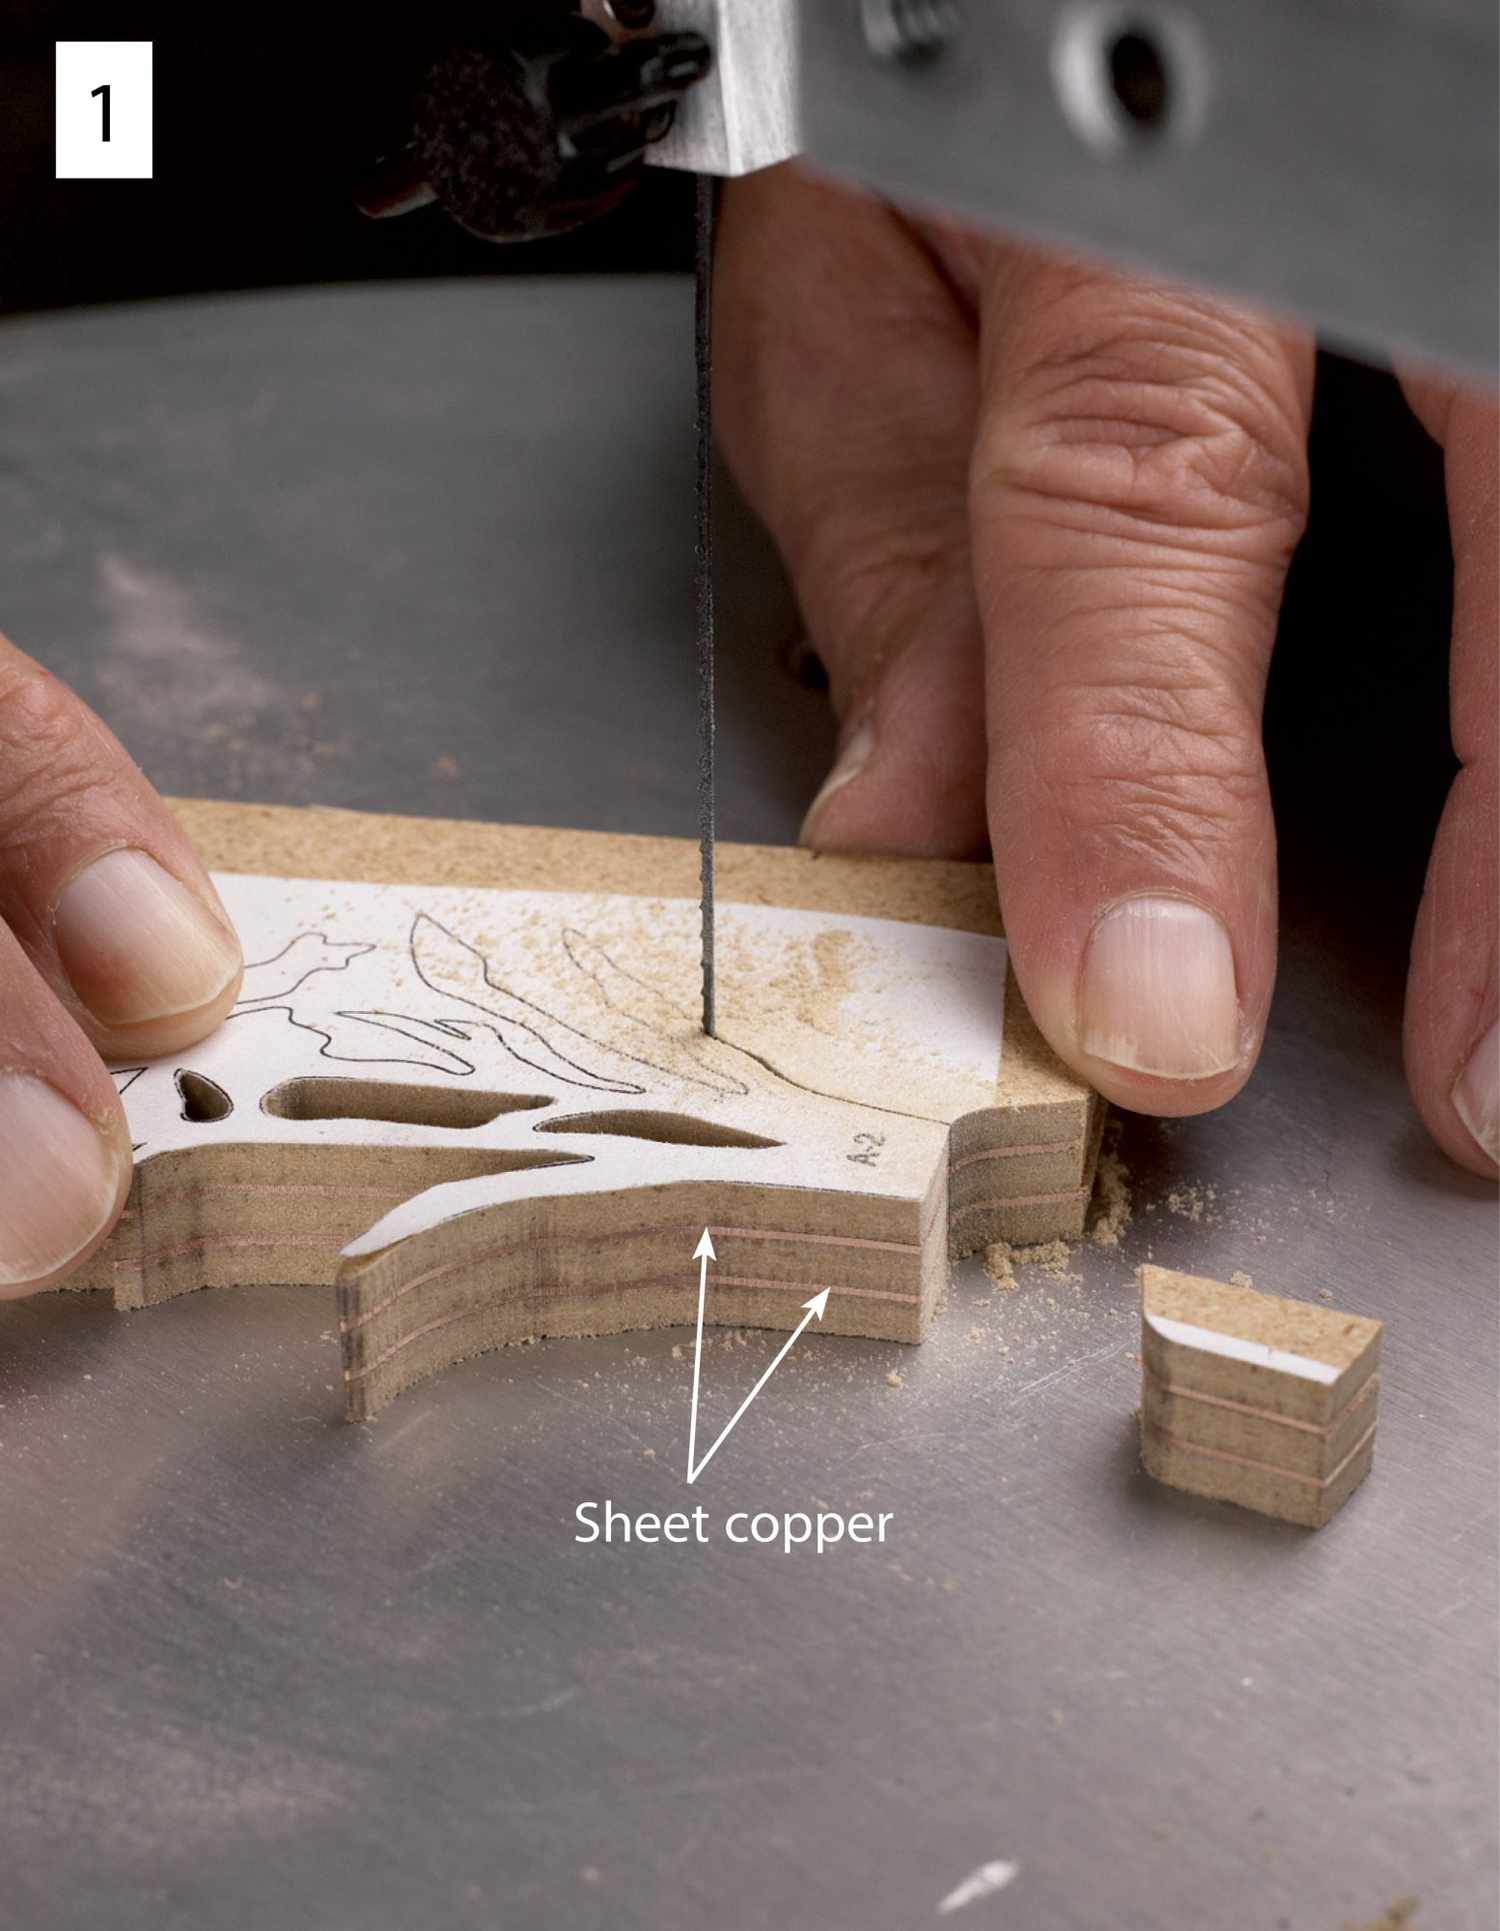
1 Rough-cut three pieces of 1/8" hardboard and two pieces of sheet copper to slightly larger than the paper pattern you wish to duplicate in copper. Using spray adhesive, make a sandwich blank, bonding together the five pieces, placing the copper where shown in the photo. Adhere the pattern to the sandwich top. Now, drill any needed blade start holes through the pattern for inside cuts, and scrollsaw the pattern to shape using a no. 2 blade (20 teeth per inch) at high speed.
Note: If you need only one motif, go with two pieces of hardboard and one piece of copper. For quality control, avoid scrollsawing more than two pieces of copper in this manner at the same time.
Sand the burrs
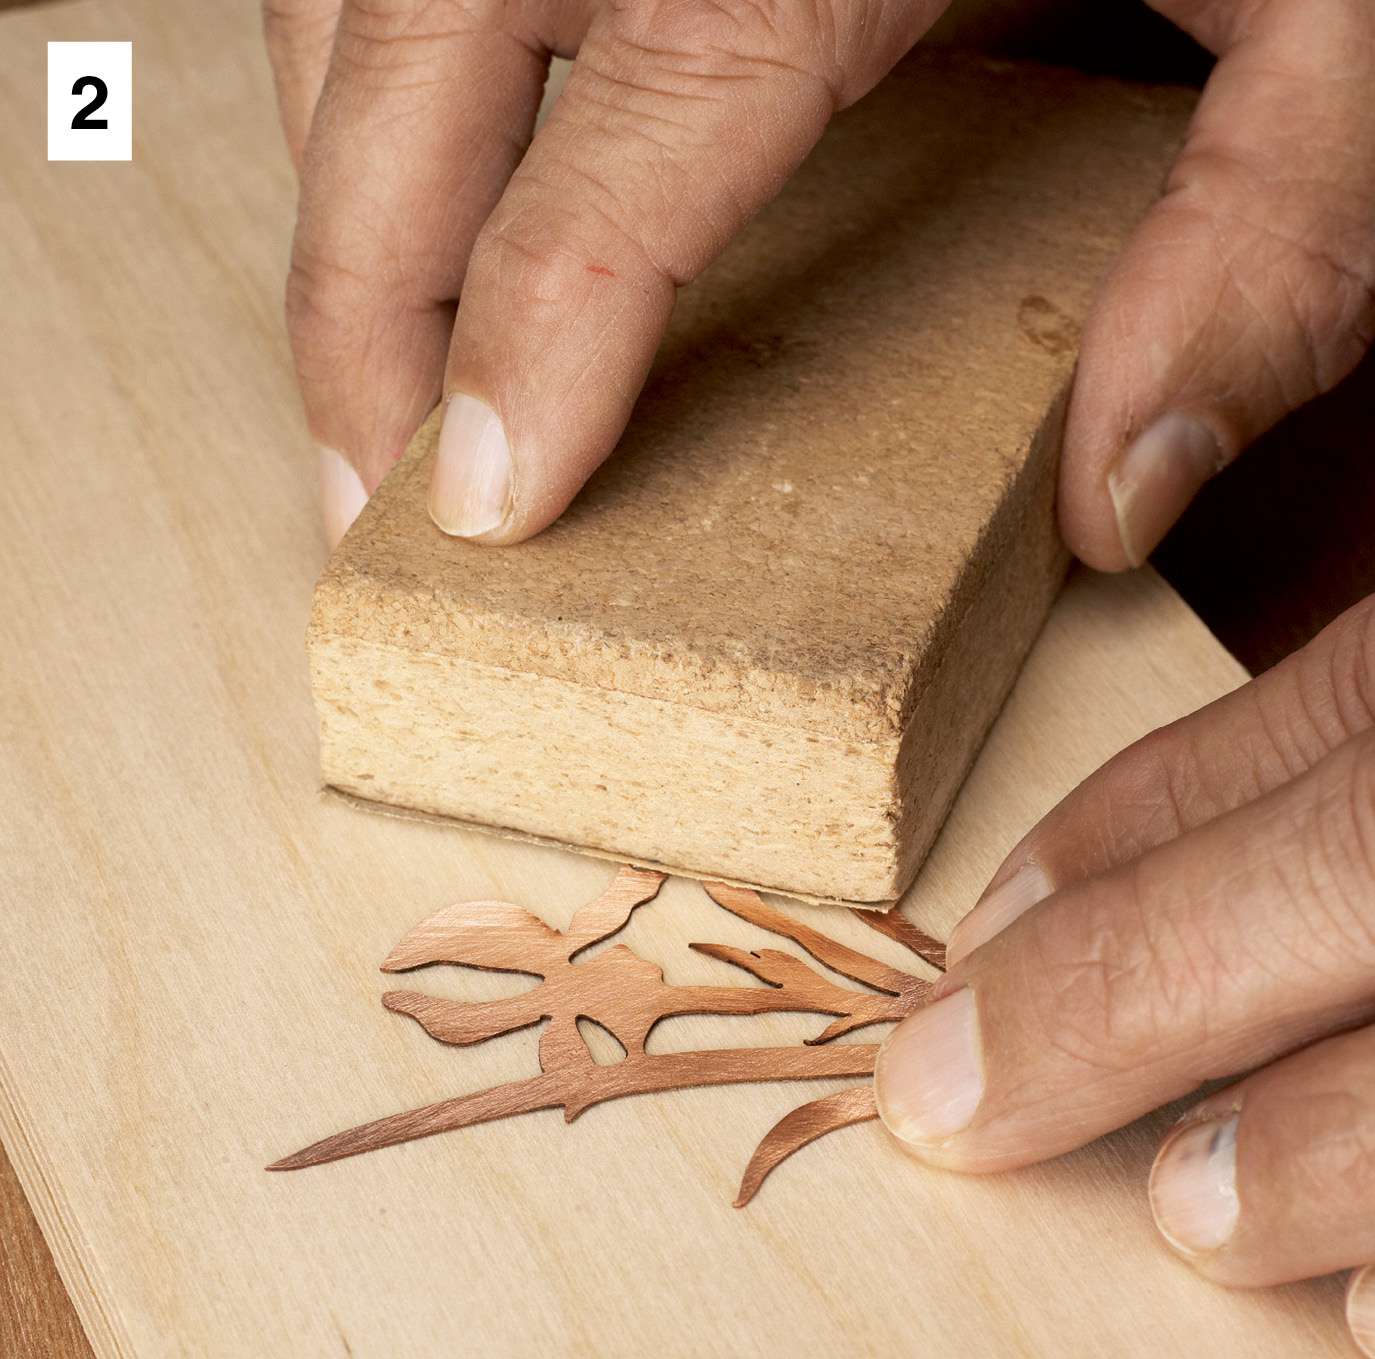
2 Carefully pry apart the scrollsawn sandwich, wipe off the adhesive from the copper motif with paint thinner, and rinse with water. Next, place the motif on a flat surface, and, with a sanding block and 220-grit sandpaper, sand the copper surface, removing any burrs along the edges of the piece.
Apply the heat
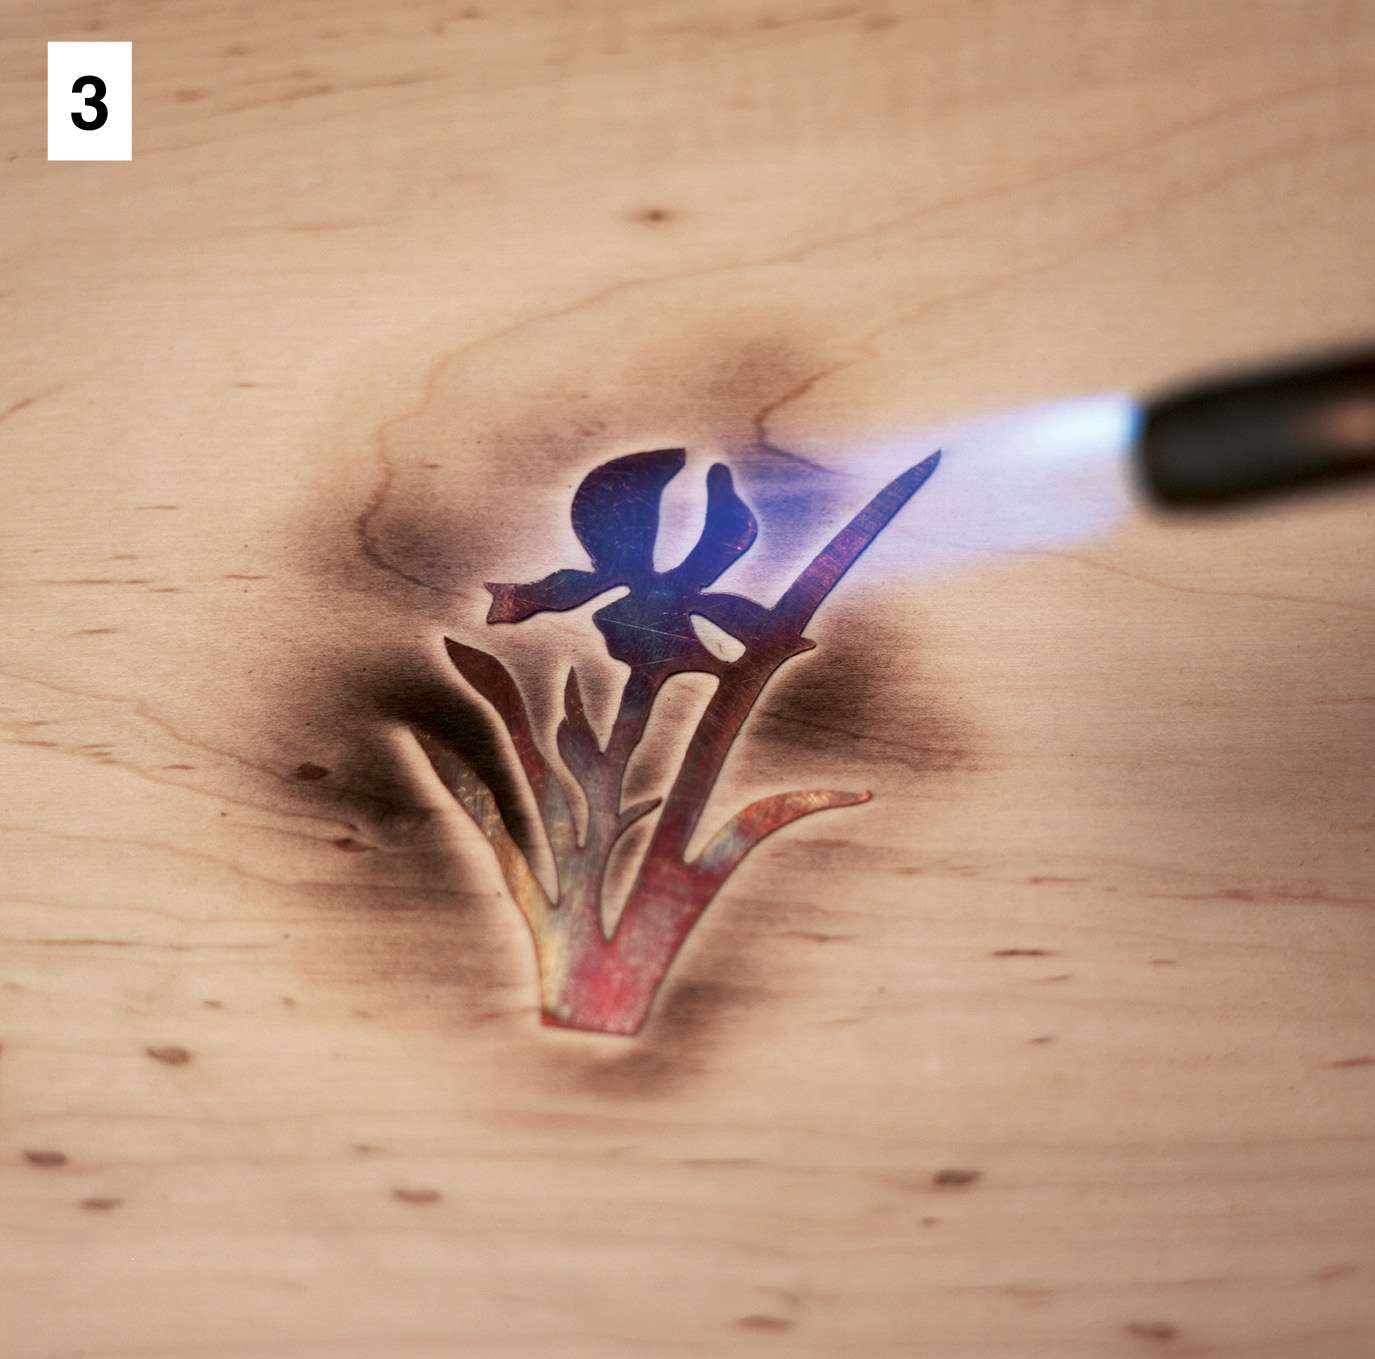
3 Place a piece of scrap copper on scrapwood. Using a propane torch on a low setting, apply heat to the copper, keeping the nozzle about three inches from the surface. Move the flame back and forth to avoid scorching. What you want is a pinkish orange coloration like that in the motifs above. Once you feel confident with the process, try flaming your motif, as seen above.