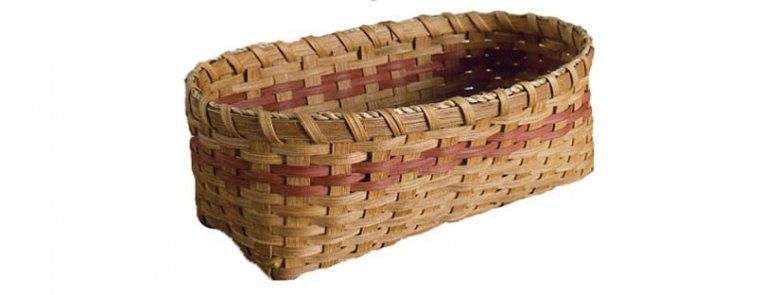
Basketmaking in 10 easy steps


Baskets, like furniture, often start out as trees. But instead of being made from boards, they're crafted from thin splints of ash, oak, and white cedar, or bark, roots, and stems of trees like birch, willow, and spruce. Of course, there are other materials, too, like reed, rattan, sisal, seagrass, bamboo, and jute. But unlike furniture, baskets require few tools, less precise measurement, and simple joinery. You don't even need a workshop. A tabletop serves quite nicely. Yet, just as with woodworking, making baskets provides relaxation and the satisfaction of creating a thing of beauty and utility.

Joe Melcher, a Des Moines, Iowa, retiree, took up basketmaking by chance several years ago while he was recovering from surgery. "My wife, Barbara, and I were spending some time at the lake in our travel trailer. I wasn't able to do much physically, and was getting bored," Joe recalls. "Then, our friend, Terri Brain-Summers, came for the weekend. She belongs to a basketmaking club in Kansas City. Of course, she brought some material along to make baskets. I got pretty interested watching her build one up, and gave it a try. I got hooked!"
Wanting to learn more, Joe took a few lessens from a local basketmaker. Now, he not only makes baskets—all kinds of them—to give away and sell, but occasionally teaches classes himself. "It's therapeutic, and rewarding, too," he says. "And I can work on them right in our living room."
We visited Joe one day to see what's involved in basketmaking. What we got was a lesson, with Barb as his motivated student. Here, you'll learn the basic steps to make a simple, straightsided bread basket, just as we did.

1. Laying out the spokes
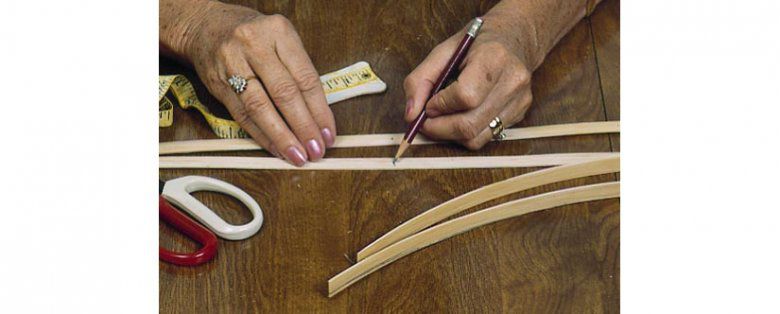
After cutting five 22"-long and eleven 17"-long spokes from 1⁄2 " flat reed, Barb marked their centers with a pencil line on the rough side. To find the rough side, soak the reed in water for a few minutes, then fold it over your finger. The rough side will have the most tiny "whiskers" sticking up and will become the inside of the basket.
2. Weaving the bottom

Barb has laid the eleven 17"-long spokes horizontally (to her left and right) on the table and aligned their center marks. Then, taking a 22"-long spoke, she plain-weaved it (worked it over and under) vertically (away from her) through the 11 spokes along their center line. She repeated the weaving with the four remaining long spokes, alternating on each side of the center spoke. A clothespin held the corner as she wove.
3. Preparing the twine

After truing the base to 4x101⁄2 " and squaring up the spokes so that the spaces between them were even, she prepared the round reed for twining. She had soaked the 6' length in water for a few minutes to soften it. (Basketmakers always keep water and a towel handy.)
Next, Barb crimped the reed with a needlenose pliers at the center of its length and folded it in half. Crimping prevents the reed from cracking when it's folded.
4. Twining the base


Barb began the twining that holds the base in shape by laying the folded edge of the round reed around one of the spokes on the long side of the base next to the woven bottom. (See the drawings, above.) She then brought the part of the reed (now called a weaver) that was below the spoke to a position above the next spoke, keeping it tight against the weaving. Next, Barb picked up the weaver below the first spoke and wove it under the next spoke. She repeated this over-under weaving all around the base. To end the twine weave, Barb nipped off the ends of each weaver, leaving just enough material to cross a spoke and tuck into the weave.
5. Bending up the spokes
When the twining of the base was complete, it was time to bring up the basket sides. Barb soaked the woven base, twining, and spokes for several minutes in the ever-present water. To bring up the dampened spokes for the sides, Barb bent them toward the center of the basket. To avoid cracking the spokes, she gently rolled each against a pencil on their rough side (the inside). Clothespins helped hold the spokes in approximate position until they dried. When dry, they retained their positions.
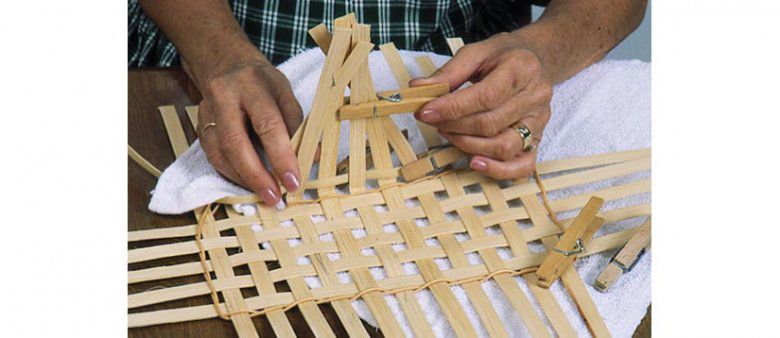
6. Weaving the sides

Because each row of weaving consists of one long weaver, Barb cut fifteen 36" long weavers from
1⁄4 "-wide flat reed to do the sides, then placed them in a basin of water. (Damp reed makes the weaving easier.) For accent, she had previously soaked three of them in water mixed with red fabric dye.
Taking one of the weavers from the basin, Barb began her weaving four spokes in from the corner on a long side. (Every row of weaving from thereon began on the opposite side of the basket from the previous one.) With the weaver smooth side out, she wove over-and-under around the basket, keeping the spokes as upright as possible and tight to the twining. At the end of the first row, as with the others, she overlapped the weaver by four spokes, cut it off, then tucked it behind a spoke, as shown in the "Hiding the weaver" drawing, below. (This burying of the weavers as she worked up the sides produces a more finished-looking basket.) Note that for rows 9-11, Barb used the dyed weavers. Clothespins again helped keep the weavers in place as she progressed with the sides.

7. Trimming the spokes

Finally, Barb's 15 rows of weaving completed the basket for rimming. But first she went around the basket, pushing the rows snugly against each other. (As the weavers dried, they shrank a bit in width, loosening the weave.)
With scissors, Barb cut off the spokes that projected up from the inside of the weaving (which is every other one) even with the last weaver. The remaining spokes received a different treatment.
8. Adding the rims

Barb dampened the remaining upright spokes—those on the outside of the basket—then one by one bent them down on the inside. With scissors, she trimmed each one just long enough to reach and tuck into the the three colored rows of weavers, as shown in the "Tucking in the spokes" drawing below.

To rim the basket, Barb cut two lengths of 1⁄2 "-wide flat reed (same as used for the spokes) to 36". One was for the outer rim, the other for the inner. She also trimmed some #2 seagrass to the same length as the flat reed.
With the help of ever-present clothespins, Barb fitted the outer and inner rims to the basket, overlapping each a few inches before trimming. This effectively sandwiched the top two rows of weaving. Atop the rims, she next laid down the seagrass through the makeshift clamps, butting the ends rather than overlapping them. The seagrass effectively dressed up the sandwich below it.
9. Lashing down the rim

For the lashing that holds the rim and seagrass in place, Barb cut a length of 1⁄4 "-wide flat reed about 90" long and placed it in water to soak for three minutes. But because of the lashing's length and her relative inexperience in attaching rims, she called on Joe for assistance.
To begin, Joe showed her how to tuck 2" of reed up between the rims from inside the basket, rough side facing in. Then he taught her to bring the long end of the reed over the rim and insert it between two spokes at the base of the rim. Slowly, carefully, she pulled the long length through the spokes, then repeated the move. Patiently, Joe helped Barb complete the lashing (knot-tiers call it whip lashing), pulling the reed tight as she fed it over and under the rim with equal spacing.
At Joe's quiet direction, Barb skillfully completed the lashing by taking the end of the reed and inserting it into the colored rows at exactly the place where the lashing had begun. A snip with the scissors trimmed the lashing reed so that the start/end "joint" was almost invisible.
10. Staining the basket
To stain baskets, Joe advocates instant tea because of its natural look. Materials either can be dipped in the hot-tea solution for a few minutes before weaving or the finished basket can be soaked. "Either way, be sure the reed is absolutely dry," Joe cautions. "Otherwise, the wet reed won't soak up enough color, or it won't take the color evenly."
If he dyes the finished basket, Joe again pushes the weaving tighter. When it has dried, he either leaves it unfinished or sprays on a coat of semi-gloss lacquer.
Simple tools, common materials make a basket

In making his baskets, Joe uses only a pencil, tape measure, scissors, clothespins for clamps, needlenose pliers for crimping, and an awl to help tuck away ends. For materials, he buys readily available 1⁄4 " flat reed (1-pound coil, about 370') and 1⁄2 " flat reed (1-pound coil, about 185'), #2 round reed (1-pound coil, about 900'), and #2 seagrass (1-pound coil, approximately 300').
A plastic basin filled with warm water keeps the materials pliable. For staining the materials dark tan, Joe relies on a strong solution of instant tea (one part tea to one part hot water). For color, he uses RIT fabric dye.
For basketmaking materials, Google "craft supplies".