Blank-Saving Bowl Coring

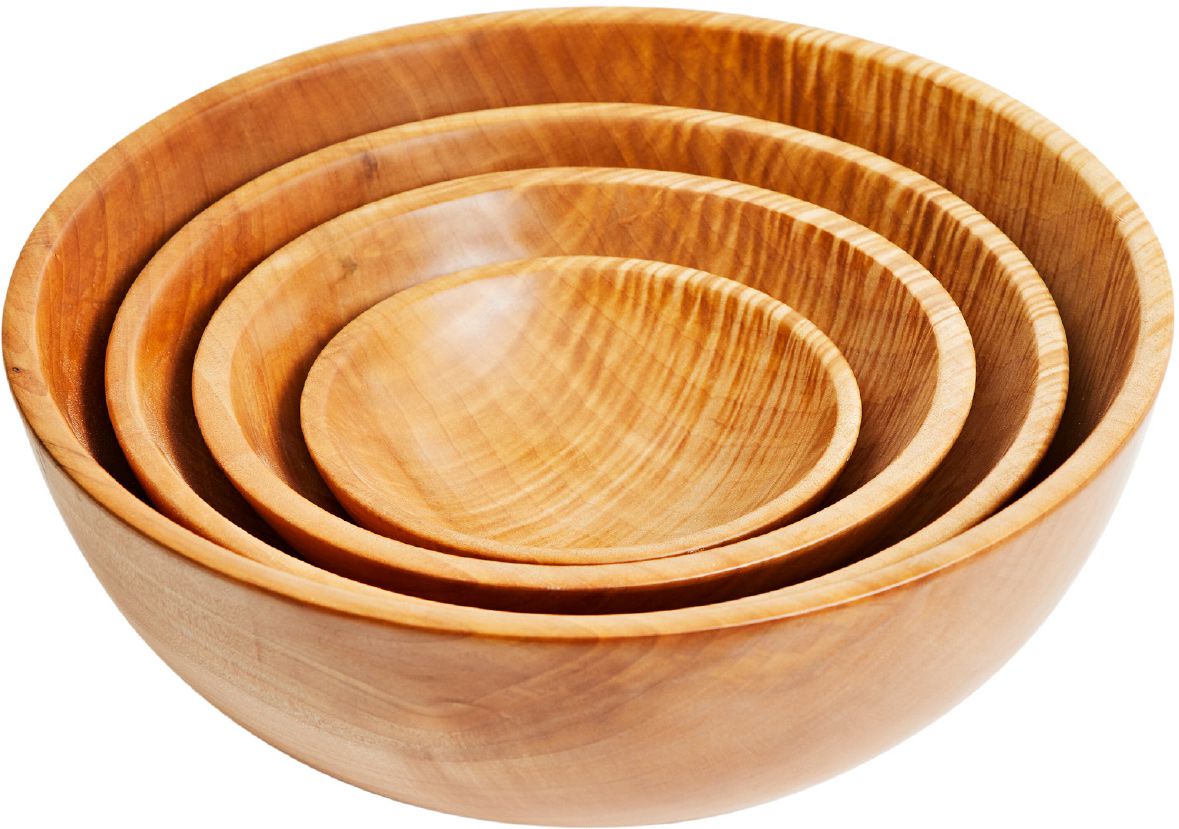
Typical bowl hollowing reduces a huge portion of your turning blank to shavings—not a big deal when you rescued your blank from the firewood pile. But when you run across a rare, highly figured chunk of wood, such waste borders on criminal. Coring rescues that material by producing nesting bowl sets—a plus no matter what kind of wood you turn.

Coring requires specialty equipment (see Oneway System Cuts to the Core, below) that makes deep cuts into the wood. So, core the bowls from a green blank, then turn them to their final shape later—a process known as "twice turning."
Twice turning: Rough-turning a green bowl and letting it dry before turning the dry bowl to its final shape. The technique reduces the development of drying cracks.
Round Down to Get Started
The coring knives cut circular arcs, meaning the radius of the rough-turned bowl equals one-half of the diameter. So, selecting a blank with a depth equal to one-half its diameter provides sufficient material for the next operations. Here, we used a 15"-diameter blank with a depth of 7-1/2".
First, refine the shape of the blank, above. Turn the blank around, and mount it in a four-jaw chuck. Then flatten the blank face. The 5/8" tenon and face flattening reduce blank depth enough to allow proper positioning of the coring-knife post later. We'll make two coring cuts, one each with the 9" and the 11-1/2" coring knives, to yield three bowls.
Mark the blank for coring
When coring, you'll initially cut the bowls with extra-thick walls. This allows the bowls to shrink and warp when drying while leaving plenty of material to turn back to round or customize the bowl shape as you thin the walls during final turning.
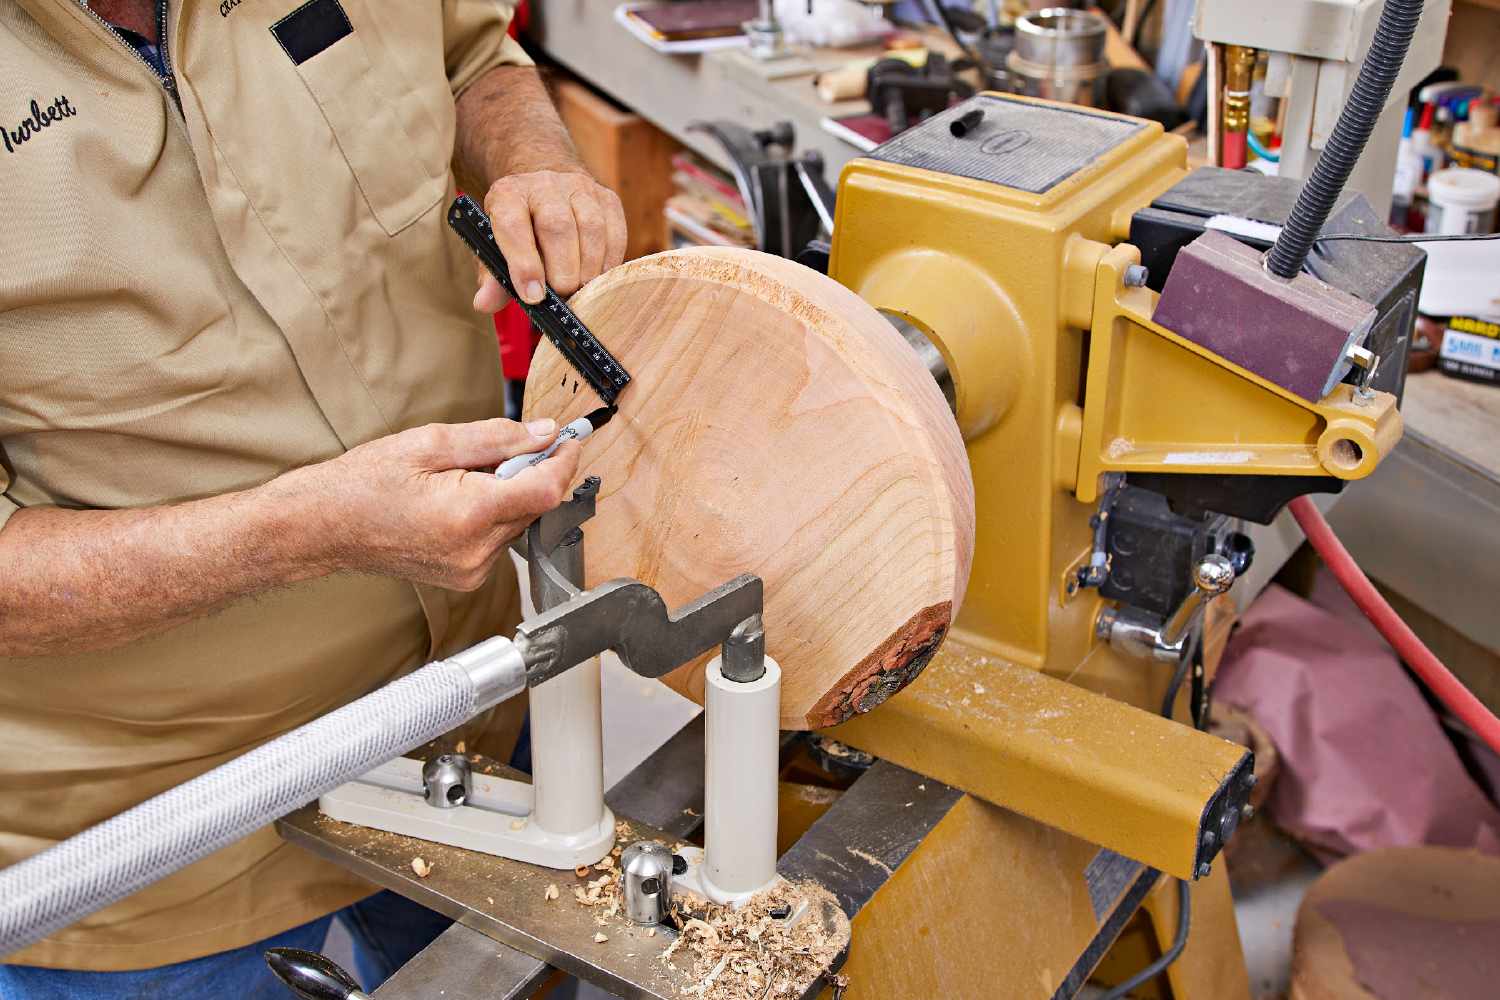
Making the wall thickness about 10% of the bowl's diameter works well. We used a 15" bowl blank, so the wall of the largest bowl equals 10% of 15", or 1-1/2". Mark the wall locations on the face of the blank, above.
Measure the diameter of the inner circle, calculate 10% of this dimension, and mark the second diameter and cutter kerf.
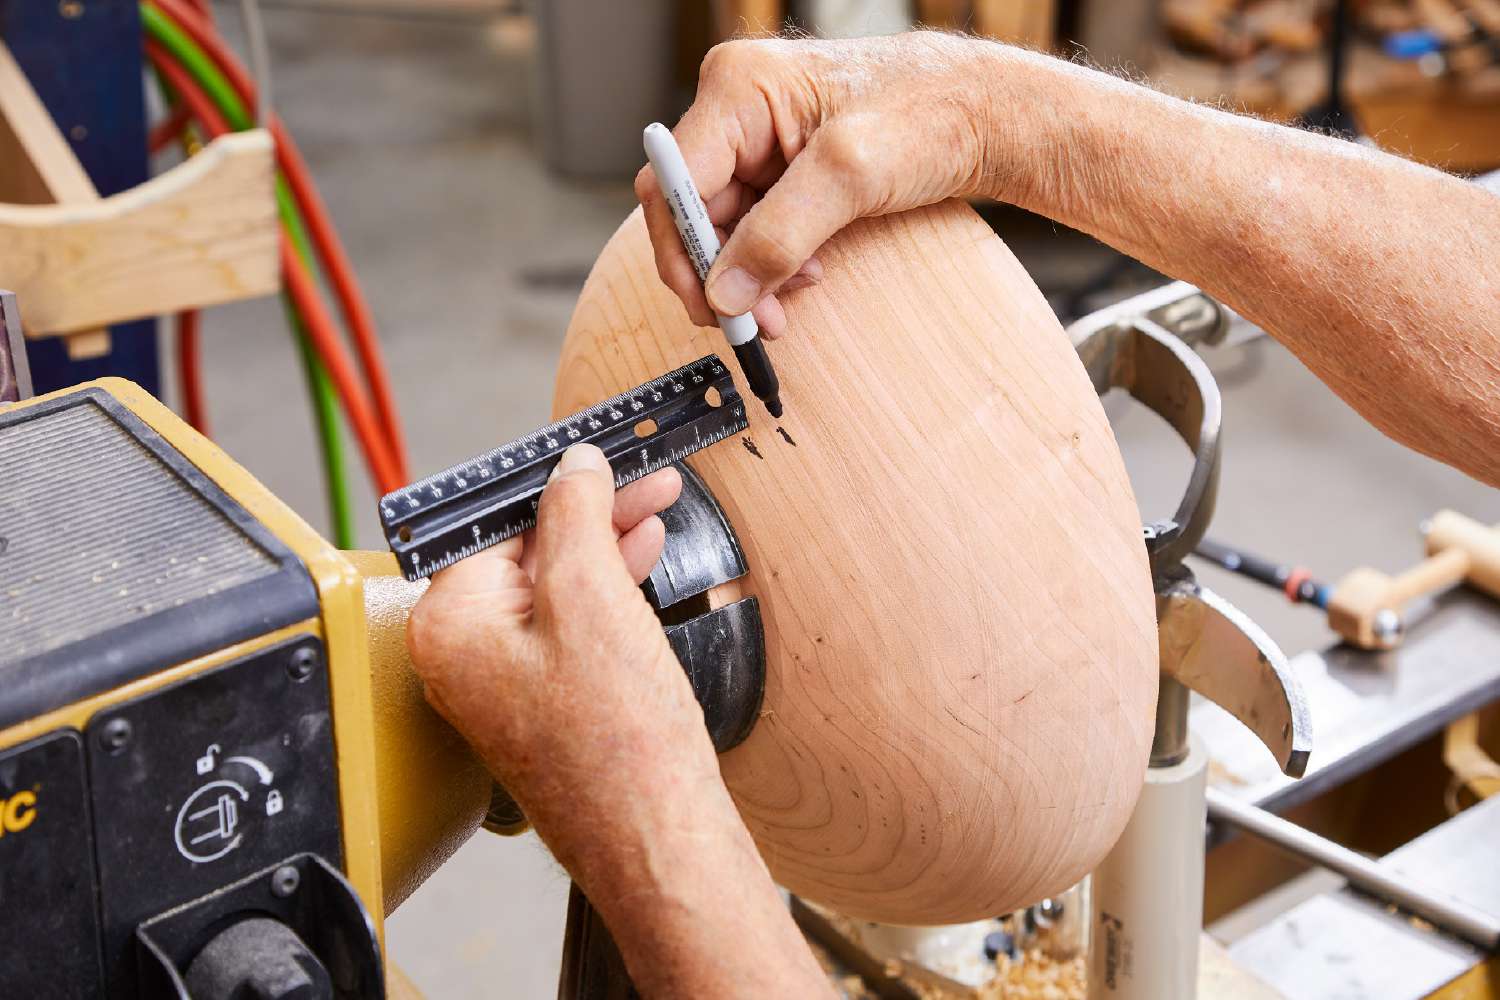
Now mark the depth of each bowl using the same measurements and marks as you used on the face. You'll use these marks to figure out where to position the post for the coring knife. Start with the largest (outside) bowl and mark its thickness (1-1/2" in our case) along with the kerf, above. Then mark the thickness of the second bowl along with its kerf.
Set up the system
Position the banjo and tool rest out of the way, removing them from the lathe if necessary, and place the coring base unit on the lathe ways.
Install the smallest coring knife and matching support finger in their respective base-unit posts, pivoting the support finger off to the side. Adjust the height of the knife in its post so the cutter sits 1/16" above the centerline of the blank. Position and raise the support finger so its shaft centers under and firmly supports the knife, and tighten its locking nut.
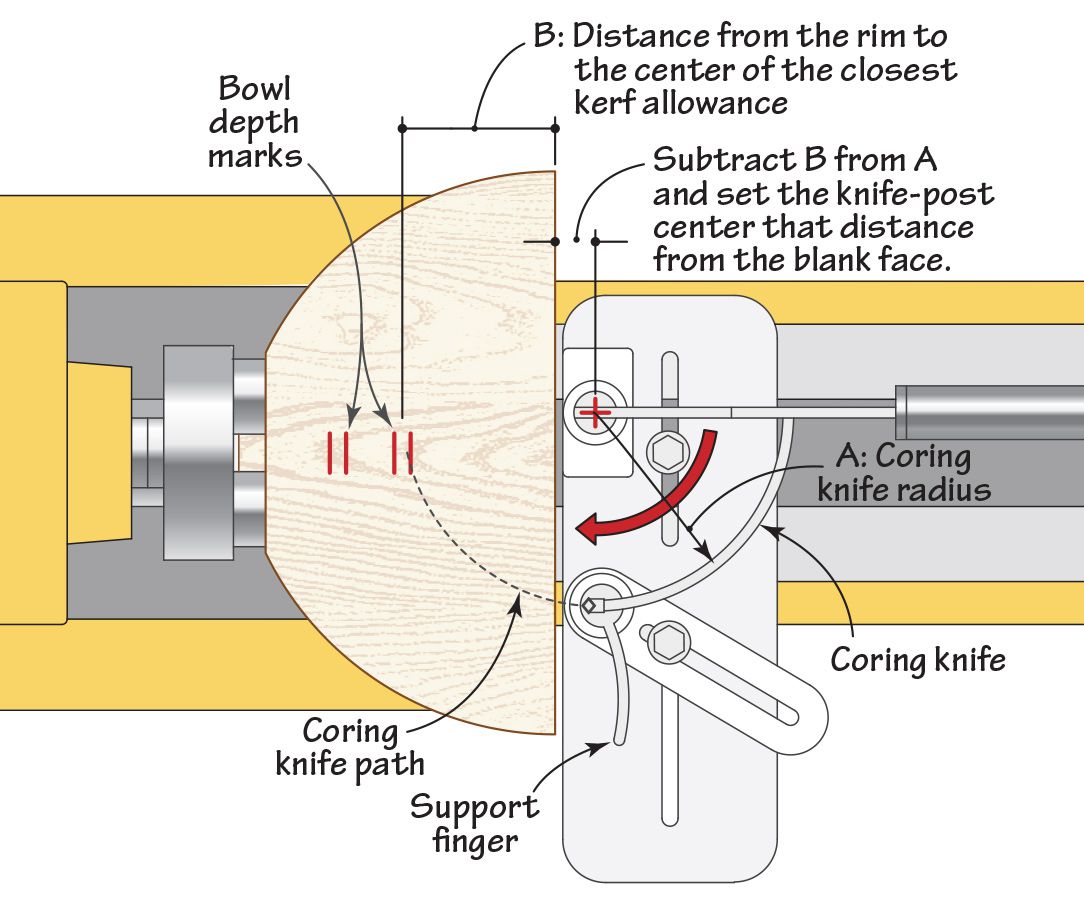
Determine the distance between the center of the knife post and the face of the blank, above. Hold the coring knife cutter against the face of the blank centered in the kerf allowance marks for the smallest bowl. Slide and rotate the base unit until the center-of-knife-post to face-of-blank distance matches the distance determined. Tighten the base-unit locking nut.
Start Coring
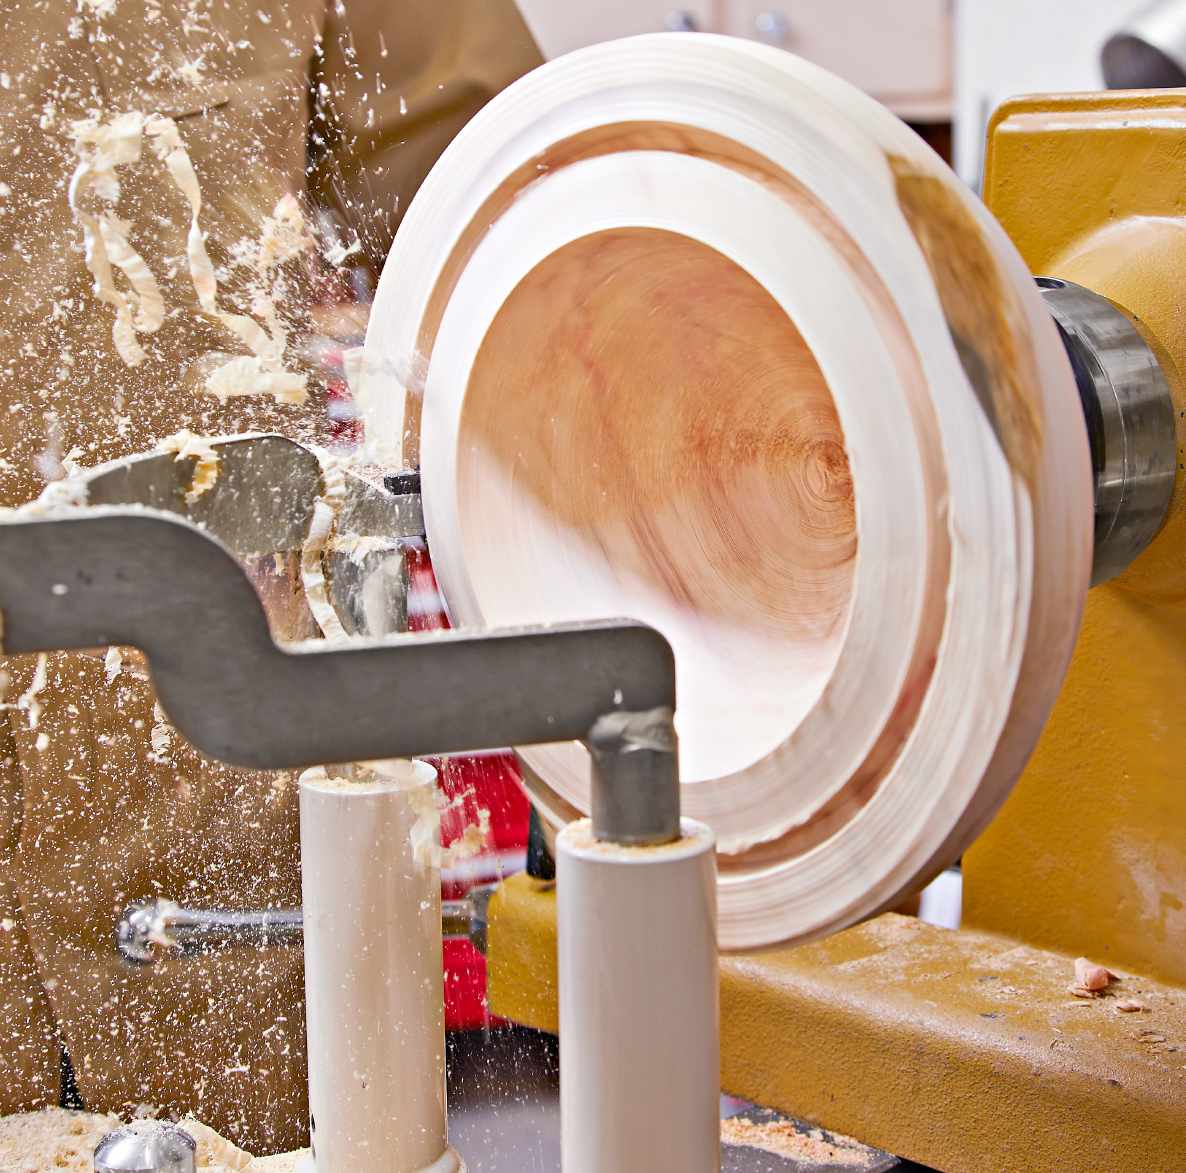
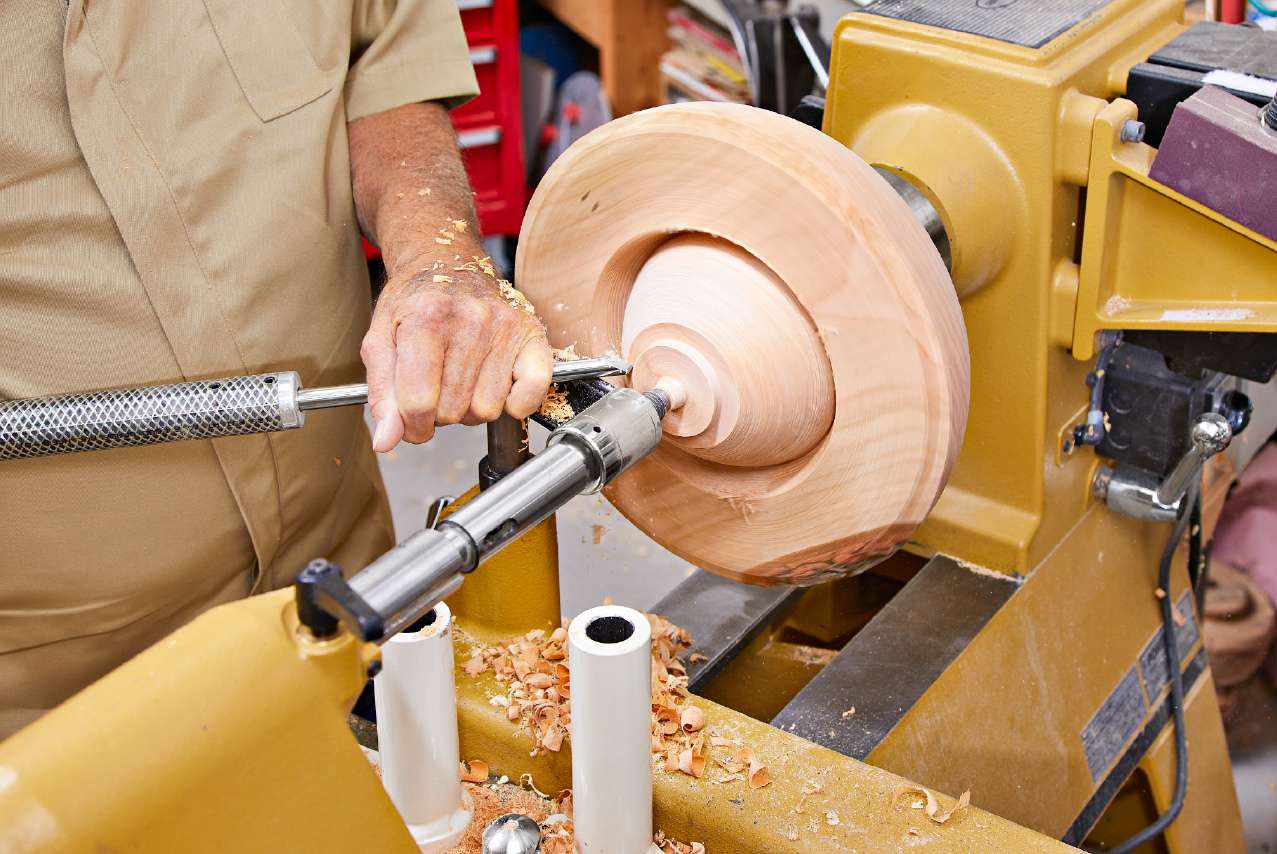
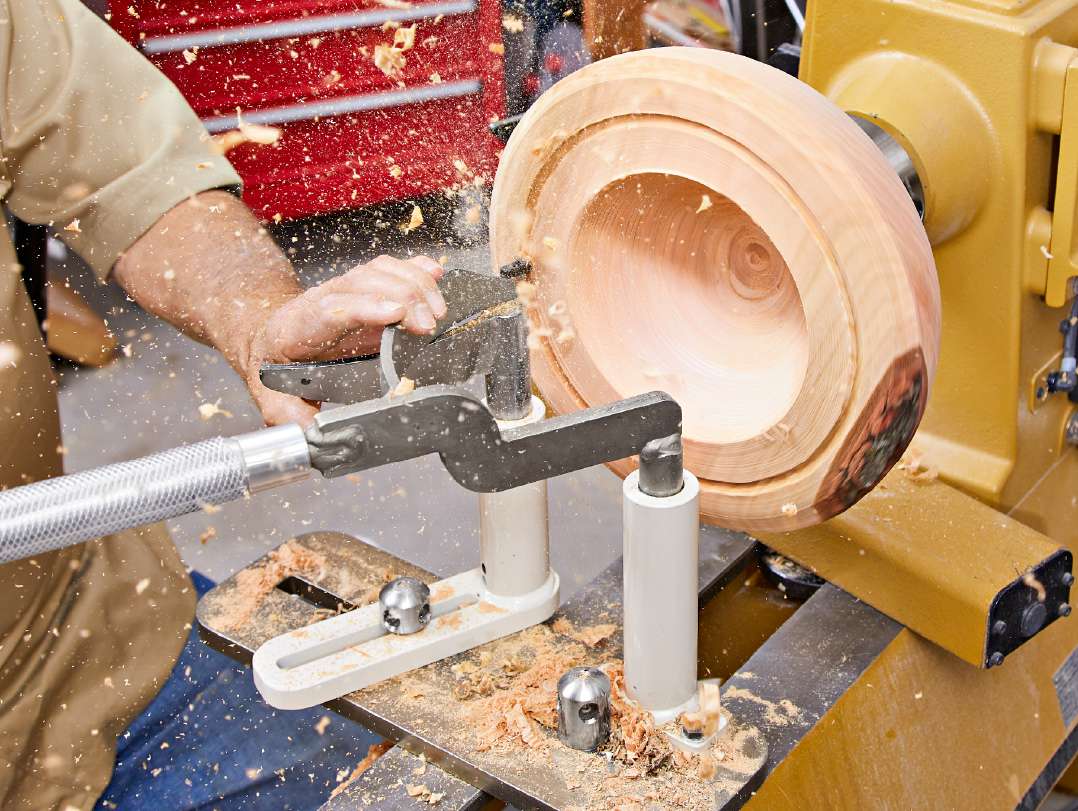
Running the lathe at 500 rpm, slowly pivot the coring knife into the blank. Coring requires only light feed pressure. Any need for excessive pressure means the cutter needs sharpening or replacement, or a chip embedded on the cutter needs to be cleared. As the cut deepens, regularly back out the knife to clear chips. Periodic backing out also keeps the kerf open, because the blank may distort due to releasing internal stress.
Note: For large bowl blanks, dampen vibration by engaging the tailstock center. When starting the cut, the coring knife will be in the way, but as the knife pivots into the blank you'll be able to engage the tailstock center.
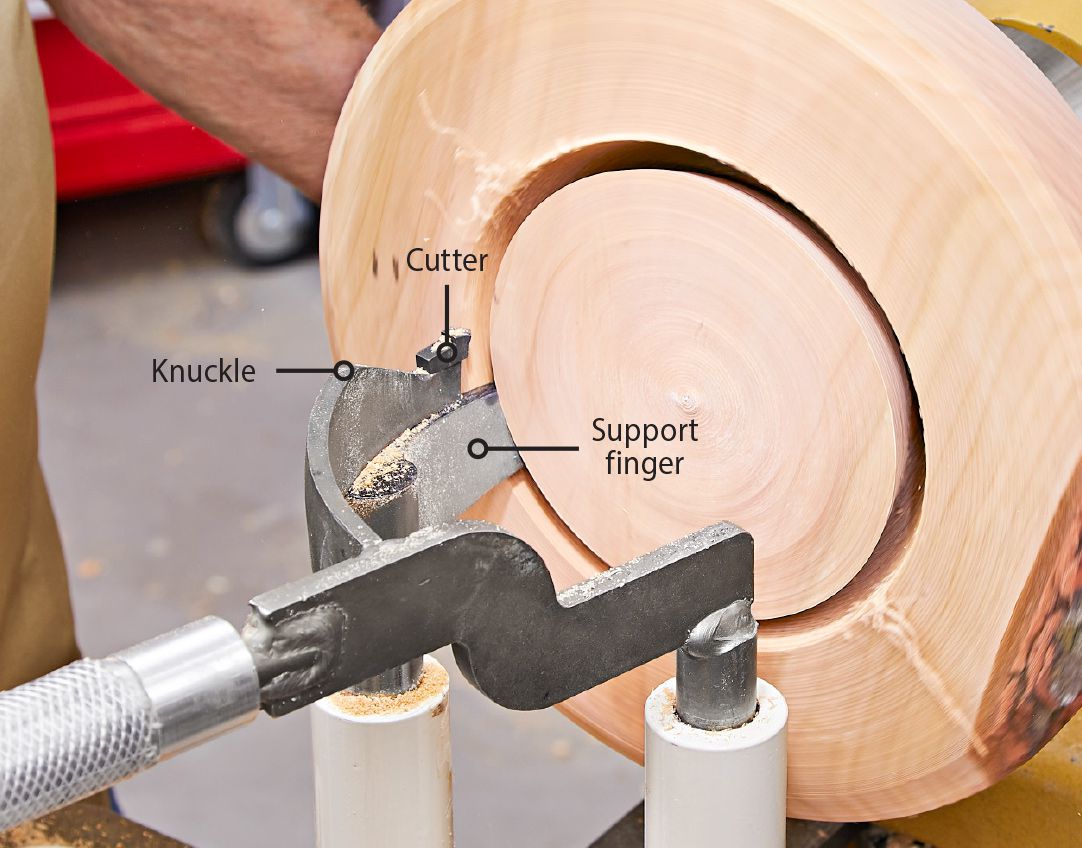
When the knuckle of the knife reaches the blank face, it's time to stop and engage the support finger, above. Make sure the blank rotates freely and resume coring. As the cut progresses, periodically stop and adjust the support finger deeper into the cut.
As the knife pivots into the blank and the handle approaches a position parallel to the blank face, a slight flutter indicates you are close to the end of the cut. You have two choices: Continue cutting and completely part the bowl from the blank, or stop cutting, turn off the lathe, and break the bowl free with your hand.
Tenon the Core
Remove the coring knife and support finger from their posts. Loosen the base-unit locking bolt and slide the unit out of the way. Form a tenon on the bottom of the bowl, above and set this first bowl aside.
Move on to number two
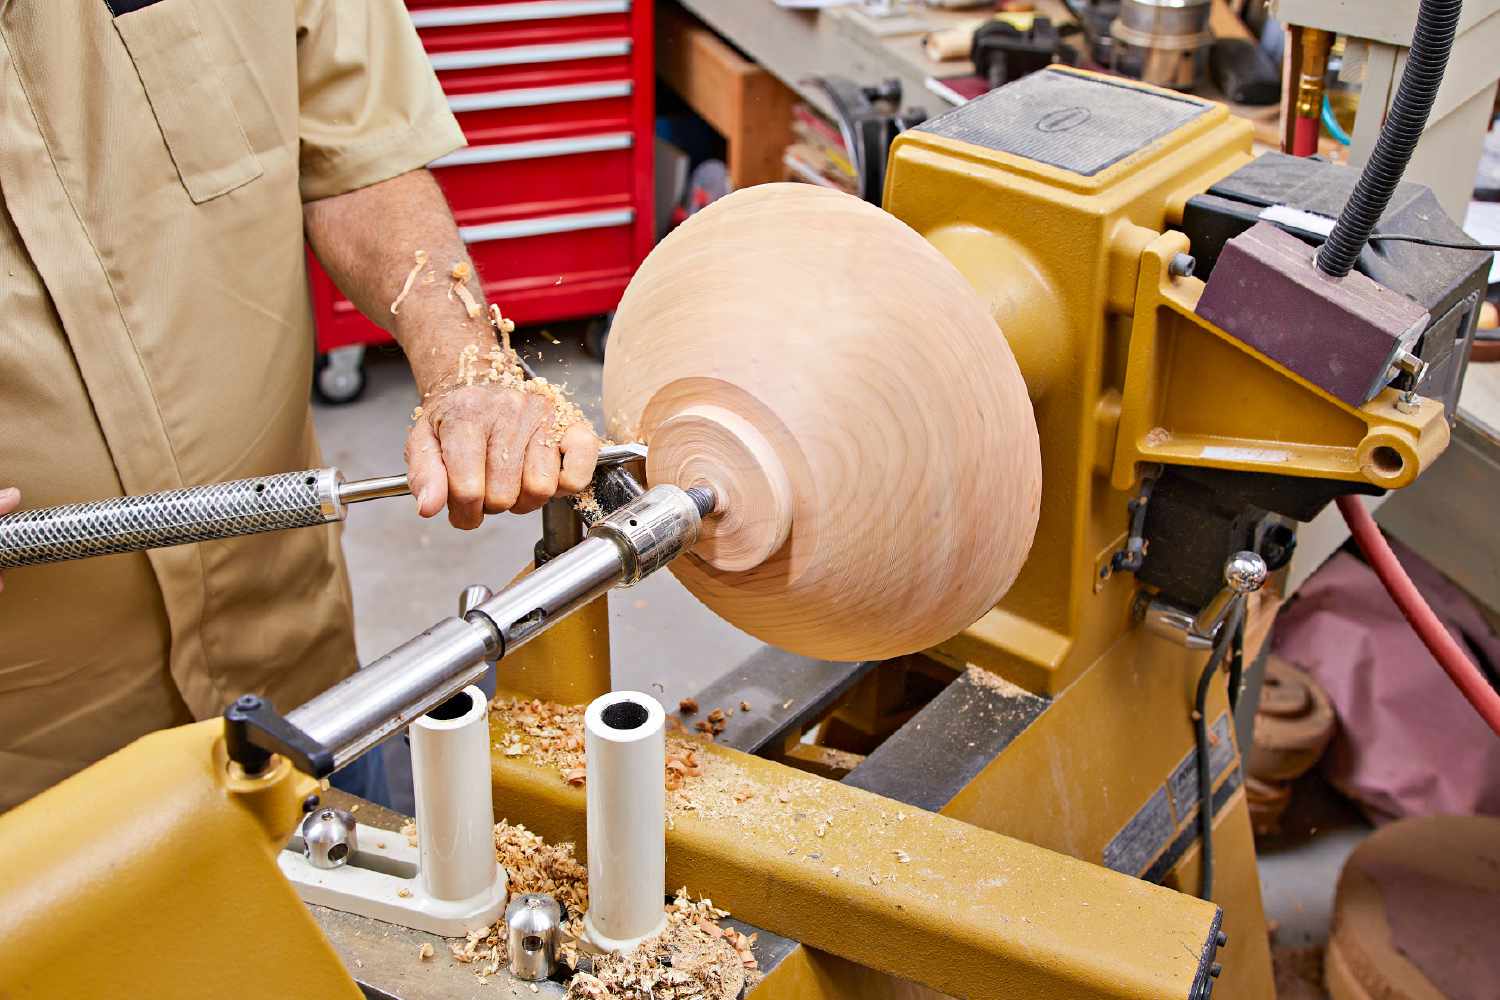
Stow the tool rest and banjo and reposition the base unit. Install the next-larger coring knife and support finger set (the 11-1/2" knife in our case). Use the markings on the blank, just as you did for the first bowl, to position the coring knife and support finger posts. Remove the handle from the first knife and mount it on the second. Core the second bowl, above and form its tenon.
With coring complete, remove the coring system from the lathe. Position the banjo and tool rest, clean up the inside of the largest bowl as needed, and remove it from the lathe. Repeat with the other two bowls, hollowing the smallest bowl to a wall thickness equal to 10% of its diameter.
Rough-turned green bowls must dry before final turning. Air-drying takes one year per inch of wall thickness. To prevent splitting, some turners coat the entire bowl with Anchorseal while others seal them inside brown-paper bags. Either way, they should be stored in a cool, dry place.
Now you'll have to wait to finish-turn the bowls, but coring is so much fun, let's sweep up the shavings and look for another blank.
Oneway system cuts to the core
The few bowl-coring systems on the market differ slightly, but all operate on the same principle: A supported curved knife plunges into a blank to simultaneously form the interior and exterior of adjacent bowls.
To turn these bowls, we used the Easy-Core System from Oneway (oneway.ca), shown below. It's easy to master and provides excellent results.
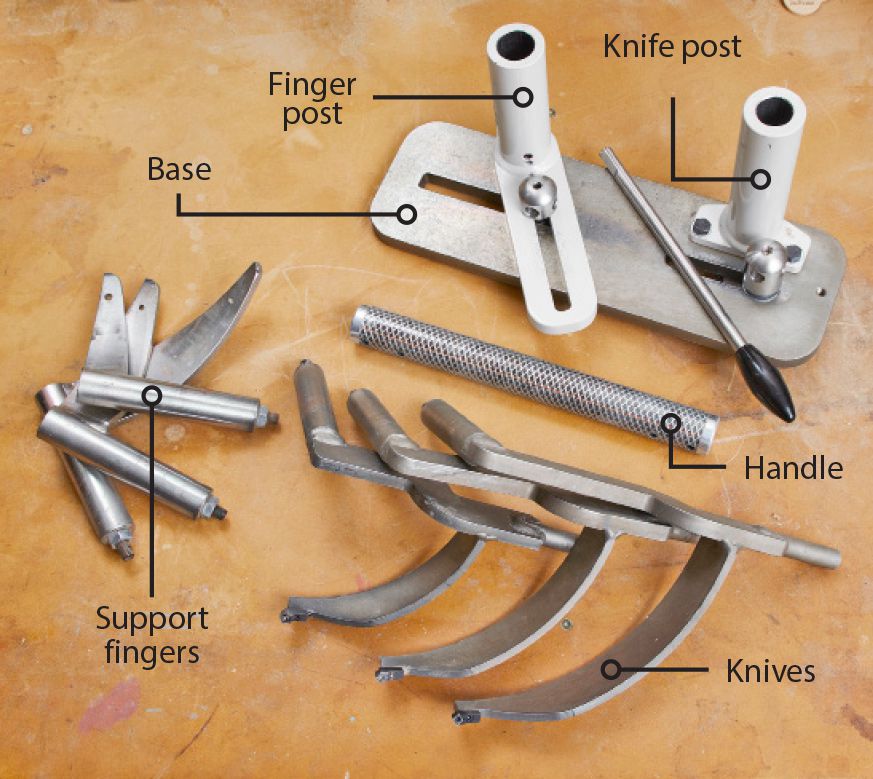
The standard system consists of a knife handle and a base with two posts that hold the knives and support fingers. Four base sizes fit lathes with different swing capacities. You choose the one that fits your lathe's capacity.
Interchangeable knives are sold separately and come in four sizes (9", 1-11/2", 13-1/2", 16-1/4") representing the approximate bowl diameter each creates. Each knife comes with an accompanying support finger. Making bowls of three sizes from our blank required two different knives. The knives come with high-speed steel cutters, and Oneway offers carbide versions. We used aftermarket Korpro cutters made by huntertoolsystems.com that are reversible and stay sharp longer.
Though the Easy-Core system requires a sizeable investment, it yields multiple bowls with little waste from rare and expensive blanks. The system requires blanks with fairly flat faces, so it won't accommodate natural-edge blanks with large undulations.