Block Plane Basics
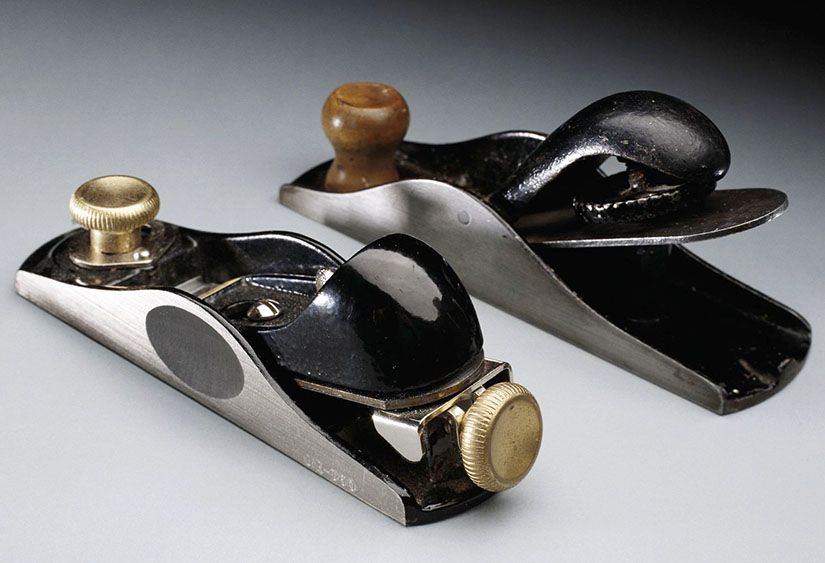

A sharp, properly adjusted hand plane allows a woodworker to peel a whisper-thin shaving from wood while leaving a surface of unsurpassed quality. That's why these venerable tools—planes go back to Roman times—still fit into today's shop. And, among hand planes, the block plane ranks near the top for versatility and convenience.
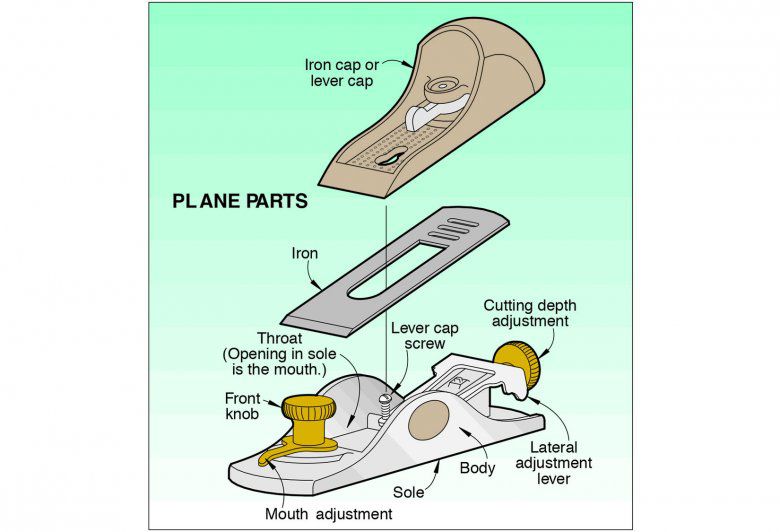
Using a block plane feels almost natural--and very craftsmanlike. You hold it in one hand, as shown photo below, with the rounded top of the iron cap (see the Plane Parts illustration, below) in your palm. When you push the plane forward, you also press the sole down against the wood.

A block plane handles many tasks, including some that would be difficult or unsafe to perform with power tools. With one, you can:
- Erase mill marks. Rely on the block plane to wipe out the wavy machine-milling marks on lumberyard stock, leaving it satin-smooth. After sawing out your parts, eliminate saw marks with a few passes of the block plane.
- Square up small stock. Grab the block plane to true a piece too small to run safely over your jointer. Clamp the plane upside down in your vise, and you can plane parts barely large enough to grasp, as shown below.


- Bevel an edge. Turn to the block plane to bevel or chamfer edges, especially on short or narrow pieces. Just draw guidelines, as shown below, and plane to them. For best results, make several passes, angling the plane across the edge. Planing bevels or chamfers by hand often is almost as fast as machining them, considering setup time. And it's always quieter than routing them.

- Plane to a line. When sawing a tapered part, many woodworkers like to cut slightly outside the layout line, then sand down to it. But, shaving down to the line with a block plane results in a nicer surface and a truer edge.
- Fit doors and other parts. You've built a small cabinet and hung the door. But it binds a bit. Instead of taking the door off to rework it, just mark the high spot and shave it off with your block plane. When any project part would fit better if it was just a smidgen narrower or shorter, the block plane can save the day.
- Sharpen your shop pencil. WOOD® magazine's master craftsman, Chuck Hedlund, even sharpens flat carpenter's pencils with a block plane. "It's quicker, easier, and neater than using a knife," he reports. Just be sure to brush off the graphite before planing light-colored wood.
The block plane owes its handy size in part to the shallow angle between the blade—or iron—and the sole. This bedding angle is usually in the neighborhood of 20° for block planes. In a bench plane, it's normally about 45°.
Even so, a block plane's cutting edge meets the wood at about the same angle as a bench plane's. (See the Cutting Edges Comparison illustration below.) That's because the bevel on the block plane's iron faces up. (For a block plane, the angle of the cutting edge to the work equals the bedding angle plus the iron's bevel angle.)

You'll also find block planes with a bedding angle of about 12°. These low-angle planes slice through wood more easily, but may cause tear-out along the grain. Some woodworkers prefer low-angle block planes for end-grain work.
Tuning benefits any plane, old or new. On a block plane, you should check two main points—sole flatness and iron bedding.
Check the sole with a sheet of 180-grit wet-or-dry sandpaper laid abrasive side up on a flat surface. (A cast-iron saw table or piece of glass would do.) Retract the iron, and rub the plane sole over the abrasive. Scuff marks indicate high spots on the sole.
To flatten the sole, wet the sandpaper, then continue rubbing the plane sole over it. When the sole shows a uniform scuff pattern, it's flat. Polish it, following the same procedure with progressively finer sandpaper grits.
To check the bedding, extend the iron. Then, inspect the back of the mouth to determine how solidly it supports the iron. If gaps appear between the back of the iron and the back of the mouth, or if the iron rocks in the throat, remove the iron and carefully file down the high spots in the plane. Check the cap for full contact, too. Solid bedding helps prevent chatter.
Sharpen the iron to a 25-30° bevel. Position it in the plane's body, bevel up, engaging the appropriate notch over the tang on the adjuster, when applicable. Center the iron in the throat, and install the iron cap.
Extend the cutting edge slightly past the sole. (Determining the proper amount of protrusion takes some trial and error; the thickness of a business card is a good starting point.) Square the end with the mouth, and then tighten the iron cap.
Some block planes feature an adjustable mouth. To regulate the length of the mouth opening, turn the front knob to loosen the sliding part, and move the eccentric lever. Generally, a smaller opening suits finer work.
llustrations: Roxanne LeMoine; Lorna Johnson Photographs: Wm. Hopkins; Hetherington Photography Written by: Larry Johnston