CNC Routers Can Do All THAT?


Whether you currently use a CNC router or are just curious to see what the hype is all about, get ready to see some of the amazing capabilities a CNC can bring to your shop. This article provides recipes for success in making cuts in polycarbonate, brass, foam, cardboard and yes, wood. The "ingredients" for each operation include the material being machined, the cutters used, feed speed, depth of cut (DOC), and other variables.
You gotta obey the speed limits
Watch a free video demonstrating each of the projects shown.
For best results running a CNC, you must control the feed rate and rpm of the router. You do this all the time with handheld routers, probably without thinking about it. Handheld routers constantly provide tactile feedback and you respond by changing feed rate, reducing the depth of cut, changing the rpm, or all of the above. A CNC router can't respond like a human, so you need to tell the machine what to do. Otherwise, it will quickly dull or break bits, and produce poor-quality cuts. Check the machine's owner's manual to learn how to set rpm and feed rate.
This article serves as a starting point rather than a comprehensive feed and speed guide. If you use different router bits or materials (such as aluminum instead of brass), you'll need to experiment, and possibly change the listed parameters. Some CNC routers yield good cut quality at faster feeds; others require slower feed rates. Good cut quality and router bit longevity depend on chip load—the size of the chip the router bit makes. If you see dust, not chips, the setup needs tweaking. Find chip-load calculators on the web; router-bit manufacturers also can help.
Wood sign: Incised letters


Find lots of options to experiment with in the Quick Engrave toolpath. Stepover controls line spacing within the engraving. A small number places the lines close together making the final result appear more opaque. Hatch Angle is the angle at which the lines are engraved. I commonly use 45°—experiment to see what you like.
Notes: To create an incised sign, select only the letters and the coffee cup when you create the V-Carve/Engraving Toolpath. Cut most hardwoods with the feed and speed shown here.
When people first consider what they'll make with a CNC router, making wood signs tops the list. Master this simple process and earn back some of the money you invested in the machine, or just knock out some cool gifts.
For the letters and cup:
■ Router bit: 60° 1⁄2 " V-bit
■ RPM: 12,000
■ Feed speed: 100"/min

An engraving toolpath requires no depth of cut. The software automatically "fills" each letter based on the angle and diameter of the V-bit.
For the rectangle border:
■ Router bit: 60° 1⁄2 " V-bit
■ RPM: 12,000
■ Feed speed: 100"/min


This toolpath requires Cut Depth as it "traces" a single line, not a letter with boundaries. The .06" (about 1⁄16 ") creates a visible detail. Don't worry about the image under Cutting Depths that shows a square profile rather than a V. This is a standard image for this toolpath, regardless of the bit being used.
For cutting the exterior:
■ Router bit: 1⁄4 " upcut spiral
■ RPM: 12,000
■ Feed speed: 100"/min
The designs and toolpaths used in this article were created in VCarve Pro, software commonly used with benchtop CNC machines. Find it at vectric.com.
VCarve Pro automatically chooses
the number of passes based on bit diameter and material thickness. You can modify this as needed, with harder material requiring more passes.
Wood sign: Raised letters

Note: To get raised letters and graphics, select the border, letters, and coffee cup when you create the toolpath.
These first two projects show how using different toolpaths on the same design can dramatically affect the final look. This shows the versatility of CNC router work.
For the letters, coffee cup, and border:
■ Router bit:1⁄4 " upcut spiral
■ RPM: 12,000
■ Feed speed: 100"/min
■ Router bit: 60° 1⁄2" V-bit
■ RPM: 12,000
■ Feed speed: 100"/min

Flat Depth tells you how much the letters and cup will project beyond the background. The 1⁄4 " bit serves as a Flat Area Clearance Tool, removing waste faster than a V-bit, which routs the finish details. This one toolpath shows both bits but they will, of course, be used separately.
For cutting the exterior:
■ Router bit: upcut spiral
■ RPM: 12,000
■ Feed speed: 100"/min

|
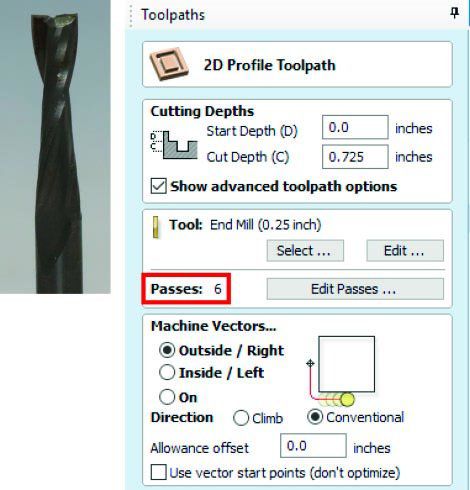
You can cut Outside, Inside, or On the line you've created. This controls where the router bit cuts relative to the design.
Cardboard templates
Notes: This tool comes with great setup instructions. To create the toolpath within VCarve Pro, use the Dragknife Toolpath Gadget. The knife cuts materials up to 1⁄4 " thick, such as cardboard, styrene, and vinyl-letter material.
Create shapes in drawing software, such as SketchUp, then turn them into templates you can trace onto your project parts. Instead of a router bit, cut with a utility-knife blade.

■ Tool: Donek D4 drag knife
■ RPM: 0
■ Feed speed: 100"/min

Although VCarve Pro has an on-board dragknife gadget built into the software, it shows up here as an imported toolpath.
360-brass bowtie

360 brass is a specific type of readily available brass [Sources].
Yes, a CNC router can cut non-ferrous metals. Add aluminum, copper, or brass inlays and other decorative items to your projects.
■ Router bit: 1⁄8 " spiral "O" single flute
■ RPM: 18,000
■ Feed speed: 40"/min

Cutting non-ferrous metal requires light cuts, so the machine makes many passes.
Notes: In addition to controlling feed rate and rpm, be careful about DOC when machining non-ferrous metals. Dividing the .27 Cut Depth by the 10 passes results in a light .027" DOC with each pass. You can use a similar setup to cut aluminum or copper, but different materials dictate slight changes in these settings.
Engraving granite

Diamonds are a CNC's best friend, especially for engraving glass, granite, or steel. A diamond-tipped stylus etches amazing detail on these materials, and others.
■ Tool: Diamond drag engraving bit
■ RPM: 0
■ Feed speed: 30"/min

Find lots of options to experiment with in the Quick Engrave toolpath. Stepover controls line spacing within the engraving. A small number places the lines close together making the final result appear more opaque. Hatch Angle is the angle at which the lines are engraved. I commonly use 45°—experiment to see what you like.
Notes: The diamond drag comes with excellent setup instructions. Increasing DOC on the spring-loaded tip applies the additional pressure required for harder material. It may take some experimentation to get the best cut, depending on the material. Use this tool on plastic, glass, aluminum, brass, and steel. Choose a 120° tip for engraving, and a 90° tip for scoring glass so you can snap it on the score line.