Create a Veneer Starburst


The beautiful symmetry of a starburst (or radial) veneered pattern transforms a project into something special. The procedure shown here makes it easy, and works for making a tabletop, a box lid, or an inlay for a larger panel.
Determine the foundation
The field can just as easily be square or rectangular.
Before starting, consider the size of the veneer field, the type of veneer you will use, and the desired number of sections in the pattern. For this tabletop, I made a 20"-diameter field with eight sections of walnut veneer, surrounded by a segmented oak border.
Substrate: The panel to which you glue the veneer.
Start by making an MDF wedge template for guiding cuts on the veneer sections. Dividing the 360° in a circle by 8 gives an angle of 45° for the wedge. The two long sides must be longer than the field radius (10"), so I made mine 12" long. Glue a piece of 120-grit sandpaper to one face to prevent the wedge from slipping in use.
Cut a piece of plywood for the substrate and sand the faces smooth. To press the veneer to the plywood, make two clamping platens the same size as the substrate from 3⁄4 " melamine [Photo A, below].
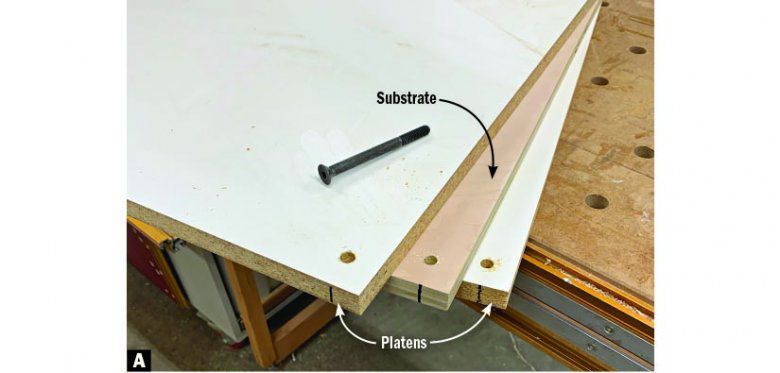
You can also use MDF or plywood for platens. Apply paste wax to them so glue squeeze-out doesn't stick to them.
Also make six clamping cauls (2×2s as long as the platens and crowned on one side) for providing equal pressure along the faces of the platens. Form the crown using a jointer or a hand plane, tapering from the middle out, removing about 1⁄16 " at the ends.
Assemble the starburst
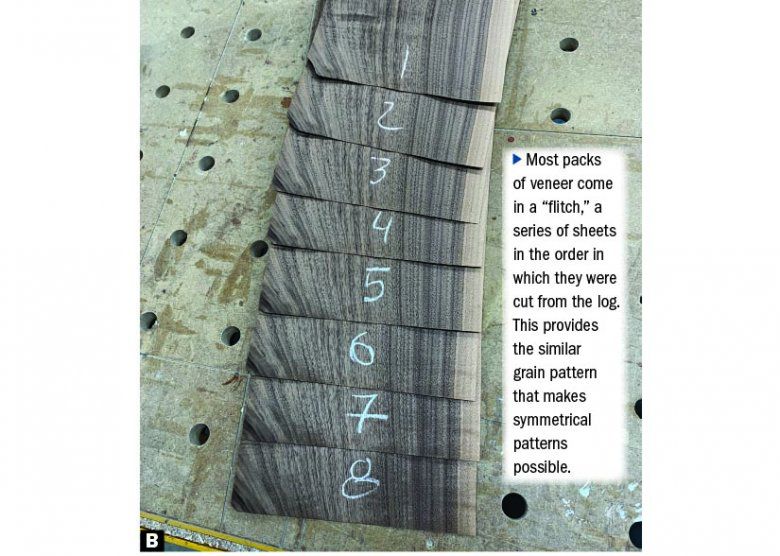
For this pattern, choose eight consecutive pieces of veneer about 8" wide and 12" long and number them 1–8 for reference [Photo B, above]. Using a pair of mirrors on piece number 1, determine the most attractive pattern and mark the veneer along the inside face of both mirrors [Photo C, below].

Stack the veneer pieces in order with their edges and ends flush, and tape the stack together. Place the MDF wedge over the veneer pack, aligned with the layout lines and with the point away from you, and clamp the assembly to your bench. Using a veneer saw or a utility knife with a fresh blade, cut through all eight pieces of veneer along the right-hand side of the wedge.
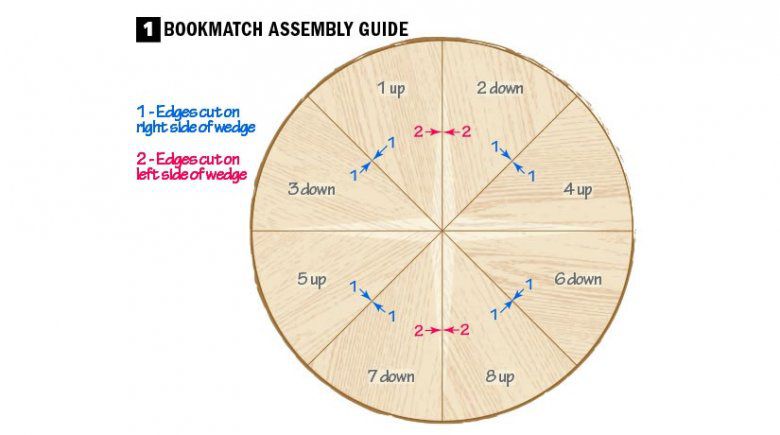
Disassemble the pack and remove pieces 3–6. Restack and tape pieces 1, 2, 7, and 8, and cut their left sides along the wedge. Then, for the best bookmatches, arrange the pieces as shown in Drawing 1, below, alternating the pieces face-up and face-down.
To get a seamless joint between adjacent pieces, "shoot" the edges straight [Photo D, below]. Then using painters tape, join the wedges [Photo E, following] to make two halves, one with pieces 1–4 and one with 5–8.


Place a long straightedge over the point where the four wedges meet [Photo F, below], trim away the excess material from the outer pieces, and shoot the edge as before. Repeat on the other half, then tape the two halves together.

To keep the completed panel stable, the back side of the substrate must also be veneered [Photo G, below].


Any type of yellow woodworking glue works.
On your bench, place a couple of 2"-wide scraps just longer than the platens, then set on them a platen, and the substrate. Spread glue over the face of the substrate only [Photo H, above]. Place the backer veneer on the glued surface and secure it with a few pieces of painters tape. Flip the substrate over and repeat the process on the other side with the sunburst veneer [Photo I, below]. Line up the holes in the platens and substrate, drop in a 1⁄4 " bolt to prevent the pieces from slipping, and clamp [Photo J, following].


Round things up
Build a simple trammel for your router.
While the veneer dries, glue up a border that will surround the field. Mill the lumber about 1⁄32 " thicker than the veneered top, 3 1⁄4 " wide, and at least 84" long. Miter-cut each end of twelve segments at 15° [Drawing 2, below], then glue these into a circle [Photo K, following].


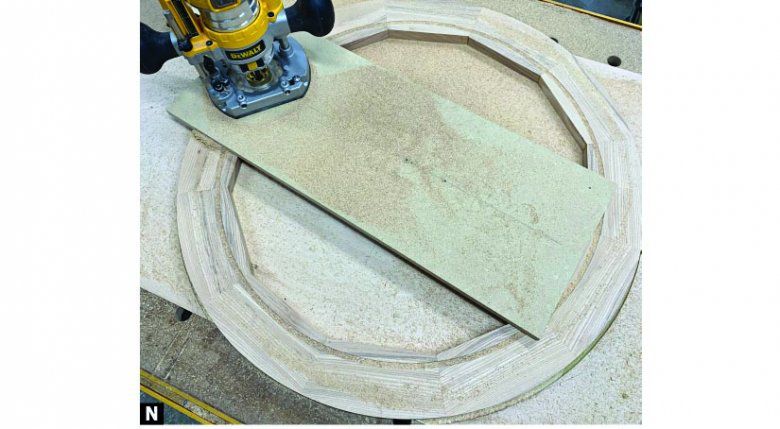
While the border dries, install a 1⁄4 " downcut spiral bit in your router, attach it to a trammel, and set it to cut a 10" radius, measuring to the inside of the bit.
Tip! Use a heat gun to soften the tape adhesive so it doesn't pull wood fibers from the veneer.
Unclamp the veneered top and peel away the tape. Then drill a hole to accept the pivot pin for the trammel where the veneer points meet [Photo L, below].

Rout the veneered field round taking three successively deeper passes. Make the first pass in a clockwise direction (a climb cut) to prevent tear-out of the veneer.
Spoilboard: A sheet of scrap under a workpiece that prevents damage to the benchtop.
After the border dries, sand it to 120 grit. Make a spoilboard from a piece of plywood large enough to hold the border, and mark centerlines on the length and width. Line up the miter joints on the border with these marks to center the assembly on the spoilboard. Secure the border with screws from below, placing them so they won't fall into the 10"- or 12"-radius cutting path of the router bit. Center and secure a 3"-square pivot block [Photo M, below].

Reset the trammel to cut a 10" radius, measured to the outside of the bit, and rout the inside of the border [Photo N, below]. Then set the trammel to 12" to the inside of the bit and rout the outside of the border.
To glue the border to the field, I use a slow-setting epoxy. This fills small gaps between them and won't swell the wood fibers. This bond also reinforces the mitered border joints.
After the epoxy cures, install an inlay between the border and the field. To do this, mount a 1⁄8 " straight bit in the router, and set the trammel so the center of the bit falls on the center of the seam between the field and border. Make two passes to cut 1⁄8 " deep. Cut 1⁄8 "-thick inlay material 3⁄16 " wide to fit the groove without hammering it in. Glue this in with PVA glue, allow it to dry for several hours, then work the inlay flush [Photo O, below].

Rout a 1⁄4 " round-over on the top and bottom edges. Cover the trammel pivot-pin hole by drilling a larger (3⁄8 ") hole then filling it with a face-grain plug.