Design and build outstanding banding


Perhaps you've marveled at intricate patterns of banding on antique furniture, and maybe even bought and inlaid fragile strips of the stuff from a catalog. But have you ever thought about making it yourself? We did, so we called on Tony Hayden, who makes banding for much of the custom furniture he builds in his shop in Monterey, California. And we found that it's easier than you might think. Start with the basic patterns shown here, then design your own, building on what you've learned.


First, choose a pattern to suit your project
Inlay banding can be merely decorative, or it can be functional, serving as a transition between veneered plywood and solid-stock edging, say in a tabletop. Using highly contrasting woods, banding calls attention to itself like the silver lining on a dark cloud. Or it can be as subtle as a fragrance, made from the same species as the project but in a contrasting grain orientation. Such subtlety provides visual interest to a piece without overpowering it. The route you choose is largely a matter of personal preference.
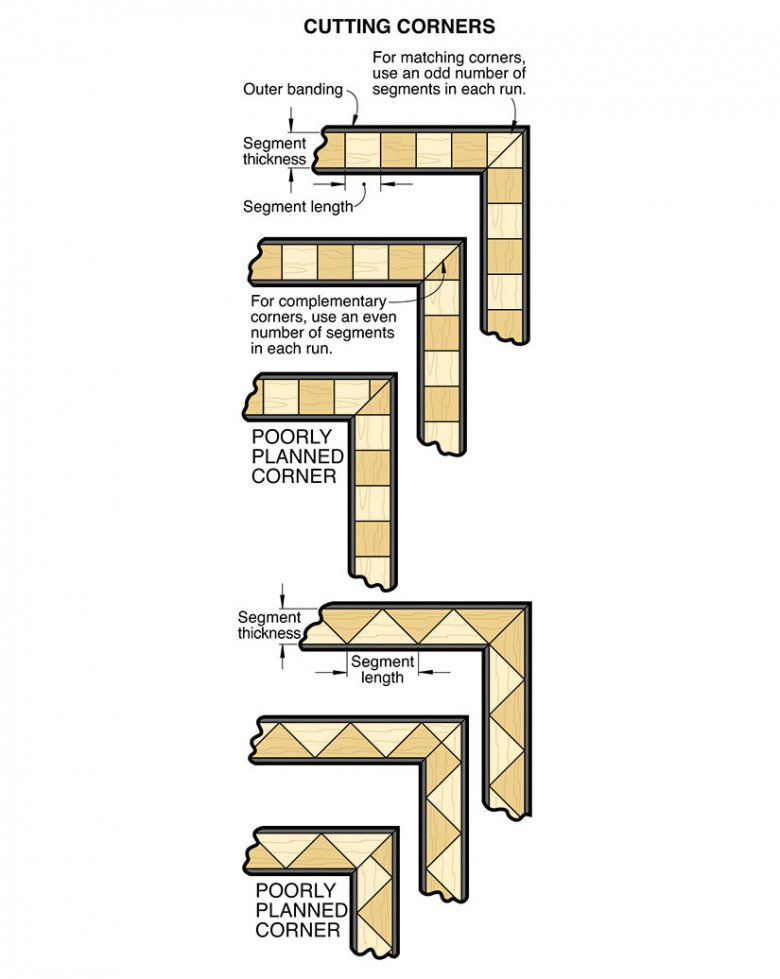
If you're not sure where to begin with your design, catalogs, such as Constantine's (954-561-1716), can give you an idea of what thickness, pattern, and colors might work best with your project. A couple of simple patterns, as well as some corner options, are shown in the Cutting Corners drawing, below. Variations of those and other patterns appear later in this article. A couple of simple patterns, as well as some corner options, are shown in the Cutting Corners drawing below. Variations of those and other patterns appear later in this article.

Besides the different species of segments that make up the pattern, for most bandings you'll also need outer banding—the bread around the segment sandwich—to sturdy up the log. (In square and triangle patterns, the segments are glued end-grain to end-grain, making fragile joints. The outer banding helps hold these joints together until the banding strip can be inlaid into the project: a strong edge-grain to face-grain joint.) You can use whatever species you want for these bands, but a 1⁄16 " or 1⁄28 " black-dyed veneer (available from Constantine's) nicely sets off the inlay while helping hide glue joints on your project.
Once you decide on the banding's pattern and materials, use the segment thickness to figure each segment's length. For example, if your inlay has square segments, the length equals the thickness; for 45° triangles, the segment length equals twice the thickness.
Next, lay out the inlay location on your project, and measure between the outside corners of the layout lines. Divide the length of a banding run by the segment length and you'll wind up with a whole number and a remainder. The whole number is the number of segments you'll need for that run.
What about the remainder? If the length of the run isn't critical, round up or down, depending on the corner pattern you desire (see the Cutting Corners drawing, above), and adjust your run length and layout accordingly. Otherwise, you can divide the remainder by the number of segments and add that fraction to each segment. Repeat the process for the other layout dimensions, adjusting the run or segment length as needed.
Don't worry if your final segment lengths aren't exactly the same for all of the banding runs. You will need to make banding logs specific to each run, but differences of 1⁄32 " or so won't be apparent unless the bandings are placed side-by side.
Next step: Cutting the segments
To simplify the inlay process, you'll want to cut enough segments to make a banding log 3–4" longer than your longest run. Otherwise, you'll have to make a splice somewhere in the middle of the run.
To be confident that every thin slice of banding will closely resemble every other slice, make your segments from blanks that show straight, consistent grain from one edge to the other. Although the exact dimensions of your blanks aren't critical, rip them to about 5" or less. (Wider segments tend to cup and twist, and a 5"×2' banding log yields about 40' of 1⁄16 "- thick inlay.) Resaw and/or plane the blank to the segment thickness.
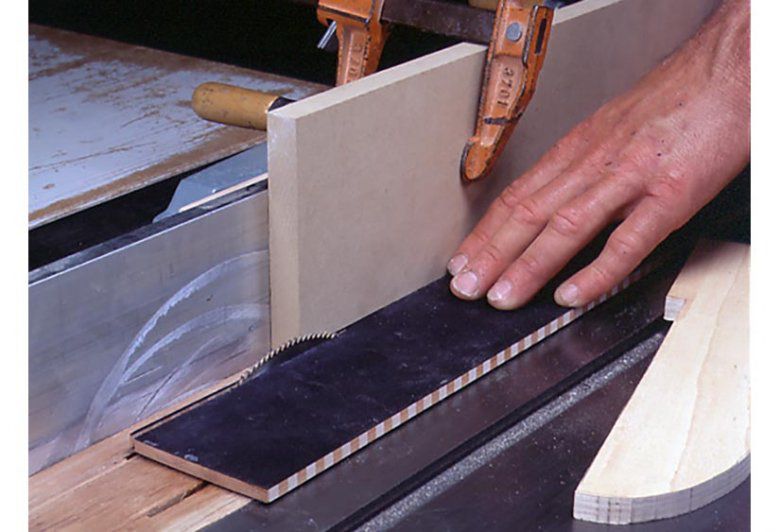
Crosscutting the tiny segments isn't as difficult or dangerous as it might seem. All you need is a simple (but accurate) crosscut sled set up with a scrapwood zero-clearance insert and auxiliary fence, as shown in the Crosscut Sled drawing, below. Affix the insert to the sled with doublefaced tape, then attach the auxiliary fence to the insert in like fashion.

The edges you cut at this step need to be flat and smooth so there will be no gaps or glue lines anywhere in the banding log. Therefore, choose a clean, high-bevel-angle, 80-tooth blade for the task. Mount the blade on your tablesaw, set the bevel angle to match your segments, then cut into the sled and insert until the blade just penetrates the auxiliary fence.
Measure your segment length from this indexing kerf, and attach a small stop to the zero-clearance insert with double-faced tape. The stop must be narrower than your segment blank (see Photo A, above, left) to keep from trapping the cut off segment between the blade and stop.
Place your segment blank against the auxiliary fence on the zero-clearance insert, make a test cut, measure the segment length with a caliper, and reposition the stop if neccesary. Once you're satisfied, tack the stop in place and you can cut segments all day long, keeping the following points in mind:
- Cut more segments than you think you'll need to allow yourself plenty of margin for unusable pieces or calculation errors.
- Keep the segments in the same order as you cut them off. This helps the grain appear to flow consistently along the length of the banding.
Assembling a trio of basic bandings
Let's start with the assembly process that's common to all three of our basic banding patterns: square, triangle, and herringbone. Then, we'll give more specific assembly instructions in the individual sections that follow.
Gather everything you'll need for the process: banding veneer, a small square, white or yellow glue, a glue brush, waxed paper, newspaper, a hardwood clamping block a little wider and longer than your banding log, spring clamps, and bar clamps.
Begin by screwing or clamping a temporary wooden fence to the front of your bench. This fence provides a reference edge against which you'll build your banding log, so make sure it's at least as tall as your segments are thick, and 3–4" longer than the log you want to make. And it's bound to get messy, so wax the face with paraffin to prevent it from becoming part of the glue-up.
Roll out a strip of high-quality masking tape along the fence, sticky side up. Tack one end to the bench with a short piece of tape, then stretch the strip while you stick down the other end with another piece. Stretching the tape provides a clamping effect during the glue-up. Repeat the process, slightly overlapping each strip of tape, until your masking-tape bed is at least as wide as your segments.
The first segment on the tape sets the alignment for the entire log of banding, so make sure it's square with the temporary fence. Stick a square to the masking-tape bed, as shown in the photo, below, and press the first segment to the tape along the square.

From here on, the technique varies, based on the pattern and shape of the segments, but there are a few more general points to be made about the assembly:
- Before gluing the dyed veneer for the outside banding, clean both sides with lacquer thinner on a cloth to promote better adhesion.
- Be generous with the glue to give yourself plenty of working time—you'll need it. When you think you've got enough, add a little more.
- After the glue sets for 20–30 minutes, unclamp the log of banding and remove the masking tape, because once the glue sets fully, removing the tape is a real bear. Then reclamp the assembly for another 24 hours.
- To get the smoothest gluing surface for the banding veneer, clean up the unbanded face (or faces) using a hand plane, cabinet scraper (photo, below), or hard block and 80- or 100-grit paper.

Alternating squares and checkerboards
Before cutting your square segments, draw two or three pencil lines on one face of each segment blank. Then cut the segments and line them up in the same order as they were cut on a scrap plywood tray. The tray makes it easy to move the segments to your assembly area, and the lines give you a reference to keep the grain running the same direction along the log. Now, build the banding log by following the steps shown in the drawings and photo, below.


For simple square banding, clean the unbanded face of the log, then glue and clamp another piece of outer banding to the just-cleaned face. To make the checkerboard pattern, rip the log in half, and glue the cleaned, unbaned faces together, offsetting the the pattern by one segment length.
Triangles, diamonds, and zigzags
Like squares and checkerboards, these three patterns are simply variations on a theme, this time triangular. Once again, we'll start with the basic pattern and show you how to build on that for a fancier effect.
First, a couple of notes about cutting the triangular segments: To avoid tearing out the fragile edges, leave about 1⁄64 " of flat at the top of each triangle by setting your stopblock a little wide of the mark. And, because some segments will still tear out, cut about 50% more segments than you actually need. Check the pieces carefully before using them and set aside any with lots of tear-out or other defects.
With all of your segments cut, assemble the log as shown in the drawings below. Keep in mind that the exposed end-grain of the segments will drink the glue in like crazy. You may want to enlist a helper to follow behind you, dropping in the top segments as you spread a heavy dose of glue on the hills and valleys.

The banding log's end-grain-to-end-grain joints are fairly fragile, so leave the log clamped for 24 hours. Then clean up both faces of the log, being careful not to remove too much material and expose the points. If your design ends here, glue and clamp banding veneer to both faces.
For zigzags, rip the log in half and flip one half back on the other, offsetting the pieces by one-half segment length. Glue the halves together, add the banding veneer on both sides, then clamp.
A diamond pattern can be done just like zigzags, except for offsetting the segments. But a better option is to cut your triangle segments from one species and mating square segments from another species. Put triangles down first, glue and nest the squares, glue and nest the top triangles, and clamp the whole thing at once. Then clean and band the log as usual.
Classic herringbone banding
Unlike square and triangular bandings, the joints within a herringbone log are face-grain to face-grain and plenty strong, so outer banding is optional. The herringbone design also differs in the way the segments are cut from the blank.
The banding's face comes from the edge-grain of your segment blank so pay particular attention to getting a blank with straight, consistent edge-grain. And, because a 2"-thick blank yields a 2"-long segment, a thicker blank means fewer segments you'll have to cut.
To cut herringbone segments, move your stop to the other side of the blade to reduce the likelihood of kickback. Make a test cut to check for correct segment width. And, just as with square segments, keeping the slices in the same order they come off the blank provides more consistent grain flow throughout the log. Now assemble the banding log as shown in the drawings below.

Finally, rip the banding strips
Remove the blade from your tablesaw and replace it with a 71⁄14 " thin-kerf hollow-ground planer blade. The smaller-diameter blade provides a better entry angle for the teeth, resulting in a smoother finish, and the thin kerf gives you an extra strip of banding about every third cut. To reduce chipping, use a zero-clearance insert in your tablesaw.
Clamp an auxiliary wooden fence to your tablesaw fence, with the end of the auxiliary fence stopping just short of the center of the blade, as shown, below. The strip you cut off will want to twist away from the blade; you've just provided it room to do that without binding.
Set the fence to cut off 1⁄16 " strips of banding. Use a sacrificial push shoe, such as the one shown on the saw table in the photo, above, to keep the log flat while you complete the cut. Don't get discouraged by the first few strips that come off the log. You'll need to cut 1⁄4 –1⁄2 " from the log before you get through the uneven segment ends and glue squeeze-out.