Drawers 101


Learn more about building and installing doors and drawers.
If the thought of building drawers for your projects makes you break out in a cold sweat, fear no more. Simply start with an easily achievable drawer design, practice a few time-proven techniques, and you'll soon be churning out just-right drawers. Here's how.
Start with good design
Before making a single cut, consider the function and style of the drawers. They will help you determine the final design and hardware choice.
■ Function. Knowing what the drawers will hold helps dictate their design and construction. A drawer for holding tools, for example, requires beefier materials, joinery, and slides than one for table linens. Drawers that will house heavyweight contents should be built with 5⁄8 "- or 3⁄4 "-thick sides and a 1⁄2 "-thick bottom. Smaller drawers that will store lightweight items can use 3⁄8 " or 1⁄2 " drawer sides and 1⁄4 " or 3⁄8 " bottoms.
■ Style. Drawers in a furniture project, such as a dresser, sideboard, or desk, often incorporate elements of the piece's overall design, and should be proportional to the project's overall dimensions. For projects with multiple stacked drawers, especially dressers and lingerie cabinets, graduated drawers [Photo A, below] look best. On kitchen cabinets with a single drawer and door, those components are typically of uniform height and style [Photo B, following]. Kitchen cabinets with all drawers can have drawers of varying heights, though not necessarily graduated from top to bottom. Shop or utility cabinets can be built with lower-cost materials and less concern about style, with function taking priority over appearance.


Drawer fronts fit their cases in one of two typical styles: inset and overlay. Inset drawers [Photo C, below] slide completely into the cabinet or furniture piece. The front of an inset drawer can be integral (joined directly to the drawer-box sides), or attached to the front of a drawer box as a "false front."

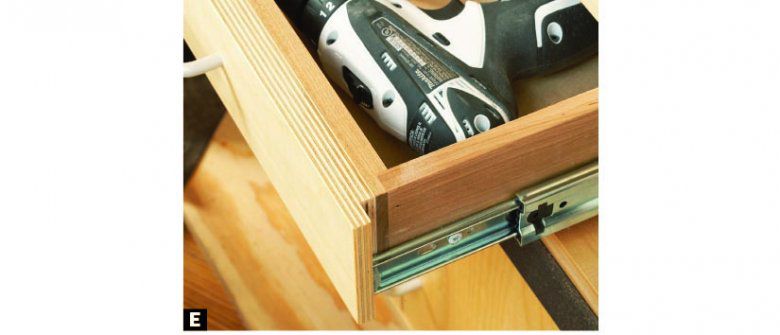
An overlay drawer front, usually applied as a false front, is wider and taller than the drawer box. When closed, the front of an overlay drawer rests against the cabinet or face frame. Overlay fronts can be full overlay [Photo D, below] or rabbeted [Photo E, following].

■ Hardware. Before building your drawers, plan and purchase any store-bought items, such as mechanical drawer slides (which we'll discuss in a moment) and handles, knobs, or pulls. Mechanical slides will affect the size of the drawer boxes: You'll need to incorporate space for them in the design. Choose handles, knobs, and pulls that not only function usefully, but also complement the overall project design.
Pleasing proportions make a project stand out

Learning how to design projects with eye-pleasing proportions will make you a better woodworker and create more appreciation for your work. One way is using the Golden Mean, a ratio of 1:1.618 when calculating dimensions for adjacent components on a project. (Rounding to an easy fraction or whole number won't greatly affect appearances.) You should also trust your eyes, because most people can lay out project parts in good proportion using only what looks pleasing. But never let a project's design compromise its function. For example, when designing a dresser with multiple banks of drawers [ Photo A, above], start with a known number. If you plan to stack three pairs of jeans in the bottom drawer, measure a stack of jeans and then design a drawer tall enough for that purpose. Then, make each drawer shorter as you go up, using either your trusty eyes or the Golden Mean.
Now decide on your slides
View a video about installing metal drawer slides
Any hardware or shop-made device that helps the drawer slide in and out of its opening in a straight path can be considered a drawer slide. You can buy multiple styles of mechanical slides or buy or make your own wood slides. Fine-furniture makers seldom use mechanical slides in their projects, opting instead for custom-fit drawers and support frames.
■ Metal slides. Buy slides to match the function and expected weight capacity of the drawer. Epoxy-coated roller slides [Photo F, below] cost the least and work well, but support lower weight capacities and don't extend fully, limiting access to contents at the back of the drawer. You'll often see these slides in inexpensive kitchen cabinets and ready-to-assemble furniture pieces.

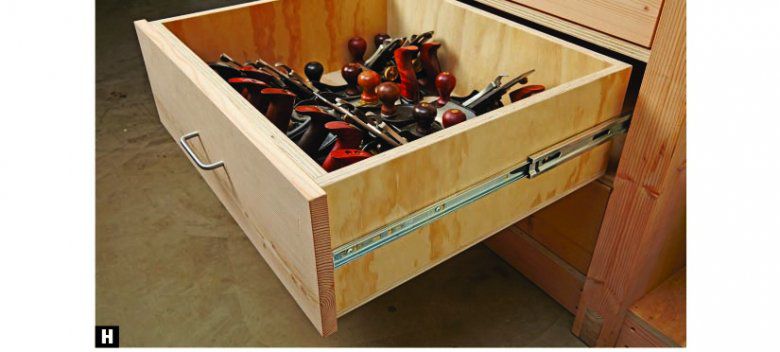
Ball-bearing slides [Photo G, below] cost a little more than roller slides but provide a more solid feel, with three-quarter and full-extension models available. Drawers that will house heavy contents, such as cast-iron skillets, small appliances, or tools, should use heavyweight-rated full-extension slides [Photo H, following]. For kitchen-cabinet drawers that house silverware (or any type of loose contents), choose soft-close slides [Photo I, beneath]. Those cost the most and may require special store-bought jigs to install.


All of those types of metal slides come in side-mount (most visible), corner-wrap (less visible), and bottom-mount (hidden) styles. Generally, the higher the quality—and cost—of slides, the more adjustments they provide for getting a just-right fit.
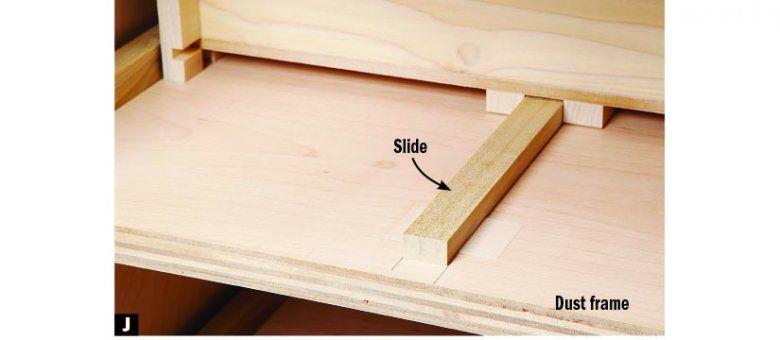
■ Wood slides. Whether square-cornered or dovetailed, wood slides [Photo J, below] serve the same purpose as metal slides, and are sometimes incorporated into the construction of the drawers. Besides saving money (if you make your own), wood slides also look great on furniture pieces where metal slides might look out of place. Plastic glide tape, used by itself or in conjunction with wood slides, reduces friction [Photo K, following].

Drawer construction
Learn more about installing drawers without metal slides.
You can build drawers from solid wood or sheet goods. We prefer solid wood for drawer boxes, especially small drawers, because you can easily match the grain and color, and scale parts to thicknesses appropriate for your project. Choice of wood species doesn't matter, but furnituremakers often choose lower-cost "secondary" woods, such as pine or poplar, for these seldom-seen parts.
Tip!
Apply a light coat of paste wax to wood drawer slides to ensure smooth movement.
Although strong, stable, and uniform in size and color, plywood is perceived as lesser quality in the eyes of many people. If you use plywood [Photo L, below], choose a high-quality product, such as true Baltic birch plywood because of its stability and lack of flaws and gaps in the plies. Remember that some types of joinery, such as dovetails, can result in chipping and tear-out in the plies.

Learn to create box joints, dovetails, and lock rabbets for drawers.
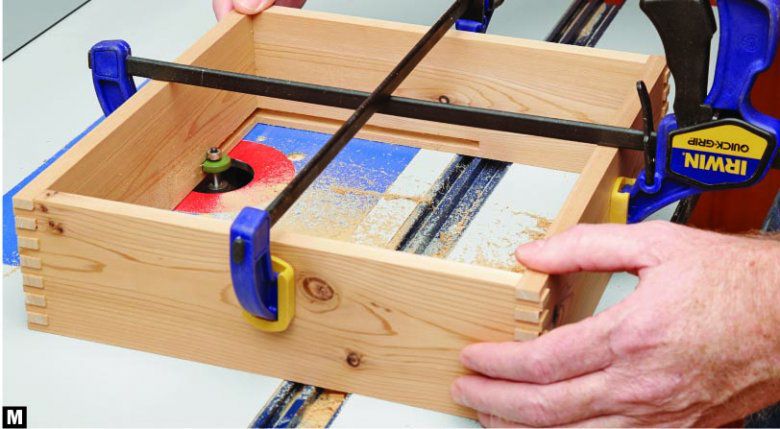
When it comes to joinery for drawer boxes, never compromise a drawer joint's strength just to get a particular look. Fortunately, some of the most attractive joints also provide all the strength you'll likely need. Box joints, half-blind dovetails, and through dovetails [Photos M,N, and O, below] provide strong, attractive joints that show an attention to detail. Lock rabbets [Photo C, above] deliver adequate strength, but lack pizzazz.


Note:
Router dovetail jigs with fixed-spacing templates will dictate the size of your drawers if you set up for joints with a half-pin on each end. A jig with variable spacing eliminates this restriction .
Make drawer bottoms from plywood, hardboard, or MDF, all of which move little with seasonal humidity changes. For most drawers, 1⁄4 " or 3⁄8 " plywood makes the best bottom panels. For large drawers, use 1⁄2 " plywood. A bottom that fits into a rabbeted groove on the bottom edge of a drawer box—even if it's tacked with brad nails—can fall out, especially when the drawer gets loaded. So capture the bottom panel in grooves cut into the sides and ends of the drawer box [Photo M, above].
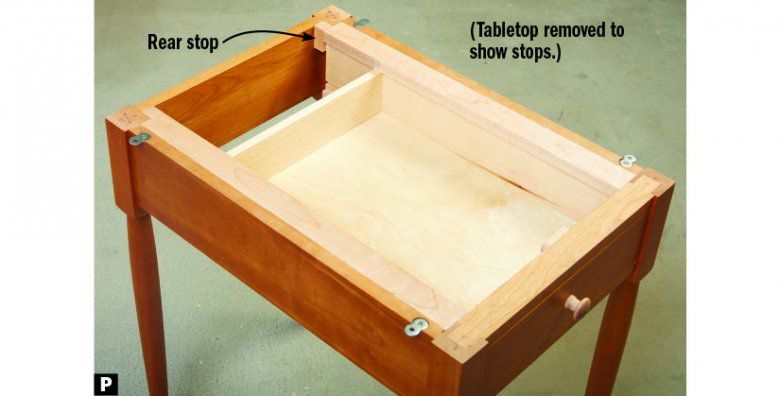
To prevent a drawer from sliding in or out too far, drawers without metal slides should, ideally, have built-in stops. With overlay drawers, the fronts act as a stop when they contact the face frame or cabinet front. In other cases, you should build a stop into the back of the cabinet [Photo P, below] to prevent the drawer from simply hitting the back panel. A front stop [Photo Q, following] helps prevent a drawer from accidentally being pulled out completely, potentially spilling the contents.