Radial-arm Saw Dust Collector
A radial-arm saw blade spews loads of material behind it. But with our catch-all dust collector, you can contain the mess, and route it into your dust collection system.
Advertisement
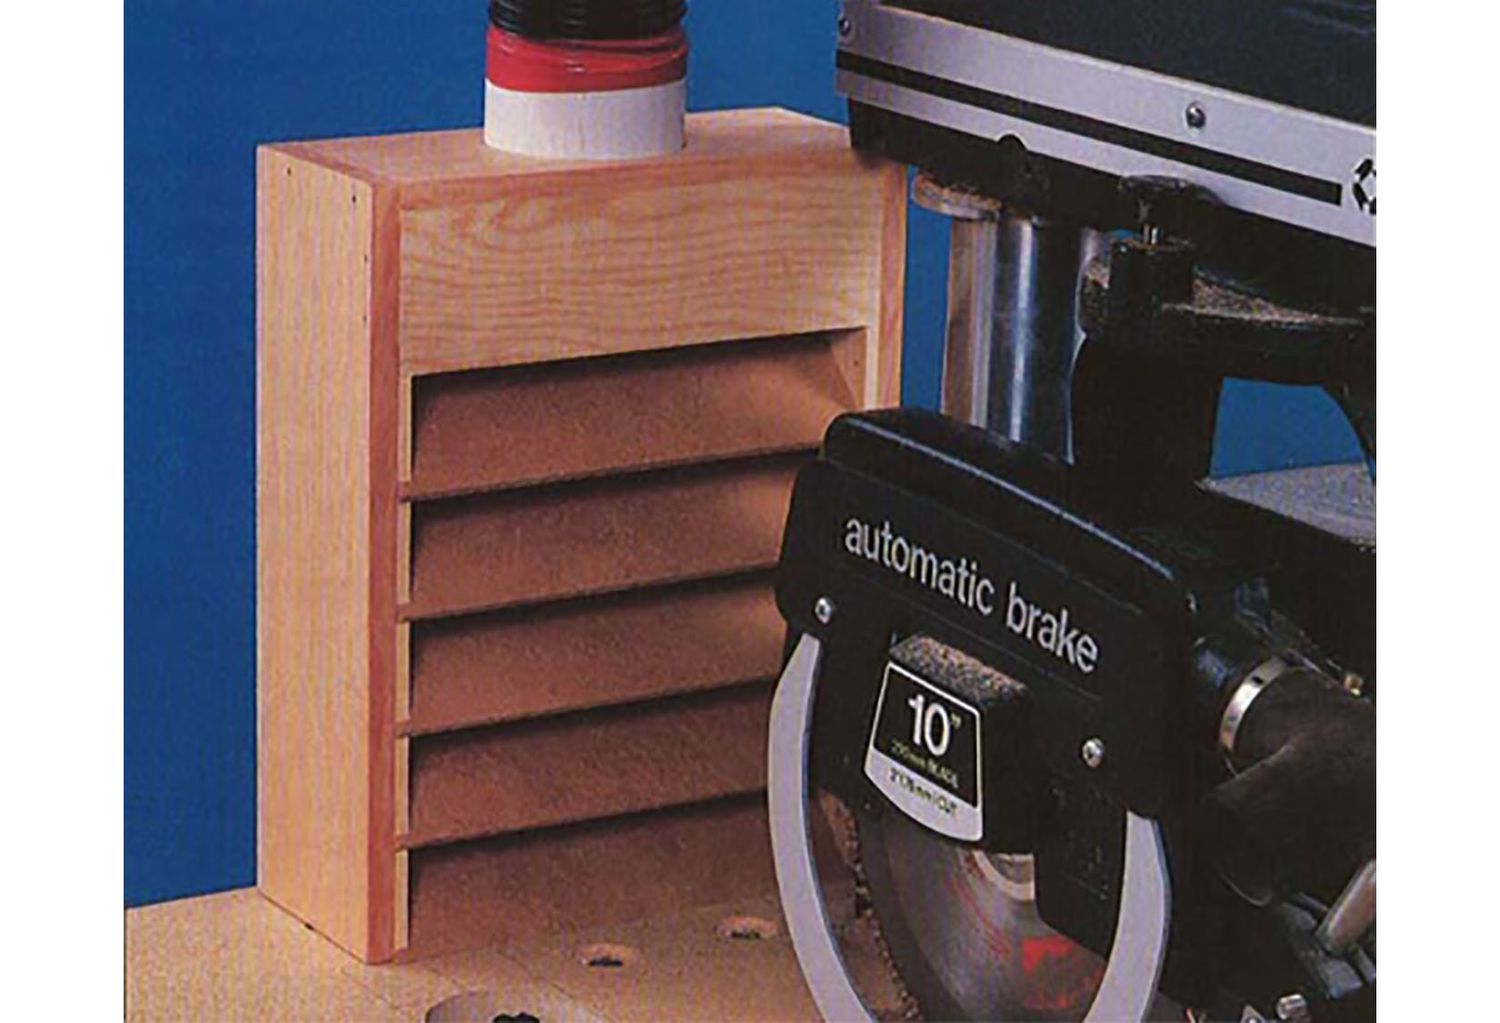

Like a spinning car tire mired in mud, a radial-arm saw blade spews loads of material behind it, spattering walls and filling the air with a torrent of sawdust. But with our catch-all dust collector, you can contain the mess, and route it into your dust-collection system. Just lift and re position the removable louvered box for either a 45° or 90° cut.
Note: You'll need some thin stock for this project. You can either resaw or plane thicker stock to size.
Start by cutting the collector pieces


- From 1⁄2 " stock, cut the sides (A), top (B), and supports (C) to size, using the dimensions on the drawing, above. From the same stock, cut the top front piece (D) to size, bevel-ripping the bottom front edge at 45°.
- Measure the outside diameter of your hose coupling (we used 3" PVC pipe). Then, with a compass, mark the same size hole centered on the top piece (B). Using a circle cutter in your drill press, cut the hole where marked. (You could also drill a blade-start hole inside the marked circle, and cut the hole to shape with your jigsaw or scrollsaw.)
- Cut a piece of 1⁄4 " stock to 113⁄16 " wide by 22" long for the louver support (E). Angle your radial-arm saw blade or tablesaw miter gauge to 45°, and cut the 10 supports to size. (We used a stop to ensure all supports were the same size.) See the pattern below for the layout.
- Cut the wide bottom louver (F) to size, bevel-ripping both edges at 45°. Now, cut the four narrow louvers (G) to size.

Next, assemble the collector
- Carefully locate, then glue and nail the louver supports (C, E) to the inside surface of each side piece (A) where dimensioned on the Collector drawing. (When positioning the pieces, we used 1⁄4 " hardboard scraps to ensure the correct-sized gap between the louver supports.)
- After the glue dries, drill a 3⁄8 " hole 1⁄2 " deep centered in the bottom end of each A/C assembly. Cut two pieces of 3⁄8 " dowel or 3⁄8 " steel rod to 1" long. If you use dowel stock, sand a chamfer on the bottom ends, and glue the dowels in the holes. If you chose steel rod, file or grind the chamfer, and epoxy the pins in place.
- With the ends flush, glue and nail part D onto the bottom front edge of part B.
- Position, and then glue and nail the pieces (B/D, F, G) between the side assemblies.
- Measure the length and width of the collector, and cut the back (H) to size. Glue and nail the back piece (H) to the collector.
And finally, add the platform
Note: The purpose of the platform is to support the collector directly behind the blade when set at either 45° or 90°. This allows you to collect the most sawdust. The size and configuration of your platform will depend on your particular saw.
- Cut the platform to shape from stock the same thicnkess as your radial-arm saw table, (Our platform measures 3⁄4 x 10³⁄8 x 201⁄4 ".)
- Place the platform on top of your saw base where shown in the top photo. Add a spacer block, if necessary, so the top of the platform is level with the top of the saw table. Mark and cut a notch for both the table clamp and the column.
- Position and clamp the platform on the saw base. Drill and counterbore two holes through the platform, spacer block, and metal base frame. Bolt the platform and spacer to the frame.
- Center the collector directly behind the saw blade where shown in the photo. For maximum efficiency, position the collector as close to the blade as possible. Mark the locations on the platform for the two 3⁄8 " dowels glued in the bottom of the collector. Drill mating holes in the platform.
- Set the radial-arm saw blade to 45°, position the collector directly behind the blade, and repeat the process to locate and drill the holes. (When drilling the holes for the 45° cut, we had to drill one of the holes in the saw table.)