Easy-clean Routine for Peak Spray-gun Performance


A high-volume, low-pressure (HVLP) spray gun makes applying a finish easier than ever. Follow these simple procedures and keep that gun performing like new for years to come.
Spray a little, clean a little
On a typical project, you may apply several coats of finish separated by a drying time based on temperature and humidity. Here's how to minimize cleanup between coats, even when spraying a slow-drying polyurethane that might require eight hours between applications.

Note:
With catalyzed finishes, clean the gun completely at the end of each day. Catalyzed finishes can harden in the gun, ruining it, if left for extended periods.
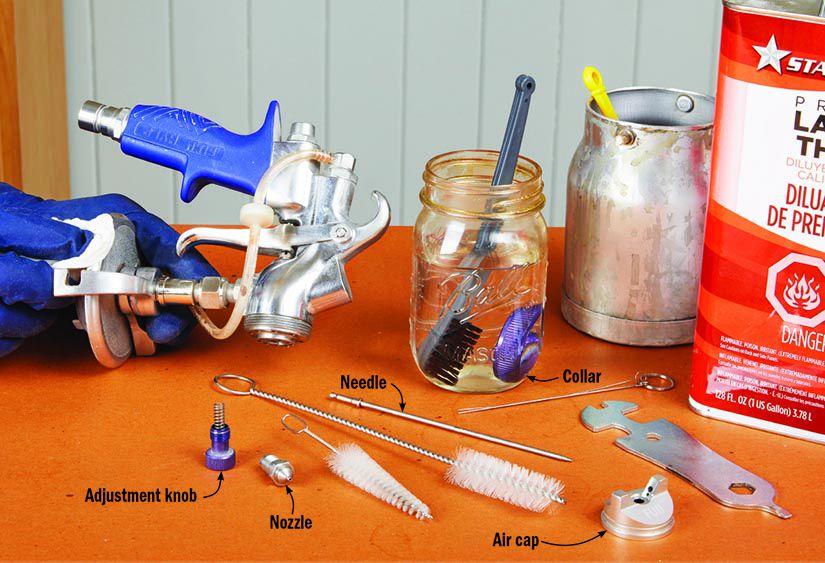
Spray the first coat, then unscrew the spray gun collar [ Spray-gun Cutaway], remove the air cap, and soak these items in a sealed jar of the appropriate solvent. Wipe the tip of the nozzle with some of the solvent as well. If overspray has collected on the exterior of the cup or gun, wipe them with the rag and solvent. No need to completely clean the gun at this time because the liquid finish is sealed inside.
As you ready to spray each additional coat, swish the finish in the gun to stir the contents, place the air cap and collar back on the gun, and spray away. Repeat the mini-cleanup routine and finish applications until you apply the final coat.
Note:
Wear eye protection to guard against solvent splatters.
With finishing complete, the gun needs a thorough cleaning. First, pour any remaining finish in the cup back into the can. Pull the trigger to drain any finish from the pickup tube, then wipe out the cup with a paper towel. Now pour in about 1" of clean solvent and lock the cup back on the gun. While swirling the cup around to distribute the solvent, spray the contents into a rag until the mist runs clear. This cleans the pickup tube and fluid passageways inside the gun. Remove the cup and pour any remaining solvent into the sealed jar. If the pickup tube has a removable filter, drop this into the jar as well. Remove, clean, and reinstall the cup lid gasket [ Photo A].

Break down the gun
Tip!
Use a low-pressure stream of compressed air to dry parts quickly
.
Next, remove the collar and air cap. With the trigger pulled, remove the nozzle [ Photo B], and place all three pieces in the solvent-filled jar. Unscrew the adjustment knob and spring to remove the needle.

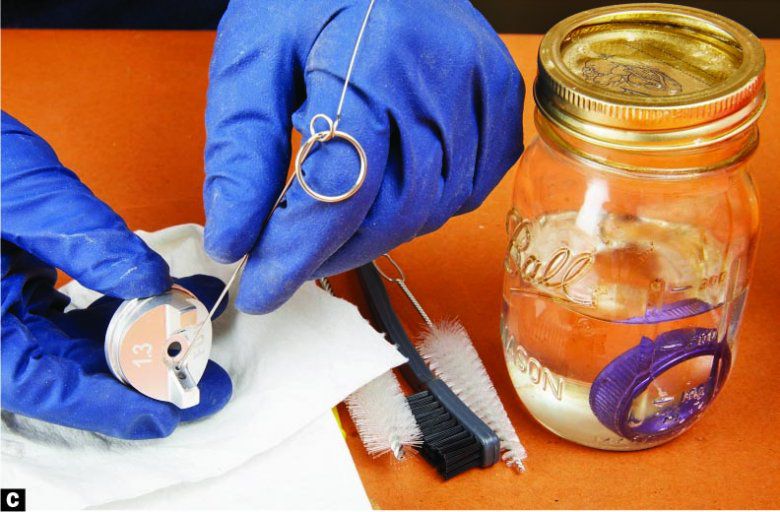
Using a paper towel, soft brush, and solvent, clean all exposed parts of the spray gun and wipe them dry. Use the same brush to clean the filter, collar, air cap, and nozzle, paying close attention to the openings in the air cap [Photo C]. Use a rag dampened with solvent to clean the needle.
To reassemble, begin by adding a drop of spray-gun oil to the back end of the needle and reinsert it into the gun, securing it with the spring and adjustment knob. While pulling the trigger to retract the needle, replace the nozzle and tighten carefully. Finally, add the air cap and the collar, and place the filter onto the pickup tube.
Reassemble the spray gun and cup. If the gun will sit unused for a long period of time, avoid overtightening the lid on the cup to prevent deforming the gasket. It's a good idea to keep a couple of replacement gaskets on hand.
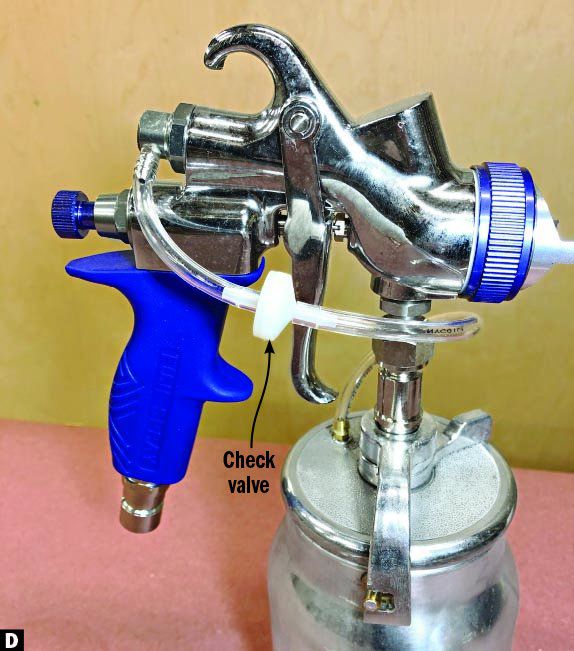
Now, visually inspect the air tube and check-valve assembly [Photo D]. If finish has collected above and below the valve, the valve has failed. A clogged valve may prevent the gun from spraying at all, and the valve should be replaced.
This entire cleaning ritual takes less time than cleaning a brush, further reducing finish time. Pretty easy, huh?