Four Ways To Fasten Tabletops
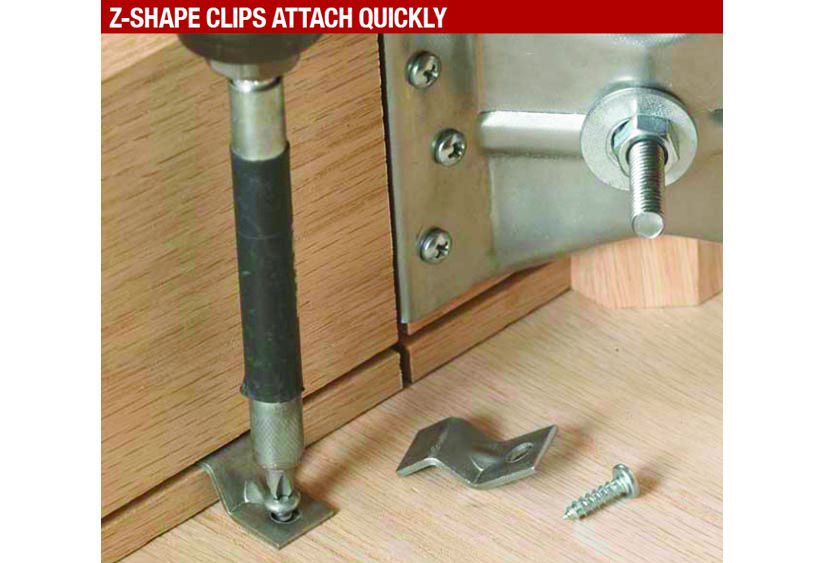

1 Z-shape clips
One end screws firmly onto the tabletop, while the other fits a saw kerf along the table apron, as shown above.
Advantages: Low cost—less than a dime apiece—and easy installation.
Disadvantages: Metal hardware doesn't complement some traditional table styles for purists who prefer solid-wood mounting systems.
How to use them: Press the screw end of the clip firmly against a flat surface and measure the rise at the other end (usually about 3⁄8 "). At that measurement, cut a groove on the top inside face of each apron piece using a router, tablesaw, or biscuit joiner. Mark the locations of mounting screw pilot holes about 8–12" apart, and drill with a depth stop to avoid boring through the tabletop. Then attach the clips to the apron sides and ends, as shown.
2 Shop-made blocks
The all-wood version of Z-shape clips, the tongue of an L-shape block rides in a mating groove along a table apron, as shown above.


Advantages: Blocks use up scrapwood and provide an authentic touch for some period furniture.
Disadvantages: Making the blocks adds another step (though not difficult) and more time to your project.
How to use them: Saw or rout 1⁄4 " grooves 1⁄4 " deep 3⁄8 " from the top inside faces of the apron pieces. Then, on a 5⁄8 ×2" blank at least 15" long, cut 1⁄4 " dadoes spaced 13⁄8 " apart as illustrated below. Drill 11⁄64 " shank holes to fit #8×11⁄4 " panhead screws, and cut the individual fasteners from the blank, as shown. To attach the blocks, space them about 12" apart at each end of the table, with the tongues in the apron grooves. Drill pilot holes into the tabletop, and attach the fasteners with washers. For long tabletops, use these with the stretchers shown below.


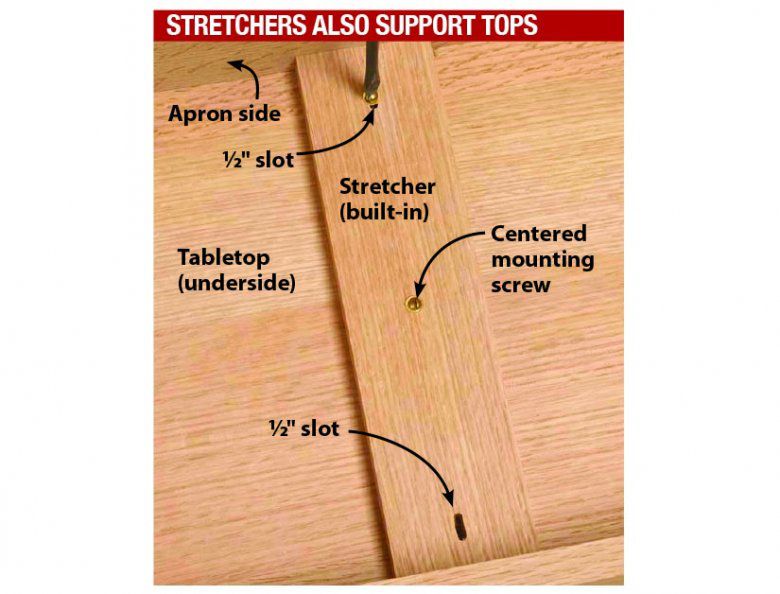
3 Slotted stretchers
Use two or three of these as part of the table framework, or combine them with other fasteners.
Advantages: Stretchers help prevent tabletop warping and keep long apron side parts from bowing.
Disadvantages: Added parts mean more machining.
How to use them: Size the 3⁄4 "-thick stretcher to fit between the long apron pieces. Then drill a mounting screw pilot hole at the center of the stretcher. To make 1⁄2 "-long expansion slots on both sides of the pilot hole, use a brad-point bit slightly larger than the mounting-screw diameter to drill overlapping holes running parallel to the grain. Smooth the scalloped edges with a chisel to create the slots.
Mount the stretchers to the long apron pieces using biscuits. Then center the completed apron upside down on the underside of the tabletop. Drive a screw at the center of the stretcher. Then drive screws into the middle of each expansion slot.
4 Figure-eight connectors
As a tabletop expands and contracts, this connector rotates within a round mortise in the edges of the apron end parts to keep the top from buckling. Figure-eight connectors vary in size and shape, with some having equal-size loops and some with the apron-side loop larger than the tabletop loop.
Advantages: Figure-eight connectors require no apron grooves and are slightly less conspicuous than the
Z-shape clips.
Disadvantages: Connectors must be mortised into the apron edges to work, limiting how thin you can make the apron parts.
How to use them: Chuck into your drill press a Forstner bit just slightly larger than the figure-eight connector. Every 12"–18", on the edges of the apron end pieces, drill mortises a hair deeper than the connector thickness [Photo 1]. Using the spur hole from the Forstner bit as a guide, drill a mounting screw pilot hole. Then trim off the mortise edges with a chisel, as shown [Photo 2], to allow the connector to rotate back and forth about one-eighth of a turn.

Screw the figure-eight connector to the apron just loosely enough to allow it to rotate [Photo 3]. Check that the connector sits flush with or a little lower than the apron edge. Repeat these steps to mount the remaining connectors. Do not mount them on the side pieces of the apron.

With the tabletop upside down on your workbench, center the apron/leg assembly on the underside of the tabletop, and mark the mounting screw locations. Drill pilot holes into the tabletop using a depth stop and insert the mounting screws [Photo 4].
Sources
Z-shape clips. Tabletop fasteners no. 27N10, Woodcraft, 800-225-1153; woodcraft.com. Mounting clip no. 13K01.01, Lee Valley Tools, 800-871-8158; leevalley.com.
Figure-eight connectors. Connector no. 13K01.50 with loops of equal size, Lee Valley Tools. Connector no. 21650 with loops of unequal size, Rockler Woodworking and Hardware, 800-279-4441; rockler.com.