Gear Up for Glue-Ups


Whether your next woodworking task is a major production or just a 10-minute skit, every project that gets rave reviews includes successful glue-ups as part of the script.
When you're gluing and clamping your part assemblies, first ready your stock. Only by working with straight, stable stock can you precisely align parts in a glue-up.
Start by acclimating your stock to the humidity and temperature of your shop. Here's how to proceed.
Acclimation stages
Stage 1: Allow rough stock to acclimate in your shop for 24 hours before milling. Aim for a 6% to 11% moisture content. Then mill pieces to rough dimensions, as shown in photo below.

Stage 2: After the initial milling, give the stock another 24 hours to acclimate again. Following this second rest, inspect your pieces to see if you'll need to flatten or otherwise adjust your stock before assembly. When satisfied, mark up your stock according to the specification in your plans, set up your tools, and machine your workpieces to size.
Planning the production
Preparing to glue up milled stock eliminates unpleasant, last-minute surprises. Use this script to ensure success:
✔ Gather the necessary clamps for the project. (In most edge-to-edge glue-ups, figure about 10" spacing between clamps.) Need more? Borrow or buy clamps as needed to provide full bonding along a glue joint.
✔Are your clamps long enough? If not, couplers or pipe extensions, such as the one shown in photo below , will save you the expense of buying more clamps.

✔Inspect the heads and bars of each clamp. Remove dried glue globs, grit, or oily substances that dent or contaminate the project surfaces.
✔To avoid marring your finely sanded stock, each clamp surface needs a clamp pad. Hardwood clamp blocks make an adequate substitute, but you may have trouble juggling them during the glue-up process. One solution for pipe clamps is shown in the drawing below.

Enter the supporting cast
The gluing process is more than clamps. In supporting roles, be sure you have on hand:
✔ Riser blocks to hold your project a few inches above the benchtop, creating plenty of room for clamp heads. Around the WOOD® magazine shop, we like the roominess that 4x4s afford. You may need to run them through the jointer to make them square and flat.
✔L-shape corner clamping squares. These simple accessories guarantee 9° sides.
✔A dead-blow mallet and cushioning block to coax together tight-fitting joints.
✔Extended open-time glue—ideal for working with large or complex assemblies. If you can't find a local supplier, visit Titebond online or call them at (800) 347-4583.

✔Cauls—stiff, sturdy boards—distribute pressure between clamps. As shown in the drawing above, woodworkers rely on a slightly bowed caul for even pressure distribution. See them in action in the photo below.

✔Wax paper and masking tape to shield wood surfaces from clamps or dripping glue. We prefer blue (painter's) masking tape because it leaves behind no adhesive residue.
✔Plastic putty knife or rubber kitchen spatula, rags, and clean water to remove glue squeeze-out.
The dress rehearsal
Before you open the glue bottle, you'll want to uncover every joinery problem, script the assembly sequence, and decide where and how to clamp.
Dry-fit your assemblies and document the steps, imagining you're applying glue along the way. Clock your time. Did your run-through last longer than the open time for your glue? (Even for extended open time glues, the maximum is 20 to 25 minutes.) If so, consider these options:
■ Split up the gluing process into smaller subassemblies.
■ If necessary, call in extra hands to share the assembly and clamping roles.
■ Rehearse the assembly process again to reduce the time. You'll be amazed at how a second or third run-through speeds assembly time.
As you dry-fit parts, you'll quickly discover problems. You shouldn't need Herculean strength or a sledgehammer to snug up a mortise-and-tenon joint. If you can't arrive at joint perfection with light clamping pressure or a couple of light taps with your dead-blow mallet, plan to remake ill-fitting parts. Clamping can't correct loose joints or mis-sized and warped parts.
With your tape measure, confirm that your assembly is square. The measurement of your diagonals should be equal, as shown in the photo below. If not, try adjusting your clamp pressure, location, or both. Still not equal? Find out why your assembly is racked: Machining or joinery may be the villain.


Let's dry up a few glue myths
Our testing of woodworking glues revealed the truth behind some popular misconceptions. Such as:
MYTH 1: Only by applying glue to both mating surfaces can you get a good bond. Actually, you'll get great results by spreading glue on just one side. Covering both pieces doubles the risk of excess squeeze-out. When possible, a wiggle or twist of one part helps ensure a reliable transfer of glue to both pieces.
MYTH 2: Let glue joints sit overnight before removing the clamps. Two hours of clamping time is enough to set joints, then you can remove clamps safely.
MYTH 3: Buy large quantities of glue to last a lifetime. Woodworking glues have expiration dates—about 1–2 years after manufacture. For this reason, avoid buying it by the gallon; get only what you need now.
Finishing touches
In some cases, you may need to stain and/or finish parts prior to assembly. Here are common examples:
■ When project parts would prove hard to access after assembly. For example, many woodworkers stain the center panel of a raised-panel door before assembly; doing so avoids drawing attention to unstained wood around the panel's edges during climate changes when wood shrinks.
■ In order to minimize glue squeeze-out, which could affect your finish along joints.
■ When finishing interior surfaces could result in runs or brush strokes that would be difficult to fix.
To protect joints during such the preassembly finishing processes, mask the surfaces where you'll later apply glue, as shown in the photo below . Most glues will not stick well to finished surfaces.

Tip! Although some literature recommends stuffing mortises with pieces of paper towel, it's our experience that this technique can compound the problem with a wicking action that draws more finish into the mortise. We've had best results with brushing finish carefully around mortises.
Finally, if you apply a finish before assembly, follow the manufacturer's recommended curing time.
Clamping with tape
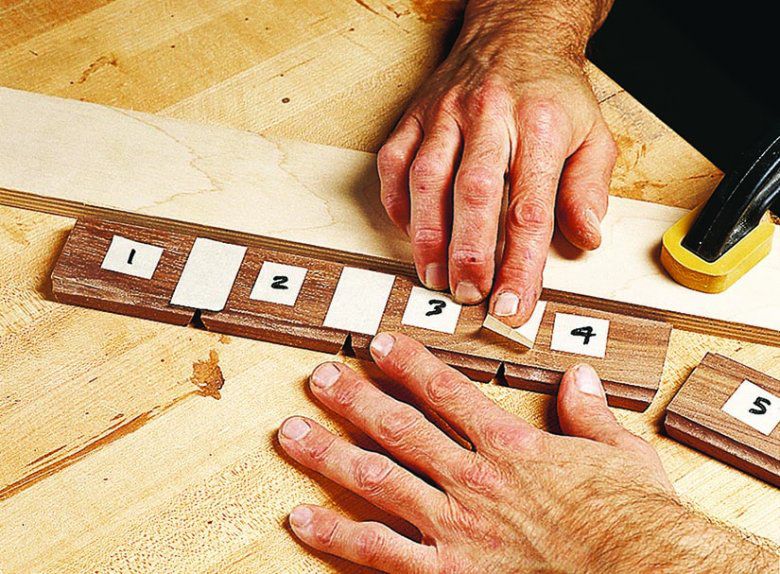
For some projects—such as boxes and small frames—masking tape can handle chores too tiny for even the smallest clamps. You can use this on standard four-sided projects, such as the one shown below. It also works for small hard-to-clamp projects, such as an octagonal box. Here's how:

First lay the box pieces so that the top or bottom is aligned against a straightedge with outside corners touching. Tape the pieces, as shown below.
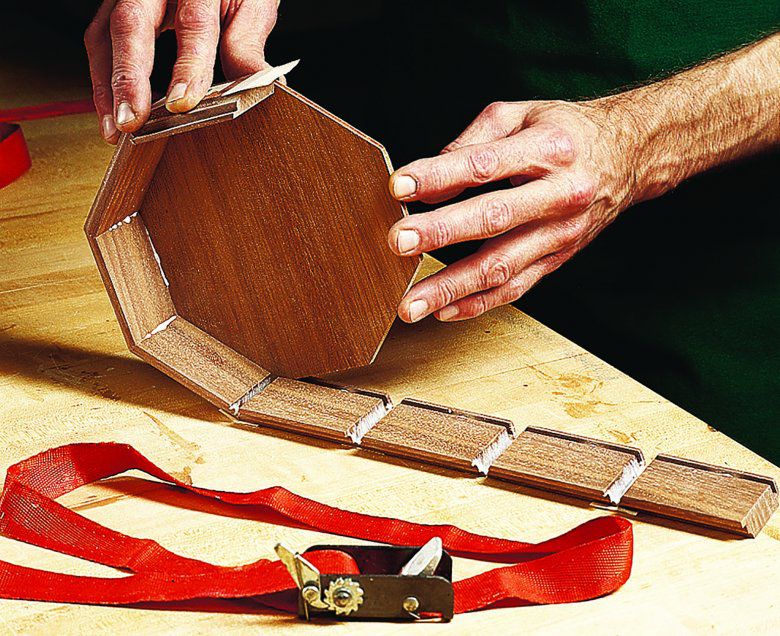
Apply glue, and roll the segments around the base, as shown below. Finish by taping the beginning and end segments, and allow the assembly to dry on a flat surface.
It's show time!
Just repeat the assembly steps you rehearsed during dry-clamping—this time with glue. Apply glue to one surface, and draw together the mating surfaces.
For 20 years in our shop, we've had great results by spreading glue with 1⁄2 "-wide acid brushes found in woodworking catalogs and the plumbing section of hardware stores and home centers. Another inexpensive (or free) glue spreader is the plastic core of used, disposable foam brushes, as shown in the photo below.

For even application, some woodworkers rave about glue bottle rollers, but they require cleaning after each use.
What's enough clamping pressure? When the wood pieces are touching and the glue starts to squeeze out, that's enough clamping pressure. If you squeeze out too much glue, you'll starve the joint and weaken it in the long run.
To prevent your assembly from twisting, allow the glue to dry while your project is supported on the workbench or other flat surface. The riser blocks help circulate air all around the assembly, producing an even drying time.
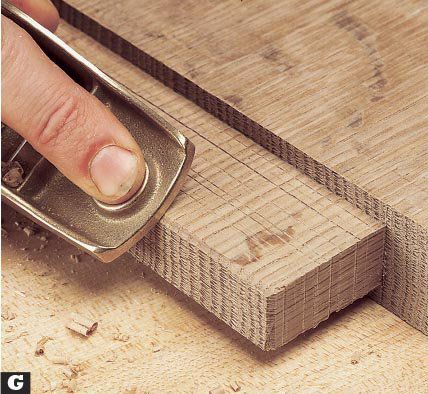
A couple of precautions will help reduce squeeze-out with mortise-and-tenon joints, and avoid the frustration of hydraulic problems created when the glue has no place to go within a tight-fitting joint. This particular messy problem makes it impossible to draw together the joint.
For starters, chamfer the tenon corners, as shown in the photo below. Ditto for the mortise; you'll gain additional space for glue to escape by knocking off the edge of the mortise. Then apply glue on all but the last 1⁄2 " of the tenon. Glue buildup within the joint will automatically cover that area.
Before walking away from the assembly, deal with the glue squeeze-out. After it skims over (glue loses its shine in a period that varies with the amount, type, and room temperature), remove glue puddles with a spatula or plastic putty knife. Then dampen a rag in clean water, and remove excess glue. If you miss a spot, some types of dried glue can be loosened with a dab of xylol or toluene. With porous-grain woods such as red oak and ash, be careful that you don't force glue into the pores. To avoid transferring glue to other surfaces, change rags frequently.
If you haven't yet applied finish, don't make the mistake of hurrying to sand freshly glued, unfinished surfaces. Water-based glues—including all the yellow glues—will temporarily swell the surrounding wood. Sand too soon, before the glue dries completely, and you'll wind up with a long, hard-to-fix recess once the wood fibers dry and shrink.
Before you apply stain or finish, wipe down all surfaces with naphtha to reveal glue blemishes you'll need to remove.
2 simple jigs for flatter, quicker glue-ups
Sure, you could fiddle with odd scraps for clamp blocks, but these quick-and-easy jigs will make glue-ups go more smoothly.
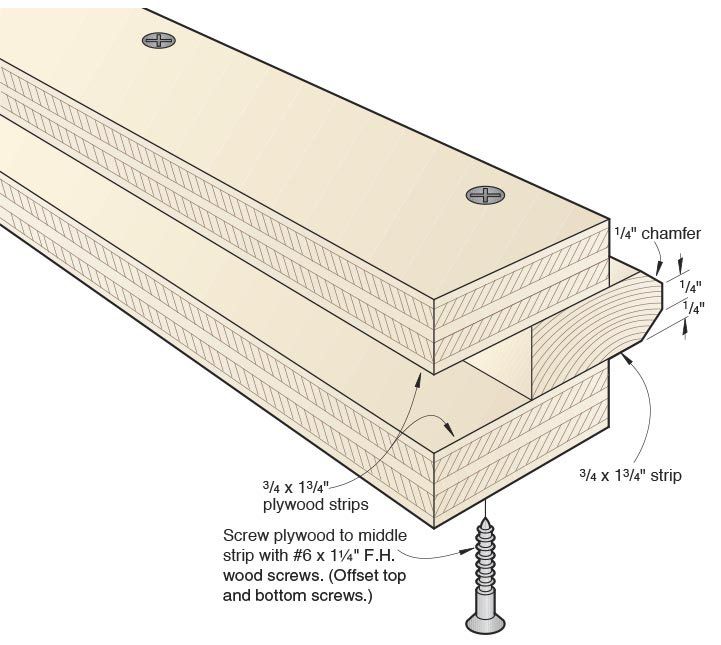
■ For edge-glued projects, cut a scrap from the same thickness of stock you'll be gluing and sandwich it between two long strips of 3⁄4 " plywood, as shown below.

■ Screwing hardboard tabs onto U-shaped clamp blocks, as shown below, helps you hold the blocks in place while arranging clamps for a glue-up. The tabs also provide a resting place for the clamp bars to keep them off the glue-up, while the blocks without the tabs distribute clamping pressure across a wider area than the opposing clamp jaws alone.


