Great Finishes for the Great Outdoors


Projects destined to spend all or part of their life outside need a finish that protects the wood against two enemies: moisture and ultraviolet (UV) light. That's a tall order, and no finish can stand up to the challenge without periodic maintenance. Choose one of these three options based on the level of protection you require and the amount of effort you're willing to invest.
Let it sink in
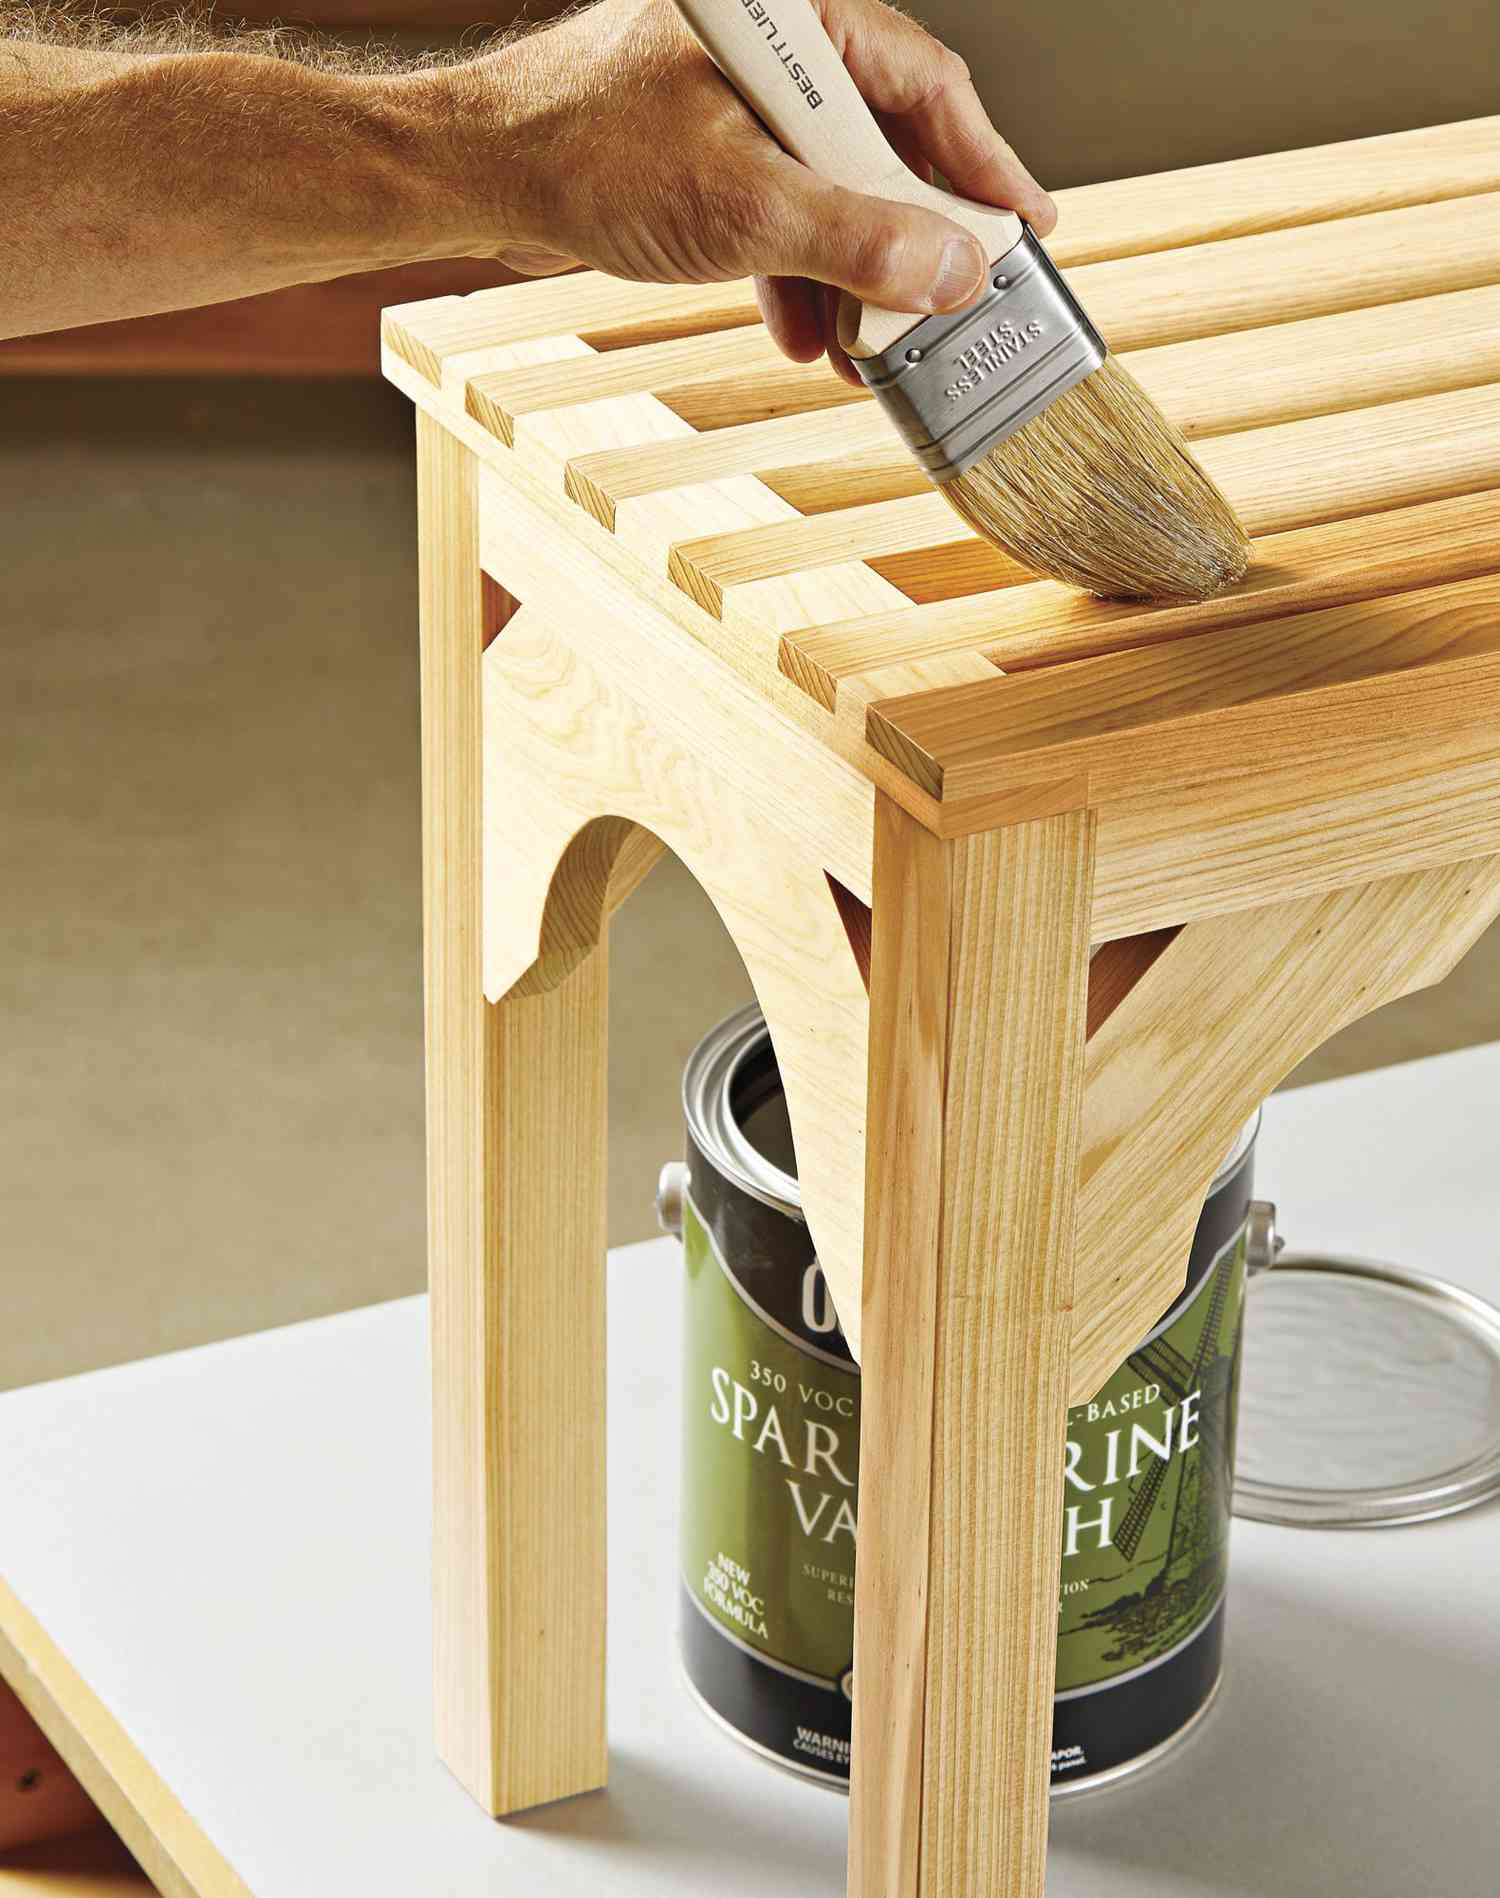
For ease of application and maintenance, you can't beat a penetrating oil finish. Penetrating oils soak into the surface of the wood, preventing it from absorbing moisture. They typically contain UV inhibitors to block out harmful rays from the sun that destroy lignin, the component in wood that gives cells their rigidity. But for even more protection, choose a pigmented penetrating oil. The ground-up pigments in these finishes block UV light for years as well as inhibit mold and mildew growth. Pigmented penetrating oils protect your project and impart color all in one step.
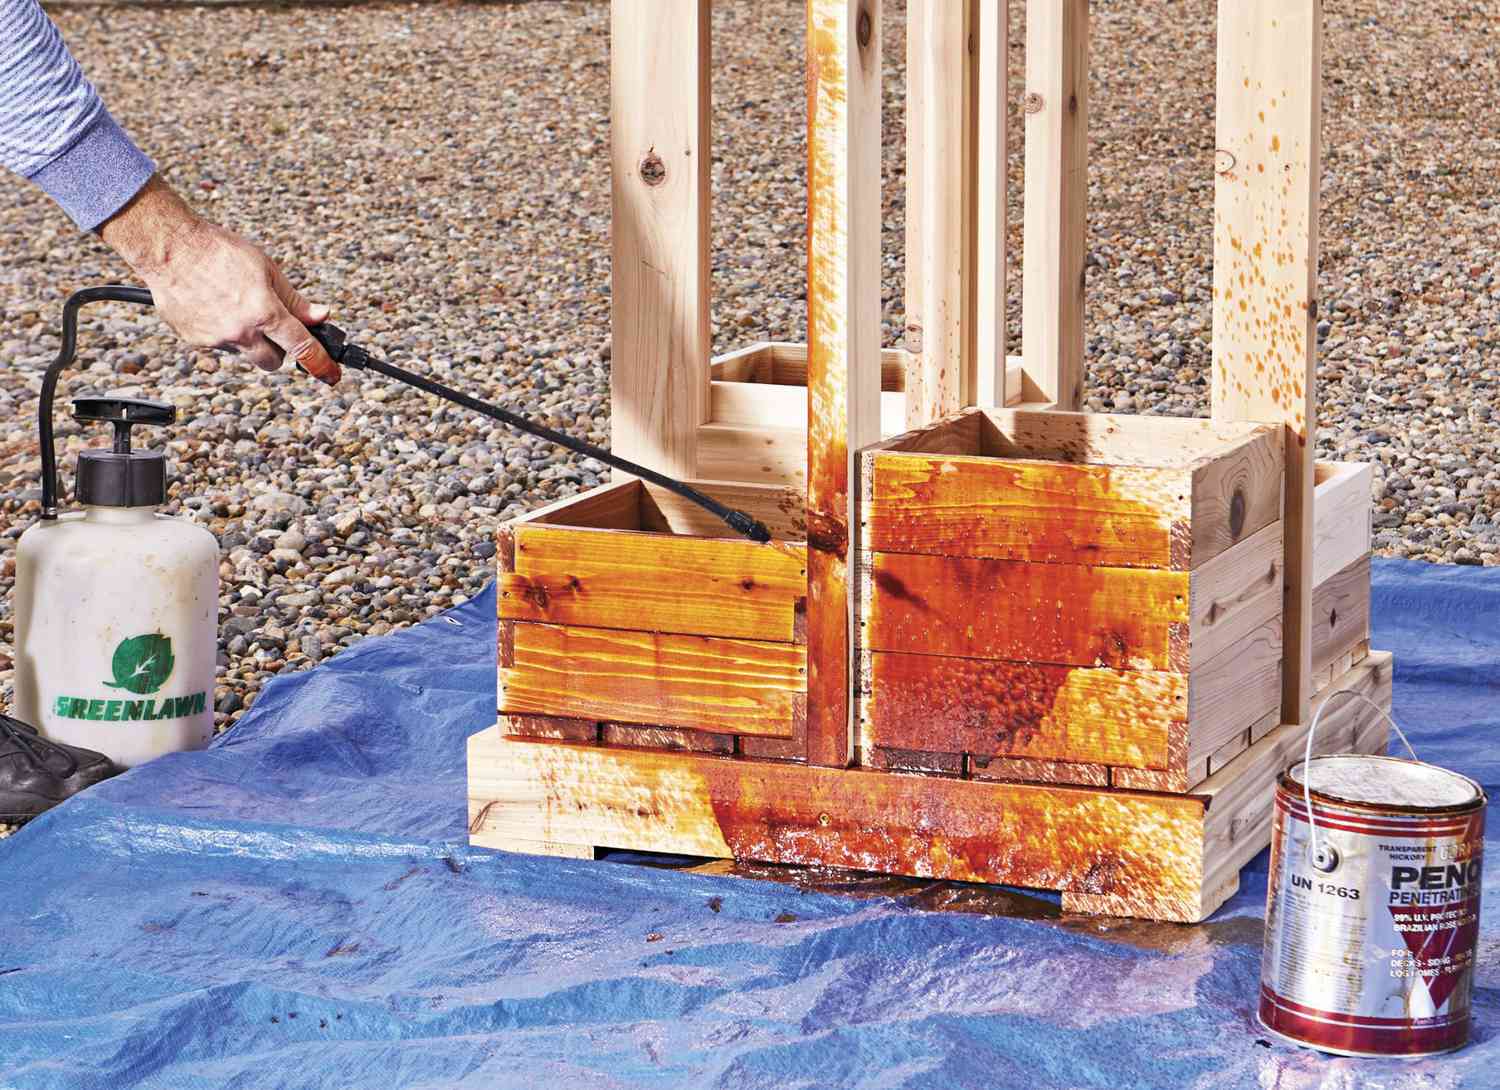

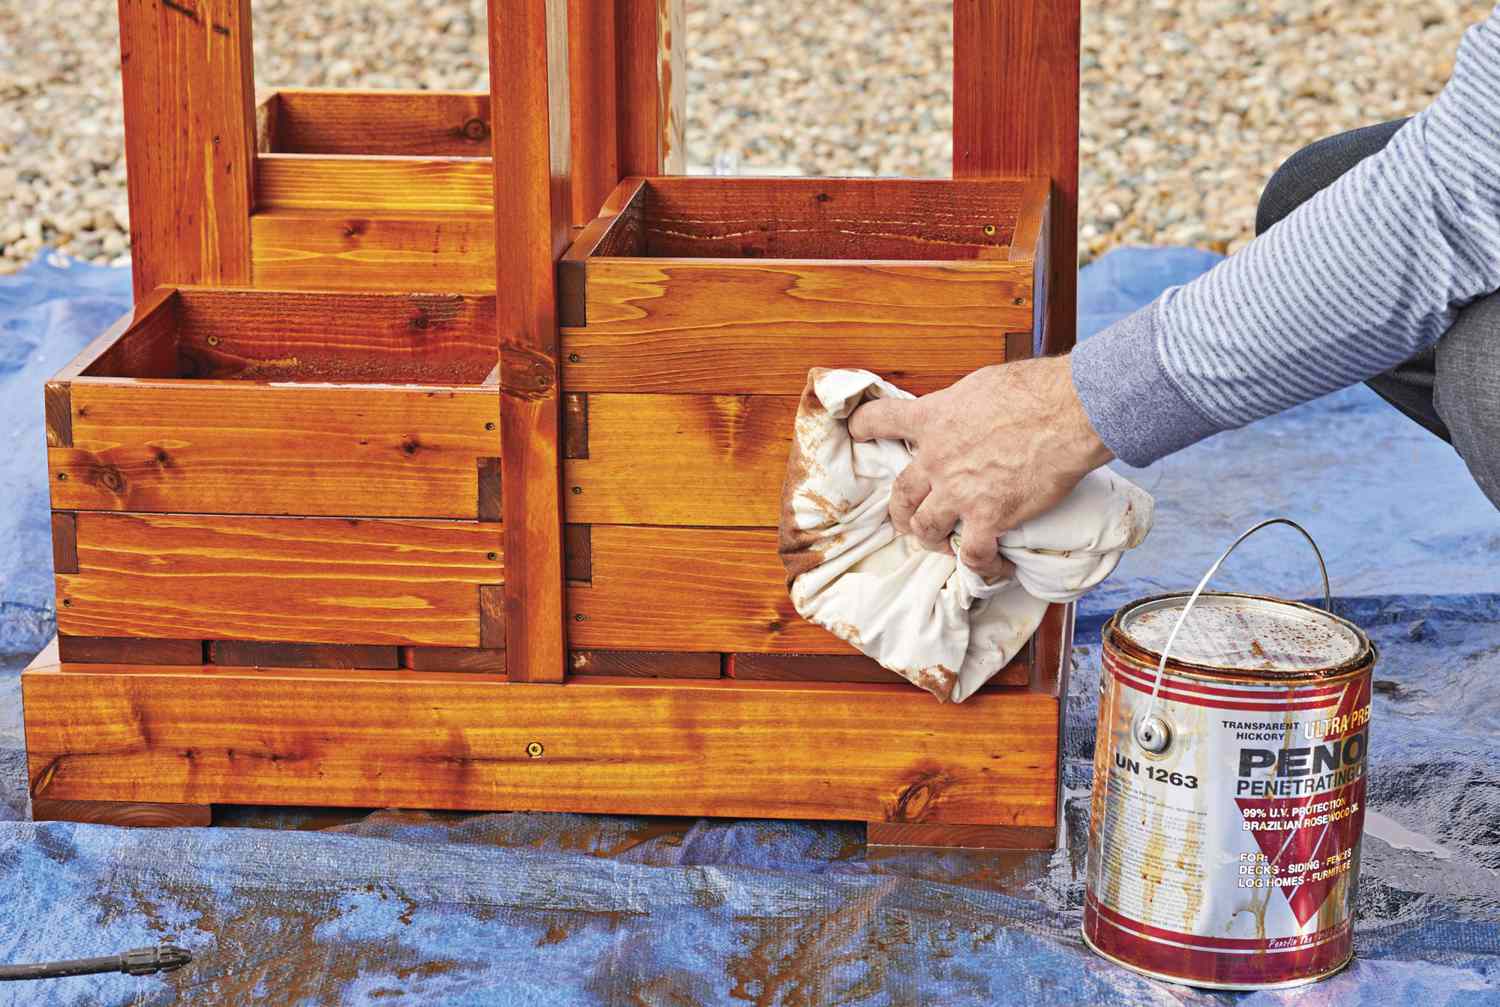
To apply a penetrating oil, stir the contents thoroughly before use to evenly mix the pigments and solids. Brush, roll, or spray a liberal amount of finish over the entire project (photo, above). Raw wood soaks up quite a bit of oil the first time you apply it, so reapply if the surface looks dry immediately. After allowing the oil to penetrate according to the manufacturer's recommendation, typically between 10 and 30 minutes, wipe off any excess with a clean rag (photo, below).
Although it doesn't offer as much protection as other outdoor finishes, renewing a penetrating oil finish couldn't be easier. Simply wash down the surface with a solution containing 3⁄4 cup of bleach per gallon of water and allow it to dry, then reapply a coat of the oil. Penetrating oils vary in quality from manufacturer to manufacturer, but plan on reapplying every 2–5 years.
Capture it in film
Film finishes, such as paints, polyurethanes, and varnishes, sit on top of the wood, forming a barrier to moisture. While paint offers the most UV protection, it doesn't allow the natural beauty of the wood to show through the way a varnish does. Varnishes sold for outdoor use are often labeled as marine or spar varnish. Spar varnishes remain more flexible than ones for interior use. This allows the finish to stretch without cracking as the wood expands and contracts. They also contain UV inhibitors, but when contained in a clear finish, most UV inhibitors only last a few years. For longer-lasting protection, stain the wood first. The stain will continue to block UV light well after the inhibitors in the finish cease to be effective.
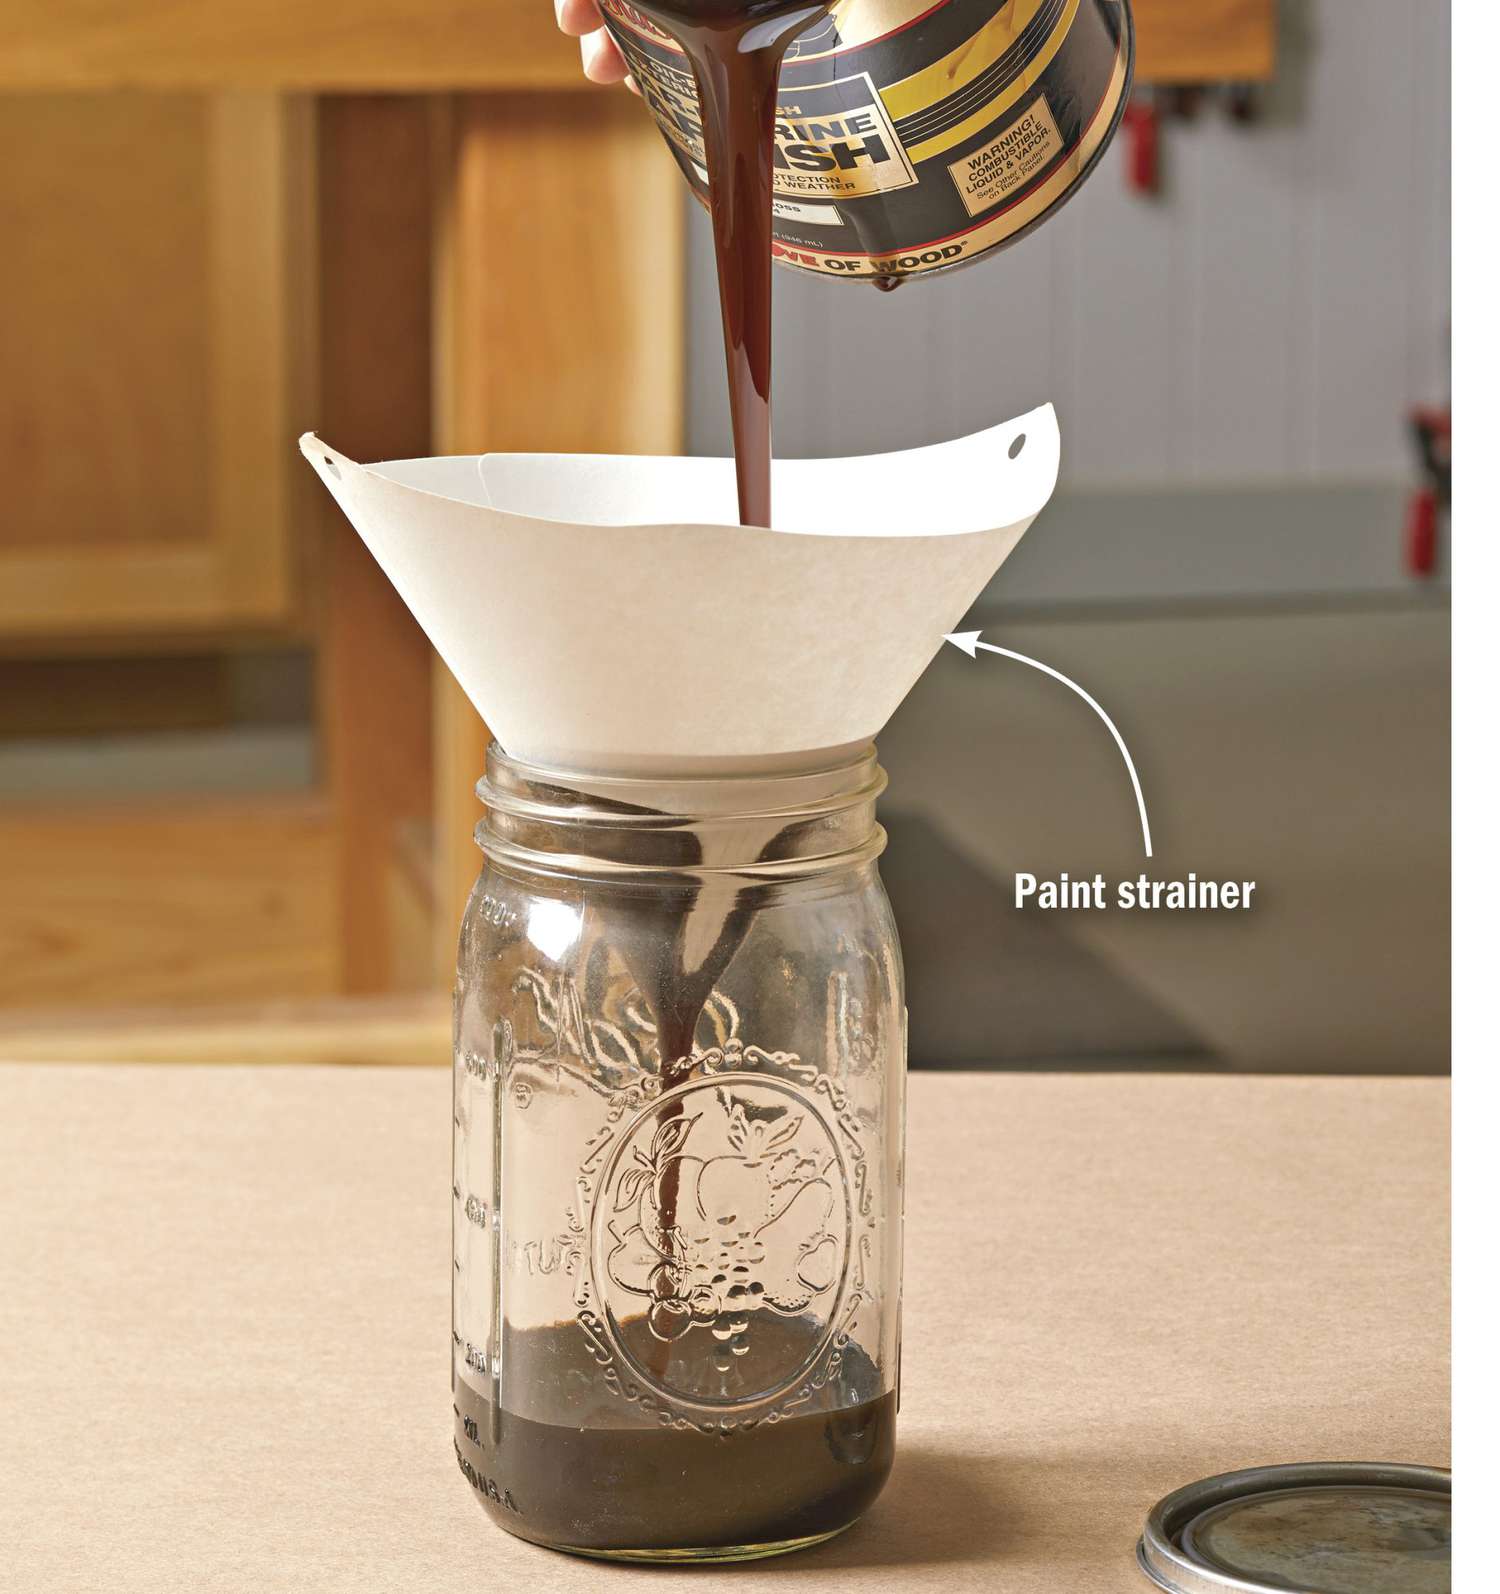
Before application, stir the varnish thoroughly to mix any solids that have settled to the bottom of the can and then pour it through a strainer (photo, above). Apply the varnish using either a fine China bristle or badger hair brush.

Brush on the varnish in straight, even strokes, keeping a wet edge and tipping off the surface as you go (photo, above). Allow the varnish to dry according to the product directions. Then, remove brush marks and imperfections using 220-grit sandpaper on a hand sanding block. Vacuum and wipe down the surface with a tack cloth before applying the next coat. To build sufficient protection, apply a minimum of three coats.
A varnish finish requires periodic maintenance, usually every 2–3 years. If you notice slight flaking or a chalky appearance on the finish, lightly sand the surface and vacuum up any dust before applying a fresh coat of varnish. If you keep up with the maintenance, a varnish finish will last for years. But let it slide, and the varnish will crack, allowing moisture under the film barrier. Once this happens, the varnish lifts and cracks more. At this point, you must strip the entire project down to bare wood before reapplying.
An impenetrable barrier
Epoxy finishes provide the most protection of all outdoor finishes, creating a thick, plastic-like, water-impermeable barrier on the surface of the wood. This makes them the finish of choice for boat builders. Although epoxy finishes do a great job at blocking moisture, they don't offer any UV protection. In fact, UV light will break down the epoxy, causing it to yellow and eventually crack and fail. For this reason, you must overcoat an epoxy finish with a spar varnish or polyurethane with UV inhibitors. This makes epoxy the most expensive and labor-intensive choice.
Tip! Some epoxy manufacturers offer spar varnishes formulated to work with their products, eliminating any concerns about finish compatibility.
Epoxy finishes work best on projects with flat surfaces easily accessible from all sides. To allow the epoxy to flow freely over the surface, avoid projects with complex moldings, crevices, or closely spaced slats that are hard to reach or where excess epoxy might collect. Epoxy doesn't bond well to sharp corners, so ease all edges with sandpaper or a round-over bit in the router and then sand smooth all surfaces.

Because you have a narrow window of time to apply the epoxy once you mix the resin and hardener, make sure you have everything ready beforehand. Follow the manufacturer's recommendation when mixing the epoxy, keeping in mind that multiple thin coats give better results than one thick coat. Stir throughly but slowly to avoid introducing bubbles into the mixture (photo, above). For large projects, choose a slower-setting epoxy or work in sections, mixing small batches of epoxy as needed.
Before heading out
Regardless of the finish you choose, if you plan to do your finishing al fresco rather than inside, follow these guidelines for best results. First, check the weather conditions. Most finishes provide recommendations for temperature and humidity levels. Applying a finish when it's too cold (or too humid) can prevent your finish from penetrating or drying properly. Warm, dry days are best.
Avoid finishing in direct sunlight. Even with a cool air temperature, heat from the sun's rays causes the finish to start drying before it has a chance to level out. Choose an overcast day with no rain in the forecast, or work inside a garage (with the door open) or on a covered porch or deck.
While some air circulation is beneficial for the drying process, avoid finishing on breezy days. Airborne dust particles and debris landing on your wet finish creates blemishes. Combat this by setting up defensive walls of cardboard or plastic sheeting around your project to protect it from dust.

Apply the epoxy with a bristle brush. For large surfaces, use a foam roller as a squeegee to spread the epoxy, rather than rolling it (photo, above). After application, go over the surface lightly with a foam brush (photo, below). With most epoxies, you can apply a second coat once the first dries to the touch but remains soft enough to leave a fingerprint (usually 2–3 hours). Sanding between coats is not necessary. If you miss that window of opportunity, let the first coat dry completely before applying the next coat. Apply three to four coats total.

After giving the final coat at least 48 hours to cure, level the surface by lightly wet-sanding with a sanding block and water or mineral spirits. Start with 150-grit sandpaper and work your way up to 220 grit for a satin finish or 320 grit for a gloss finish.
Before topcoating with varnish, thoroughly wipe down the surface with clean water and dry with rags or paper towels. Water beading up on the surface of the epoxy indicates contaminants that will interfere with the varnish. In this case, wipe down the surface with mineral spirits and dry with a rag before applying at least two coats of varnish.
In order to maintain the integrity of the epoxy coating, the varnish topcoat requires maintenance every few years, when it begins to look cloudy or dull. Lightly sand the surface, wash it down, and apply a fresh coat of varnish. Don't wait until the topcoat cracks or peels or you'll need to remove the epoxy finish entirely and start over. Diligent maintenance of the varnish topcoat will help the epoxy last for years.
Get your feet wet to keep them dry
End-grain legs or feet resting on the ground soak up moisture like sponges. Give your feet some extra protection by setting them in small cups of penetrating oil while you finish the rest of the project. The penetrating oil wicks into the end grain, creating a barrier to ground moisture.
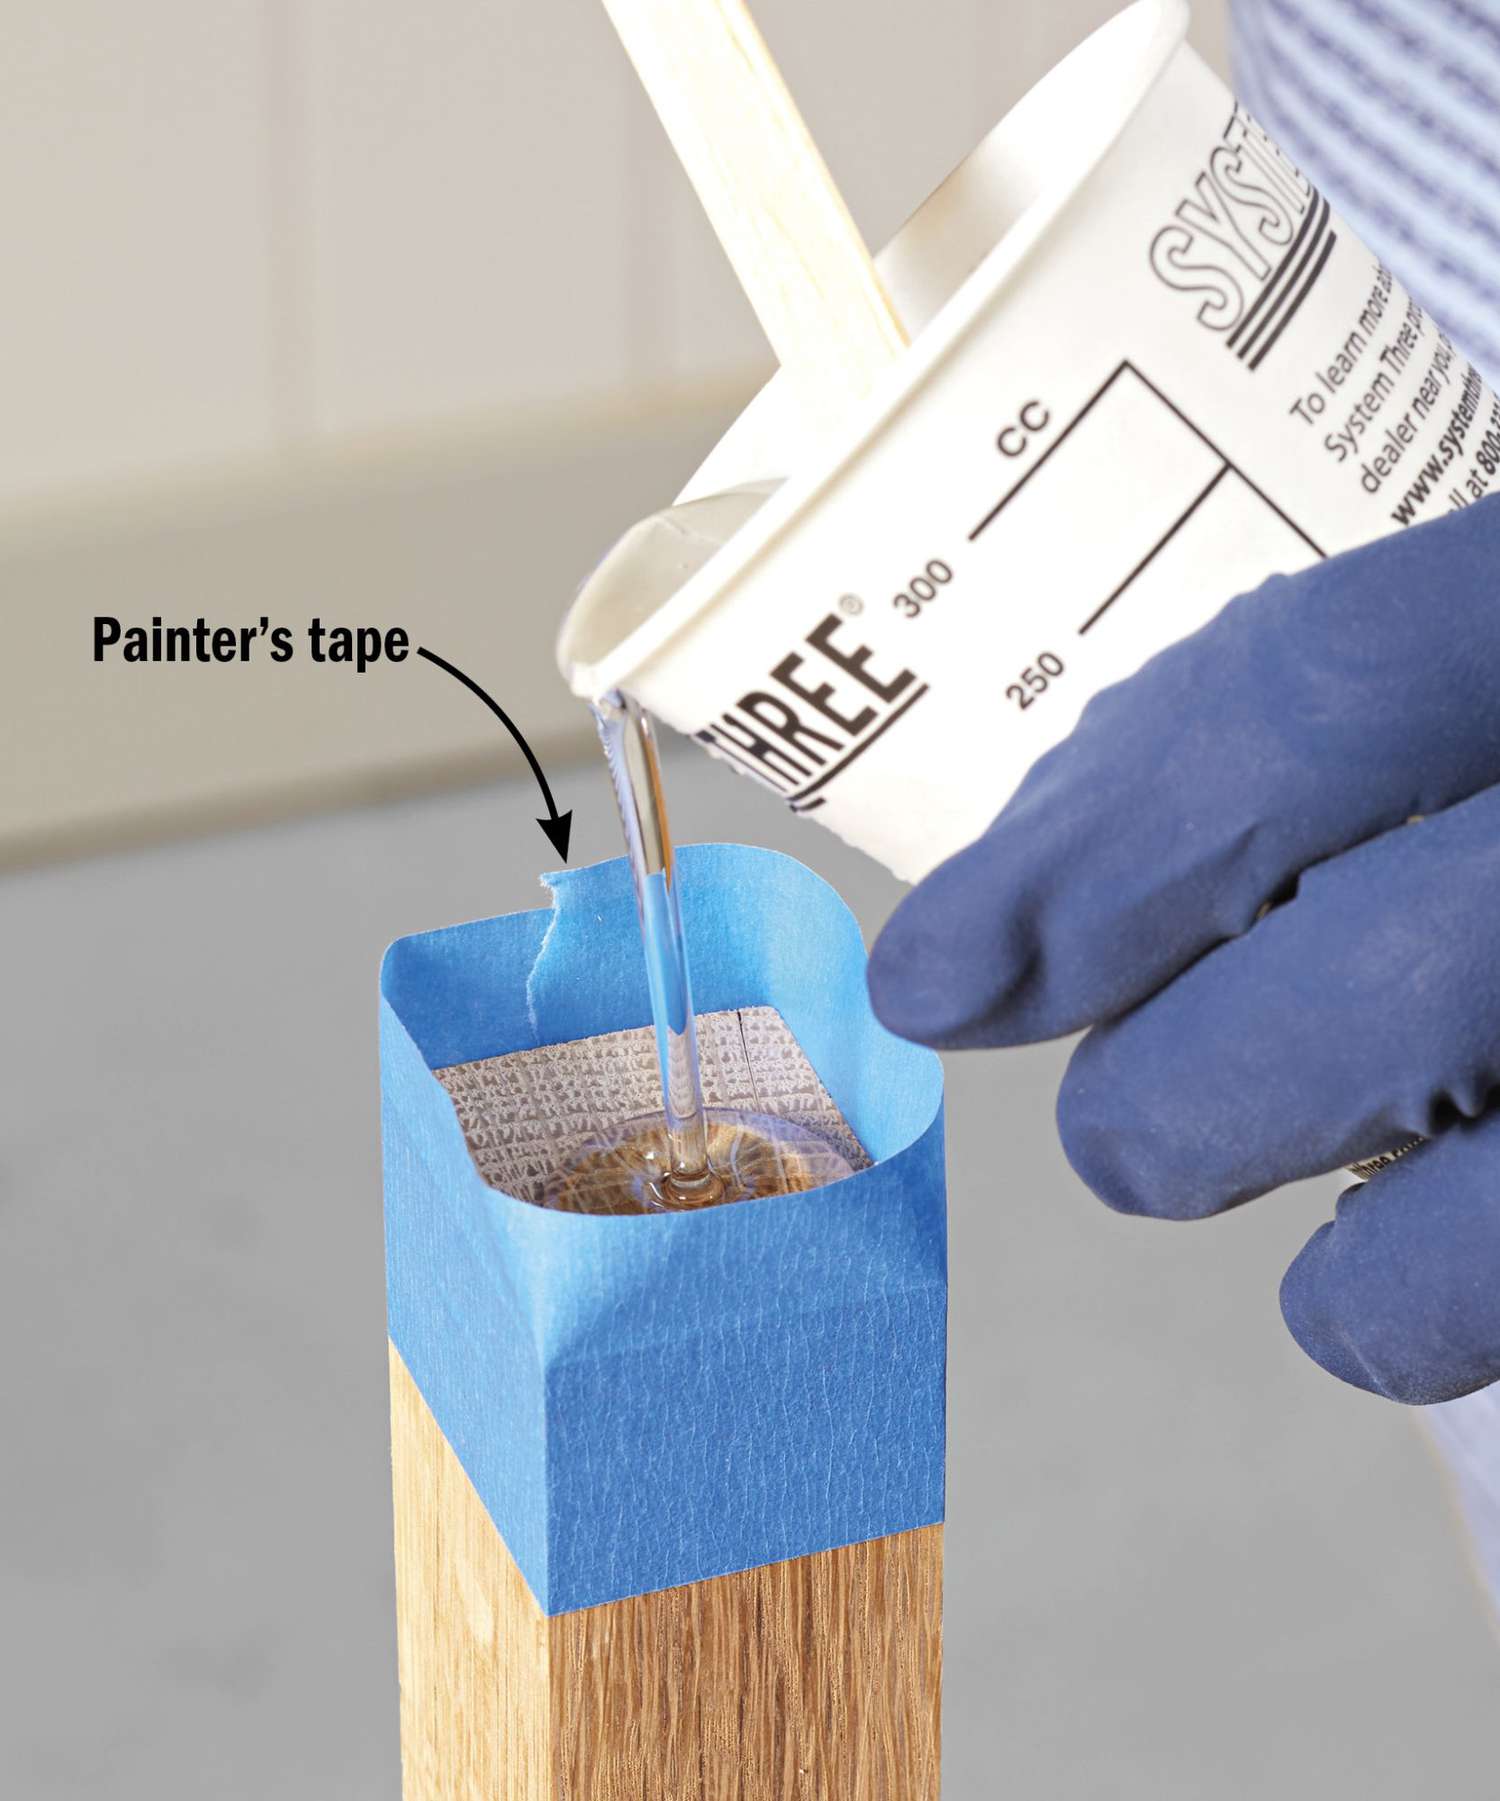
Another option is to coat with epoxy the bottoms of feet or legs. Before applying your chosen finish, flip the project upside down and create a dam around the leg or foot with masking tape. Pour epoxy onto the masked-off area (photo, above). After the epoxy cures, remove the tape and sand smooth to blend the transition.