How to faux-finish like a pro


When we found out about Tim Vander Well's skill as a decorative artist, we asked him to show us his wood-graining technique. You'll be impressed with the results. Take a peek at his secrets, then have a go at it yourself.
You're a woodworker, so naturally you like to build projects with beautiful wood. But once in a while, it would be fun—and even useful—to know how to fake it.
What if you could take a humdrum piece of medium-density fiberboard (MDF) and make it look like satinwood? That would accomplish a couple of things: It would save you a chunk of money, and protect an exotic wood at the same time.

Or what if you were remodeling your home, and wanted to turn a well-made but dull door into a richly figured walnut showpiece? That would be worth some effort, don't you think?
Faux (pronounced "foe," it's French for "false") finishing began long ago as a means of imitating wood, stone, and various kinds of finishes on common materials. Faux bois, or wood-graining, was all the rage in the 19th century, when European status-seekers wanted to give the impression that they could afford the finest woods even though they couldn't. The idea made it across the Atlantic, too. Go to Thomas Jefferson's Monticello home in Charlottesville, Virginia, and you'll find faux woodwork right alongside expensive furniture that Jefferson imported from France.
No doubt about it, faux wood graining is an art, requiring practice and patience. But we think you can find lots of fun in the learning.
Tim Vander Well, a master at this sort of thing, just happens to work in a loft not far from WOOD® magazine headquarters. What he can accomplish in on short session will set you to wondering what you might be able to create in your own workshop.
Gather your equipment
The first key to faux finishing lies in the glazing you use. A glaze is like a thin paint that can be manipulated while wet to create effects you can't get with paint or stain alone. See the sidebar at the end of this article for two glaze recipes.
You'll need the right kind of paint to do this work the way Tim does it. We recommend buying a few small tubes or cans of artist's oils at an art-supply store. You can find the basic colors you need—raw sienna, burnt sienna, raw umber, burnt umber, Van Dyke brown—and their heavy-bodied consistency will help you create the striking effects you want.
A wood-graining expert, such as Tim, brings out one specialized brush after another, in sizes and shapes that you'd never find in a housepainter's toolbox. Wood graining calls for a series of effects, and you can find a brush to help you achieve each one.
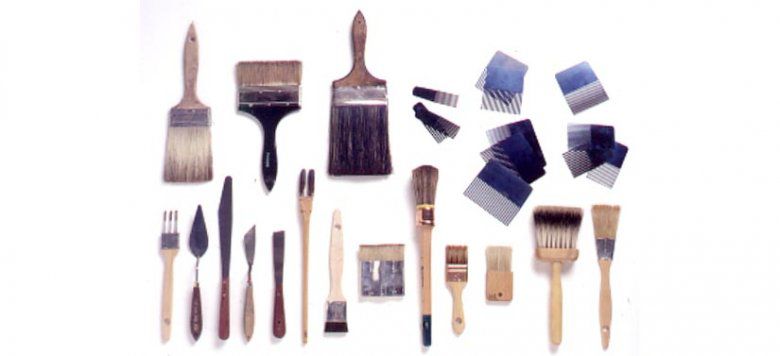
But you don't have to lay in a box full of brushes just to experiment with wood graining. You can give it a try with just a few brushes and tools similar to the ones shown in the array above. If you want to take your efforts a step further, visit an art store or contact the sources at the end of this article to buy the kinds of brushes you see Tim using in this article.
Prepare the surface
Pick out a piece of material to practice on. It can be wood, MDF, plywood, or just heavy card stock or poster board. Also, round up a good-looking sample of hardwood to use as your model, and apply a coat of oil to highlight its grain.
Start with a primer coat of paint on your sample board. The test of your art savvy begins now, as you choose the lightest background color that you see in the wood species you want to imitate, then select an alkyd paint that's a shade lighter than that. Apply two coats of this paint over the primer.
Brush on the paint in the direction of the grain, if any. Lightly sand each coat with 220-grit sandpaper after it dries.
Six steps to walnut grain
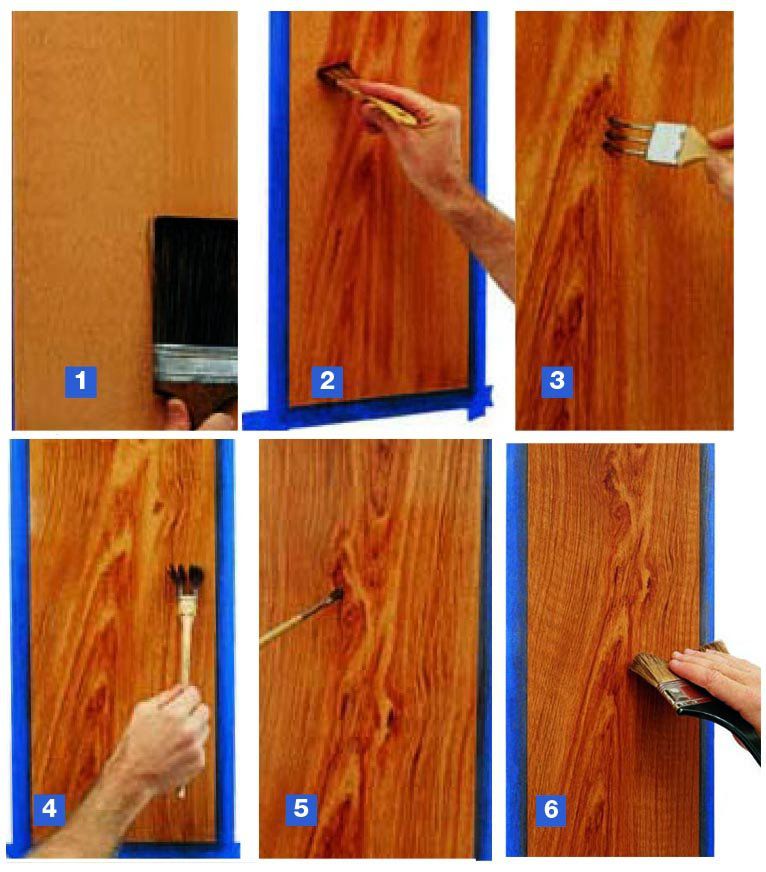

1. After you paint the surface, make it resemble wood pores with a technique called flogging. To do this, apply a coat of glazing. Then add some Van Dyke brown to a brush with long, stiff bristles—it helps to have a special flogging brush for this step—and begin working up the surface, one brush-width at a time.
Grip the brush just above the ferrule, and tap the glazed surface with the heel of the bristles. Keep tapping your way up the surface in a single row from bottom to top, then repeat. Overlap each succeeding row. The more times you go over the glaze, the finer the pores.
2. Mix glaze, burnt umber, and burnt sienna, plus small amounts of Van Dyke brown, ultramarine blue, and black. While the glaze from Step 1 is still wet, use this mixture to sketch in the figure grain with a brush—ideally, a tooth spalter.
3. Still working in the glazing, define the heart grain with a three-headed pencil-grainer brush, dipped in burnt umber and burnt sienna. Shape a series of peaks, but don't make them too sharp or regular. This is your chance to make wood look the way you want it to look.
4. Next, make the straight grain, using a two-headed brush loaded with glazing mixture and dabbed in black glaze. The ideal piece of lumber for building a piece of furniture might consist of arrow-straight grain from end to end, but it's more fun, and still natural, to make something showy. Start off-center, and put in a gentle curve or two.
5. Define knots and heart grain details with a small, flat brush. This step requires a good eye, a deft touch, and lots of practice.
6. Let the piece dry for 24 hours, then apply an overglazing tinted with Van Dyke brown. To add the subtle, rippling, moire patterns you see in quilted wood grain, hold a wide brush in a V shape and dab the surface, moving down the surface and dragging down slightly with each stroke.
Five steps to quartersawn-oak grain
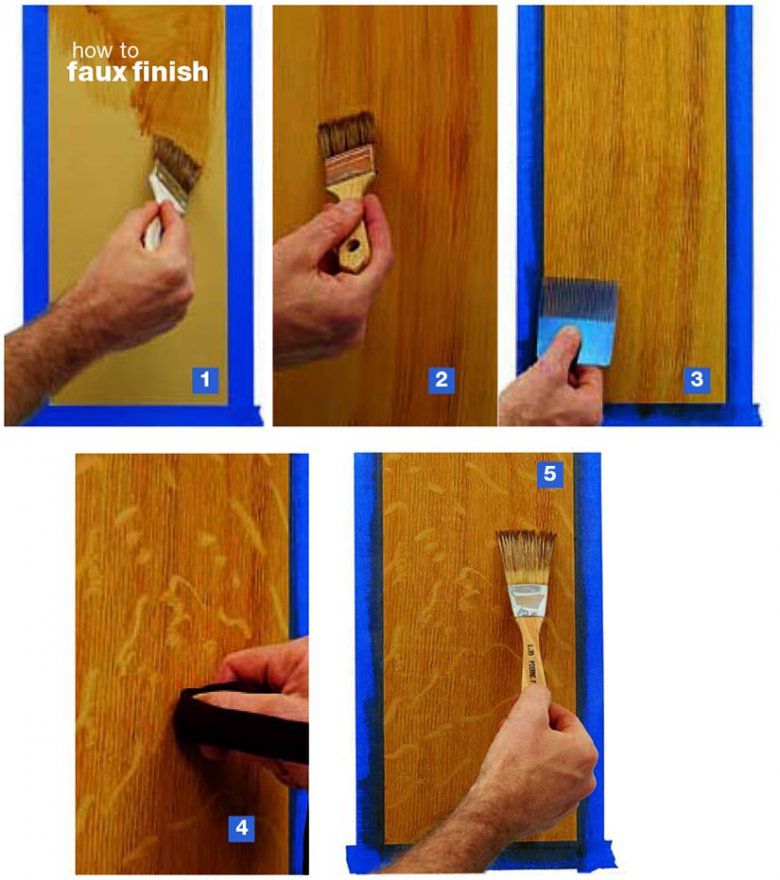
1. After painting a flat surface, apply a coat of glaze. You'll need a blend of raw sienna, raw umber, and burnt umber.
2. Dip a tooth spalter brush in a tinted glaze and create color contrasts. The example you see here includes raw umber, burnt sienna, yellow ochre, and a touch of ultramarine blue.
3. After dragging the surface with lint-free burlap, comb it to define grain lines. Steel graining combs come in various tooth widths and overall widths. You even can start with an inexpensive, three-sided rubber comb.
4. Using a real board as a model, draw the distinctive rays of quartersawn oak with a piece of felt. The felt absorbs some glazing and gives the rays a muted, natural look.
5. Let the piece dry for 24 hours, then brush on a coat of "overglazing" that includes Van Dyke brown and raw sienna. This is the time to add light grain lines through the rays and subtle moires.
Here are some sources:
* Professional Painted Finishes, A Guide to the Art and Business of Decorative Painting; Watson-Guptill Publications.
* The Catalog of Artists' Materials; Daniel Smith, www.danielsmith.com
Two easy glaze recipes

You need the right blend of ingredients to get the best results. Tim uses this recipe:
● 1 part linseed oil
● 2-4 parts turpentine
● not more than 10 percent Japan drier
● artist's oil colors, as needed
Or, if you want to simplify the process and avoid mixing paint, you can use this recipe:
● 1 part premixed glaze
● 1 part interior oil-based satin paint (off the shelf or mixed by the retailer)
● 1 part paint thinner
Either recipe makes an oil-based glaze that you'll use in two ways as you produce a faux finish:
1. Apply it by itself as a base coat for wood graining.
2. Pour out a small amount on wax paper to mix with individual colors of artist's oil as you add the various graining details.
You also can use water-based glazing, which requires you to work more quickly. Check the resources for more about that approach.
This faux artist is for real
Tim Vander Well went to Iowa State University to study industrial engineering, not art. Later, he added two years of art studies at the University of Texas, and now his work as a decorative painter and renovation project manager takes him all over the world.
Among many memorable assignments, he has worked on a high-rise hotel in Barcelona, Spain; a department store in Singapore; a ceiling mural in South Africa; and during his recent stay in his hometown of Des Moines, he helped to re-gild the gold dome high atop the venerable Iowa State Capitol building.

If you travel through Iowa on Interstates 80 or 35, you have the opportunity to see a wonderful example of faux wood grain at Living History Farms in Urbandale, on the west side of Des Moines. Tim, his twin brother Terry, and Richard Davis of Los Angeles worked their magic in the Tangen House in 1995. They created mahogany, walnut, light-oak, and dark-oak finishes for the house, built to represent the home of a business owner in the 1875 village of Walnut Hill.