How to Install Concealed Hinges


They might look bulky and clumsy, but don't let that fool you. European-style hinges offer some great advantages when hanging cabinet doors. They install easily, make it simple to nudge doors into perfect alignment, and remain out of sight when the doors are closed.
These hinges are part of a standardized cabinet system developed decades ago in Germany for efficient production. One end of a European hinge fits snugly into a hole that you drill in the door. The other end connects to a mounting plate attached inside the cabinet; with most models, you simply snap it in place. It's just that easy to disconnect the hinge, too.
Be sure to choose a hinge style that suits your application. European hinges come in various models for inset and overlay doors, frameless and face-frame cabinets, and also in a range of opening-angle options. Any model works with either frame-and-panel or slab doors.
To get you started, we'll show how to hang overlay doors with medium-priced hinges that we bought at a home center. Be sure your hinge purchase includes templates for locating the mounting holes. Otherwise you'll have to experiment on scrap to determine hole locations.
The tools you need include:
- a drill press and portable drill;
- a Forstner drill bit that's either 35mm or 13⁄8 " in diameter;
- a bit to drill pilot holes (we used a 7⁄64 " bit to match #8 screws);
- and, as an option that makes the job go more smoothly, a 7⁄64 " self-centering Vix bit.
If you buy a Forstner bit to use with European hinges, make sure it has a short lead point that won't penetrate the outer face of your door when you drill a 1⁄2 "-deep cup hole. If you already have a bit of the correct diameter, test it on scrap the same thickness as your door to make sure.
Follow these steps to install this common hinge

1. For convenience and consistent results, make a drilling guide to help you locate the mounting plates. With a standard blade mounted in your tablesaw, rip a single kerf approximately 1⁄2 " deep centered on one edge of any handy scrap piece (ours measured 3⁄4 ×2×10") to make a handle. Cut a piece of 1⁄8 "-thick hardboard to approximately 3×6" to make the panel. Slip a long edge of the panel into the saw kerf, as shown above, with one short edge flush with the top end of the handle.

2. Now, tape the paper template for mounting plates to your drilling guide, using the 33⁄4 " dimension shown above for a door that's about 24" long. (Use a smaller measurement for short doors, and a longer one for long doors.) Place the guide next to your finished door, as shown, with its top edge 1⁄8 " beyond the door's top edge to produce a door reveal of 1⁄8 ". (This dimension also can be changed to create a larger or smaller reveal or to accommodate inset doors.) Use a square to align the two template centerlines and then tape the door template to the door.

3. Using the marks on the paper template as entry points, drill 7⁄64 " pilot holes through your drilling guide. Now, place the door facedown on your drill-press table. Lower the Forstner bit until its lead point touches the cup-hole center marked on the paper template and then lock the quill. Slide your fence against the door and lock it in position. Then place a stopblock against the end of the door and clamp it to the fence. Measure and record the distance from the bit's lead point to the stopblock. Finally, drill the cup hole to the required depth, as shown above. To mount hinges on several doors, drill one hole in each door before changing the setup.
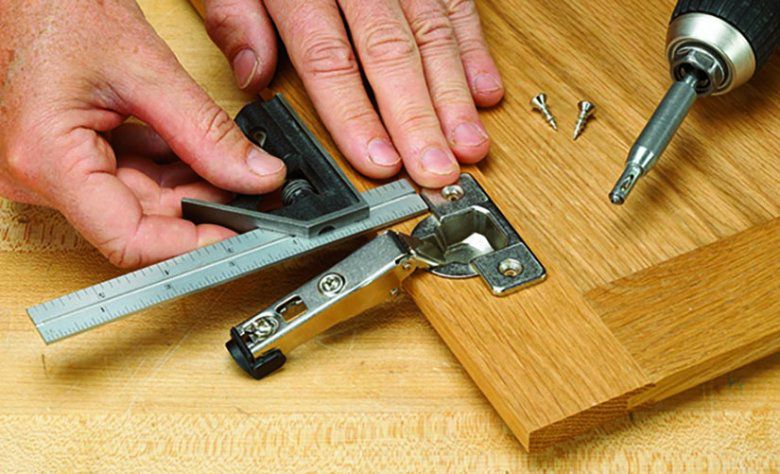
4. To drill the second cup hole at the opposite end of the door, switch your stopblock to the other end of the drill-press fence at the recorded distance. Now clamp it in place, position the door, and drill. Place and align the hinge on the door and then drill the screw pilot holes. Screw the hinge to the door and repeat the process for the other hinge or hinges.
If you get serious about using European hinges, and build a fair number of cabinets, step up to models that are even handier to install on the door. Some mount without screws by squeezing against the walls of the cup hole. Call Woodworker's Hardware at 800/383-0130 for a catalog.
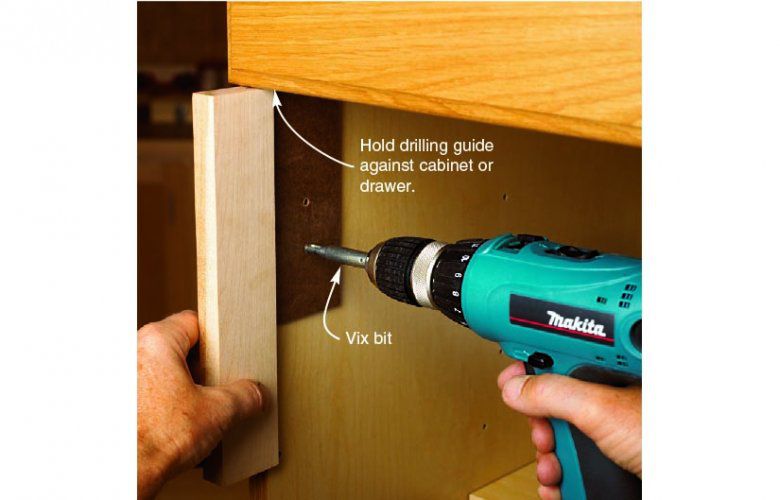
5. To drill holes inside the cabinet for the mounting-plate screws, hold your drilling guide with its top end against the drawer edge, as shown above, or the top of the cabinet. Drill the holes and then attach the mounting plate with the supplied screws. Use the drilling guide in this orientation for top corners and then flip it upside down to handle bottom corners.

6. You'll find adjustment variations among different brands and models of European hinges. Here's how to tweak this common design: (1) Loosen both mounting-plate screws on both hinges to nudge the door up or down. (2) Turn this screw to bump the door left or right. (3) Loosen this screw to move the door in or out and make it flush with the cabinet front.