How to table-mount your router

Precision counts when you mount a router under a table. Ideally, you want the router and its insert plate to lift out easily when necessary, and to stay solidly in position while you rout.
If you're using a commercial insert or an insert-based router lift, proceed to the "Cut the table opening" section. If you are making your own insert, start right here.
Prepare the insert
1. Buy a 3⁄8 ×12×12" piece of acrylic or polycarbonate plastic from a woodworking store or catalog. Either type works fine; acrylic is somewhat stiffer, while polycarbonate offers greater resistance to shattering. You can use the piece as is, or trim it to your preferred dimensions with a fine-tooth laminate- or plywood-cutting blade in your tablesaw. Check for squareness at every corner.
2. Chuck a 1" Forstner bit in your drill press, and drill a pair of finger holes near opposite corners of the insert to help with quick installation and removal. We centered ours 11⁄2 " from each of the adjacent sides. Ease the top and bottom edges of the holes, using a 1⁄8 " round-over bit in your router.
3. With the protective covering still in place on the insert, use a pencil or marker to draw diagonal lines from opposite corners of the insert to find the center. Install a V-groove bit in your router, and position the router so the bit's point contacts the center, as shown below. Place the router so that the handles fit within the perimeter of the insert plate and therefore through the planned insert opening. Trace around the router's plastic subbase.

4. Now, remove the subbase from your router, and place two strips of double-faced tape on its face. Position it on the insert to match the traced outline. Using a self-centering bit, drill holes through the plate at each of the subbase's mounting holes, as shown in the photo below.

5. Select a Forstner bit with a diameter 1⁄8 " larger than the largest router bit you intend to use (we used a 11⁄2 " bit). Chuck it in your drill press, and drill a through hole at the previously marked centerpoint, as shown below.

Cut the table opening
1. Position the insert on your router table, centered from side to side, and far enough from the table's front edge to allow for a miter-gauge slot and an adequate work area. Trace around it with a pencil, as shown below.

2. Draw lines 1⁄2 " inside the insert outline to form a smaller rectangle, as shown below. These inside lines serve as cutting lines. Drill a start hole for your jigsaw blade, and carefully cut out the opening.

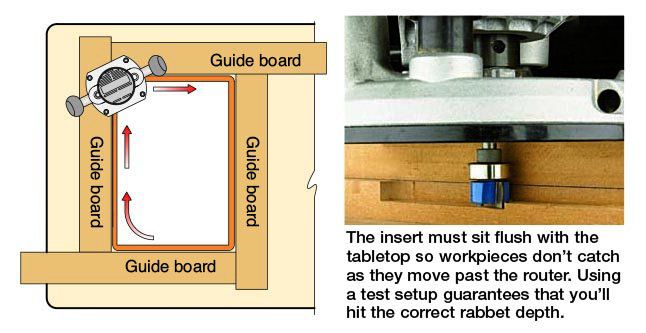
3. Now, prepare to rout a rabbet that will support the insert. Cut 5"-wide guide-board stock from flat 3⁄4 " material. Medium-density fiberboard (MDF) is a good choice. Crosscut five guide boards of equal length (you'll use one as a test piece); the length should be slightly more than the longest edge of the plate outline plus 5". Apply two long strips of cloth-backed double-faced tape to the bottom of each of these guide boards.
Align your insert with the traced outline, and place the guide boards as shown below, using single playing cards as spacers between the insert and the guide boards. These spacers create enough extra room to ensure that your insert is easily set in place and removed, without allowing any significant movement while routing. Tap down on the guide boards with a rubber mallet or apply pressure with clamps to bond the tape firmly. Remove the insert.

4. Next, affix your test guide board on a piece of scrap with double-faced tape, and then clamp the assembly to your workbench. You'll use this test piece to sneak up on the needed rabbet depth for an exact flush fit.
5. Now, you need to put a pattern-cutting bit or dado-cutting bit in your router. Such a bit features a top-mounted pilot bearing, as shown below. The diameter of the bit determines the radius to be shaped at each corner of the opening, and the length of the bit must be appropriate to the planned depth of the rabbet and the thickness of the guide boards. For example, to make a rabbet 3⁄8 " deep with 3⁄8 " radiused corners, we used Woodline USA's WL 1011-D dado-cutting bit with a 3⁄4 " diameter and a 7⁄16 " cutting length.

6. With the router base resting on the surface of the guide boards, adjust the cutting depth to rout 1⁄8 " deep into the tabletop. Then, working clockwise as shown below left, guide the pilot bearing along the inside edge of the guide boards and begin to rout the rabbet. Also rout along the edge of your test piece, as shown below right. Lower the bit 1⁄8 ", and make a second pass on both the router table and the test piece. Again lower the bit 1⁄8 ", but this time rout only partway along the test piece and hold the insert in that rabbet to check the fit. Adjust the depth if necessary, and test again. Repeat this process until the insert rests flush with the top of the test piece. Now, make a final pass on the router table for a perfect fit.
Install the insert and router
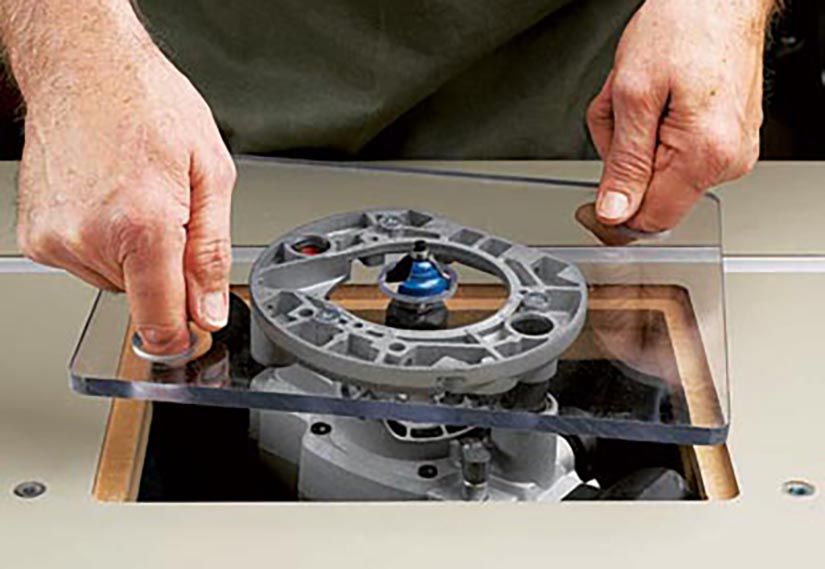
1. Sand the corners of your insert so they match the radiused corners of your rabbet. Install the insert on your router, replacing the subbase mounting screws with longer ones if necessary. Make sure to buy screws with the same diameter and thread type as the originals.
2. Peel off the guide strips around the table opening. Set the insert and router into it, and you're ready for action.