How to Use a Bowl Gouge


Know your gouges
A bowl gouge differs from a spindle roughing gouge in that it is made from solid round bar stock, rather than forged from flat stock [Photo A]. And, although it looks similar to a spindle detail gouge, a bowl gouge has a flute ground deeply along its length.
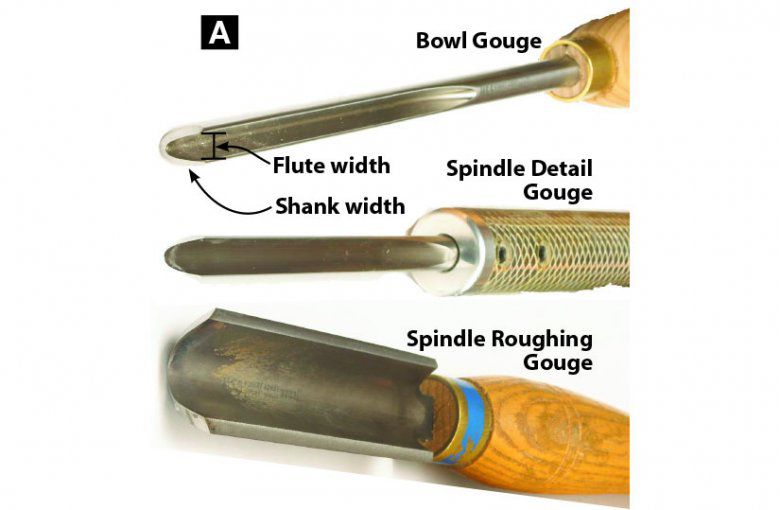
In shopping for a bowl gouge, you'll find them measured in two different ways: British-made tools use the English System that measures the width of the flute (the inside diameter), typically 1⁄8 " less than the outside diameter of the shank. The American System instead measures the diameter of the shank. So a 1⁄2 "-diameter bowl gouge from a North American manufacturer equals a 3⁄8 " gouge under the English System. (If in doubt, ask your tool dealer which system applies to the tools.) We recommend a 3⁄8 " (English System) bowl gouge for most small- to medium-size bowls, because this size is easier to control than larger gouges, and more rigid than smaller ones.
Start with a sharp tool
Like many cutting tools, a bowl gouge needs to be sharpened before use, and you have two options: the traditional "square grind" or the modern "fingernail grind." We prefer the fingernail grind because it works for both pushing or pulling cuts, as we'll explain shortly. Although advanced turners can sometimes achieve a consistent fingernail grind freehand, you'll get the best results from a sharpening jig, such as Oneway's Wolverine Grinding Jig and Vari-grind Attachment (see Source at the end of story), mounted to a 1,725-rpm bench grinder equipped with an 80-grit aluminum oxide wheel.
Begin sharpening by establishing the bevel angle. Adjust the grinder's tool rest angle to 60–80º to the face of the grinding wheel. Lay the gouge, flute up, on the rest [Photo B], and grind a flat bevel on the tip of the gouge [Photo C]. Next adjust the grinder's tool rest 90º to the face of the wheel and lay the tool on its side with the flute facing the wheel. Orient the shaft of the gouge at a 45º angle to the face of the wheel [Photo D]. Then, without changing the angle of the tool, grind the tip to produce a pair of 45º wings extending from the bevel to the top of the flute [Photo E].


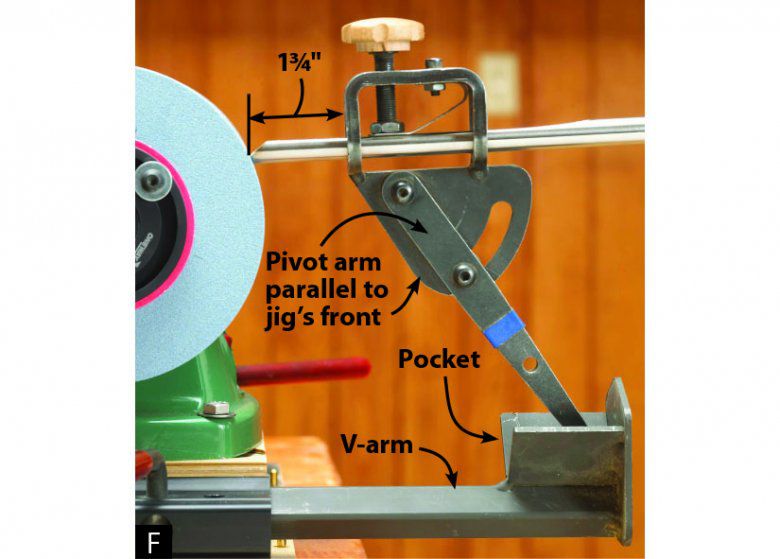
Once you establish the bevel and wing angles, install the bowl gouge, flute up, into the Vari-grind Attachment with the tip extending 1¾" from the front of the jig [Photo F]. Adjust the pivot arm parallel to the jig's front, place the pivot arm into the pocket of the V-arm, and adjust the length of the V-arm so that the tool's bevel angle rests on the grinding wheel. Switch the grinder on and roll the tool and jig clockwise [Photo G], holding the tool centered on the grinding wheel. Keep the tool moving from center to right and back and continue grinding until the tool is sharp with a single faceted bevel from tip to wing. Then, repeat the process for the left side of the tool. Once the bevel is sharpened, make one final pass from left to right to create a smooth and consistent bevel from wing to wing, with 45º wings and a 60–80º bevel angle [Photo H].


After using your gouge for a little while, you may notice that it requires more effort to make the cut. That means it's time to resharpen, starting with the steps shown in Photos F and G. At a minimum, you should resharpen three times while turning a bowl: before starting; before making the finishing cut on the exterior; and before the finishing cut on the interior.
Turn the bowl's outside first
To shape the exterior, make cuts with your bowl gouge by pulling the tip along the tool rest. Position the tool rest slightly below center, and keep the handle of the gouge against your waist. Turn on the lathe, roll the flute about 45º counterclockwise, touch the bevel to the bottom side of the bowl blank, and then pull the tool toward you along the tool rest. Continue making successive cuts from the base of the bowl toward the rim, allowing the left-hand wing to remove the waste while the bevel on the tip of the tool rubs against the freshly cut surface [Photos I and J].
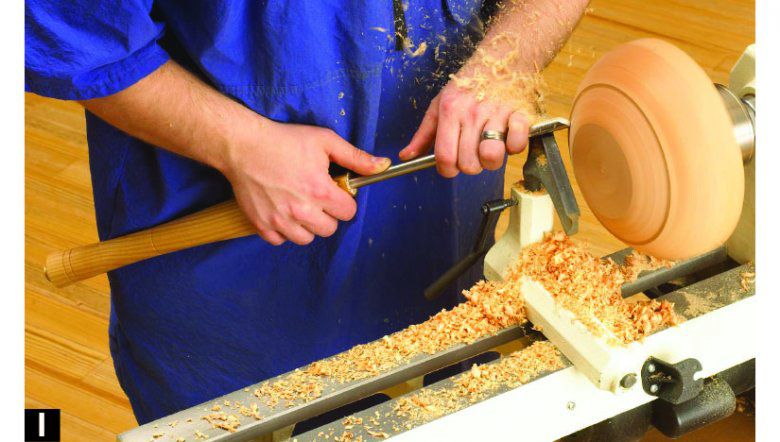

Make sure that the handle of the bowl gouge stays against your body for support. You can control the curvature of the bowl by swinging the handle of the tool. To create a pleasing, convex curve from base to rim, gradually swing the handle and your body toward the headstock of the lathe while pulling the tool toward you.
With the outside shape of the bowl established, it's time to finish the outside surface in preparation for sanding by shear-scraping with your bowl gouge. Shear-scraping works in much the same manner as rough pulling cuts, except the handle is lowered (presenting the left wing at a shear angle) and the bevel does not contact the wood. This technique leaves a ready-to-sand finish.
With a freshly sharpened gouge, lower the tool handle from your waist to your hip [Photo K]. Then, roll the flute farther counterclockwise [Photo L]. Draw the left-hand wing along the surface of the bowl, making light cuts to remove any torn grain or ridges. Proper shear-scraping produces fine, angel-hair shavings, and leaves the wood surface exceptionally smooth. Note that only the wing touches the bowl while shear-scraping.


Now, hollow the bowl
After remounting the bowl's bottom to the lathe chuck, adjust the height of the tool rest slightly below center. Lay the tool on the tool rest near the center of the bowl, roll the flute 45º clockwise, and point the tip of the tool into the bowl [Drawing 1]. Turn on the lathe and, beginning with the handle lower than the tip of the gouge, raise the handle to begin cutting until the handle is approximately parallel with the lathe bed.
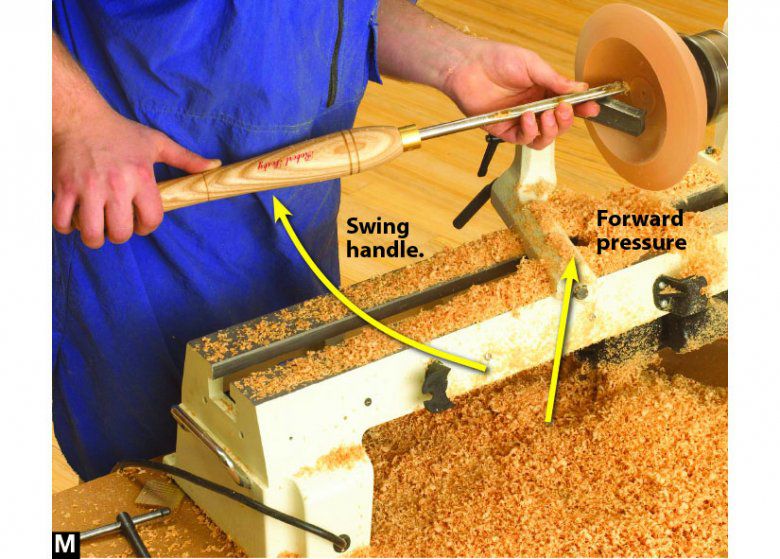
Swing the handle toward your body while applying forward pressure (in line with the shaft of the tool) with your right hand—a pushing cut. Use your left hand as a fulcrum and to hold the gouge firmly on the tool rest. Continue swinging the handle until the bevel on the tip of the tool is parallel with the bottom of the bowl [Drawing 2]. If the bevel of the tool becomes parallel with the bottom of the bowl before it reaches the center, stop swinging the handle and continue applying forward pressure with your right hand until you reach the center of the bowl. Conversely, if the tip of the tool reaches the center of the bowl before the bevel is parallel with the bowl's bottom, you must swing the handle more on your next pass. If necessary, adjust the tool-rest height so that the tool cuts on center. Continue successive cuts from the rim toward the center of the bowl [Photo M] until you reach the desired width and depth of the bowl. You can adjust the internal curvature of the bowl by varying the forward pressure with your right hand and the amount you swing the handle.


Practice makes perfect
Get comfortable using the bowl gouge by practicing on scrap before turning bowls from expensive burls and exotic woods. Inexpensive 2×6 pine from a home center is forgiving, and if your cuts are free of tear-out, you've got the technique just right. Remember that each bowl you turn requires numerous exterior and hollowing cuts. If you make each cut as if it were the finishing cut, by the time you reach your actual finishing cut, you'll have already practiced your technique dozens of times.