Improving your carving skills

How does a beginning or intermediate woodcarver advance to higher levels? By buying more and better tools? Taking more classes? Watching more videos?
We posed these questions to carver and instructor Keith Randich of Greece, New York. Like other accomplished carvers we've asked, his answers went right back to the basics: Make clean cuts with sharp tools and plan ahead. When he offered to show us an easy way to judge tool sharpness and some more tips, we headed out to see him. And while we were in Keith's shop, he showed us a few other handy tips as well.
Job one: sharpen your tools

"A good carving calls for good design and execution," Keith sums up. "And you can't expect good execution with dull tools." Rough, fuzzy cuts, like the one marked A in Photo A, above, will condemn any carving to mediocrity. And while you could sand away the roughness, your work just wouldn't have the crisp look delivered by sharp cuts, like the one shown at C in the photo.
"Many carvers look at sharpening as something to be tolerated," Keith points out. "But poor sharpening is often all that's keeping a carver from reaching the next plateau."
Here's how to judge an edge
How do you know when a tool needs to be sharpened? "Some people give an edge the thumbnail test, some slice paper, some shave hair on their arms," Keith notes. "But the surest way to check an edge for sharpness is to make a cross-grain cut." If you see fuzzy, torn wood in the cut, it's time to sharpen.
There are no secrets to putting a keen edge on a tool; all it takes is careful application of simple techniques. But to consistently sharpen tools well, you must first be able to determine when an edge is sharp. "The surest way to judge your progress toward a sharp edge is by looking closely at the edge," Keith says.
To check for sharpness, Keith stands with the light coming from behind him and points the tool edge toward the light as he inspects it. Dullness shows up as a light reflection off the edge (shown in Photo B, below). The reflection comes from a flat surface—the blunt edge—shown in the Sharp Edge vs. Dull Edge illustration, following. (Incandescent light shows the edge better than fluorescent light; daylight is best of all.) Eliminating that flat surface makes the tool sharp.


When it comes to equipment and techniques to do the actual sharpening, Keith allows a lot of leeway. "You should stick with any sharpening equipment and technique you're comfortable with," he says. To Keith, methods and equipment are less crucial to proper sharpening than the ability to assess the blade's edge with a sharp eye. "I've had an opportunity to try most of the offerings on the market at one time or another. They will all perform as advertised," Keith says of sharpening equipment. By being able to differentiate a dull edge from a sharp one, you'll be able to get good results from whatever equipment and methods you use.
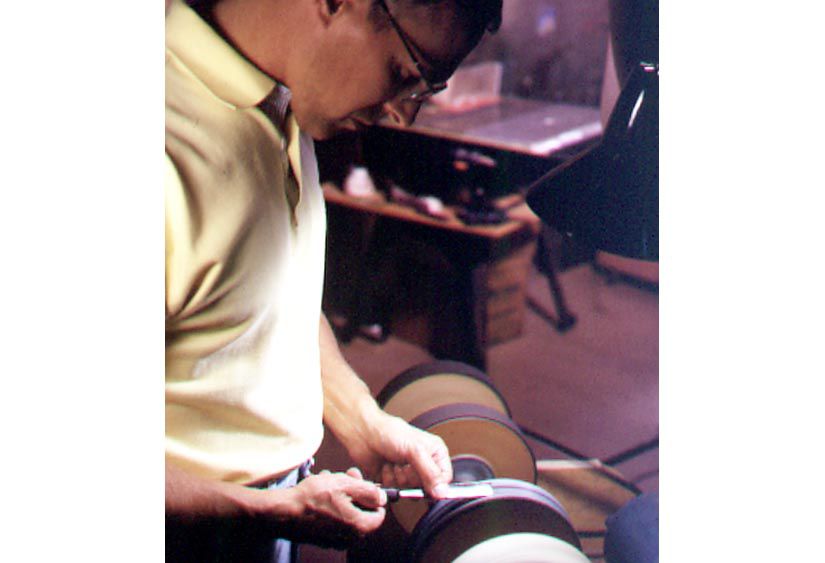
In his own shop, Keith relies on a homemade sharpening machine, shown in the opening photo. A shaft, running in two bearing blocks, carries two 8"-diameter abrasive wheels, a leather wheel, and a cloth buffing wheel. Each abrasive wheel is a wooden disc with an inner-tube rubber band around the rim, with cloth-backed abrasive glued to that. One wheel carries 80-grit abrasive; the other, 100. A drive belt turns the shaft at about a quarter of the electric motor's 1,725 rpm.
Five steps to sharp tools
Sharpening and honing comprise two distinct operations, in Keith's view. Sharpening, done against a coarser abrasive—a grinding wheel, a stone, or sandpaper—shapes the blade end and forms the bevel so you can bring the blade to a sharp edge. Honing, often done with a strop or a leather wheel charged with a finer abrasive compound, polishes the bevel and creates the sharp edge.
To make a tool sharp, Keith follows these five steps.
1. Shape the tool's cutting end, and remove nicks. This may not be necessary for every tool every time. When it is, Keith uses the 80- and 100-grit abrasive wheels.
2. Set the bevel. A 25° bevel is good for most common carving woods. Keith grinds the bevel with the 80- and 100-grit abrasive wheels, taking care to move the blade to keep the bevel surface flat, not hollowed or rounded. After shaping the edge and setting the bevel, the business end of the blade looks like the one on the gouge in Photo B, above.
3. Sharpen the blade to reduce the edge reflection to about the width of a pencil line, as shown in Photo C, below. Keith sharpens the blade on the 100-grit wheel, checking it frequently and keeping the bevel flat.

4. Set an inner or top bevel on gouges and chisels. This bevel, shown in the illustration below, is really a slight (say 1⁄32 "), shallow (maybe 5°) chamfer that breaks the top corner of the edge. It strengthens the edge and helps curl the chip away. Keith sets this bevel with a standard slipstone. U-veiners, V-tools, and bent tools don't get an inside bevel.
5. Hone the bevel. This is where Keith develops the sharp edge. Using a strop or leather wheel charged with a honing or stropping compound, a fine ceramic stone, a waterstone, or other fine abrasive, he hones the bevel until the edge becomes so thin you can no longer see light reflecting from it, as shown in Photo D, below. Inspect the edge frequently as you hone.

When the tool is sharp, Keith polishes the bevel and heel. This reduces scratching in the cuts, shown at B in Photo A, above, and gives you a perfectly smooth cut, like cut C. Keith does this final step against the leather wheel for the result shown in Photo E, below. "Cloth wheels round the bevel over too quickly," Keith says.

As a test, Keith stabs the tool edge into a scrap of carving wood, then inspects it for reflected light again. If the edge is weak at any point, it will deform when stabbed into the wood, creating a flat, reflective surface.
Keep a sharp edge on your work
Once you've established a sharp edge on a tool, maintaining it is relatively easy. Generally, you won't need to take a tool through all five steps very often. Honing and polishing the bevel will keep the edge sharp through lots of use.
How do you know when a tool needs honing? "Keep a critical eye on the cuts you make," Keith advises. "Scratches and tearing across the grain are signals that it's time to hone the tool." (Your best indicators will come from cuts across the grain, he notes; going with the grain, even a less-than-perfectly sharp tool can cut an impressively long chip, like the one in Photo F, below.) "When you start to notice you have to push the tool a little harder to make a cut, you're probably past the point where you needed to hone," he adds.

Keith's approach is to hone tools frequently—after roughing cuts, while he's planning the next cut, when he stops to think things over. And he always hones tools before making any final cuts on a carving. "Don't worry about honing a blade too much," he says. But do keep an eye on the bevel; stropping may round it over, as time goes by. If so, grind a new bevel, and resharpen the edge.
Guard against physical damage, too. Edge tools tossed into a box or drawer for storage probably will be dull when you get them out again. And, of course, dropping a tool on a hard floor is a certain edge-killer. Keith covers the concrete floor around his workbench with rubber anti-fatigue matting; it's not only less tiring to stand on, it saves the occasional dropped tool from harm.
Work at the right height
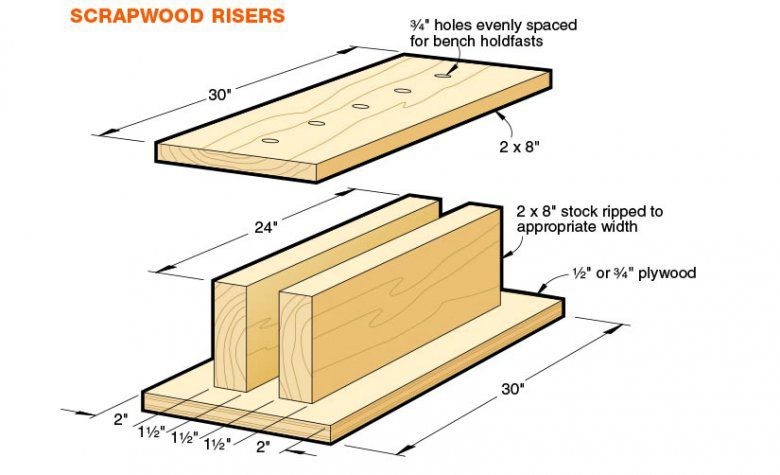
Most woodworking benches stand about hip-high. But you'll have better control of your carving chisels and gouges if you keep your workpiece at about elbow height. (You can sit down, however, and work in your lap for power-carving, chip-carving, and whittling.) Instead of building taller benches to raise work to the right height, Keith knocked together some scrapwood risers like the one shown in Photo G, below, and the illustration following. You can modify the dimensions shown in the drawing to suit your shop situation. Clamp the riser to the workbench.
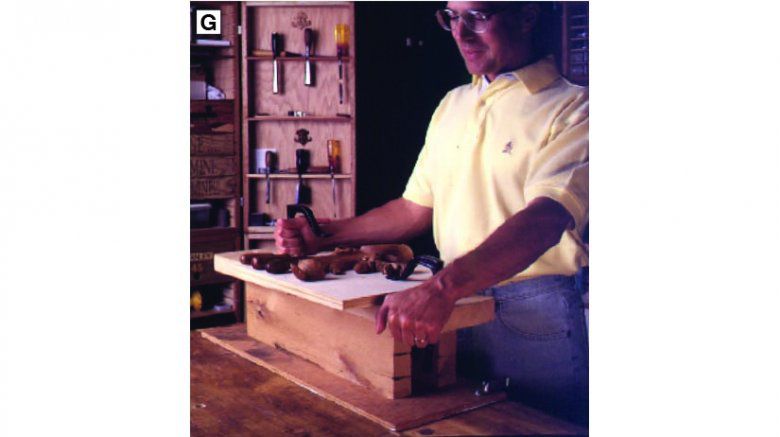
Traditional bench holdfasts fit into the holes in the riser top to secure work, as in Photo G. The floral ornament in the photo has been glued temporarily to a piece of plywood to make it easier to hold. (To make an easily breakable glue joint for this task, glue a piece of paper to the back of the carving, then glue the paper-backed carving to a suitable piece of scrapwood. You can use either white or yellow glue.)
Keep your work on firm footing
It's tough to make a clean, sharp cut if the workpiece moves every time you press a gouge against it. And one of the most difficult workholding situations arises when you have to support a workpiece against a carved side that has no flat surfaces. In those instances, Keith relies on a sandbag made from one leg of an old pair of blue jeans, shown in Photo I, below. To make the bag, just sew one end of the pants leg shut, fill it about three-fourths full with sand, and sew the other end shut. You can then nestle a carving, such as the floral ornament shown, down into the bag for solid support. Secure the carving with a clamp.

There are no rules against using old tools
Keith mostly carves with old tools, rescued from garage sales, second-hand shops, and antique stores. He enjoys rehabbing old tools and putting them back to work. When he shops for old gouges, chisels, V-tools, and so forth, he only considers the blade, disregarding cosmetics and handle condition. If necessary, he'll replace a ferrule (copper pipe can usually be made to fit) or make a new handle. A little cleaning, sharpening, and honing are often all it takes to put a new old tool to work.
Lighten up your work area
Standard fluorescent shop lights do a great job of illuminating the workbench, but they aren't the best when it comes to carving. "The light is too soft and flat," Keith explains. For carving, he prefers bright light color-balanced more toward the daylight spectrum. Daylight is, of course, ideal, but not always available. (Keith likes Solux lamps, which render colors nearly as accurately as daylight and give sharp shadows to show details. For information on Solux lamps, call 800/254-4487.)
Great carvings start with a plan
Time and again, carvers have told us, "At the very least, sketch or draw your carving idea before you start." For realistic carvings, such as birds or wildlife, gather as much research material as possible—don't try to work from memory. In short, to convert the image in your mind's eye into three dimensions, you need a plan.
Sometimes coming up with a plan is as simple as studying the pattern before you start. That's what Keith did when he carved the floral ornament in Photo J, below. Before making his first cut, he marked the pattern (shown under the carving) to indicate levels, contours, and cut directions.

Planning became a bit more involved for the legs of a table he designed to display baseball memorabilia. For the feet, Keith envisioned a variation on the ball-and-claw theme—a hand holding a baseball. Early on, he decided he would need a model to work from. Keith made castings of his wife's hand (hers is the right size) holding a baseball, using a Body Parts casting kit, available from art-supply stores.
He attached the cast hand, shown in the center of the Photo below, to a roughly bandsawn model of a cabriole leg so he could work out the way the leg and hand would meet, shown at right in the photo. Then he carved a prototype, shown in the photo below, which served as a model for the final versions.

Buying guide
Books.
For more carving information, see Carving the Little Guys and Old Time Whittling, both by Keith Randich.