Install Drawers Without Metal Slides

For centuries, before metal drawer slides were a thing, woodworkers relied on wood guides to prevent drawers from tipping or binding as they were pulled out. Today, wood drawer guides still have their place, preserving a traditional look on deserving projects, and saving you the expense of ball-bearing slides. So go ahead, use or adapt one of these approaches on your next set of drawers.
The trade-off
Full-extension metal slides allow you to build a drawer the full depth of the cabinet and still access its furthest reaches without removing it from the cabinet. To get that access using wood guides, you'll need to move the back of the drawer forward 2–4". When the back reaches the front of the cabinet it provides a visual cue that you've pulled out as far as you should. A portion of the drawer sides remain in the cabinet preventing the drawer from tipping.
Top, bottom, and side guides
Mounting the bottom guides 1⁄16 " proud of the face-frame rail prevents the drawer from rubbing on the rail and creates a reveal below the drawer.
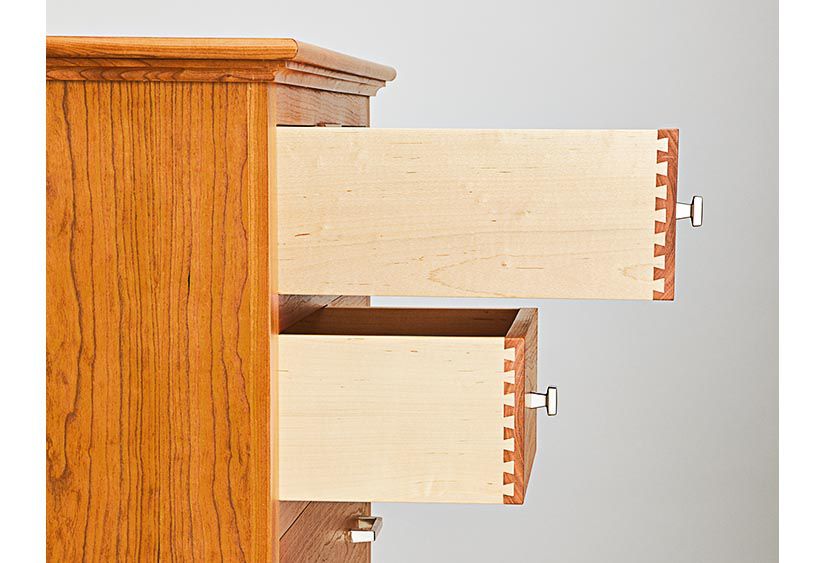
Guides above and below the drawer prevent it from tipping, while side guides keep the drawer tracking straight. This approach provides a clean uncluttered drawer side, perfect for highlighting attractive joinery, such as dovetails.
Tip! Make guides from hardwoods that wear well, such as hard maple or hickory. Rub on paste wax or paraffin for a smooth glide.
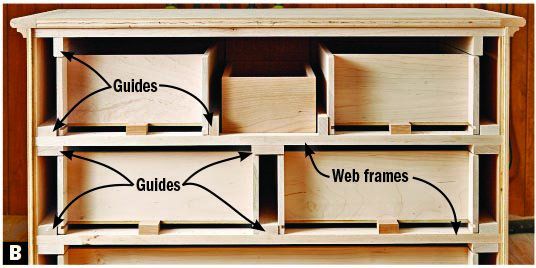
On a cabinet with a face frame [Face-frame Cabinet Drawing], the inside edges and faces of the guides rest flush or near-flush with the edges of the rails and stiles. Mount the guides by adding blocks to some combination of the cabinet side, side stiles, rear of the face frame, or cabinet back. In some cases, you can mount them directly to the sides [Photo A] or to web frames [Photo B].

Tip! Make mounting drawer guides easier by installing the cabinet back after securing the guides. If the cabinet sides include solid-wood panels, mount the guides to allow the panels to expand and contract with changes in humidity. To do this, drill slots in the guides and mount with screws only—no glue.
On frameless cabinets, eliminate the side guides and let the cabinet sides serve to keep the drawer running straight in and out [Frameless Cabinet Drawing, below]. If the cabinet sides are plywood, glue and screw the top and bottom guides in place.
Drawer-building notes:
- Because no part of the guides intrude into the opening, make the drawer box as wide as the opening, less 1⁄8 " for clearance.
- On frameless cabinets, you give up a bit of vertical drawer depth to accommodate the guide below the drawer.
- For stacked inset drawers, extend the fronts above and below the drawer-box sides to cover the exposed ends of the guides between drawers.


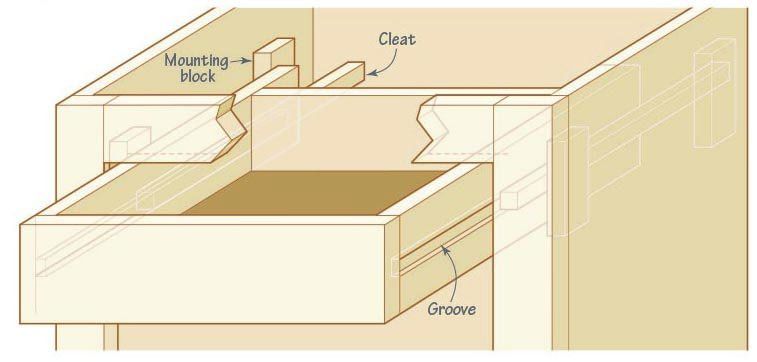
Drawer-mounted cleats
A 3⁄8 ×1⁄2 " cleat on the drawer minimizes bulk. Increase the width to 3⁄4 " for drawers supporting heavy loads.
Instead of trapping the entire drawer side between guides, this method traps only a cleat mounted to the drawer side [ Drawing, below]. The guides may be separate pieces, or a single grooved piece that the cleat slides in. Because the guides prevent the drawer from tipping while also eliminating side-to-side movement, no side guides are needed. Mount the guides using one of the techniques for mounting the top and bottom guides described in the previous section.
A narrow cleat expands and contracts very little compared to a single, wide side guide, so the drawer is less likely to bind.
Drawer-building notes:
- You give up a bit of drawer width to accommodate the cleats. To determine the drawer width, subtract from the width of the opening the combined thickness of the cleats and an additional 1⁄8 ".
- For inset drawers, the front must be longer than the horizontal dimension of the drawer box to conceal the cleat and guides.
- Screw the cleats to the drawer sides (no glue) to allow for removing them and making fine adjustments, if needed.

Grooved drawer sides
A cleat attached to each cabinet side fits into grooves in the drawer sides [Drawing]. The exposed drawer side looks cleaner than one with a cleat attached. You don't sacrifice drawer width, and side guides are not needed. Size and mount the cleats so they extend into the drawer opening the depth of the groove.
Drawer-building notes:
- This method allows for drawers the full height and width of the opening.
- Because the groove should be at least 3⁄8 " deep, the drawer sides should be at least 5⁄8 " thick.
- Cut or rout the drawer-side grooves before assembling the drawer.
- Locating grooves at or near the centerline of the side maximizes material above and below the grooves, preserving drawer strength.
- An inset drawer front will match the box size, hiding the grooves.
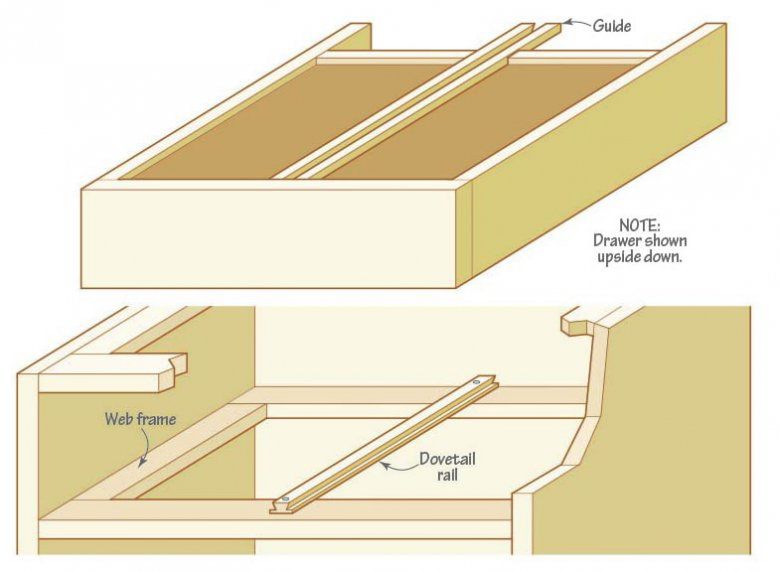
Under-drawer guide
A Rockler Center-Mount Drawer Guide [Source] provides a drawer box free of cleats or grooves. This system requires a web frame below the drawer opening for securing a rail with a dovetail profile [bottom drawing, below]. A guide with a matching groove mounts to the drawer bottom [top drawing, below]. Cut the rail and guide to length to suit the depth of the cabinet and length of the drawer.
The rail and guide keep the drawer tracking straight as you move it in or out, eliminating the need for side guides. The web frame supports the drawer and prevents it from rocking.
Source: Center-mount drawer slide, 22", no. 24877, Rockler Woodworking and Hardware, 800-279-4441, rockler.com.
Drawer-building notes:
- You must notch the rear of the drawer to accept the guide and allow the rail to slide in.
- Position the drawer bottom to provide space below it (typically 5/8") to accept the guide.
- Matching the guide to the length of the drawer sides keeps the drawer from tipping as you pull it forward.
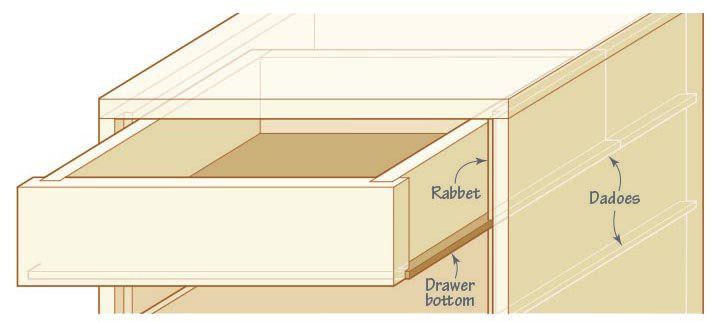
Bottom as slides
This method may not suit fine furniture, but it provides a quick and easy way to mount drawers in utility cabinets and shop fixtures.
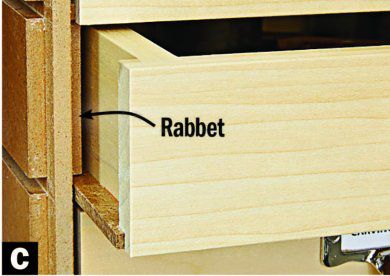
Extend the drawer bottom 1⁄4 –3⁄8 " beyond each drawer side. These "wings" slide in dadoes in the cabinet sides. Let the dadoes show, or hide them by rabbeting the front edges of the carcase [Photo C], or by using overlay drawer fronts.
Drawer-building notes:
- To fully access the drawer while leaving it in the cabinet, make the bottom at least 1⁄2 " thick and extend it 2–4" beyond the ends of the sides. A loaded drawer may snap off a thinner bottom when extended.
- Mount the bottom to the underside of the drawer rather than capture it in grooves.