Japanese Hand Planes

Because they look different than steel-body Western planes, Japanese hand planes (kanna) may seem like primitive mystery tools used only by esoteric craftsmen. Converts from Western hand planes insist the steel in a Japanese plane provides a smoother finish on their work, with additional tactile feedback and an intimate connection with the workpiece. And, not to get all mystic, but the Zen-like experience and satisfaction of seeing a paper-thin ribbon of wood float out from a tool you carefully tuned is surprisingly rewarding.
To dismiss Japanese hand planes as a possible addition to your hand-tool collection means overlooking their benefits. Let's take a closer look at these neo-ancient tools and see if one or more might be in your future.
Why do they look like that?
The body of a Japanese plane is called a dai (pronounced "die").
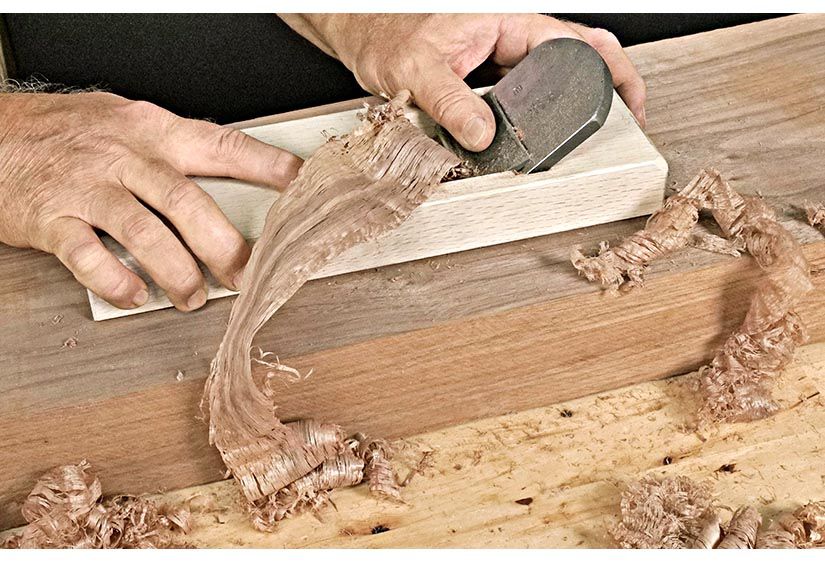
Other than appearance, the most striking difference between these and Western planes is the direction of planing: Japanese planes cut on the pull stroke, similar to Japanese saws. Though they provide no totes or knobs, they perfectly suit a two-handed grip [ opening photo]. A longer sole ahead of the blade helps steady the plane on the workpiece at the start of the stroke.
Their simple design, without mechanical blade adjusters, has changed little over hundreds of years. You adjust the blade depth and lateral position by tapping it with a mallet.
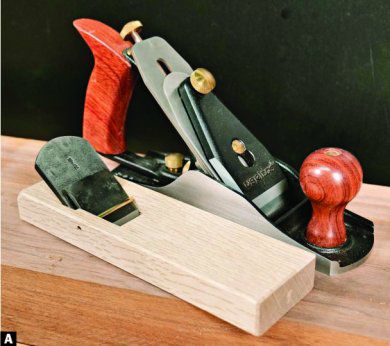
Unlike Western planes, where the footprint of the sole determines their primary usage, Japanese planes are classified by their blade width, with wider blades intended for smoothing wide panels. Still, you can find them in sizes similar to Western planes [Photo A]. But note: Japanese "block planes" differ from Western block planes, serving instead as small smoothing planes.

The blade makes the plane
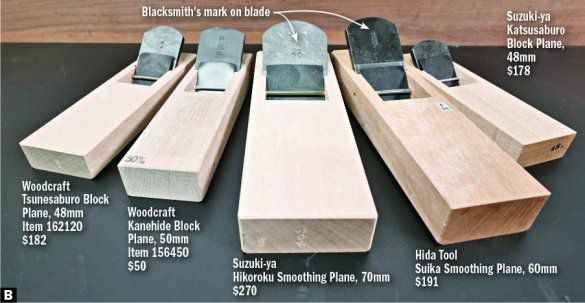
Better-quality Japanese planes feature blades—and often chip breakers—forged by highly skilled blacksmiths [Photo B]. In fact, when shopping for a Japanese hand plane, you'll find them categorized by the blacksmith's name. Each blade-maker uses a unique combination of forging techniques and metals that make his blades unique. Some blade-makers have such a reputation for quality that their planes cost well over $1,000. Don't fret; you can find perfectly suitable planes for no more than you would spend on a new Western plane.
The blacksmith starts with a hard, but brittle, steel for the cutting edge. To offset the brittleness and add mass that dampens vibration while planing, the blacksmith laminates a softer steel on top. The thick blade holds a super-sharp cutting edge, the hallmark of a Japanese hand plane [Photo C].

The blade differs from that on a Western plane in other ways, too. For example, the wedge-shaped blade tapers in thickness, which helps hold it in place. Also, a hollow on the back of the blade reduces the amount of material to remove when flattening the back—the first step in the sharpening process [Photo D]. The two narrow strips along the edges of the blade and the area directly behind the cutting edge form a flat reference surface. This helps ensure a sharp cutting edge but also provides the foundation for a tight-fitting chip breaker.

The sole of a Japanese plane contacts the workpiece at only two points ahead of the blade, with a hollow of about 1⁄64 " between them [Drawing]. An optional third contact point at the shorter end of the dai keeps the plane from tipping at the end of the stroke and is helpful when planing narrow stock. Note: Since the plane cuts on the pull stroke, the front and back of the plane are opposite of Western planes.

Fitting and fettling
Watch a video on how to set up a Japanese hand plane.
When you purchase a new Japanese hand plane, you receive a kit of parts. First, remove and sharpen the blade. As with sharpening any blade, flatten and polish the back before focusing on the bevel.
Out of the box, the blade seats too high in the throat, so adjust the mouth of the dai using plane floats, small rasps, files, or a sharp chisel [Photo E, Sources]. Darken the blade back with a soft pencil, then test the fit. Graphite left behind in the throat indicates high spots that need further trimming.
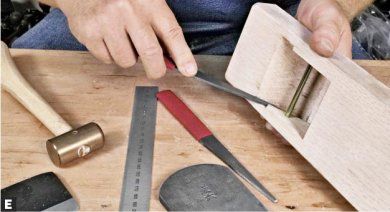
Keep repeating this process, removing the high spots in the throat until the cutting edge of the blade drops to within a couple of millimeters above the mouth opening. With the depth of the blade almost set, continue to file the side grooves until they allow no more than 1⁄16 " of space for lateral blade adjustments [Photo F].

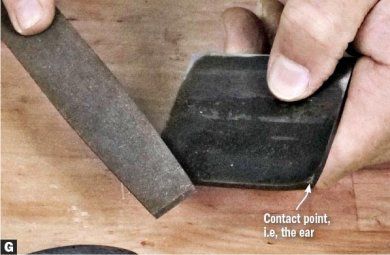
A hand-forged blade and chip breaker may not fit together perfectly at first. If the chip breaker rocks or "rattles" against the blade when applying pressure at the corners, file material from the point of the "ear" on the back where it contacts the blade [Photo G]. Work slowly and keep checking your progress until the chip breaker sits flat.
Finally, flatten the back side of the front edge of the chip breaker and check the fit on the blade. You shouldn't be able to see any light between them at the cutting edge. Using fine sharpening stones, hone the beveled leading edge so that shavings easily glide over it. You want a smooth edge and polished surface so shavings slide up and out of the throat, but the edge doesn't need to be razor sharp.
Buy tools to tune your hand plane.
Install the blade and chip breaker and adjust the depth until the blade nearly protrudes through the bottom of the dai. This stresses the dai as it will be during use, so check the bottom of the dai for flatness using a straightedge. If the dai needs work, sand the bottom on a flat reference surface, such as a piece of float glass, until flat.
Form the slight hollows [Drawing] using a card scraper or wide chisel until you see a thin line of light under a straightedge. Since you're removing so little material, this process takes almost no time at all.
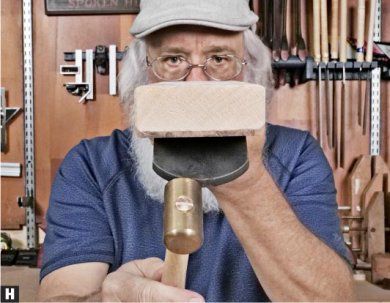
Finally, set the depth and lateral position of the cutting edge with light taps on the blade [Photo H]. Then tap the chip breaker firmly in place before planing.
Why bother?
By now you may be wondering why anyone would go through all this fuss to set up a Japanese hand plane. But after you do it once, it becomes second nature. And, if this process makes you nervous, your tool vendor can point you in the right direction for additional guidance. The time you dedicate to learning how to finesse a plane for ultimate performance will be rewarded.
Sources:
Suzuki-ya
510-409-0217
suzukitool.com
Hida Tool & Hardware Co.
510-524-3700
hidatool.com
Woodcraft
800-225-1153
woodcraft.com
Plane floats and rasps:
Lee Valley
800-871-8158
leevalley.com