Jointer Tips and Techniques


The jointer helps you flatten one face of a workpiece, and then square one edge adjacent to that face: the first steps in turning rough lumber into cabinet-quality stock. Follow up jointing with a thickness planer (to make the board a consistent thickness) and a tablesaw (to rip the remaining edge parallel), and you create squared-up stock. Here's how to properly use a jointer—and some tricks you may not know it can perform.

Getting flat-out performance
Learn to square up stock with a jointer, planer, and tablesaw.
On a jointer, infeed and outfeed tables flank a rotating cutterhead [Drawing, above]. The infeed table sits just below the highest arc of the cutterhead, and the outfeed table rests parallel to the infeed table and at the highest point of the arc of the cutterhead.

Tip: Retrieve or download your jointer's owner's manual. This provides the information specific to your jointer.
For a jointer to work efficiently, it must be properly set up. First, set the outfeed table even with the cutterhead height to prevent snipe at the trailing edge [Photo A, above]. To make that adjustment, lower the outfeed table slightly and set the infeed table to take a light cut. Joint a couple inches of the edge of a piece of scrap [Photo B, below]. Hold the scrap in place and turn off the jointer. Raise the outfeed table until it just kisses the newly jointed edge. Lock the outfeed table at that height. Run the test piece another few inches to ensure the jointed edge remains fully supported.

Next, using a square, check that the fence rests exactly 90° to both the infeed and outfeed tables [Photo C, below]. This ensures that boards glued edge to edge will rest flat.

Coating the table and fence faces with a bit of paste wax (nothing with silicone, as that causes finishing problems later) allows boards to glide easily while being jointed.
Proper jointing technique
For boards longer than the infeed table, and bowed end to end, place the concave face up and joint from the middle toward the ends.
The first step in preparing a rough board is reading the grain direction on the edge. Feeding stock with the grain running "downhill" results in a smooth surface with little, if any, tear-out [Drawing, top]. I mark that direction on the board. If the board face is cupped, or bowed from end to end, place the concave side down to keep the outside edges or ends in contact with the tables [Photo D, below].

Get a free jointer pushstick plan.
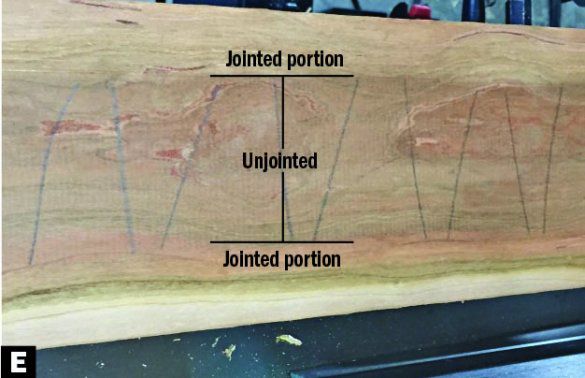
Turn on the jointer and, using push pads or a pushstick—never your hands—apply light downward pressure against the infeed table as the leading edge of your stock crosses the cutterhead. Transfer downward pressure to the outfeed table only after about 6-8" of the piece passes the cutterhead [Opening photo]. This prevents rocking the leading and trailing edges, which would ruin a smooth, flat face. Take care not to press the board flat as you work; it will only spring back after completing the cut. To know when you've completely flattened a face, run a squiggly pencil mark on its surface. Make passes until the pencil mark disappears [Photo E, below].
Twisted stock requires a patient approach. Often, you must press on diagonally opposite corners and prevent the board from rocking during the cut. With each pass, you create more flat surface along each corner, creating a more stable "platform." Continue nibbling away these corners, working closer and closer to the center of the board. Exceptionally cupped, bowed, or twisted stock requires many passes to flatten, reducing the overall thickness of the stock, which may make it too thin for its intended use.

To joint an edge square to its now-flat face, place the freshly jointed face firmly against the fence [Photo F, above]. Use the same downward pressure technique as you did when jointing the face. Make enough passes to remove a pencil line marked on that edge.Watch your feed speed—it affects the final result [Photo G, below].

Same jointer, more tricks
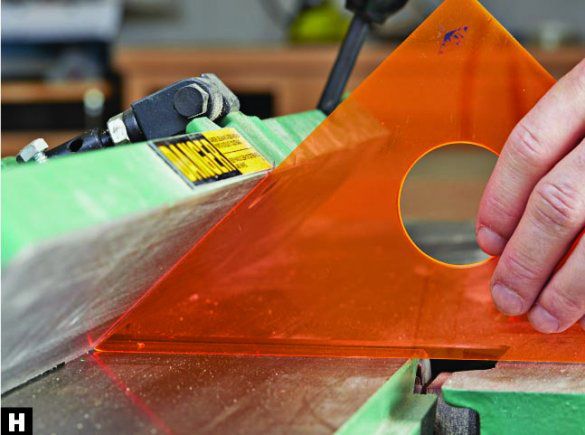
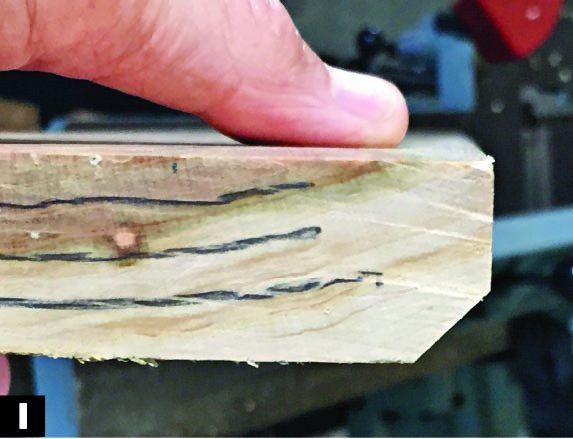
There are a few more operations that the jointer does well. For example, you can chamfer an edge at any angle by tilting the fence [Photos H, I, below]. Each pass removes little material, so it takes multiple passes.
Never joint end grain. It tears out excessively.
Many jointers allow for cutting rabbets far smoother than those done with a dado blade in a tablesaw. To cut a rabbet, remove the blade guard, and adjust the fence so the distance between its face and the edge of the blades equals the depth of the rabbet [Photo J, below]. (You'll stand the workpiece on edge so the fence steadies it.) Now lower the infeed table to take no more than a 1⁄8 "-deep cut. Make a pass, lower the table, and repeat until you reach the desired width.
