Kent Schubert's Bentwood Beauties

Ken Schubert didn't set out to become a career woodworker. As a materials scientist, he spent his days devising and studying high-tech materials in the laboratories at the University of Delaware. Woodworking simply provided Ken a hobby. Then a request from a family member changed everything.
Unexpected events get business rolling
About a decade ago, Ken's niece attended Bryn Mawr College, in Bryn Mawr, Pennsylvania, where they held an old-fashioned hoop-rolling race every year for the senior girls. Not content to use a Hula-Hoop, she requested that Ken build a hoop from wood. He ripped 2"-thick stock into narrow strips, then laminated several layers together on a round form. For years thereafter, Ken made 40 to 80 hoops per year for women at the school.
Then, a series of circumstances put Ken's woodworking on a roll. First, he lost his job at the university. At about the same time, a neighbor and woodworking mentor passed away. Ken bought all his tools, and he picked up more equipment at a local manufacturer's surplus sale.
Ken now had a shop, and needed a way to make a living. "Since I knew how to make laminated hoops," Ken says, "I tried to find something which incorporated this knowledge. I settled on oval trays."
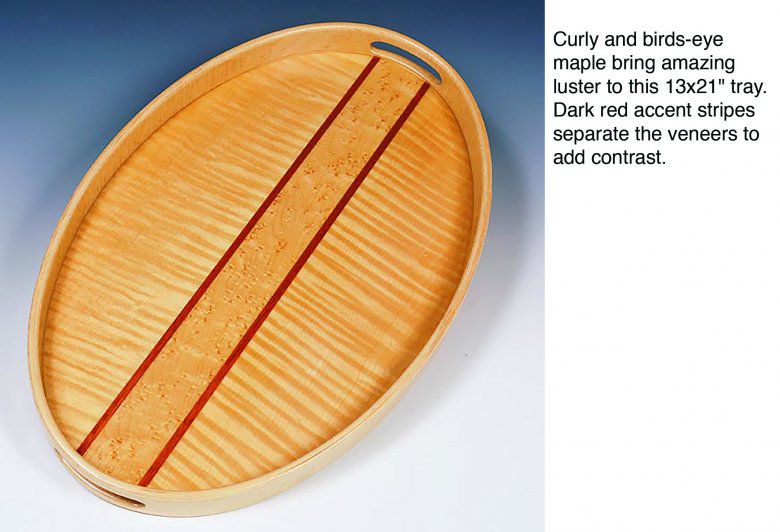
Each tray's most noticeable feature is the exquisitely veneered bottom panel. A 2"-wide rim, laminated from several thin layers of wood, surrounds the bottom panel and completes the design.
Using similar techniques, Ken also builds lazy Susans, and makes drum hoops for a professional drum builder and restorer. Here's a look at how Ken, with the help of his wife, Ellen, crafts these comely creations in their Wilmington, Delaware, basement shop.
Welcome to Ken's house of veneer
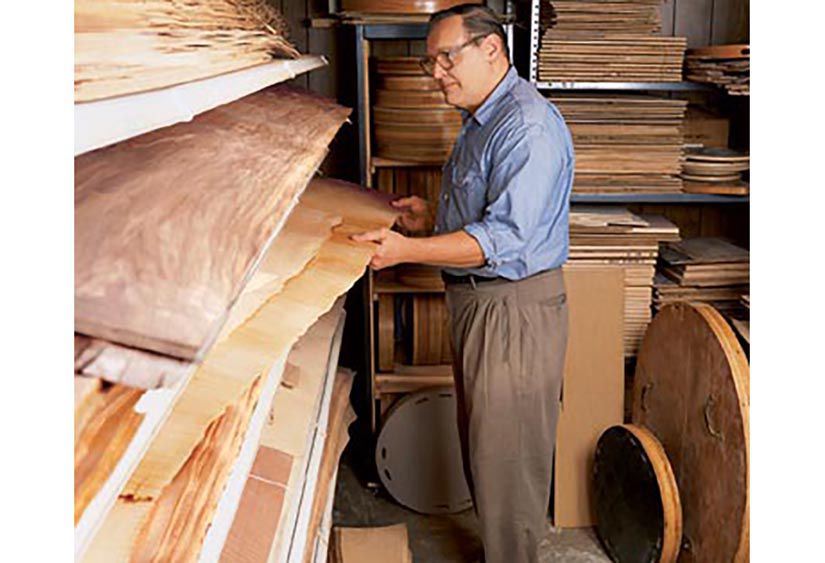
On the outside, Ken's house is brick. Inside, it's all about veneer. His treasure trove of beautiful pieces fills shelves throughout his shop. Like many of us, he can't resist a beautiful piece of wood. "I'll never use it all," he says. "Someday, I'll retire and take a bath on this."
Ken buys wood a bit differently than many woodworkers, though. Often, he buys veneer by the flitch: a whole log flat-sliced lengthwise into veneer, then restacked in the order the veneer sheets came from the tree. That allows him to book-match grain, or build a series of trays with matching bottoms.
Ken mostly uses domestic hardwoods, but occasionally dabbles in more-exotic tropical woods. Regardless of the wood species, it must have interesting grain, such as birds-eye, quilted, flame, crotch, or wavy patterns. There are veneers dyed deep black, as well, which Ken and Ellen use for accent stripes in the patterns.
Every tray starts from the bottom up
The tray begins not in Ken's hands, but with Ellen, a kindergarten teacher and an education instructor at an area college. (See "Piecing it together," below, to see how she crafts the veneers into patterns.) "She makes whatever she feels like," Ken says. "She comes in, sits down, and says 'What am I going to make today?'" No matter what Ellen decides, chances are that Ken's impressive supply gives her plenty to choose from.
Before Ellen's veneer patterns arrive down in the shop, Ken cuts 1⁄4 " Baltic birch plywood sheets into oversize rectangles—roughly matching the veneer panels Ellen creates—to make tray bottoms. Each tray bottom receives veneer on both faces. The fancy, patterned veneer goes on the upper face, and a less-dramatic but still-beautiful veneer (usually a plainsawn version of the face veneer) goes on the underside.
Piecing it together
Looking at Ellen Schubert's work area—the dining room table—you might not think she has all she needs to create her beautiful veneer patterns. She has no power tools or fancy jigs, and only a few basic measuring devices. But Ellen is well equipped because veneer cutting still relies more on traditional skills and a keen eye than on high-tech tools.
Her mainstay tool is a handheld veneer saw—the same type used for generations. Her worksurface is a piece of medium-density fiberboard (MDF). A narrow MDF straightedge guides the saw.
Ellen begins by selecting veneer. She may just pull pieces that strike her fancy that day, or she may have a specific look or pattern in mind. If she wants to make a tray bottom that's book-matched (the grain in one half is a mirror reflection of the grain in the other) she selects two pieces sliced consecutively out of the same tree.
Ellen cuts each piece of veneer into manageable lengths with a pair of scissors. To straighten the contoured edge, she eyeballs it, lays down the straightedge, and pulls the veneer saw along the edge. She cuts through in two or three passes. The razor-sharp saw leaves a glue-ready edge.
She assembles pieces on a metal plate, as shown in the photo, below. Veneer tape secures the seams. A few pieces go across the seams to hold the pieces in position; another runs along the seam to keep it tight. A simple pattern can go together in a matter of a few minutes. A more complicated pattern, like a sunburst, may take 30 to 45 minutes. Ellen leaves the assembled piece oversize and rectangular, and sends it downstairs to Ken's domain.

A low-pressure system at the heart of the shop
Ken brushes glue on the plywood substrate, and positions the veneers—with the taped side facing out—on either face of the plywood. Then he prepares the pieces for clamping, as shown in Photo A, below. But Ken isn't one to use ordinary clamps.

Off in one corner sits the heart and pride of Ken's shop: a vacuum veneer press he built himself. It's a series of vacuum pumps—all scrounged up from surplus sales at local businesses and laboratories for a tiny fraction of their new costs. Those pumps are connected through a hand-fabricated tubing-and-manifold system to two large rubber bags, made by Ken from industrial rubber roofing. The device looks like a science experiment gone mischievously awry. But it works.
Ken stacks the substrate sandwiches into the bags (which rest on a large shelf), as shown in Photo B, below. He rolls the ends closed and secures them, then flips the switch on the largest of three vacuum pumps. In short order, the system sucks the air out of both bags, putting 33 pounds per square inch of pressure on the assemblies inside. Ken then switches off the big pump and fires up two smaller ones (one for each bag) to maintain the pressure.

When a veneered bottom panel is ready—after three hours in the press and another day of drying—Ken sands off the veneer tape and smooths the surface using a random-orbit sander loaded with 150-grit abrasive. He sprays each side with two coats of a water-based finish (Ken prefers Aqua-Cote finishes), sands to 220 grit, and applies five or six more coats of finish.
Time to give the bottom an attractive rim
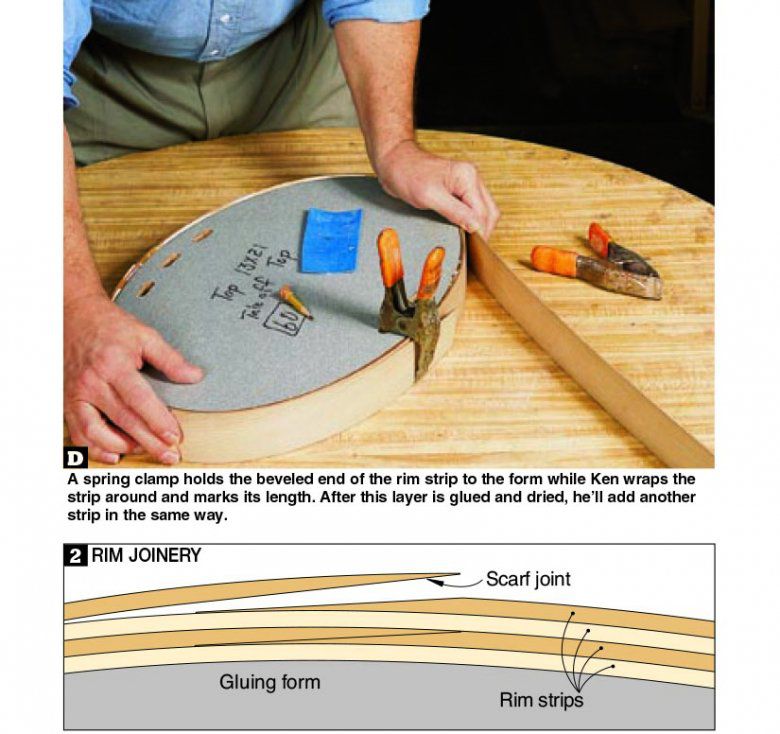
Ken's rims consist of bent laminations, built up from several layers of thin wood. Ken used to resaw thick stock to create the thin strips. But the process took time and wasted stock, so he now buys his 3⁄32 "-thick strips precut.


Using a homemade jig, Ken sands a bevel on one end of an extra-long strip, as shown in Photo C and Drawing 1, both above. Then he wraps the piece around a tray-shaped form. He marks where the strip begins overlapping itself, as shown in Photo D, below, and then cuts it and sands a bevel on that end. Without measuring, the two ends meet perfectly when they're back on the form, creating an almost-invisible scarf joint, shown in Drawing 2, following. He fits the subsequent three to five layers in the same way, placing the scarf joints on opposite sides of the rim.

Once he has two layers prepared, Ken spreads glue on their mating faces, wraps them around the form, and secures them with a band clamp. When he first started building trays, he'd glue on a strip, then wait hours for the glue to set up before he could add the next layer. With four to six layers, making the rims took a lot of time.
A trip to a woodworking machinery fair ended that, as Ken discovered radio-frequency drying. The process, usually employed only in commercial manufacturing, is less dramatic than it sounds: He uses an industrial white glue, and once the pieces are glued and clamped in place, he turns on a machine the size of an orange crate. A handheld "gun" connected to the machine shoots radio waves at the glue as he guides it around the form, as shown in Photo E, below. The radio waves heat the glue, curing it in about half an hour. Think of it as a handheld microwave oven, but without danger—the radio waves it emits are safe.

From here, the rim-building process is more conventional. He next cuts the top of the rim parallel to the bottom. A round-over bit shapes the top and lower outside edges. If there will be a handle, he routs it out using a jig he designed and built, as shown in Photo F, below.


Ken routs a shallow rabbet around the lower inside edge of the rim to receive the bottom panel, shown in Photo G, below. Then he sands and finishes the rim.

At last the tray bottoms, which have remained rectangular up to this point, meet the rims. Again there's no measuring; Ken just eyes the veneer seams to check they align with the handles and run straight the length of the intended rim. Next, he clamps a completed rim over the finished bottom and traces the outline of the rabbet cut earlier, as shown in Photo H, below. He cuts the bottom just outside the line, and then sands to get the final fit.


When the fit is right, Ken secures the bottom to the rim using the thinnest grade of Hot Shot cyanoacrylate (instant) glue. Ken signs the bottom and covers everything with a final coat of finish. Next step, the marketplace.
Marketing their wares take Ken and Ellen on the road for a busy schedule of art festivals and craft shows during the summer months. It's a nomadic time of year, and just part of a life quite different than Ken's days in the lab. He misses those old days, sometimes, but given the choice, Ken would rather be in a basement stacked full with veneer, dust, and machines, listening to his vacuum pumps and juggling the summer schedule.
Ken Schubert's Top 3 Tips for Woodworking Success
1. If you need a jig, build it. Don't be afraid to get it wrong, and don't be afraid to rebuild it better. And think about using materials you don't normally work with, such as the acrylic plastic Ken used on his handle-cutting jig. Consider using familiar materials and tools in different ways. Put an oversized bearing on a standard router bit to create a different profile, for example. Design jigs so they can be set up quickly.
2. Use the right glue. Ken uses two glues in his trays. The rims are held together with an industrial white glue that dries quickly when exposed to radio waves. The manufacturer says the same glue works without the radio-frequency dryer so Ken veneers with it, too. If the glue caused any trouble securing the precious veneers, though, he'd change to yellow glue in a heartbeat. Ken secures the tray bottom to the rim using cyanoacrylate glue because it dries quickly and is clear.
3. Don't measure unless you have to. When he first started, Ken tried to find the length of each lamination by measuring. It seldom worked. When he switched to simply wrapping a long strip around the form and marking where the ends overlapped, he seldom got a piece the wrong size. Ken extends the principle throughout his work. He traces the rim to fit the bottom, uses patterns when he can, and centers the handles by eye. While he believes "measure twice, cut once" is good advice, Ken prefers to arrive at the right size without measuring at all.