Learn to love your Skew Chisel
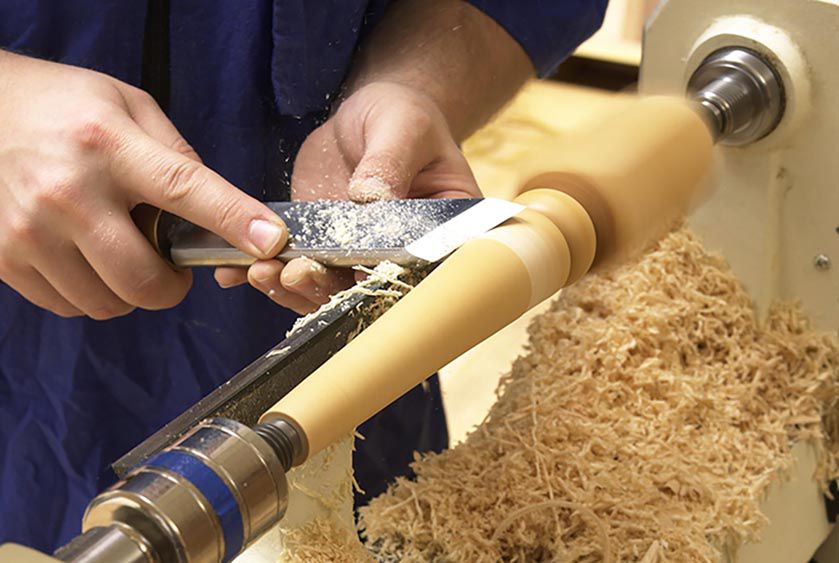

Interested in spindle turning? Then come along and discover the keys to effectively sharpening and using the indispensable skew chisel. You'll soon be producing fine, ribbonlike shavings and superbly smooth surfaces in need of little sanding.
Which skew is best?
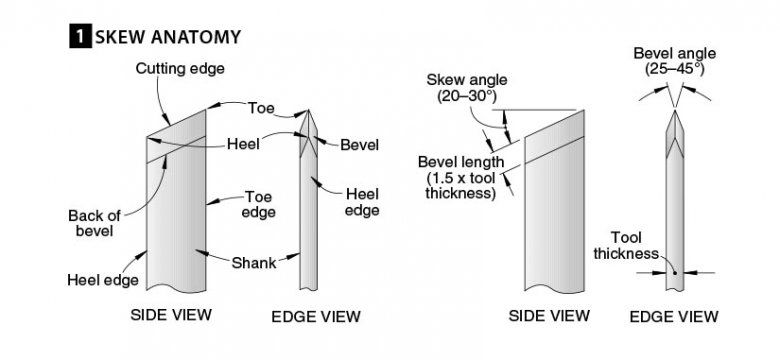
You'll find skew chisels with different cross sections—round, oval, and rectangular—and widths from 1⁄4 " to 11⁄2 ", but they all operate the same way. The tool bevel [Drawing 1] rides against the wood as the angled cutting edge peels away shavings. We'll concentrate on the rectangular skew because it's the most common, versatile, and easiest to sharpen. And, as we'll explain later, choose the widest skew you can afford.
The square corners on the shank of a regular rectangular skew [Drawing 2] don't roll easily on the tool rest and make it difficult to smoothly slide the tool along it. When buying a rectangular skew, avoid these shortcomings by purchasing a "rolled-edge" model. If you already have a square-cornered skew, round the edges on your grinder.

Choose your skew angles
The term "skew" refers to the angle of the cutting edge. For the three uses of a skew chisel—planing cuts, V-cuts, and forming beads—a 20–30° skew angle works best [Drawing 1].
Bevel angles vary from 25° to 45° [Drawing 1]. A 25° bevel angle slices easily through the wood but gives you a fragile edge that needs frequent sharpening. A 45° bevel holds up well in tough stock but won't cut as easily. A good rule of thumb is to make the bevel length about 11⁄2 times the tool thickness (3⁄8 " for a 1⁄4 "-thick tool).
Grind the point to shape
Watch a video demonstrating skew chisel sharpening techniques.
When sharpening lathe tools, start with a 1,725-rpm bench grinder equipped with a 50–80 grit aluminum oxide wheel. The combination of a coarse wheel and slow speed gives you greater control of the sharpening process.
To grind the skew angle, lay the tool flat on the grinder tool rest, and adjust the rest so the tool shank is perpendicular to the face of the grinding wheel. Grind slowly to minimize heat buildup, and periodically check your progress with a protractor or angle guide.
Now you're ready to grind the bevel. Mark the bevel length on both sides of the tool with a fine-point permanent marker [Photo A]. Rest your hand on the grinder tool rest and the tool on your hand. Adjust the grinding angle by raising or lowering the tool handle. Keeping the cutting edge parallel to the face of the grinding wheel, move your hand and the tool side-to-side along the tool rest [Photo B]. To clearly see where you are grinding, color the developing bevel with a permanent felt-tip marker [Photo C]. Turn the tool over often to check your progress. Keep the bevels on both sides uniform and the cutting edge centered in the tool thickness.


Honing the ultimate edge
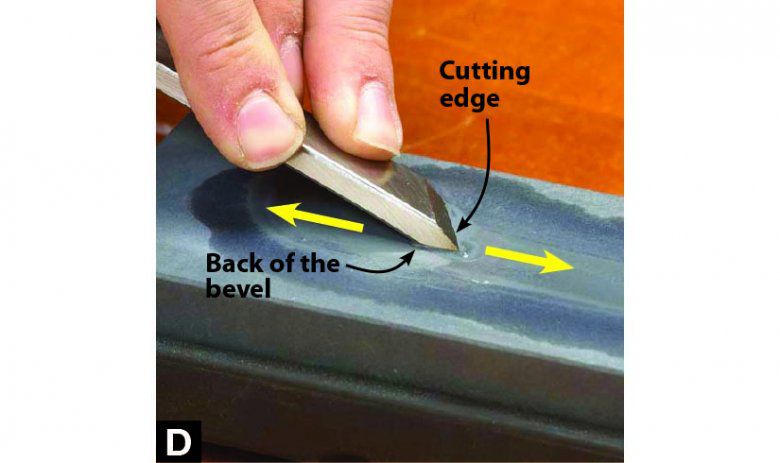
You can use a skew right off the grinder, but a honed skew cuts easier and leaves a smoother surface than one sharpened only on the grinder. Begin honing with a 320-grit bench stone. Wet the stone with the proper lubricant. Place the back of the bevel on the stone, and then raise the handle until the cutting edge makes contact [Photo D]. Press down on the bevel and slide the tool back and forth. The grinding wheel forms a concave surface on each bevel, so only the back and cutting edge contact the stone, minimizing the amount of steel removed [Drawing 3]. As you hone, check often to make sure the back and cutting edge of the bevel contact the stone equally. Hone both bevels until the edges are flat, leaving an oval hollow [Photo E].


Switch to a 1,000-grit stone and polish the flat edges. When the tool dulls, quickly restore the edge by honing only with the 1,000-grit stone. As you rehone the tool, the hollow oval gradually disappears. When it becomes faint, return to the grinder, reestablish the hollow grind on each bevel, and then hone again with both stones.
Planing cuts
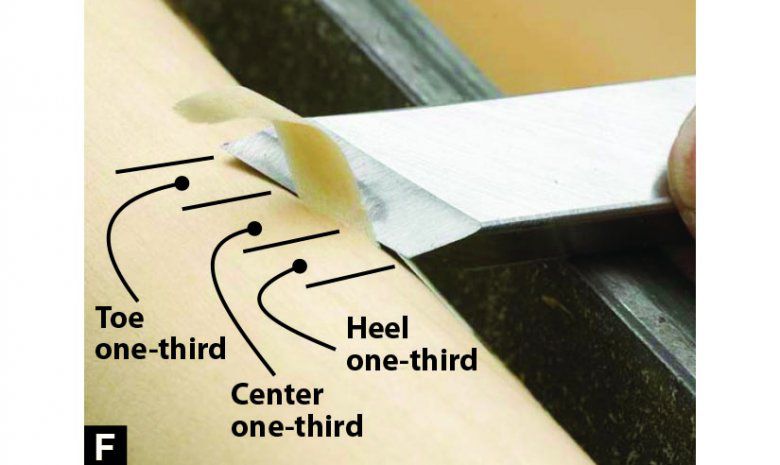
Planing cuts are made with the center one-third of the cutting edge [Photo F]. Cutting too close to the heel risks digging into the workpiece and rapidly removing too much material [Photo G]. Cutting too close to the toe risks catching the point and tearing off chunks of material [Photo H]. A wide skew is easier to use than a narrow one simply because the center one-third of a wide skew is wider than that of a narrow one.


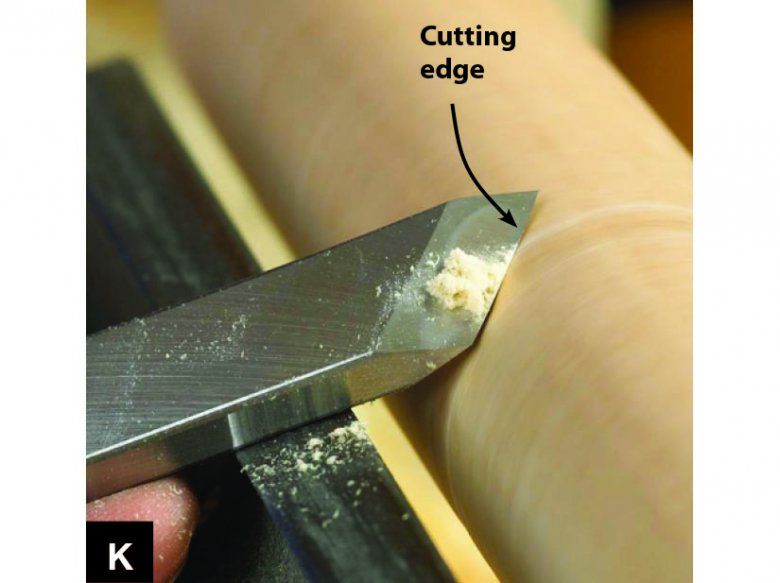
To get the feel of a planing cut, first use your spindle-roughing gouge to form a turning square into a cylinder. With the lathe stopped, position the tool rest slightly above center and about 1⁄2 " away from and parallel to the surface of the workpiece. With the lathe running, hold the tool handle below the tool rest, place the side of the skew on the tool rest, and the back of the bevel against the wood [Photo I]. Orient the cutting edge 45° to the workpiece axis [Photo J]. (Regardless of the skew angle, the cutting edge always forms a 45° angle with the axis of the workpiece.) Raise the tool handle slightly while pulling back on the tool until the center of the cutting edge also touches the wood [Photo K]. With the tool on the tool rest, and the back and cutting edge of the bevel contacting the wood, slowly push the tool along the length of the workpiece, peeling off shavings using the center one-third of the cutting edge. If the cut wanders toward the heel, slightly tip the tool on the tool rest toward the toe edge. If the cut wanders toward the toe, slightly tip the tool toward the heel edge. Practice planing in one direction, flip the tool, and practice in the other direction.


V-cuts
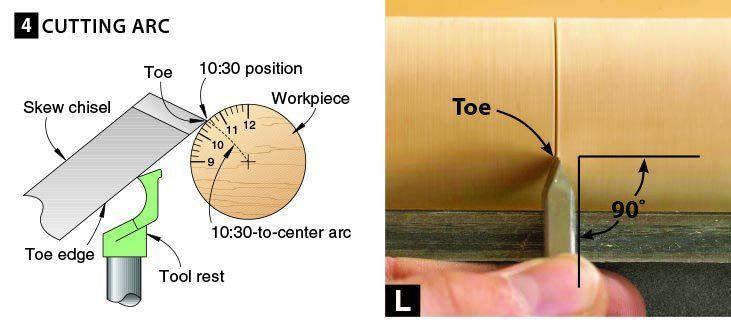
These cuts form stand-alone decorative elements and also serve as the starting point for forming beads. Begin a V-cut by positioning the tool rest slightly below center and about 1⁄2 " away from and parallel to the workpiece surface. Stand the tool vertically with the toe edge on the rest [Drawing 4], holding the handle low and the tool 90° to the workpiece [Photo L]. Place the toe of the skew close to the surface at the 10:30 position. Now slowly raise the tool handle, pivoting the tool on the rest, and lower the toe into the workpiece [Photo M]. Make a shallow cut following a 10:30-to-center arc. Do not push the tool into the workpiece; only raise the handle.

Now pivot the tool handle to the left, and place the toe slightly to the left of the center cut. Raise the handle to lower the toe into the workpiece, and cut to the bottom of the center cut [Photo N]. Pivot the tool to the right, and repeat [Photo O]. To widen the V-cut, increase the angle of the tool to the left and right, and cut from the 10:30 position to the bottom of the center cut. To increase the depth of the V-cut, decrease the angle of tool to the left and right, place the toe at the edge of the V-cut, and make additional cuts. Follow the 10:30-to-center arc with the toe, raising the tool handle more with each cut. Never raise the handle above the tool rest.


Beads
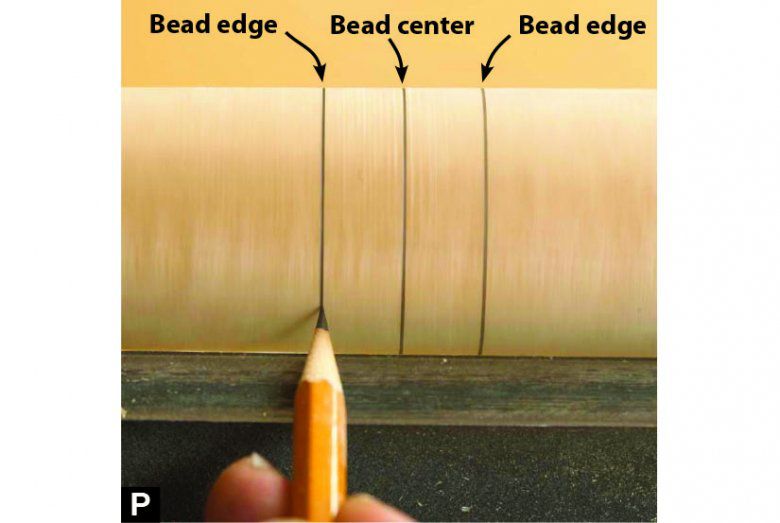
Lay out the centerline and edges of the bead on the workpiece with a pencil [Photo P]. Position the tool rest slightly below center. Then define the width of the bead, and remove waste material by making V-cuts to the bead depth at both marked edges.
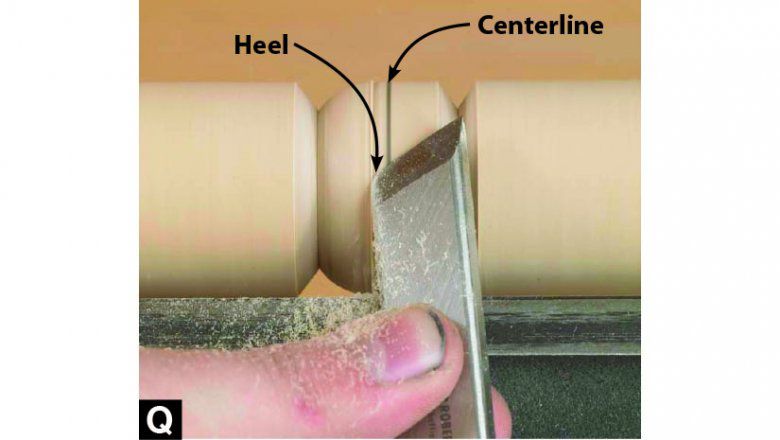
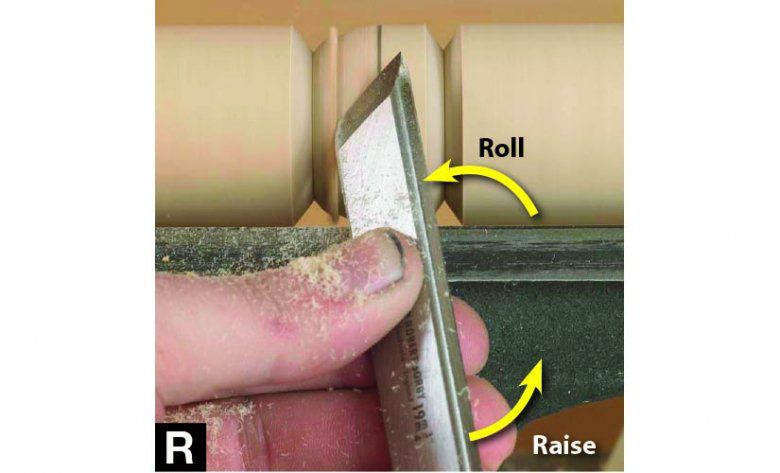
To form the left half of the bead, lay the skew flat on the tool rest at a 90° angle to the workpiece, with the cutting edge pointing left. Rest the back of the bevel against the wood, with the heel of the cutting edge close to the right edge of the V-groove. Engage the heel by slowly raising the tool handle and gently pulling it back. As the skew begins to cut, continue to raise the handle, and roll the tool onto the heel edge, forming a small radius [Photo Q]. The heel of the cutting edge should start cutting at the 10:30 position and cut toward the center of the workpiece.
Repeat this process, increasing the bead radius in small increments until a smooth curve extends from the centerline to the bottom of the left-hand V-cut [Photo R]. Always start your cuts with the tool flat on the tool rest, and finish with the tool standing vertically on the heel edge [Photo S]. Cut with the heel of the tool, and do not raise the tool handle above the tool rest. Do not cut away the centerline. You'll need it as a reference to keep the bead symmetrical, and you can sand it off when the bead is complete. Flip the skew over and form the right half of the bead.

Practice, practice, practice
Master the skew chisel by practicing on scrap rather than on a turning you want to keep. Ruining a candlestick or lamp base causes permanent skew-shyness. Instead, rip 2×4s into 2×2s and cut them 6–12" long, avoiding knots. Practice planing cuts first. When you are comfortable with planing, make a series of evenly spaced V-cuts. Then turn the V-cuts into beads.