Let Grain Reign
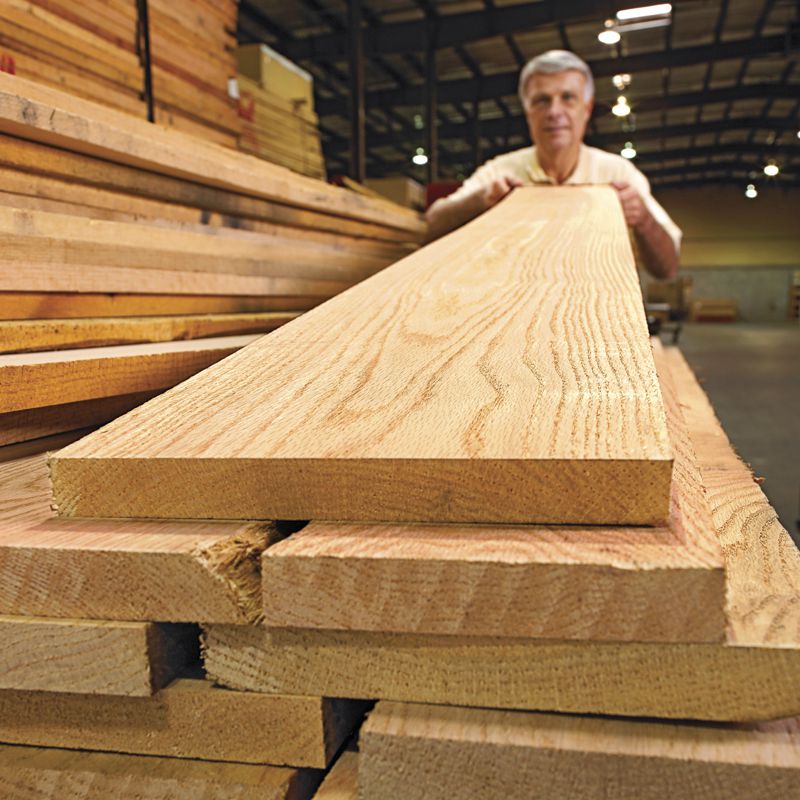

When WOOD® magazine Master Craftsman Chuck Hedlund heads to the lumberyard for a couple of hours, he's not playing hooky. Just the opposite: By investing time and trouble to sift through lumber stacks for just the right stock, he sets his projects on the path toward harmonious grain patterns and matching wood tones. These early efforts may go unrewarded until after Chuck applies the last coat of finish, but even the best finish can't create attractive grain that's lacking within the wood. Invisible glue lines and cabinet frames where the wood colors blend together even without stain don't just happen by chance, either.
Focus on parts and prep work
Plan your purchases before you reach the lumber supplier by thinking in terms of buying project parts instead of just lumber. Using your project parts list, examine what pieces you'll need and prioritize them by appearance. For example, the visible components of a tabletop will be more conspicuous than pieces hidden within a carcase.
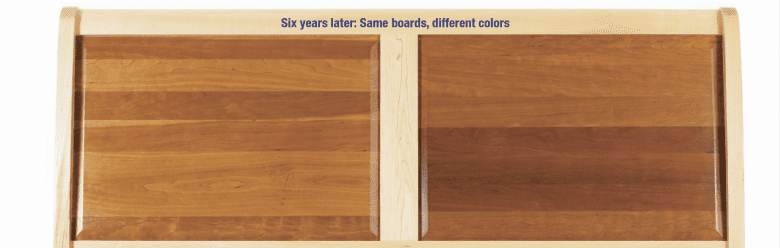
Whenever possible, build solid-wood panels and tabletops from a single board, or boards you know came from the same log. Your panel pieces will stand a better chance of matching in both the short and long term, as you can see by the cherry panels created for the sleigh bed, shown below. In just six years, the once color-matched pieces of cherry used in these panels darkened differently, something not apparent when the bed was built. If you simply can't find enough stock from the same board or log, apply stain during the finishing process to help even out color differences now and in the future.


Cut parts with the grain in mind
Cutting diagrams help you make the most of your lumber purchases, but they can't tell you how to make the most of wood grain. Instead of studying boards to see how many parts can be cut from the least amount of wood, consider what grain works the best for each part.
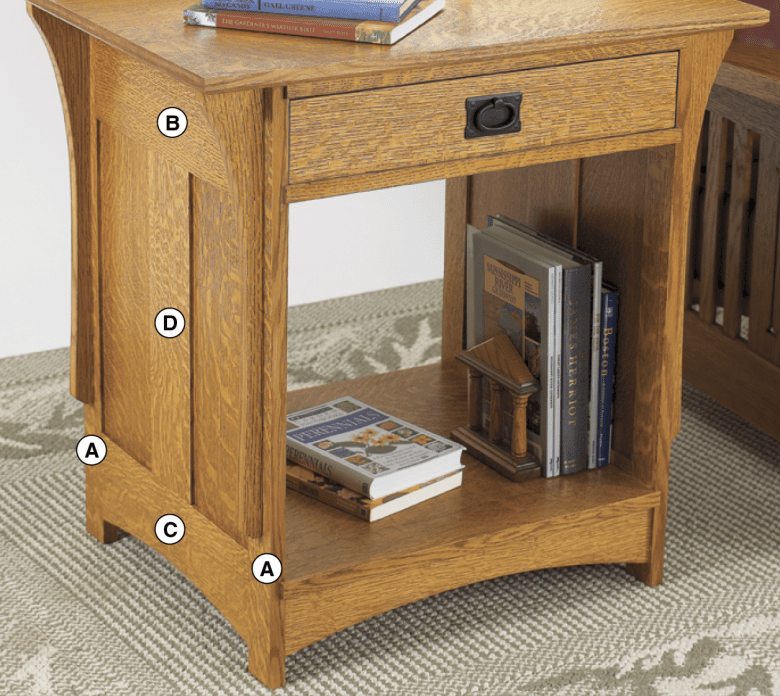
For example, the cutting diagram for the Arts & Crafts nightstand shown below is based on getting the most project parts from hypothetical board sizes. It shows parts A and C cut from a different board than parts B and D to make the side panel. So you either need two boards from one log or one board long enough to cut all five parts for each side. Remember, a cutting diagram is just a guide, not a mandate, for how to cut parts from boards.
If one project part in particular provides an opportunity to show off an attractive grain pattern, knot, or other grain feature—the top rail of a headboard, for example—note that on your shopping list. To preview how a piece will look on the finished project, cut the part's shape out of a piece of paper and bring this "window" to the store with you to position on different boards. Back in your shop, use the window, or a more rugged cardboard duplicate, to rough-plan the final cut, as shown below.

Other items to bring along on your shopping trip include a tape measure and chalk for marking which parts you'll cut from each board. If your lumber dealer sells rough-cut or skip-planed stock, bring along a sharp block plane, and a bottle of water and a rag to check for color.
Let's go lumber shopping
Once at the store, start by weeding out warped or twisted boards that will only get worse with age and humidity changes. Don't pass up rough-cut pieces with a slight taper along the edges; these boards just follow the shape of the tree.
Now you're ready to sort the most promising boards by grain and color. That can be tricky when saw marks and debris partially obscure the surface. If the lumberyard owner allows, here's where your block plane comes in handy. For a look at what's beneath the rough-sawn surface, lightly plane the board to reveal grain details beneath the saw marks, as shown below.

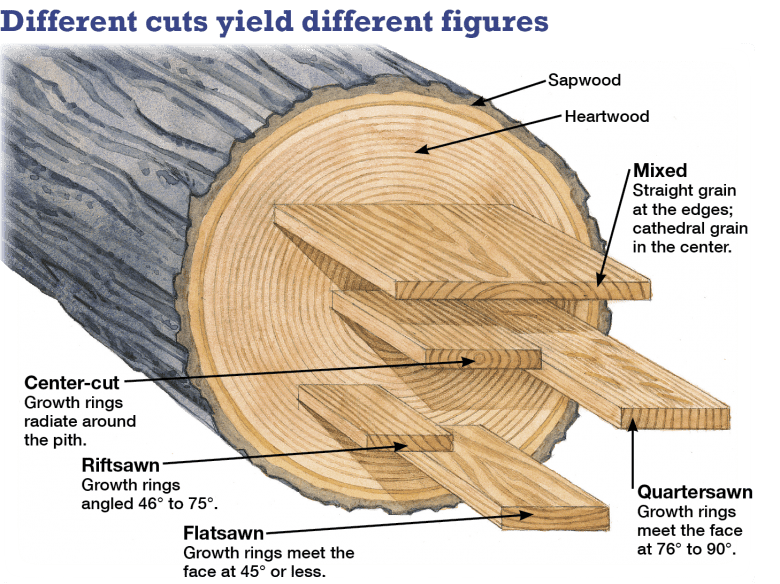
Now that you have a better idea of what's below the surface, choose the dominant grain pattern for your project from the types illustrated below. Quartersawn stock will yield straight-grain surfaces, an easy pattern to match and one that's more dimensionally stable than flatsawn lumber. Flatsawn boards, on the other hand, produce a more dramatic grain pattern and are often less expensive because this sawing method makes more efficient use of each log.
Whether you choose quartersawn, riftsawn, or flatsawn figure, determine which parts need to be consistent with each other. You may want to cut table legs from quartersawn stock, for example, but make the tabletop from riftsawn lumber.
If you need more than one board for a glue-up, wipe a water-soaked rag across the surface, as shown below, for a preview of how well they'll match after you apply a finish. Back in the shop, you can do the same thing using mineral spirits.

With your choice boards set aside, organize cuts around the features of specific boards. Some boards are wide enough to contribute more than one part. By splitting an extra-wide board, like the one shown below, you can create straight-grained stock for stiles and rails and use the cathedral grain at the center to form parts of the center panel in a raised-panel door.

Transform rough stock into contributing parts
Double-check your in-store observations by planing or jointing rough-sawn lumber to study all of the grain—including any surprises, such as the curly figure in the piece of ash shown below. Once you can see what each board has to offer, map out which parts to cut from specific boards.


As you're laying out your cuts, you may discover that the best patterns don't always follow the edge of the board. If necessary, mark and rough-cut pieces at an angle to follow the best grain flow.
Not all parts benefit from this approach. The top pair of drawers in the cabinet shown below, for example, were cut from contiguous pieces of the same board, as were the bottom pair. Study the fronts on both pairs and you'll see that the grain flows almost uninterrupted from the drawer faces on the left to the ones on the right.

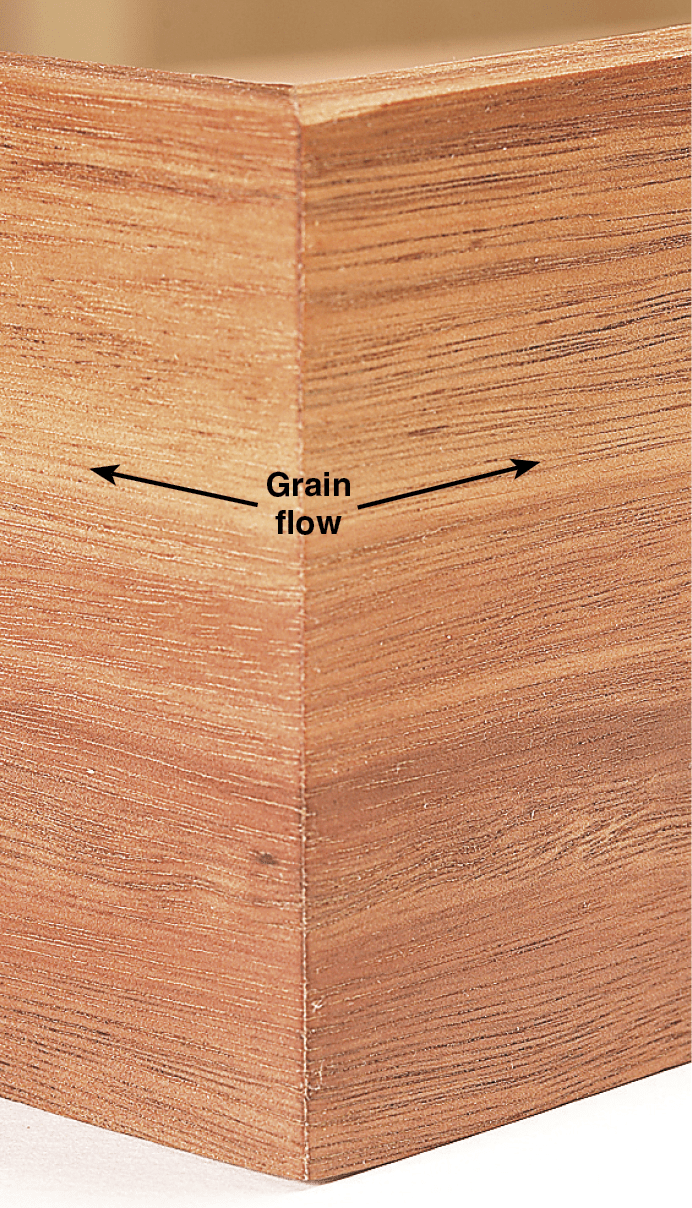
Grain flow is equally important for large and small projects where corners wrap around, such as the jewelry box shown below. After cutting your four pieces slightly oversize from the same board, number each piece in order and indicate the front surface and top. Then make your 45° miter cuts at each corner, removing as little stock as possible. As you prepare to glue the sides together, order them in the same sequence they were cut from the stock, with surfaces facing out and up as marked. The result will be grain lines that seem to flow from one side to the next at three of the four corners.
A gallery of great grain
We could write pages about techniques for matching wood color and grain for the most attractive effect, but pictures provide even better explanations. We chose these examples, mostly from past projects shown in WOOD magazine, to demonstrate the many potential payoffs for your grain-matching efforts.
Match solid stock and plywood panels
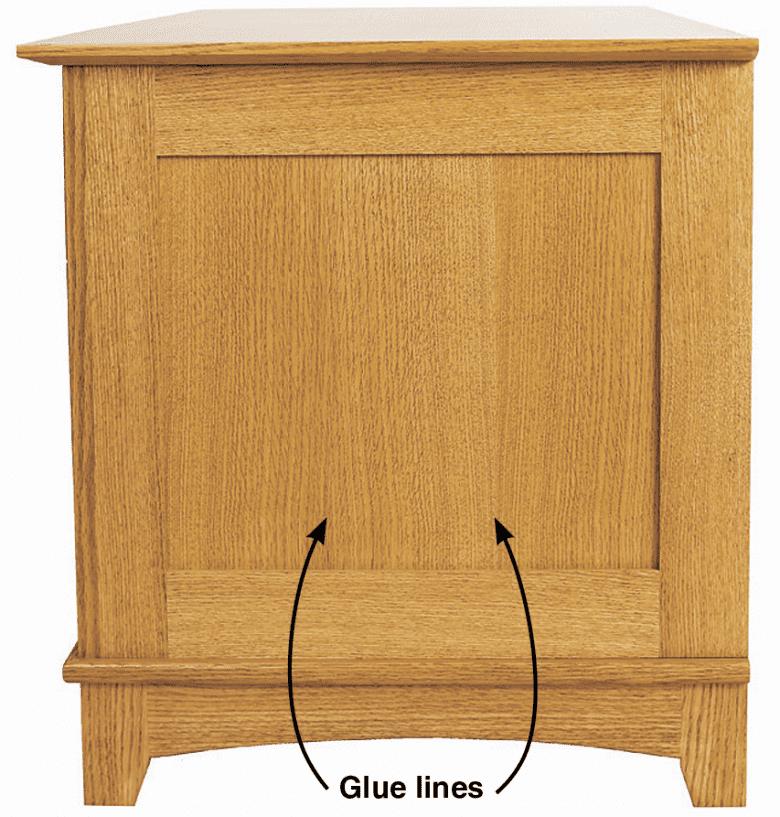
The secret of this traditional oak sideboard is the way the grain of the plywood panels in the doors matches that of the solid oak frame. The fronts of the three drawers coordinate so well because they came from the same board—even though the cutting diagram shows them cut from two separate boards for more efficient use of the lumber.

Look for patterns in plywood
Even plywood panels give you options for making the most of wood grain. Just as you would with a solid wood panel, center the glue lines to make the design as symmetrical as possible.
Showcase the wood's character
Show off unusual features in the wood, such as the cluster of knots on the top rail of this pine bookshelf. Use a paper cutout of the rail shape to center the feature on your part, as shown above.

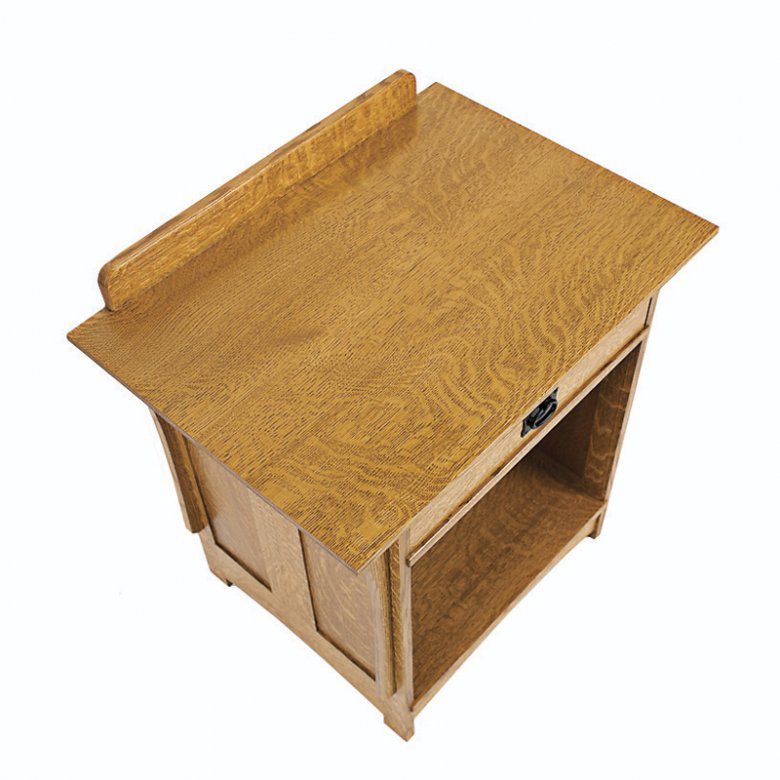
Match grain for glue-ups
The color and grain pattern on the four pieces forming the top of this night stand match so closely that the panel seems made from a single board. The most dramatic swirls are at the front where they're sure to be noticed.
Resaw for book-matched parts
Although there's a mix of grain patterns in this dresser, the swirling grain of the inset panels seems to flow together. That's because they were resawn from a single board.

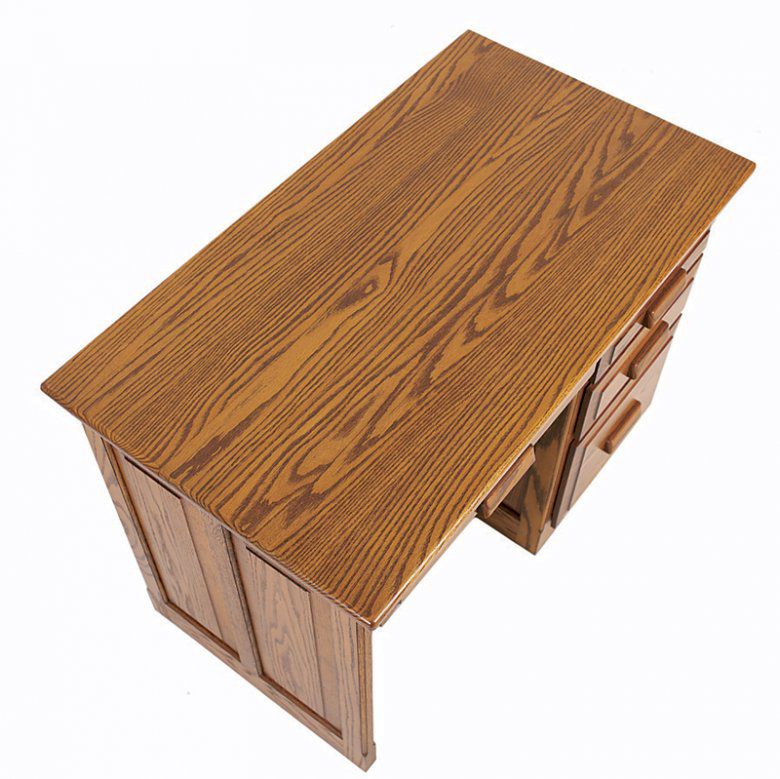
Dramatic grain requires added planning
There's nothing wrong with vivid grain patterns like those on the first desktop below—if that's the effect you want. Coordinating dramatic patterns into a desktop can be challenging, however. Straight-grain stock used for the student desk (second photo below) makes it easier to coordinate pieces and creates a more refined look for your project.

Center panel patterns
When working with book-matched plywood panels or veneers, center the most prominent figure, as on the side of this sofa table.

Luck favors the prepared woodworker
While purchasing knotty pine stock for the base of this hutch, Chuck discovered two boards cut from the same log with the same arrangement of knots. He then glued up two raised panels with mirroring knot patterns.
