Lock-Rabbet Drawer Joints


Step 1
Although you can build drawer joints using any number of methods, we think lock-rabbet joints like the ones below make sense for attaching the sides, fronts, and backs of most drawers. Although not as strong as a dovetailed joint, a well-made lock-rabbet joint will hold up fine unless the drawer takes heavy, regular pounding. And, it's much simpler to cut than dovetails.
Note: Before you start, make sure that all of your drawer front stock is the same thickness (about 3⁄4 "). Also, your sides and backs should be identically thick (about 1⁄2 ").
1. To protect the face of your tablesaw fence from blade cuts, attach a 6"-high wood auxiliary fence to it. Install a 1⁄4 "-wide dado set, and adjust the fence so the dado set just grazes it.
Use your 1⁄2 "-thick stock for the drawer side or back to adjust the height of the dado set to match the thickness of that material as shown in illustration below . Make a 1⁄4 x1⁄2 " rabbet cut in a 3⁄4 x3x3" scrap "gauge block" positioned face down on your saw. Nestle your drawer side or back into the rabbet to double-check that the depth of the cut matches the thickness of the 1⁄2 " stock. Save this gauge block.

Steps 2 - 4
2. Readjust the fence-to-dado set distance to match the width of the rabbet cut in the gauge block. As shown in illustration below, the edge of the rabbet should meet the dado set teeth closest to the fence. Use a square to hold the gauge block 900 to the fence.

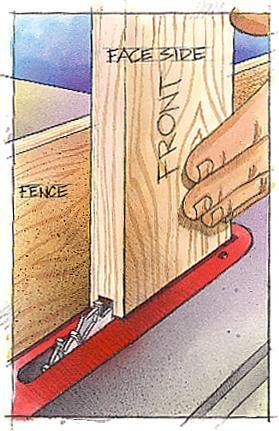
3. Position a drawer front on edge with its back face against the fence. Now, cut 1⁄4 x1⁄2 " grooves in both ends as shown below. Do this to all of your drawer fronts.

4. Once again, the gauge block helps you precisely set up for a cut. Position it as shown below to reset the height of the dado set to 1⁄4 " high. Do not change the position of the fence.

Steps 5 - 8
Note: For each of the following steps, first make test cuts in scrap stock of the same thickness as your actual workpieces. Check the fit of the scrap pieces with the project pieces cut in earlier steps.
5. Place a drawer side outside face up on the saw, butt either end against the fence, and cut a 1⁄4 x1⁄4 " groove as shown below. Groove the other end of the drawer side in the same fashion, and repeat these steps on your other drawer sides.

6. Position a drawer back on edge with its inside face against the fence. Cut a 1⁄4 x1⁄4 " rabbet in both ends as shown below. Make these cuts on all of your drawer backs.
Now's a good time to cut the 1⁄4 x1⁄4 " groove in each of your fronts, sides, and backs for holding the drawer bottom. Leave the fence and dado set where they are, position your drawer parts inside face down with their bottom edges against the fence, and cut the bottom-holding groove.
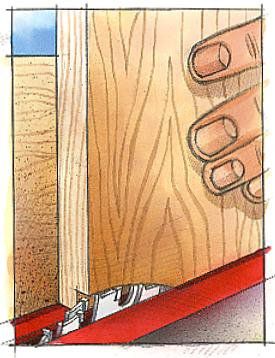
7. Raise the dado set for a 3⁄8 "-deep cut. Readjust the fence so the dado set just grazes it. Position your drawer fronts face side up on the saw and complete the cuts on their ends as shown below.


8. To assemble each drawer, first test-fit the parts. Then, apply glue to all of the grooves and rabbets. We suggest you make the bottoms from plywood instead of solid stock. In that way, you can glue the bottom in place without concern about expansion and contraction problems.
Assemble the glued parts, clamp them together, and measure diagonally from corner to corner to check for square. If one diagonal is longer than the other, place a long clamp along that diagonal to bring the drawer into square.
If you like this short-subject feature, please check out our 20+ downloadable and more in-depth woodworking seminars at the WOOD Store.
If you like detailed woodworking information, click below for information on subscribing to WOOD® magazine.