Make and Mount Super-Simple Drawers

Limiting yourself to furniture projects without drawers is like trying to drive without using the steering wheel: Either way, you won't get far. But once you master how to measure, build, and mount these basic drawers, you're on the road to a world of furniture and storage projects.
Start with design decisions
Two basic drawer styles will fit most project needs. Build inset drawers when you want the drawer front flush with the cabinet frame. Or build partial- or full-overlay drawers to conceal the frame with the drawer fronts. We'll focus on making inset drawers [Drawing 1, below], the ones we use most often.
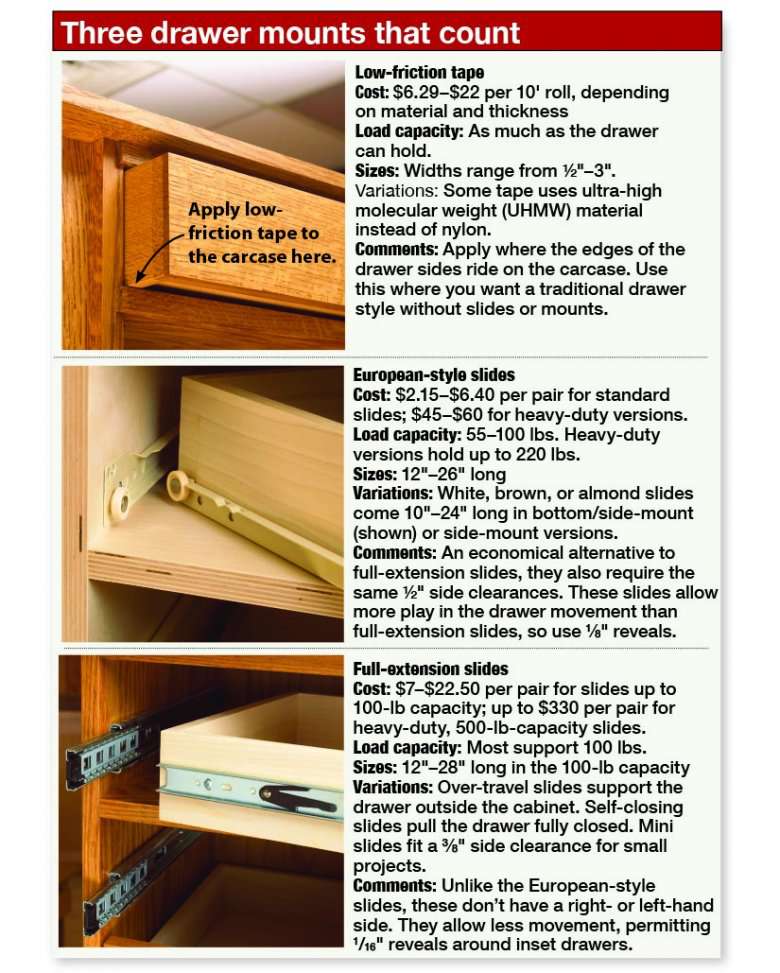
■ Mounting. Choose a drawer slide or other mounting method compatible with inset drawers. Of the dozens of options out there, the ones we use for most WOOD® magazine projects are full-extension slides, for their smooth operation and easy access to drawer contents. See "Three Mounts that Count", below, for two other popular options: European-style slides, and loose drawers that ride on low-friction tape.

■ Materials. Economize by making drawer boxes out of less-expensive materials than the rest of your project. We like poplar for its strength, light weight, and low price. For drawer bottoms, we prefer Baltic birch plywood. It's strong, doesn't expand like solid wood, and measures a consistent ¼" thick. (See the Shop Tip below.)
SHOP TIP
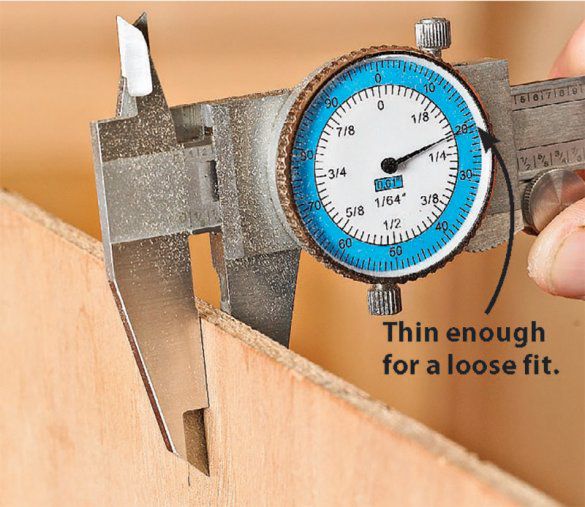
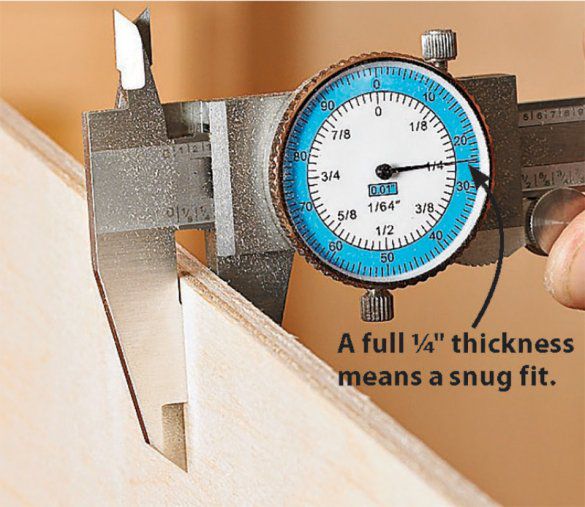
For grooves that fit, check drawer-bottom stock
Not all sheet goods sold as 1⁄4 " stock measure a true 1⁄4 " thick. If you don't discover that until after you cut the drawer-bottom grooves, the rattle coming from your finished drawers will serve as a constant reminder. For example, the lauan plywood below measures close to 13⁄64 ", thin enough to fit loosely. Even today's hardboard sheets measure too thin for a tight fit. The Baltic birch plywood, following, comes closer to a true 1⁄4 ", even though it's typically manufactured in metric dimensions (1⁄4 " equals 6.35mm). For another source of 1⁄4 "-thick drawer bottom stock, try MDF-core plywood.

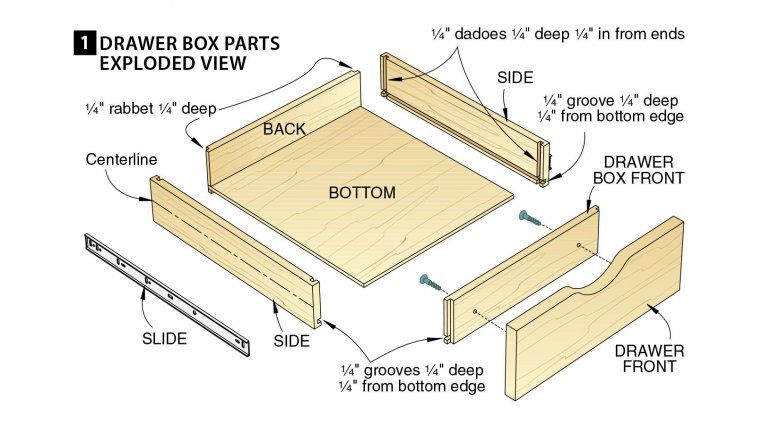
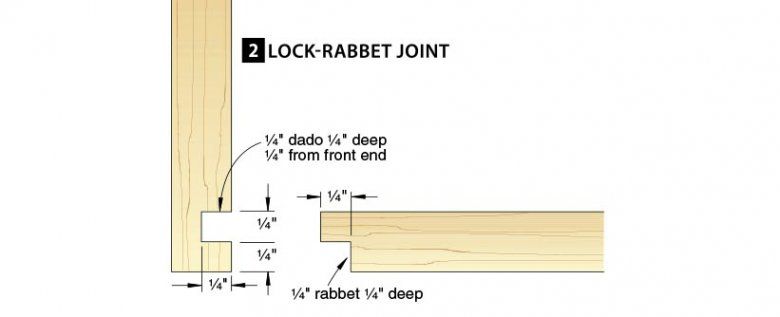
■ Joinery. Dovetails produce sturdy, attractive joints, but they're time-consuming. Lock-rabbet joints [Drawing 2, below] also provide plenty of mechanical and glue strength and can be cut quickly on a tablesaw without special jigs.
Size the drawer to fit the hole
Now, you're ready to calculate the drawer-box dimensions using the formulas in Drawing 3, below. Begin by measuring the cabinet opening width (A) and height (B). Full-extension slides typically require 1⁄2 " clearance on each side, so calculate the box width (C) by subtracting 1" from dimension (A). The box height (D) can vary to suit your needs.
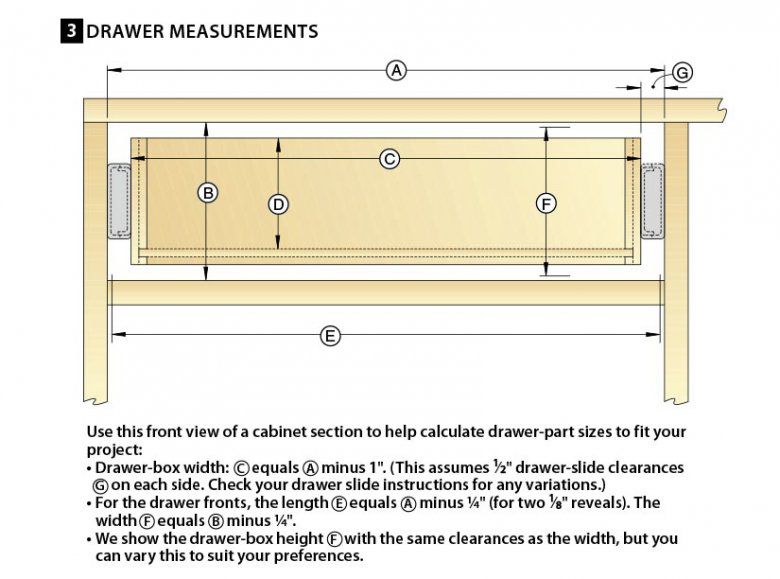
For an easy way to remember how long to cut your box parts to allow for the lock-rabbet joints, just subtract 11⁄2 " from (A) and from the box length. To calculate sizes for the drawer front, subtract 1⁄8 " to 1⁄4 " from dimension (A) and (B) when using full-extension slides, or 1⁄4 " when using European-style slides.
Cut the drawer-box parts
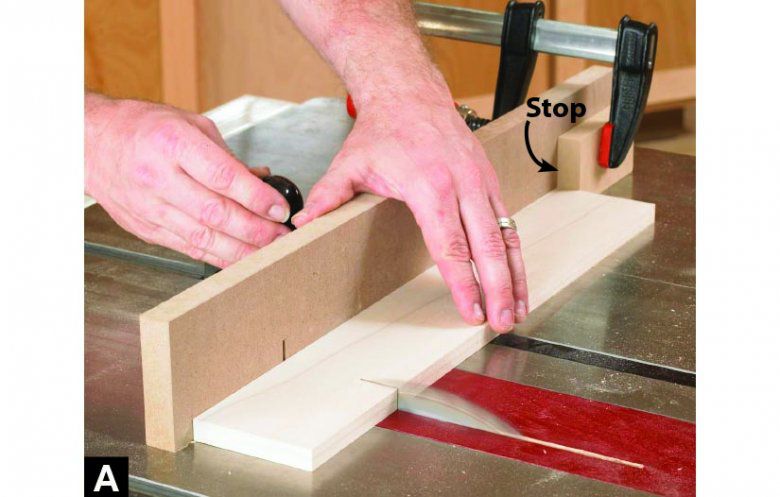
Consistent cuts yield tight-fitting, square drawers, so use stops instead of a measuring tape when cutting drawer parts to length [Photo A, below]. For a project with multiple drawers, cut all box fronts, backs, and side pieces in groups. Also, cut extra parts to test your setups to make the lock-rabbet joints.
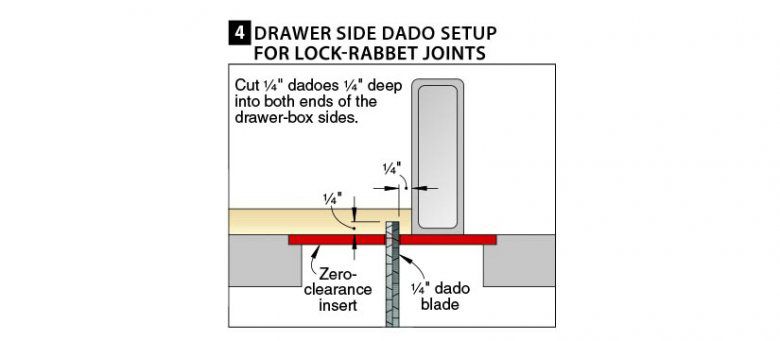
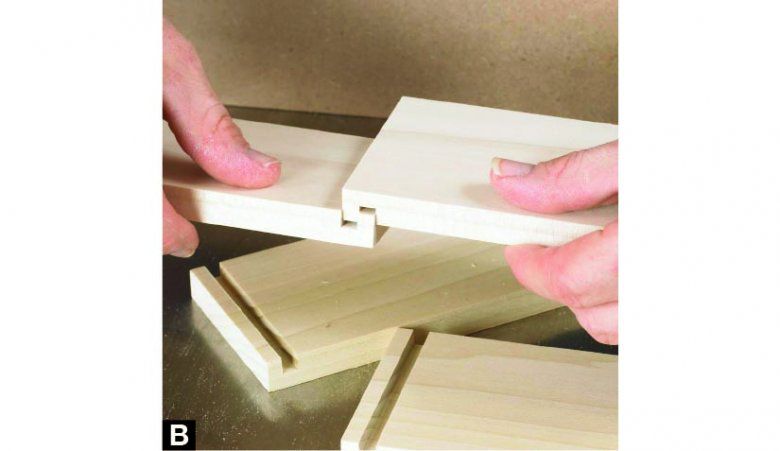
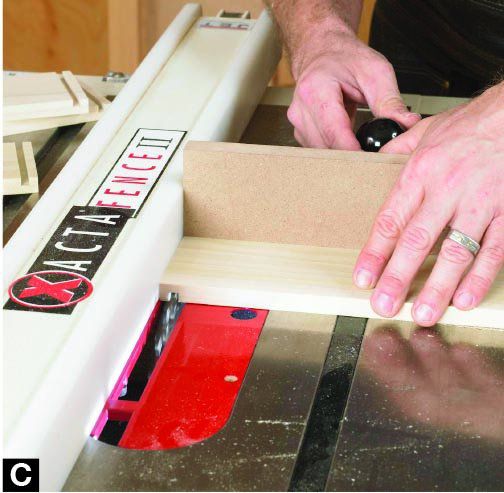
To dado the box sides for the lock-rabbet joint, first cut a 3"-wide spacer the length of your rip fence from 1⁄4 " stock. Install a 1⁄4 " dado blade, set the rip fence 1⁄4 " from the blade, and lock the blade 1⁄4 " high [Drawing 4, above]. To test the fence position and blade height, cut dadoes into two scraps [Photo B, below] and check that they join snugly end-to-end. Once you achieve a tight fit, dado both ends of each drawer side [Photo C, following].
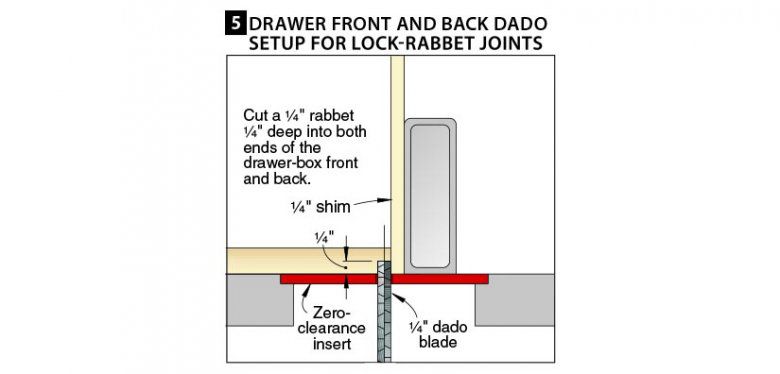
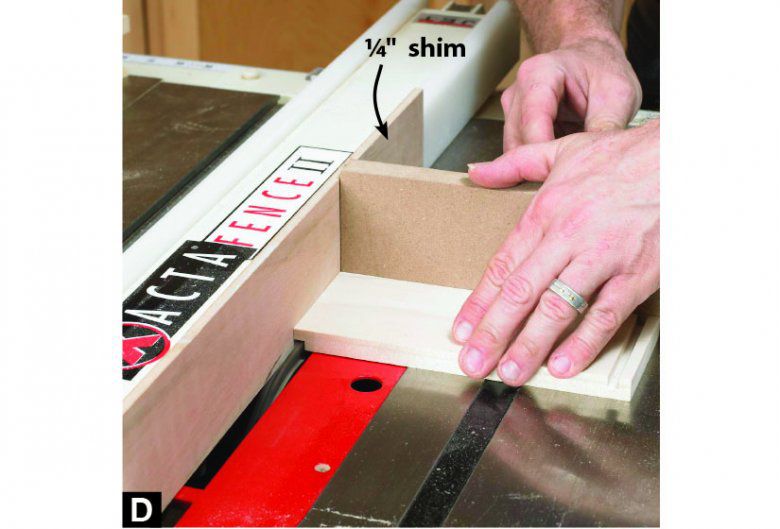
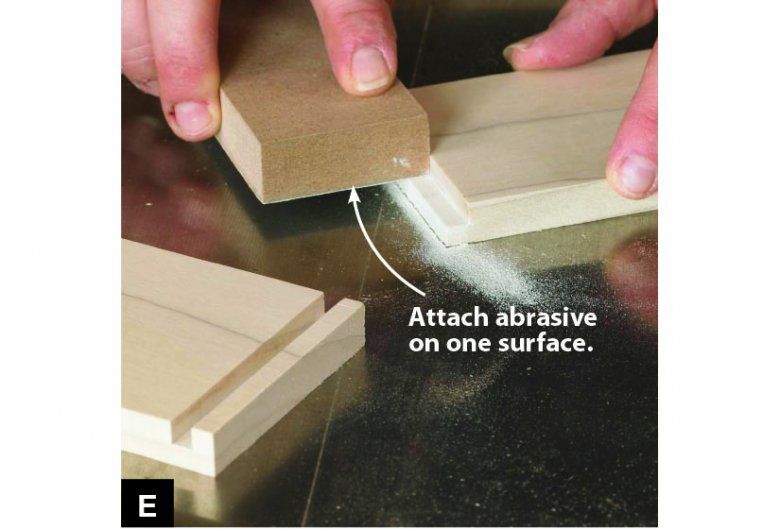
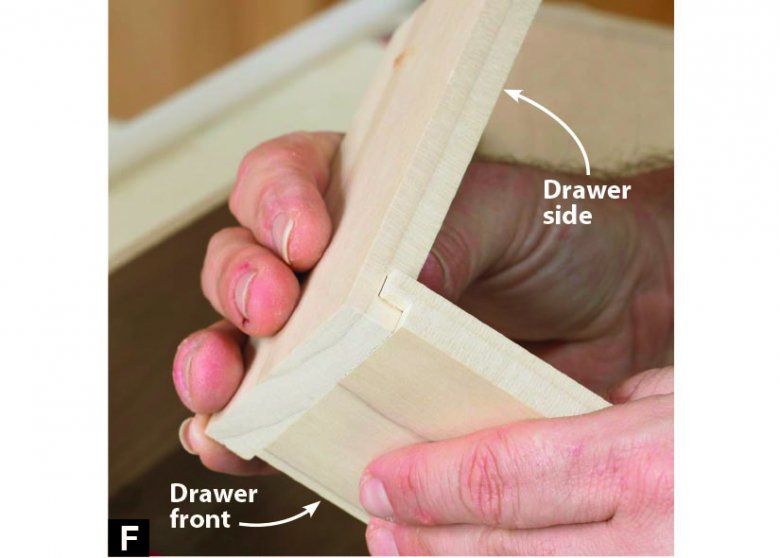
To rabbet the box fronts and backs, attach the 1⁄4 " shim to the fence using double-face tape [Drawing 5, above], and then rabbet the end of a scrap [Photo D, below] to test the fit with the dadoes cut in the previous step. Next, cut a rabbet on both ends of each drawer front and back. Fine-tune the fit using a block with 120-grit sandpaper on one face [Photo E, following]. The joint should fit together with moderate hand pressure [Photo F, beneath].
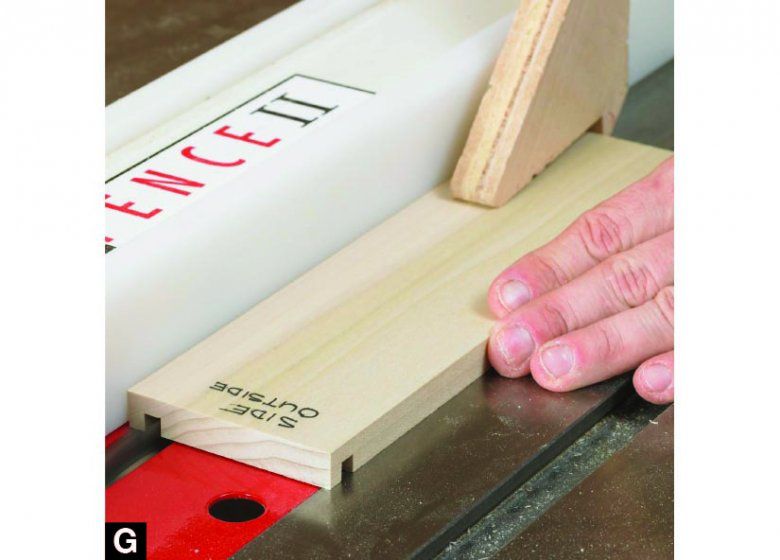
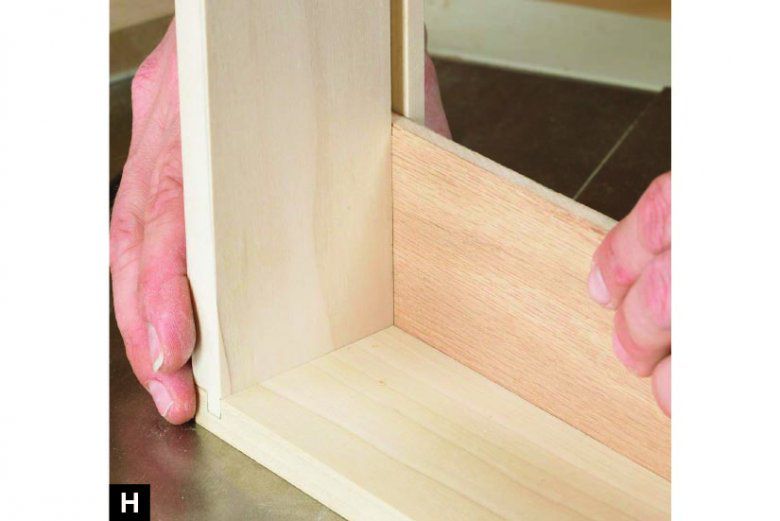
To set up your tablesaw to cut the drawer-bottom grooves, simply remove the 1⁄4 " shim without moving the fence. Then, cut grooves into the inside faces of all four pieces of each box [Photo G, below]. Check the alignment of the box front, back, and sides using a piece of drawer-bottom scrap [Photo H, following]. Dry-assemble the box, and measure the inside length and width. Add 7⁄16 " to each of those dimensions, and cut the drawer bottoms to that size.
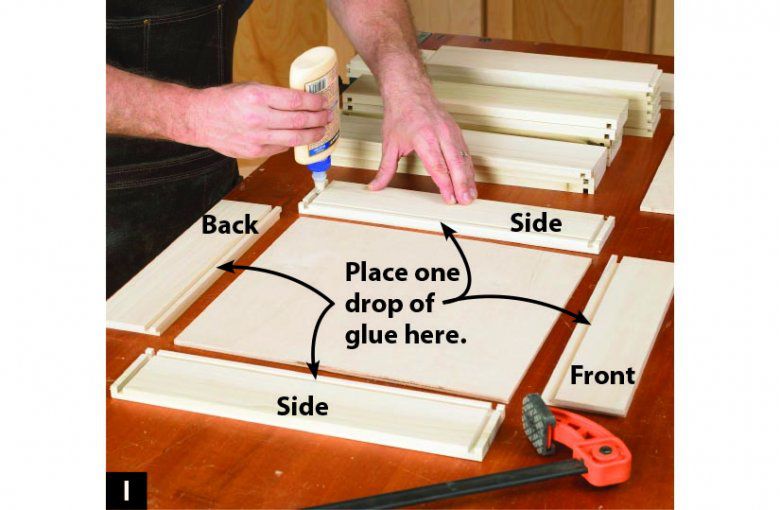
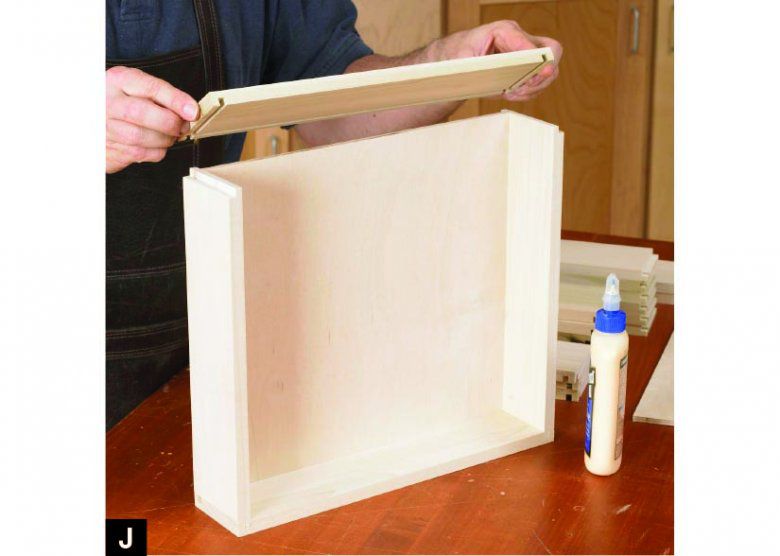
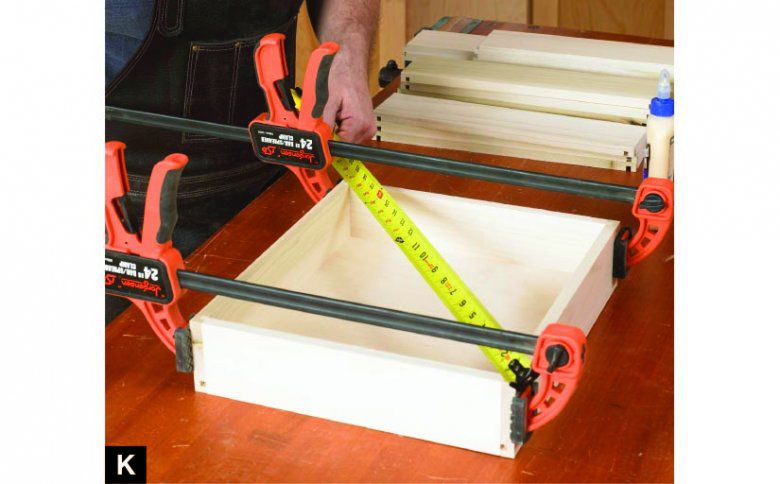
To assemble the drawers, apply glue to both dadoes in a side piece [Photo I, below]. To keep plywood drawer bottoms from rattling, add a drop of glue at the center of each piece's drawer-bottom groove. Insert the front and back pieces into the dadoes on a side piece, add the drawer bottom and then the other side piece [Photo J, following], and clamp all four joints. Measure both diagonals [Photo K, beneath] to verify that the boxes are square.
Install the drawers
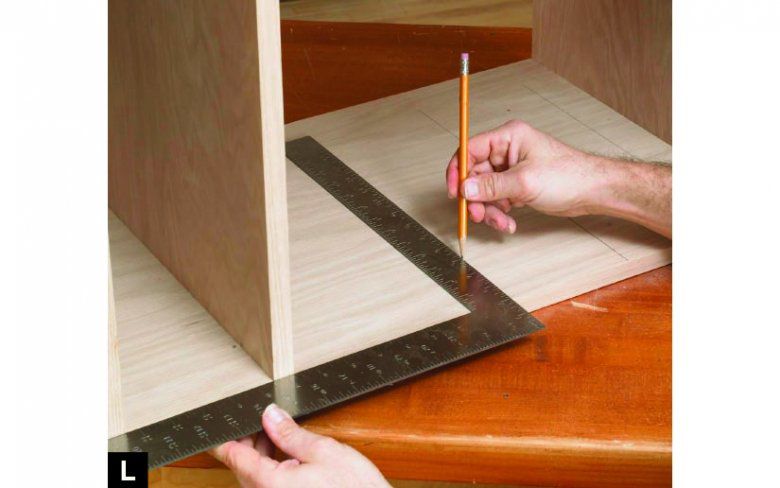
To mount full-extension drawer slides, first measure and mark the cabinet or case with centerlines where each drawer slide will be mounted [Photo L, below]. Then, mark height centerlines on both sides of each drawer.
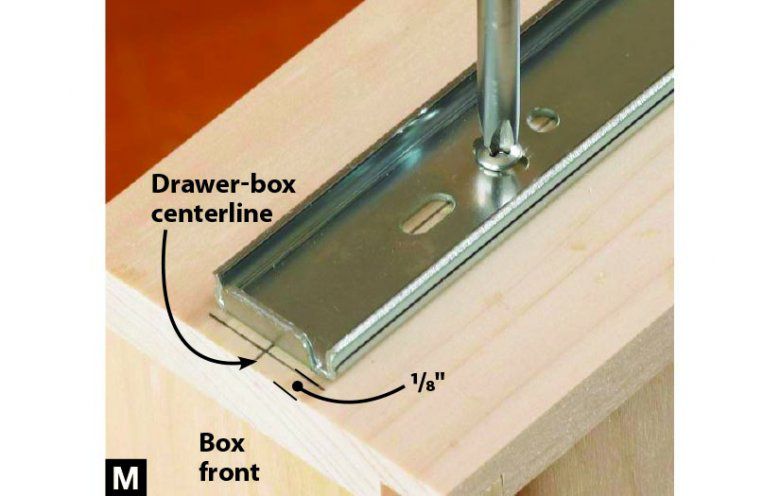
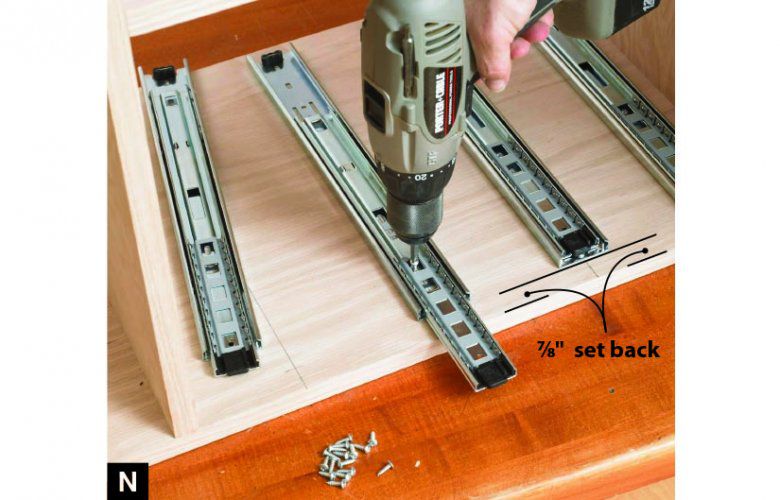
Next, remove the drawer-mounted part of the slide from the slide assembly that will mount on the case. The front of the case-mounted slide part rests 7⁄8 " from the front edge of the case—3⁄4 " for the drawer front plus a 1⁄8 " margin to keep the drawer slide from bottoming out as it closes. The box-mounted slide part mounts 1⁄8 " from the front end of the box side.
Both the drawer-slide parts that attach to the cabinet and the part that attaches to the drawer [Photo M, below] use slotted holes to allow adjustments. Mark the locations of the mounting screws within these holes, drill 3⁄32 " pilot holes (for #6 panhead screws) into the hardwood pieces, and mount the slide parts onto the drawers and the carcase [Photo N, following], with the screws centered in the slotted holes. Now, insert the drawers, and check that the slides operate smoothly.
Attach the drawer fronts
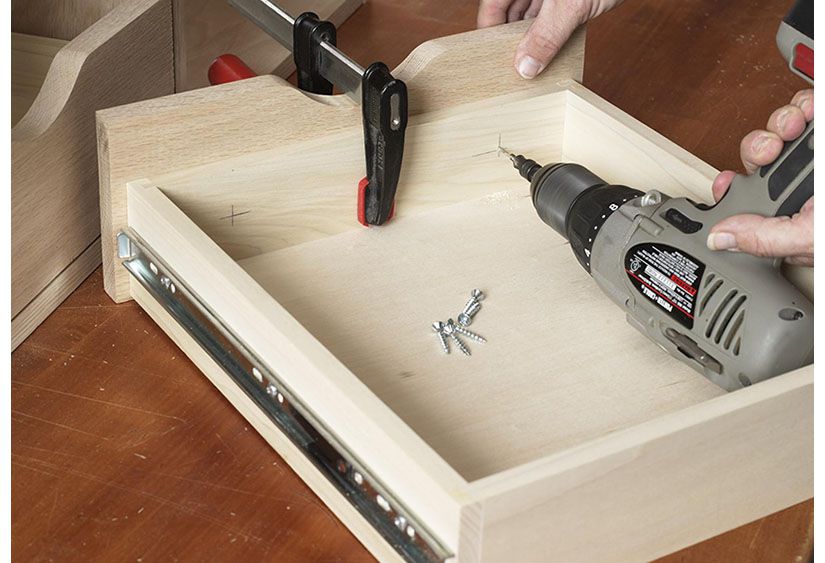
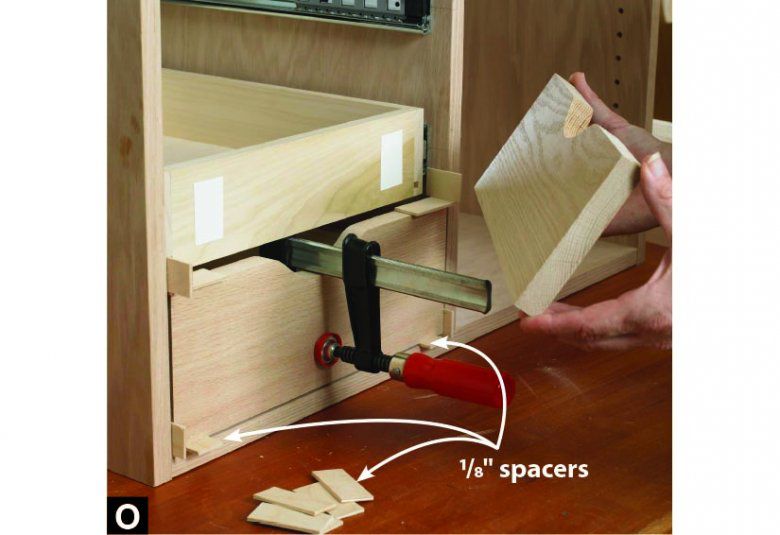
Before attaching drawer fronts to the boxes, cut about a dozen 1×3" spacers from 1⁄16 "-thick strips for full-extension drawer slides or 1⁄8 "-thick strips for European-style slides. Attach double-faced tape to the box to temporarily mount the drawer front, and use spacers to leave a consistent gap around the drawer front. With the spacers inserted as shown [Photo O, below], press the drawer front against the box, push the drawer out from the back, and reinforce the tape with a clamp. Then remove the drawer with the clamp still attached, and insert two mounting screws from inside the box, as shown above. Repeat for the remaining drawer fronts.
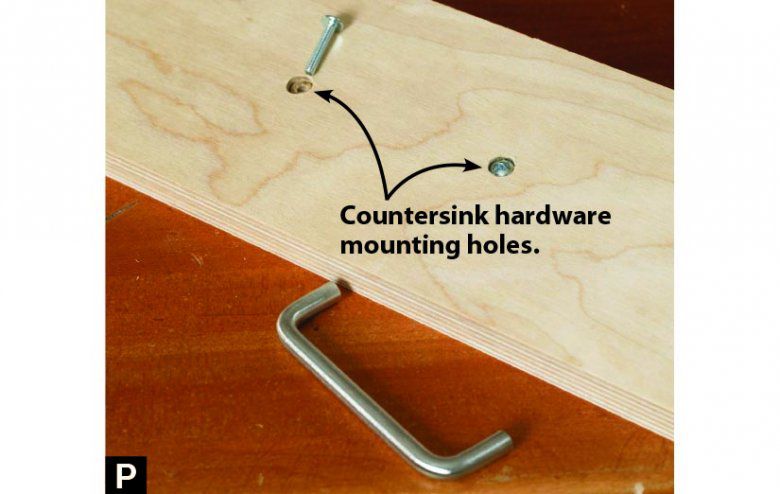
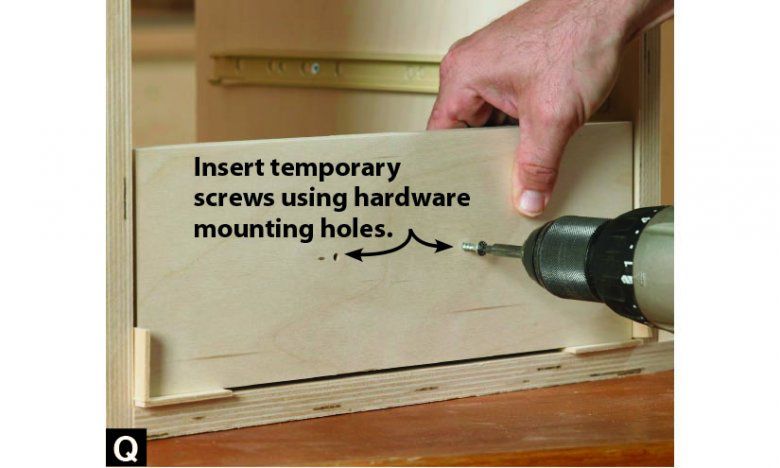
If you want a knob or pull on the drawer front, remove the mounting screws, and detach the front from the box. Mark where you want the hardware, then drill the mounting-screw holes. Counterbore the holes into the back side of the drawer front so the screws sit flush [Photo P, below]. Use the holes to temporarily screw the drawer front to the box [Photo Q, following], and reinsert the two mounting screws to attach the drawer front onto the box.
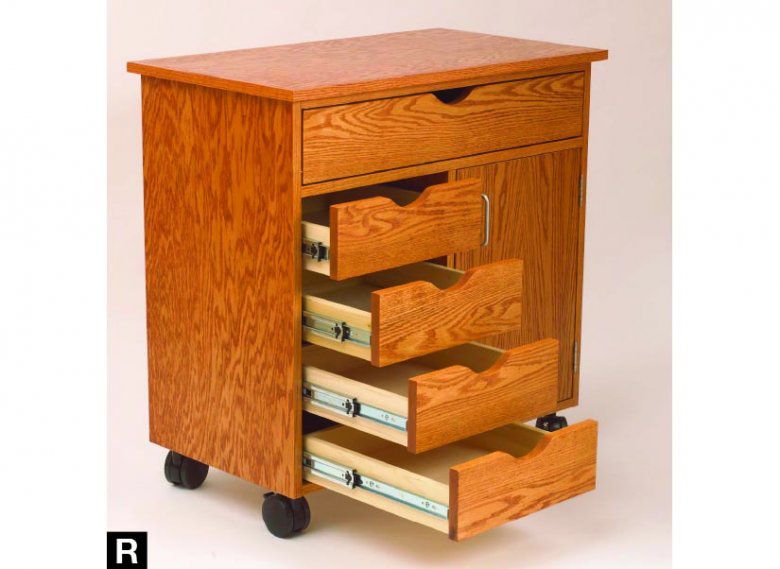
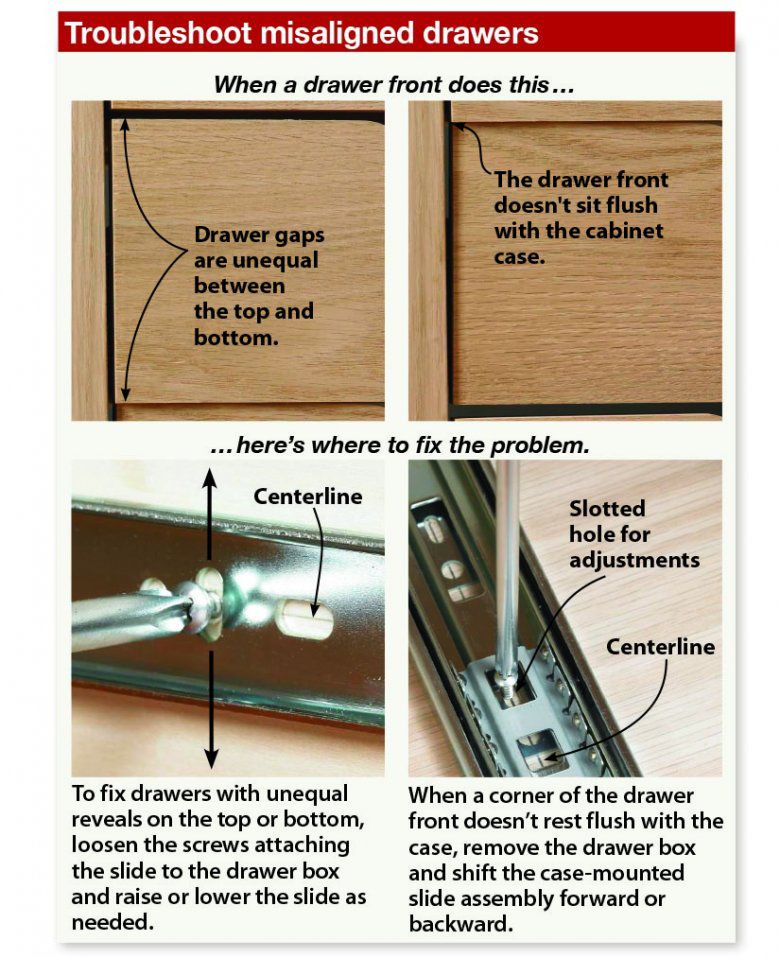
Once you've finished your project [Photo R, below], you may need to fine-tune the slide adjustments. See "Troubleshoot Misaligned Drawers" below for tips on getting drawers flush and even.