Make Beautiful Baseboards and Chair Rails


Most of the wood trim in today's homes was meant to be ignored, not admired. If you look around at the skinny baseboards and chair rails in your home and think, I could do better, you're probably right. Making and installing custom baseboards and chair rails adds personality and value to your home.
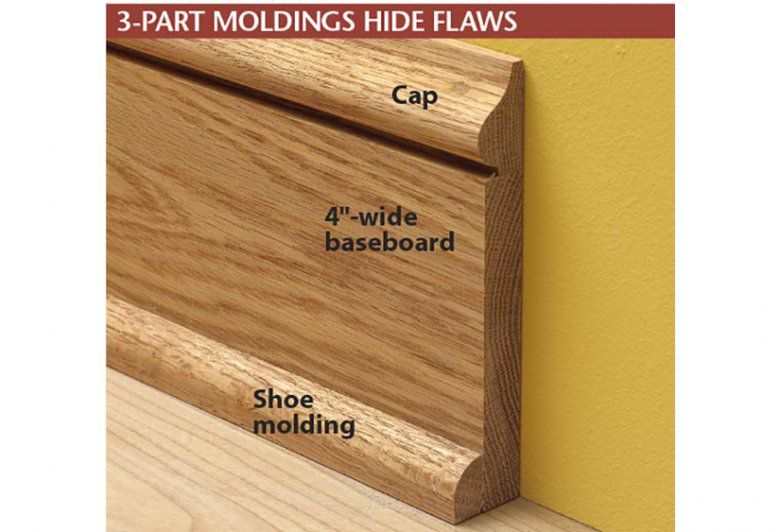
When choosing baseboard profiles, first decide whether you want a one-piece molding or one built up from two or more pieces [photo below]. A single molding saves you time and money, but a built-up molding lets you combine pieces for a dramatic, extra-wide profile. Then decide between stained or painted moldings. Stained or clear-finished moldings need to be cut from straight, clear wood. A layer of paint, though, can hide inexpensive stock, such as a poplar cap, or an MDF baseboard.
There's no rule dictating what molding size or style looks best in your home. In general, a roomy house with ceilings higher than 8' accommodates trim wider than the common 21⁄2 " baseboard width.
To help you decide what you want, gather molding ideas from magazines, historic homes, real-estate open houses, and router-bit manufacturers' Web sites. Then pick a few styles, mock up short samples against a wall [photo below], and live with them until you settle on your favorite size and combination.

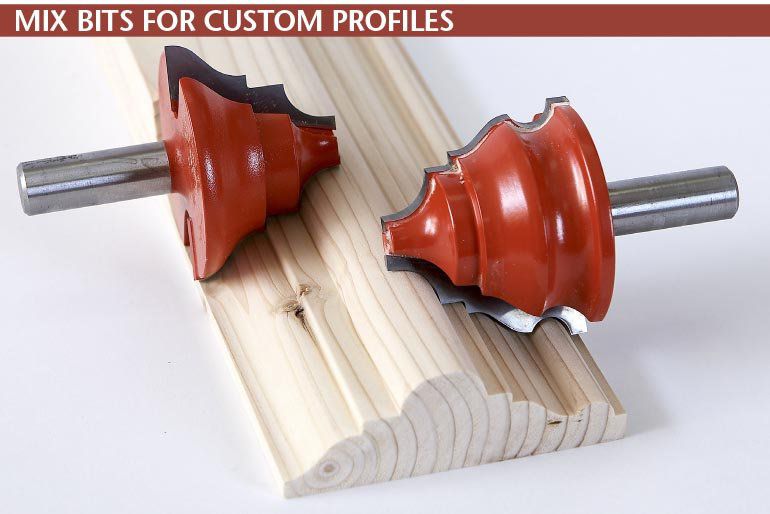
Like baseboards, chair rails can be fashioned from a single molding or combination of moldings. A variety of router bits used individually or in pairs create custom chair-rail designs [photo below].
In the room shownin the opening photo, we topped a beaded chair rail with a beaded-edge shelf [photo below].

Gear up to make moldings
Baseboards and chair rails fit between door and window casings, so install that trim first [photo below]. When estimating and preparing stock to rout for molding, joint and plane two extra strips for each type of molding to allow for routing tear-out, miscuts, and other mishaps.

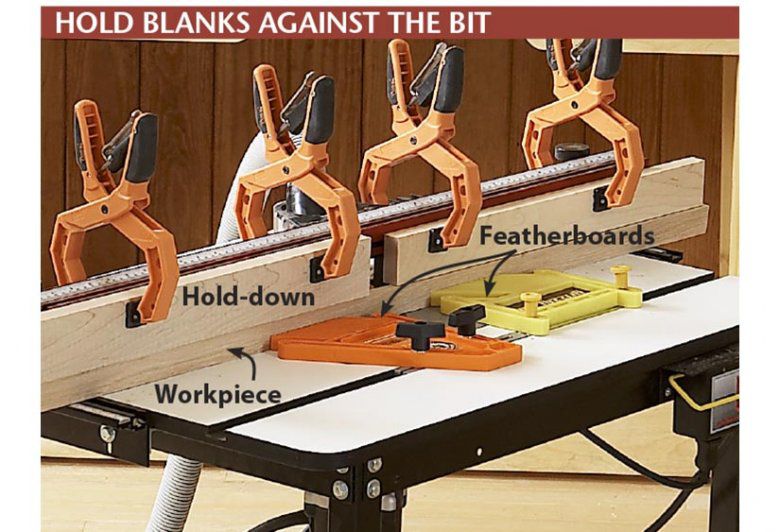
Now set up your shop to mass-produce moldings out of blanks at least 8' long (to minimize splices on long walls). That means table-mounting a variable-speed 3-hp router that can handle large molding bits. Then add infeed and outfeed supports, featherboards, hold-downs, and dust collection [photo below]. While routing, maintain a steady feed rate without pauses that leave burn marks.
The most carefully routed moldings still need to be sanded up to 180 grit using pads, sanding sponges, or contoured blocks that follow the molding profile. You can stain the moldings before installation, as we did here, but apply a clear finish after cutting joints and patching nail holes.
Common hand tools help you handle most installations, but a mitersaw makes the job easier. You'll also work faster using a 15- or 16-gauge pneumatic nailer with 21⁄4 " or 21⁄2 " nails to attach trim to walls. Use an 18-gauge nailer with 11⁄4 " or 11⁄2 " brads to attach moldings to each other. You'll also need a 3' level, a 6' or 8' straightedge, tape measure, coping saw or jigsaw with a narrow 20-tooth-per-inch blade, a hammer, and nail-pulling pliers. (See the Shop Tip below.)
SHOP TIP
Remove Nails with Care
Sooner or later, one of your nails will strike a hidden knot, drywall nail, or some other obstacle. Be ready with a pair of end cutters or pliers designed to grip even a small nail head. Place a shim or scrap beside the nail to protect the baseboard, and use the shape of the pliers to leverage the nail out of the wood.

Begin with the baseboards
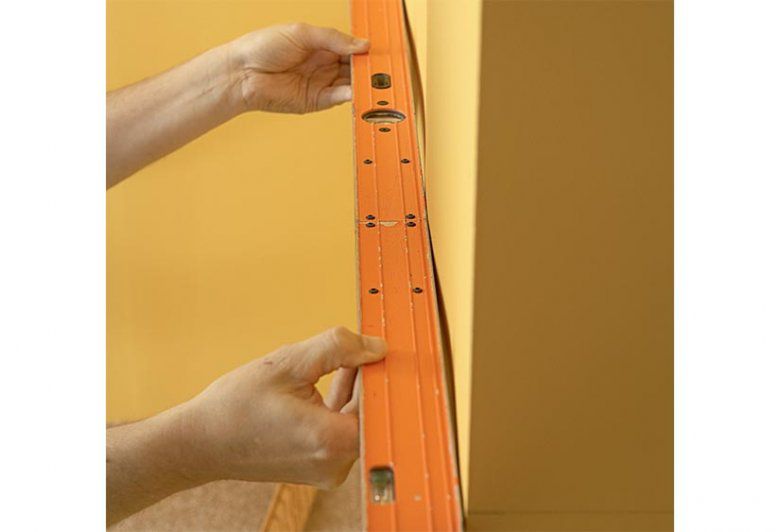
First check walls for severe dips that will create gaps behind baseboards and chair rails [photo above]. Then locate wall studs to attach the baseboards and chair rails [photo below]. Mark these plus the chair-rail mounting heights at each stud—typically 36" above the floor.

Follow these general rules when planning your job:
■ Avoid coping both ends of a trim piece. That makes it hard to cut accurate lengths.
■ Cut baseboards and caps starting with the longest pieces first. That way, any miscut pieces can be reused elsewhere in the room.
■ On walls longer than your longest piece of trim, join two pieces with a 45° scarf joint [photo below]. Place the joint somewhere inconspicuous, such as behind an open door, and in front of a stud. Glue the joint ends and then drive 15- or 16-gauge nails through both pieces and into the stud to eliminate gaps.


In a typical room with four inside corners and one entry where you're using moldings with profiles, for example, first cut the piece for the longest wall using straight-cut ends. Add an extra 1⁄8 " to the length of the wall and cut the molding this length. Then bow it slightly, and pop it into place for a snug fit in the corners.
For walls 90° to the long wall, cut coped ends to go against the long-wall molding and squared ends to go against the opposite wall or any doorway casing in between. Only as a last resort would you cut molding for the remaining wall with cope cuts on both ends.
That's the plan; now let's go to work on the baseboards.
Unlike the controlled world of the workshop, you'll need to work around drywall flaws in most houses. For example, inside wall corners become rounded because of built-up joint compound. To compensate, sand a round-over on the inside end grain of your baseboards to fit these corners. Now fasten the first piece into the wall studs using a 15- or 16-gauge nailer.
With no profile to cope-cut for the simple baseboards shown here, simply butt the ends of the adjoining pieces against your first baseboard until you've worked your way around the room. On outside corners, miter the end so the inside face ends flush with the corner. Then cut the mating miter, glue the joint, and attach the baseboard with 15- or 16-gauge nails. Reinforce the joint with 18-gauge brads [photo below].

SHOP TIP
Hate miters? Try this miterless alternative
In the same way that corner blocks eliminate mitered door-casing corners, these corner blocks eliminate outside corner miters in baseboard moldings. They also withstand bumps from shoes and vacuums. To make them, cut blanks about 1" to 11⁄2 " square, and add a 1⁄8 " round-over to the three exposed edges. For a decorative touch, rout the top end on all four faces. Then add either a 1⁄4 " notch for outside corners or chamfer for inside corners to allow for drywall imperfections.

Now you're ready to add the cap—again starting on the longest wall and bowing a 1⁄8 "-overlong piece to fit. Because it's narrower and less rigid than the baseboard, the cap hides dips and curves in the drywall. So press it firmly against both the wall and baseboard before fastening it through to the wall studs using an 18-gauge nailer.
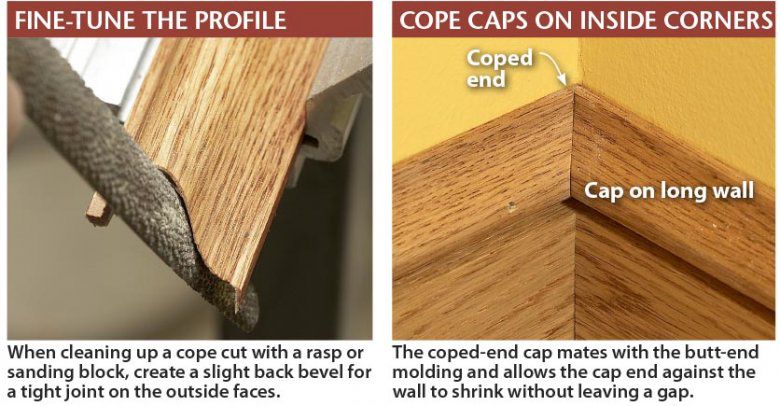
For inside corners, cope the ends of caps that will butt up against your first cap with its square-cut ends. To cope-cut an end, first reveal the profile by cutting a 45° miter, as though making an inside mitered corner. Then saw on the waste side near the miter edge using a coping saw [photo below left or photo below right], and coping jig. (See Sources.)

Use a rasp or a 3⁄4 " dowel wrapped with 80-grit abrasive to match the profile to the miter edge, [photo below left]. Test the coped end profile against a cap-molding scrap or an installed cap [photo below right].
Plan the cap layout to make a square cut or outside-corner miter on the other ends of any cope-cut pieces and work your way around the room. (For a hardwood floor not shown, install shoe moldings the same way to hide gaps between the baseboard and floor.) Then, putty nail holes to match the wood.
Now add chair rails
Walls that were flat at the baseboards may still have waves at chair-rail height. Check walls with a straightedge or taut string. Then patch dips with joint compound and repaint.
Because both the chair rail and shelf shown have routed profiles that don't lend themselves to cope-cuts, miter the inside and outside corners. As with the baseboard, begin by miter-cutting a chair rail to fit the longest wall first. Attach that section with a 15- or 16-gauge nailer at the studs marked earlier.
If the next piece goes between two inside corners, measure for length and miter the ends with gradual cuts until you achieve a tight fit. (See "Install wall moldings like a pro," below.)
When working from an inside corner to an outside corner, first miter the inside corner end and hold it in position while you mark the miter location at the outside corner. Cut on the waste side of that mark until the miter fits flush with the corner.

Then attach the shelves to the chair rails using an 18-gauge brad nailer on the top and to the wall from the front with a 15- or 16-gauge nailer [photo above]. Miter inside shelf corners to match the chair-rail corners [photo below left]. Where the shelf meets door or window trim, chamfer the shelf end to create a transition [photo below right], with no sharp corners.

With the molding installed, patch the nail holes using oil-based wood putty, and apply two coats of clear finish.
Install wall moldings like a pro
Builder and finish carpenter David Fish of Des Moines shares the following tips to help you successfully install baseboards and chair rails:
* When cutting baseboards with miters on both ends, gradually shorten them to the correct length. To do this, David butts one end against the stopped blade of his mitersaw, lifts and starts the saw, and cuts off just a hair at a time.
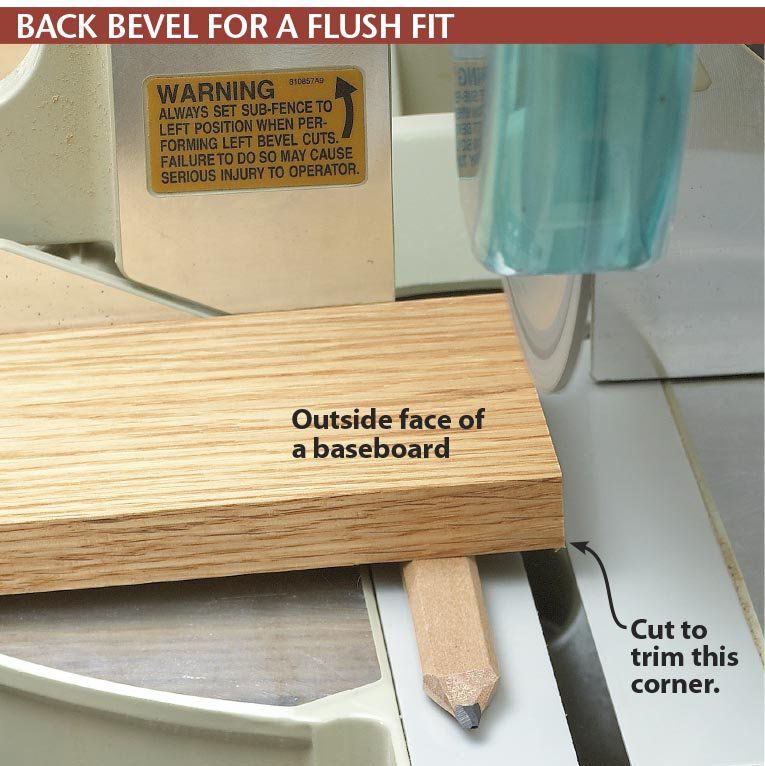
* For walls that meet at an angle other than 90° on inside corners, create a back bevel, as shown [photo below], on the baseboard ends so the front faces butt together without gaps.
* Instead of using a level to determine chair-rail mounting lines around a room, measure up from the floor. Your eyes automatically use the floor for reference to tell whether the chair rail slants.
* Cut chair-rail shelf miters with the top face up to minimize visible tear-out. The chair rail hides tear-out on the underside of the shelf.
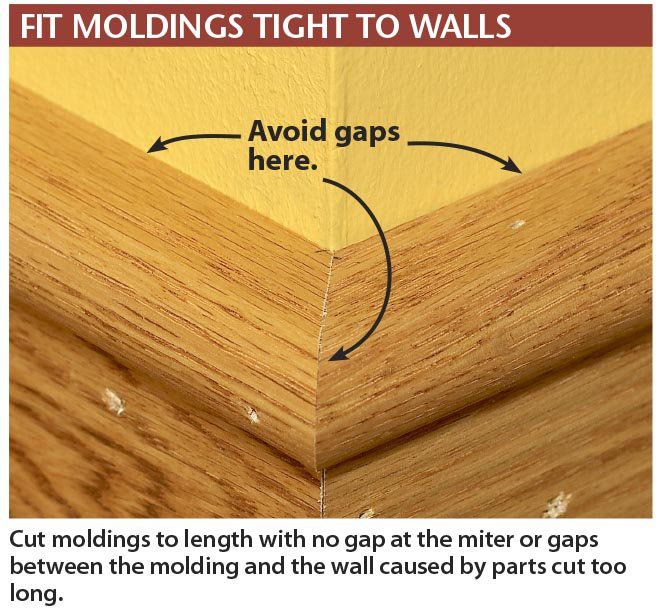
* To cut chair-rail outside corners, miter-cut the workpiece slightly overlong and hold it in position. Then butt a scrap miter against the workpiece miter and check for gaps. Gradually shorten the workpiece until you see a tight miter and no gaps, as shown below.
ADDITIONAL RESOURCE
FREE RELATED ARTICLE
■ "Nailer/Compressor Combo Kits" Issue 190 (May 2009)