Make the Most of Your Garage Shop

Start at the bottom
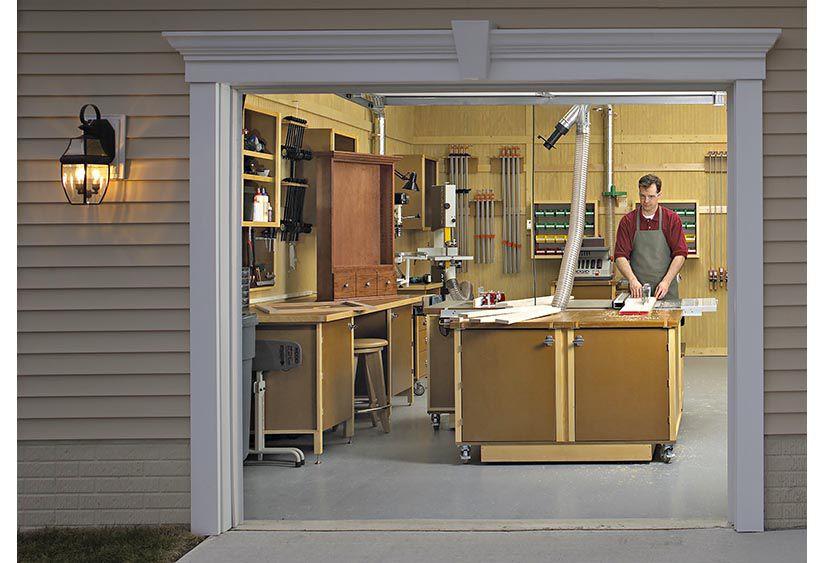
See how we tricked out this dream garage shop
You can't upgrade your shop floor until you find it. Begin by moving everything out of the shop space and list which tools, accessories, and supplies will make the return trip. As for the rest, donate or toss what you can, and find a new home for non-shop-related items in a shed or elsewhere in the garage. (Keep reading for more storage ideas.)

Thoroughly clean the floor and seal any cracks or expansion joints large enough to trap the wheels of a tool base. For a bright, smooth floor, apply a concrete paint or epoxy-based coating [Photo above]. To give your feet and back a break, install snap-together tiles [Photo below], anti-fatigue mats, or vinyl flooring near tools and workbenches.


Control your shop climate
Frostbite or heatstroke needn't be shop hazards. To build in more comfort, insulate the garage walls, overhead doors, and ceiling [Photo below]. After insulating, brighten the space by covering exposed studs with drywall, painted plywood, or pegboard.

In climates where the temperature regularly drops below freezing, replace—or at least insulate—open-cavity garage doors to prevent condensation in the shop from building up on frozen surfaces.
Learn more about controlling your shop climate
To remove winter chill, a wall- or ceiling-mounted electric or gas space heater takes up no floor space and reduces the risk of accidental fire from materials left too close to the heat source [ Photo below]. Some gas-fired units may require venting to draw in outside air and exhaust combustion gases.

For cooling an overheated shop, an inexpensive box fan will help, but investing in an industrial fan will move more air. Ceiling fans circulate plenty of air, but consider your ceiling lighting locations and overhead door clearances before choosing and installing one or more.
A place for everything
As you plan your shop organization, separate the tools you'll use every day from the ones you'll use only once in a blue moon.
Tip!
For plans to make simple wall cabinets, see our Downloadable Wood plans.
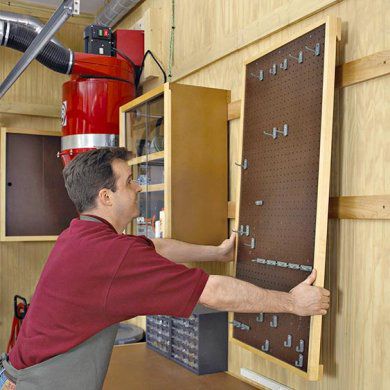
Hang wall racks close to your workbench for tools you reach for regularly: hand tools, a drill/driver, and measuring tools, for example. Because your shop will grow and change, use a French-cleat mounting system for reconfigurable storage [ Photo below].
Tip!
Mounting shelves just above the height of your car hood won't rob parking space when the shop is idle.
Cabinets protect and organize tools and accessories. You don't even need to build them yourself. Repurpose inexpensive used cabinets from a Habitat for Humanity ReStore, for example, or use these tips to customize stock cabinets. Add locks to keep items away from any young shop assistants.
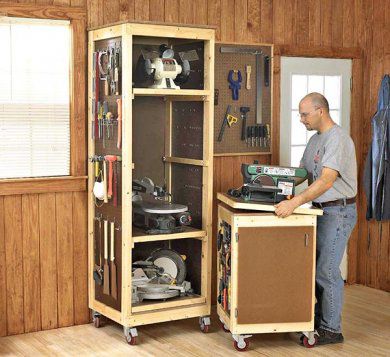
Park tools that don't need the protection of a cabinet on wall-mounted shelves or a mobile tower [Link and Photo below]. Then get lumber up off your shop floor and store it overhead or on wall-mounted racks.
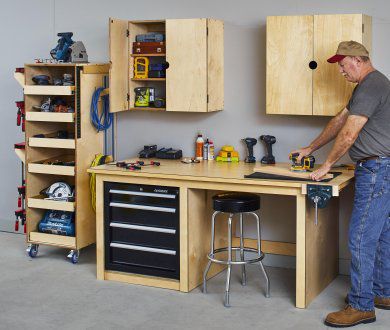
Running out of wall space already? Build a mobile cabinet that delivers maximum storage in minimal space [Link and Photo below].

High garage ceilings create loads of unrestricted airspace. Claim the area above a raised garage door for hanging storage platforms to house surplus lumber or seasonal items that eat up space elsewhere in the garage [Link and photo below].

Work on a better bench
Garage shops that share space with a car can't afford the luxury of a fixed workbench in the center of the shop. Instead, consider putting one on wheels [photo below]. If you're working in a spare garage stall or have extra space along one wall, a stationary bench may be what you need [photo beneath]. No bench space at all? Build a bench that collapses to a third its full size and wheels away [photo bottom].


Immobility has to go
Putting your shop on wheels opens up parking space for cars, lets you rearrange tools to fit the job, and roll tools onto a driveway to handle oversize workpieces. Reorganizing as a shop grows is a snap, too.
Learn more about tracksaw features and choosing the right one for you.
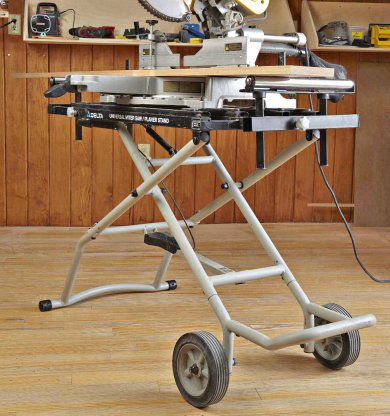
Locking mobile bases allow you to move even your heaviest tools, such as cabinet saws, bandsaws, and drill presses, and still fix them in place for use. For a mitersaw, consider a folding stand [ Photo below].
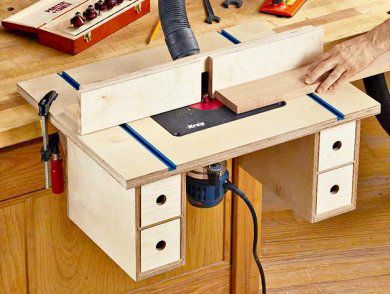
Now ask yourself whether your typical projects really require space-eating stationary tools. For example, if you only need to rout small trim parts, why have a large router table? Either incorporate the router table into your tablesaw extension or build a router table that's easier to store [Photo above]. If space limits you to a benchtop or no tablesaw, consider adding an easy-to-store tracksaw [Photo below].

Overhead—the good kind


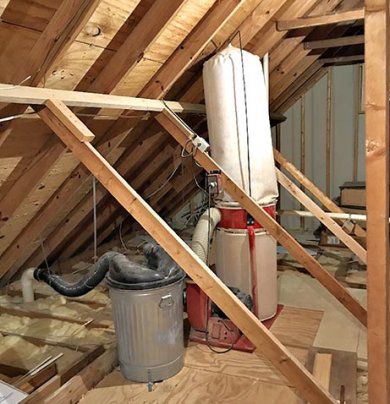
Take advantage of the unused socket in the outlet powering a garage door opener by installing an overhead cord reel. This can provide power to most of your shop without having a cord underfoot. Likewise, by plumbing your shop for compressed air from an overhead air-hose reel [Photo above], the compressor can sit in an unused corner or a shelf. Free up even more floor space by wall-mounting your dust collector. If there's clearance in the attic, consider relocating the collector to this unused space [Photo below].
Bright done right
Plumb your shop for compressed air. It's a breeze.
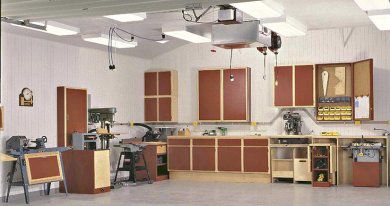
Once the details of your shop layout take shape, plan how you'll light it. Fixtures in the wrong place create problem shadows or glare. For example, you'll want at least one fixture directly over your tablesaw and another over the workbench, with additional fixtures close enough to overlap light on the worksurface [ Photo below].
Upgrade lighting by replacing the usual bare-bulb garage lights with LED fixtures. These produce more light from less electricity, so you increase illumination without overburdening existing lighting circuits.
Follow these tips for positioning shop light fixtures.
If you have a wall-hugging workbench, include task lighting or additional overhead fixtures to compensate for the typical lack of lighting along shop walls and in corners. For fine detail work, step up to a magnifying light fixture.
While you're focused on electrical upgrades, consider installing additional circuits and outlets, including 220-volt outlets if you plan to step up your tools. If you don't want to crack open finished garage walls, run wire in surface-mounted conduit.
You're almost finished
Find more inspiration and dozens more plans from our Idea Shops.
Creating a dust-free finishing space can be tricky in any shop, but especially so in an unfinished space where debris and insects can settle on a newly applied finish. If space allows, create a dedicated finishing area with low, angled lighting that lets you detect drips or gaps in a wet finish. In a tight space, make a temporary finishing booth to contain overspray and repel dust [ Photo below].
