Making Tambours
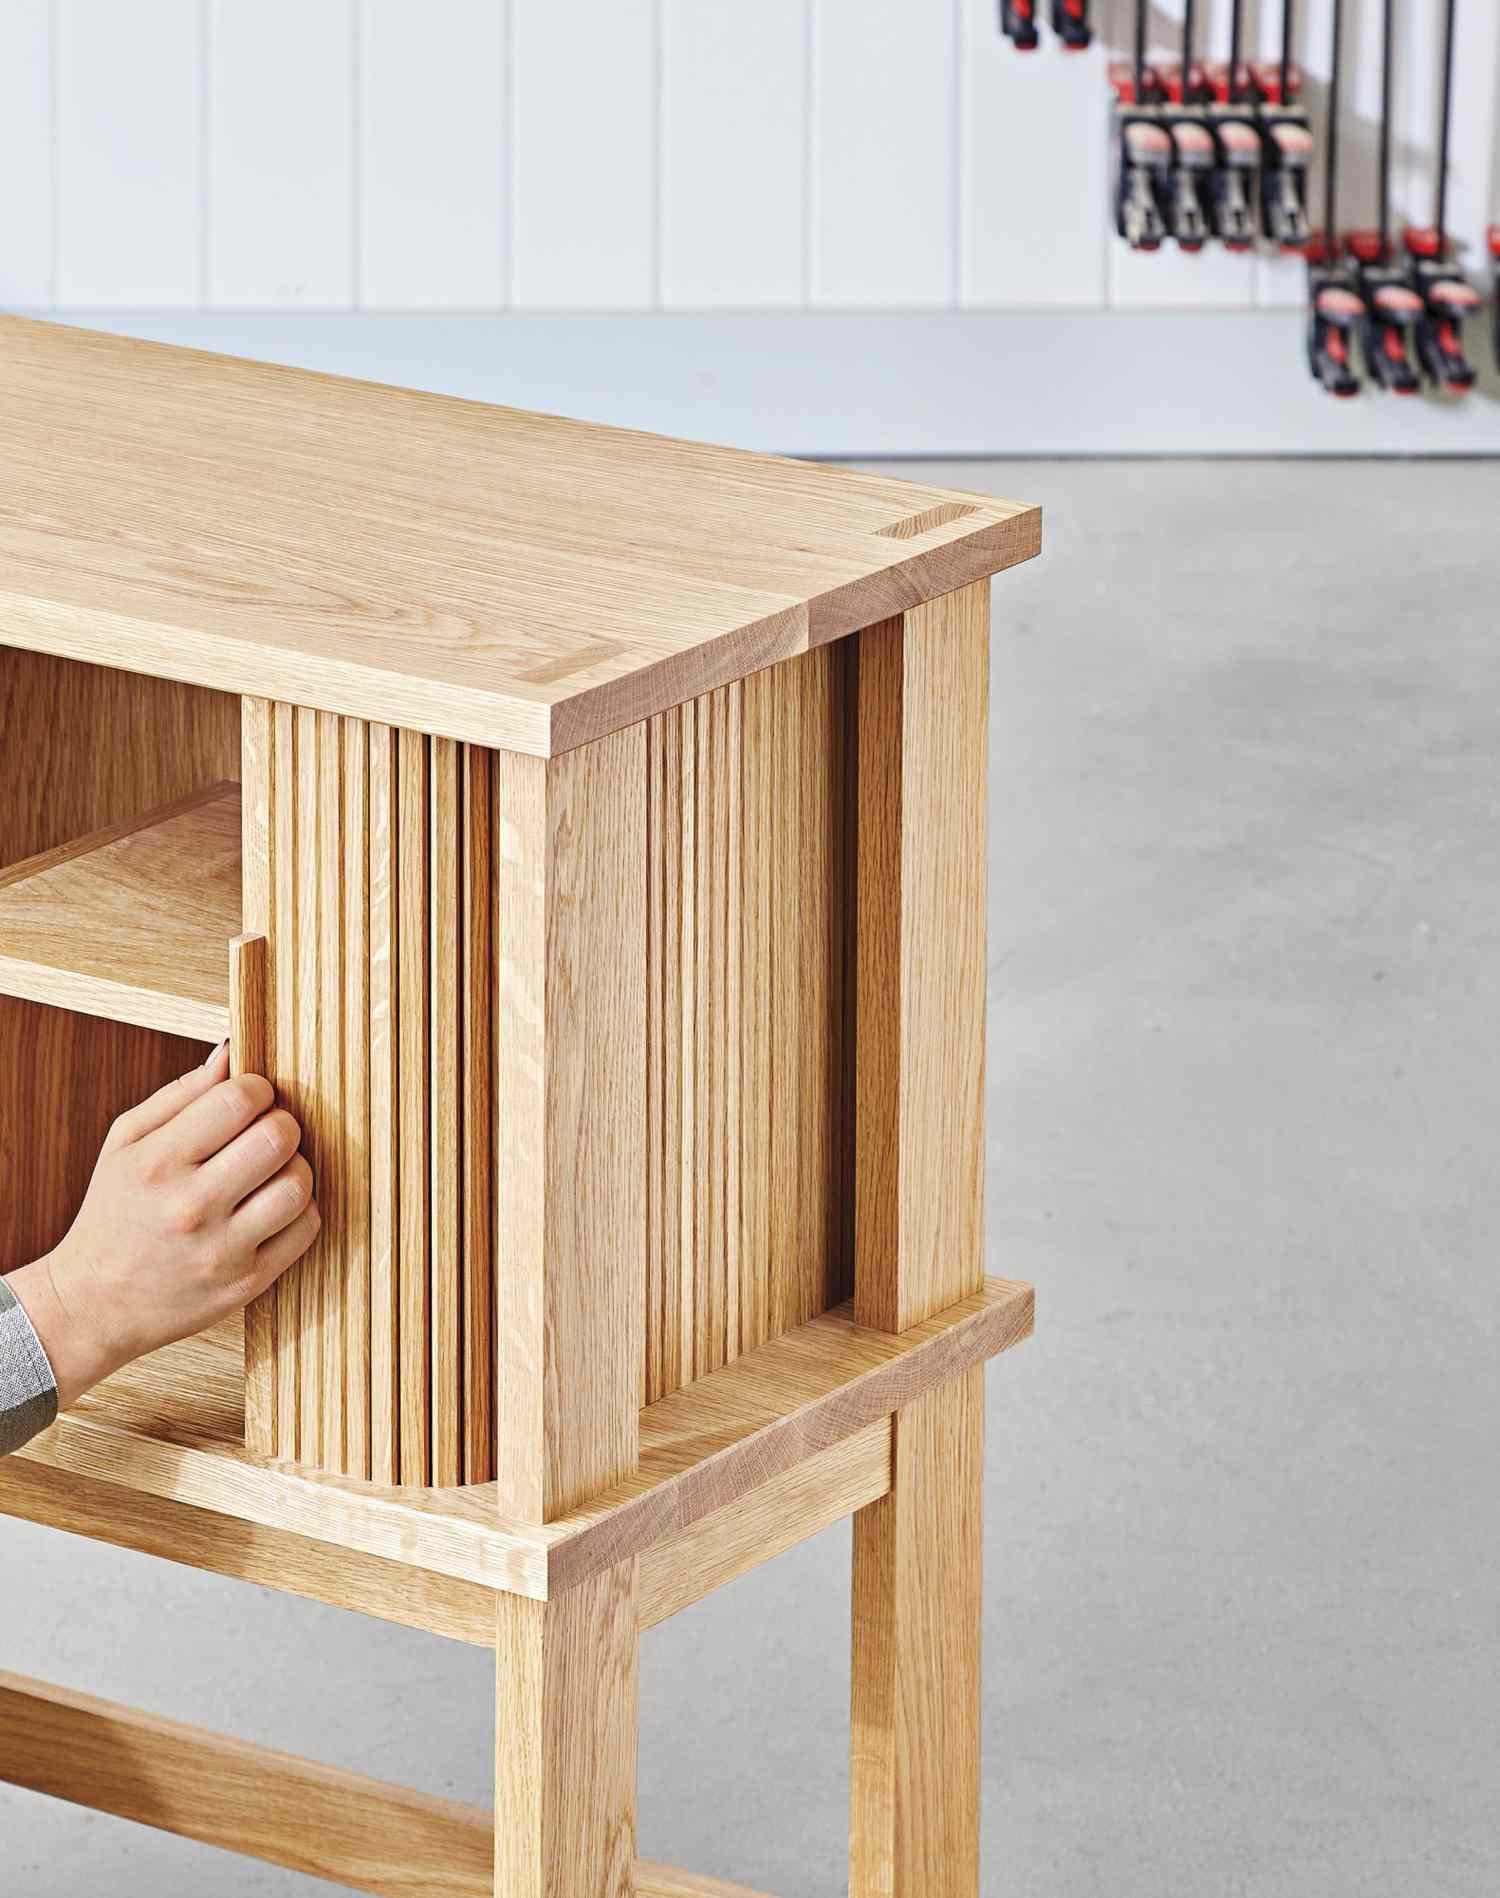

Moving components on furniture invite you to give them a try, and projects that incorporate tambour doors or panels pretty much guarantee you will. In addition to the fun factor, they work well in situations that lack the space for traditional hinged doors. Common uses include rolltop desks, breadboxes, appliance garages, and midcentury-design sideboards or consoles.
Think of a tambour as a sliding wooden curtain made of narrow strips of wood typically attached to a thin, flexible backing. The tambour rides in a pair of grooves, or tracks, and the backing allows it to bend around curves.
While making a tambour door isn't particularly difficult, designing a smooth-sliding door can be a little tricky. Here are some tips you can use to make yours a smooth operator.


Start with a good design
Building a slick-sliding tambour starts with designing the track and the slats in tandem—and the number of variables, including track width, slat size, and curve radii, makes testing your designs in scrap a critical first step. Because you probably already have an idea of the size of the case the tambour will fit in, start with track configurations.
The width of the track and the radii of any curves help determine the slat width, with tighter curves requiring narrower slats. For best results, aim for a minimum radius of 2" on all curves. A larger radius allows for wider slats. A track width of 1⁄4" to 5⁄16" will generally handle slats from 1⁄2" to 3⁄4" wide. Sizing the slats thicker than the track's width allows you to add a track-concealing rabbet to the ends.
Keep in mind that thinner slats (1⁄2" or less) make the tambour lighter and easier to pull through the track. For wide panels, thicker slats (up to 3⁄4") sag and flex less.

A profile along the edges of the slats allows the tambour to turn corners and bend without binding. For tracks with simple convex curves, a small round-over or chamfer provides the necessary clearance while hiding any minor unevenness between the slats. For concave curves or S-bends, half-round slats allow the tambour to bend in both directions (photo, above). For long, horizontal tambours, such as you find on a rolltop desk, an interlocking profile prevents the tambours from separating or flexing under pressure (see end of article).


A well-designed tambour project usually conceals the inner workings of the tambour. The tambour nearly disappears into the top or sides of the project when open, and reemerges as it closes. Rails or stiles typically conceal the curved path of the tambour where it comes into view. Chamfering the edges closest to the groove allows them to sit close to the tambour and still provide clearance as the panel rounds the bend (drawing, above).
To conceal the panel when open, the carcase of a tambour project often includes an outer case and an inner case (or inset back) (drawing, above). The inner case hides the less-attractive back face of the tambour while preventing items stored inside from impeding its travel. It also provides a means for attaching shelves or dividers without obstructing the tambour's path.
When laying out the path for your tambour, include an entry slot to insert the tambour into the assembled case or remove it for repair or refinishing (drawing, above). Locate the entry slot where you won't see it, usually at the back. If the case back blocks access to the entry slot, make the back removable. For wall-mounted cabinets, place the entry slot at the front of the cabinet and screw a removable rail to the front to access the slot. Or, make friction-fit plugs to fill the slot after the tambour is installed.
Plan your work
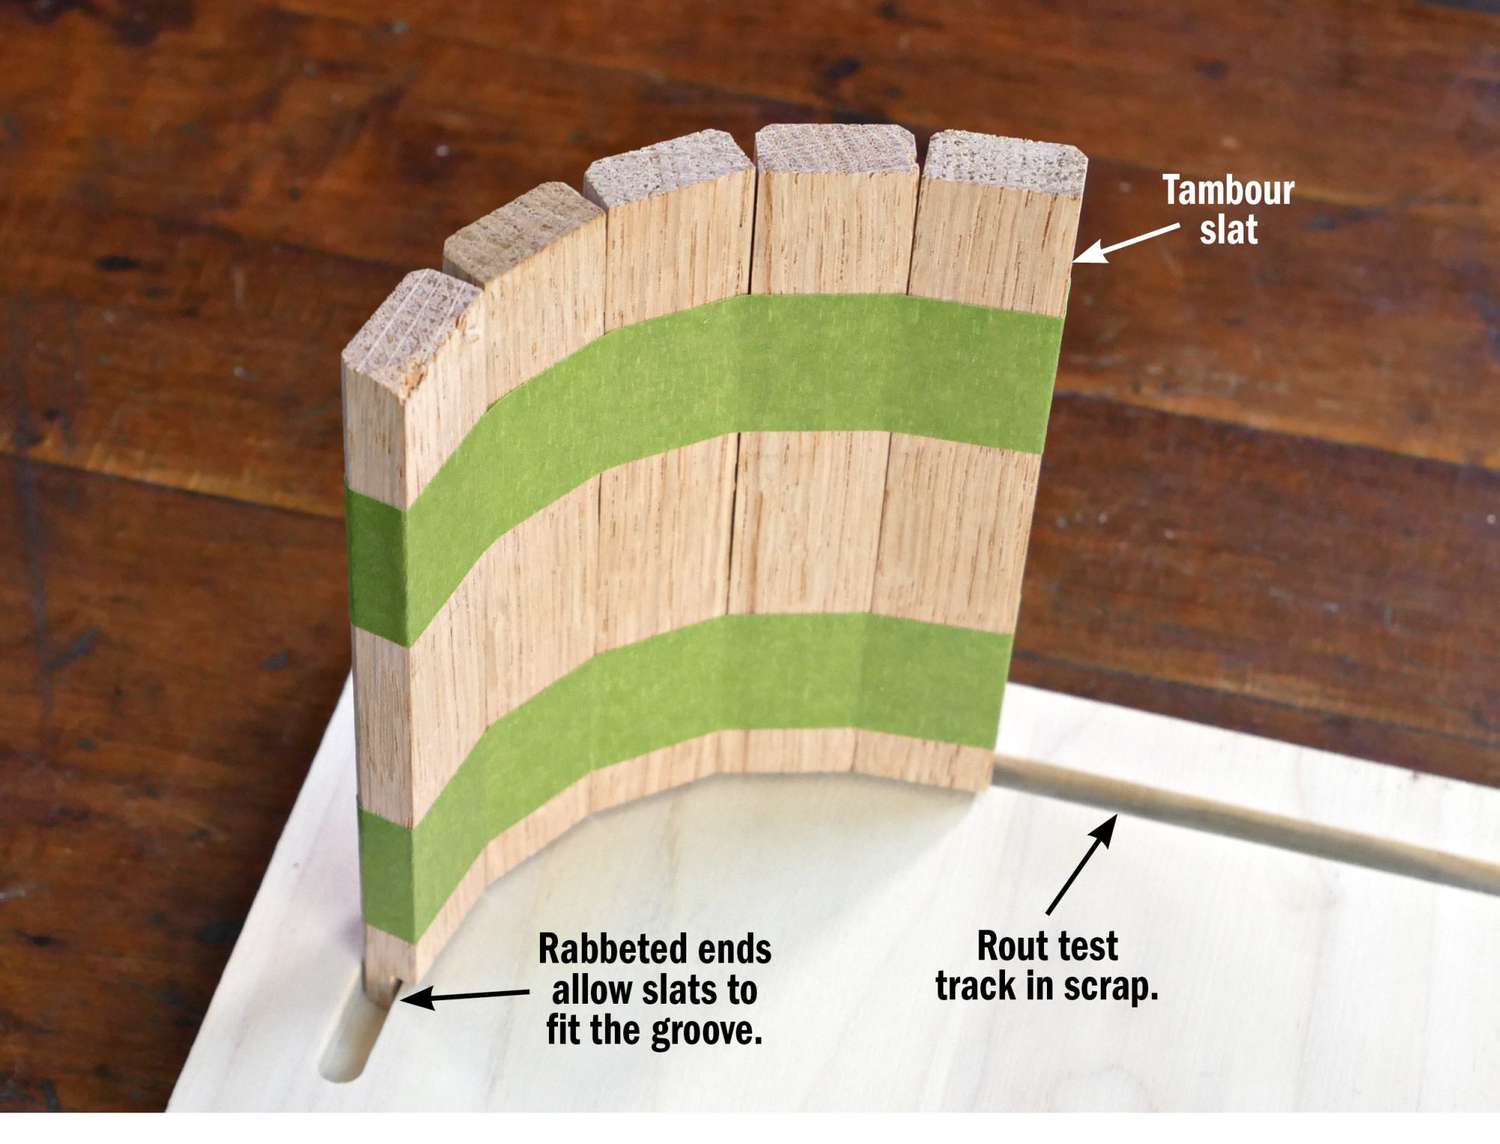
You'll use a template and a straight bit guided by a guide bushing to create the track. Start by making a template of the tightest curve from your layout, plus a short straight section on each end. Account for the offset of the router bit from the guide bushing when sizing the template. Rout the track curve in a piece of scrap. Then, cut, rabbet, and shape the ends of a few short slats to make sure the geometry works (photo, above). If the tambour can't navigate the curves, increase the radius or narrow the slats.
In order for the tambour to slide smoothly, the track must be smooth and well-formed. Solid wood works better here; the end grain on the walls of a groove in plywood wears down the softer long grain of the tambour slats. If you must use plywood, edge it with a wide, mitered frame of solid wood and rout the track in the frame to avoid cross-grain travel.
Now work your plan

With the tambour path all charted out, make a hardboard or plywood template of the track and rout along it (photo, above). Flip the template over when routing the opposite workpiece to mirror the track. After routing, sand the track to remove any rough spots left by the router bit.
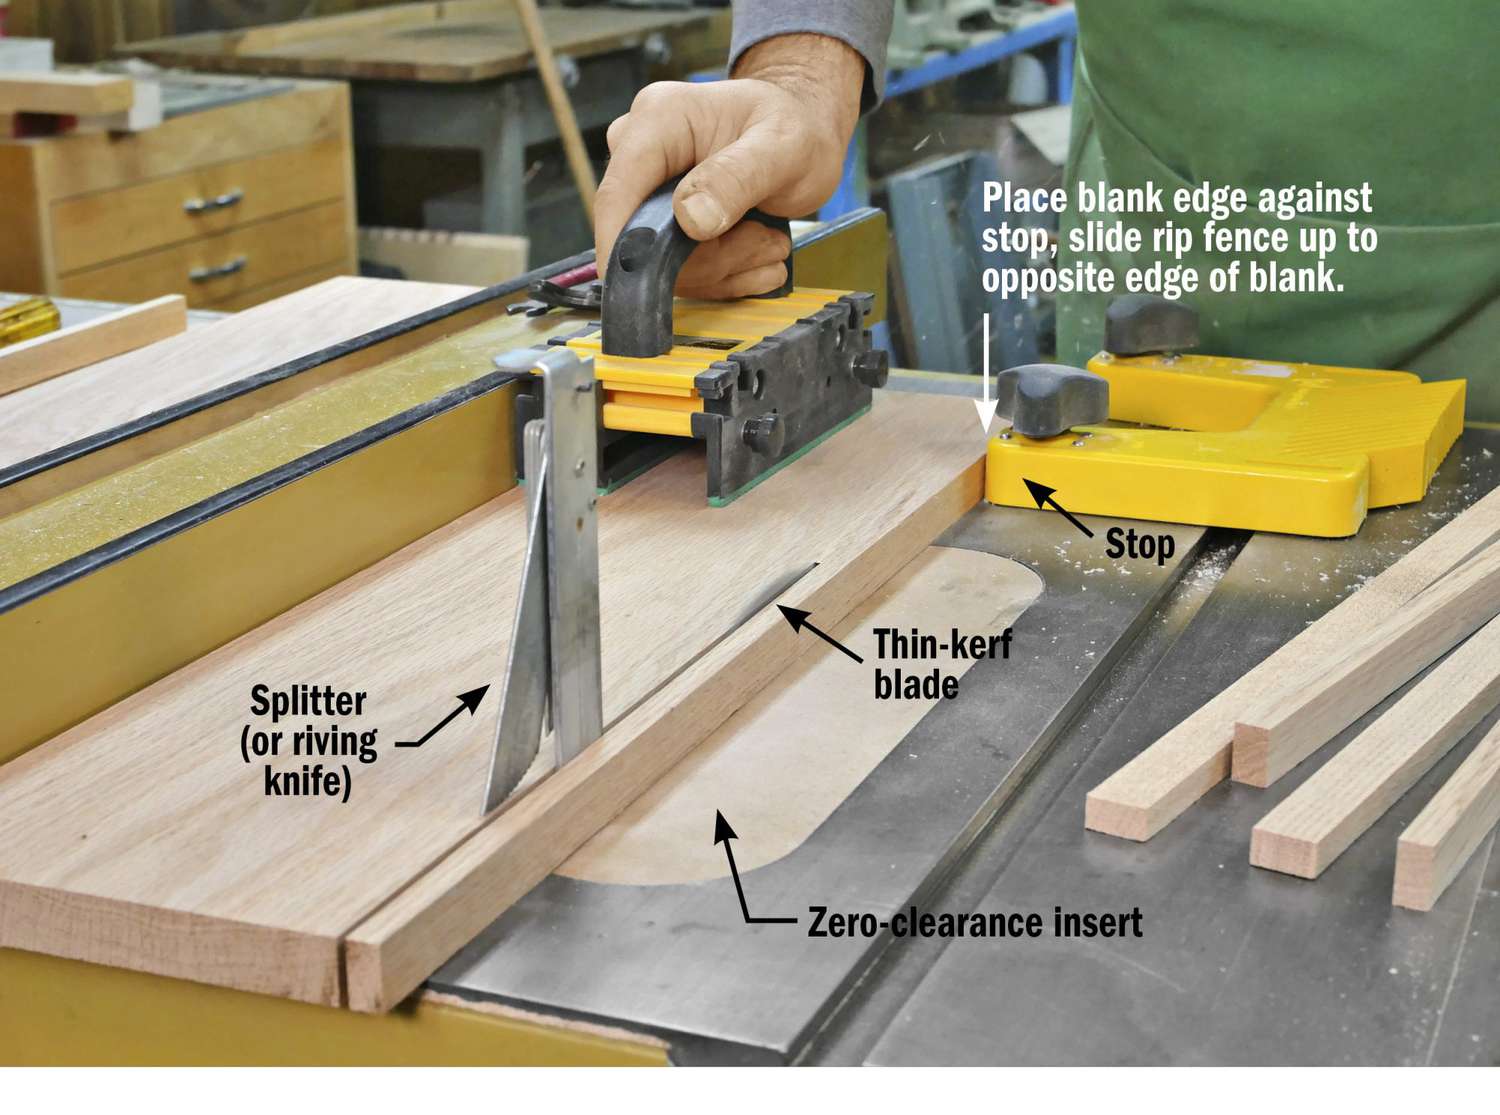
You have two options for making the tambour slats. In the first option, plane the stock close to its final thickness and then rip the slats to width. Or, to save time and material, plane the stock to a thickness that matches the intended width of your slats, then rip the slats from the edge of the board (photo, above). Using plainsawn stock for this method yields quartersawn slats, which minimizes warping and bowing. Rip the slats 1⁄16" wider (thicker) than needed and cut 20 to 25 percent extra so you can choose the best ones. If time permits, allow the slats to acclimate and stabilize for a few weeks before planing or sanding them to final thickness. Then rout the edges.
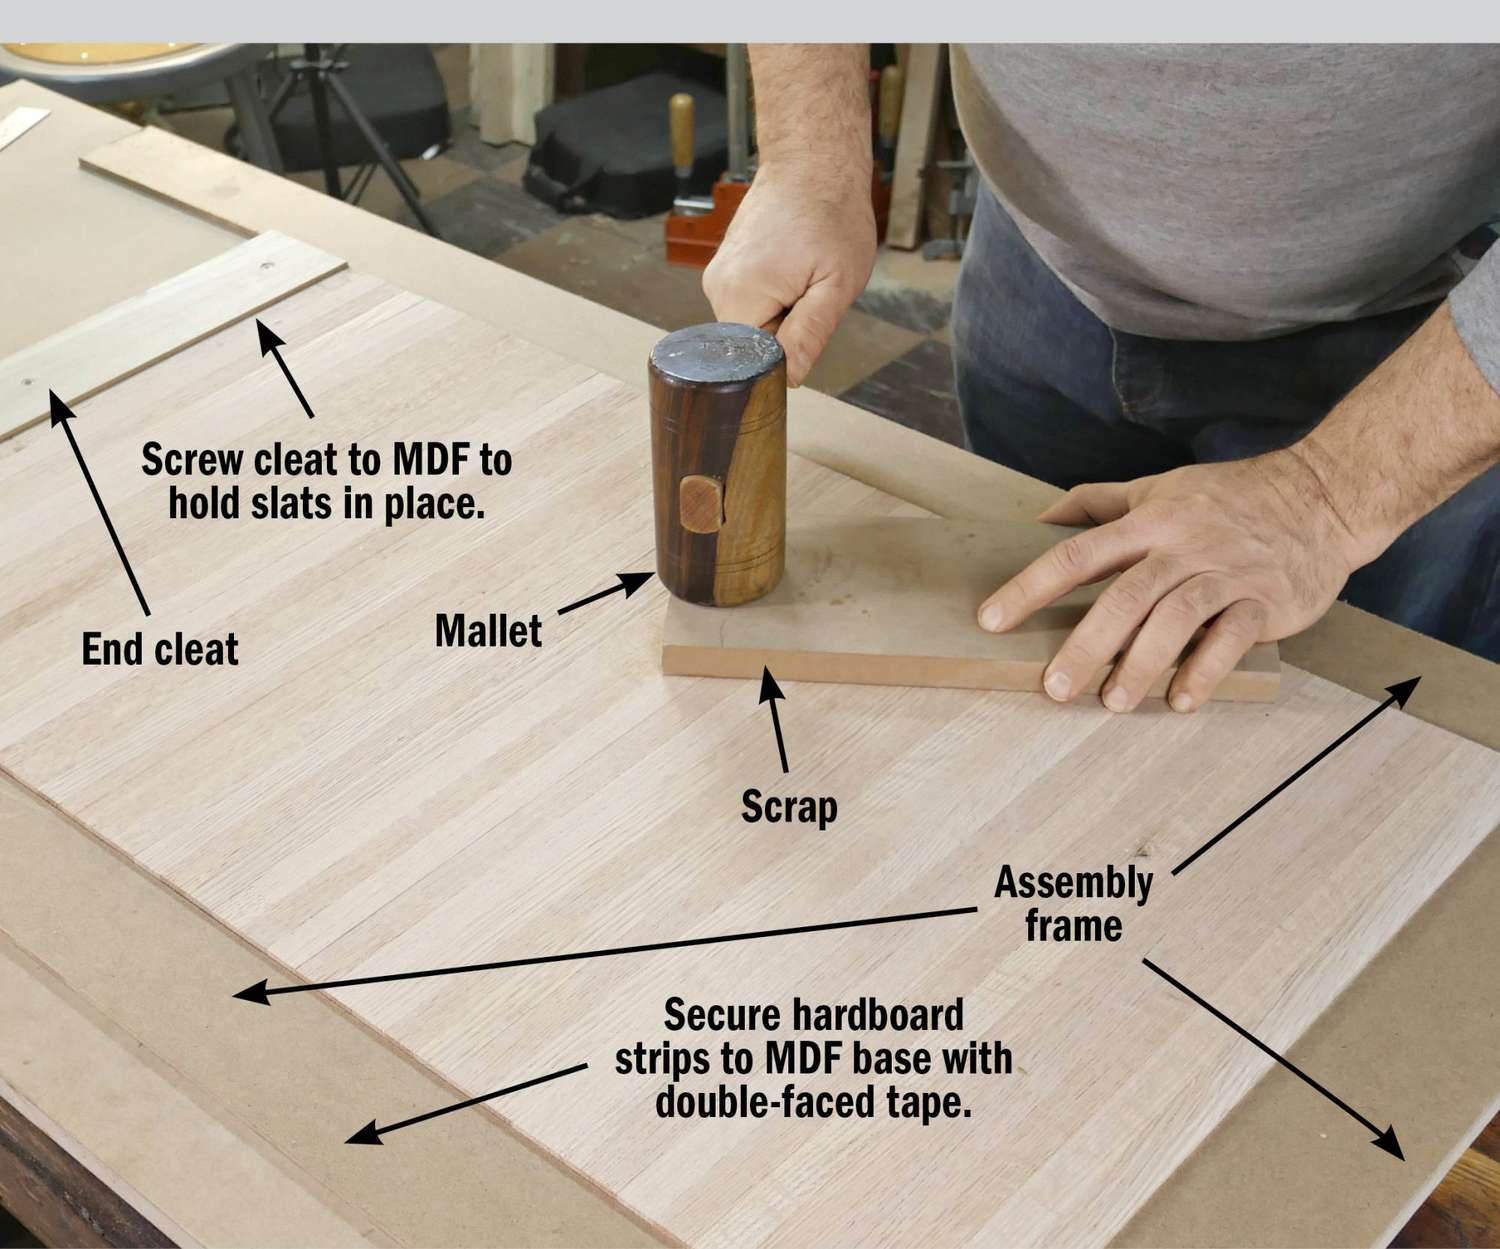
An assembly frame simplifies gluing up the panel. To make one, attach three narrow strips of 1⁄4" hardboard to a piece of plywood or MDF in a U-shaped configuration that matches the length of the slats and exceeds the length of the panel. Sort the slats for appearance and straightness, discarding any warped or twisted slats. Fit the slats in the frame show-face down (photo, above) and press them flat.

Mask off the edges of the tambour in preparation for glue (photo, above).
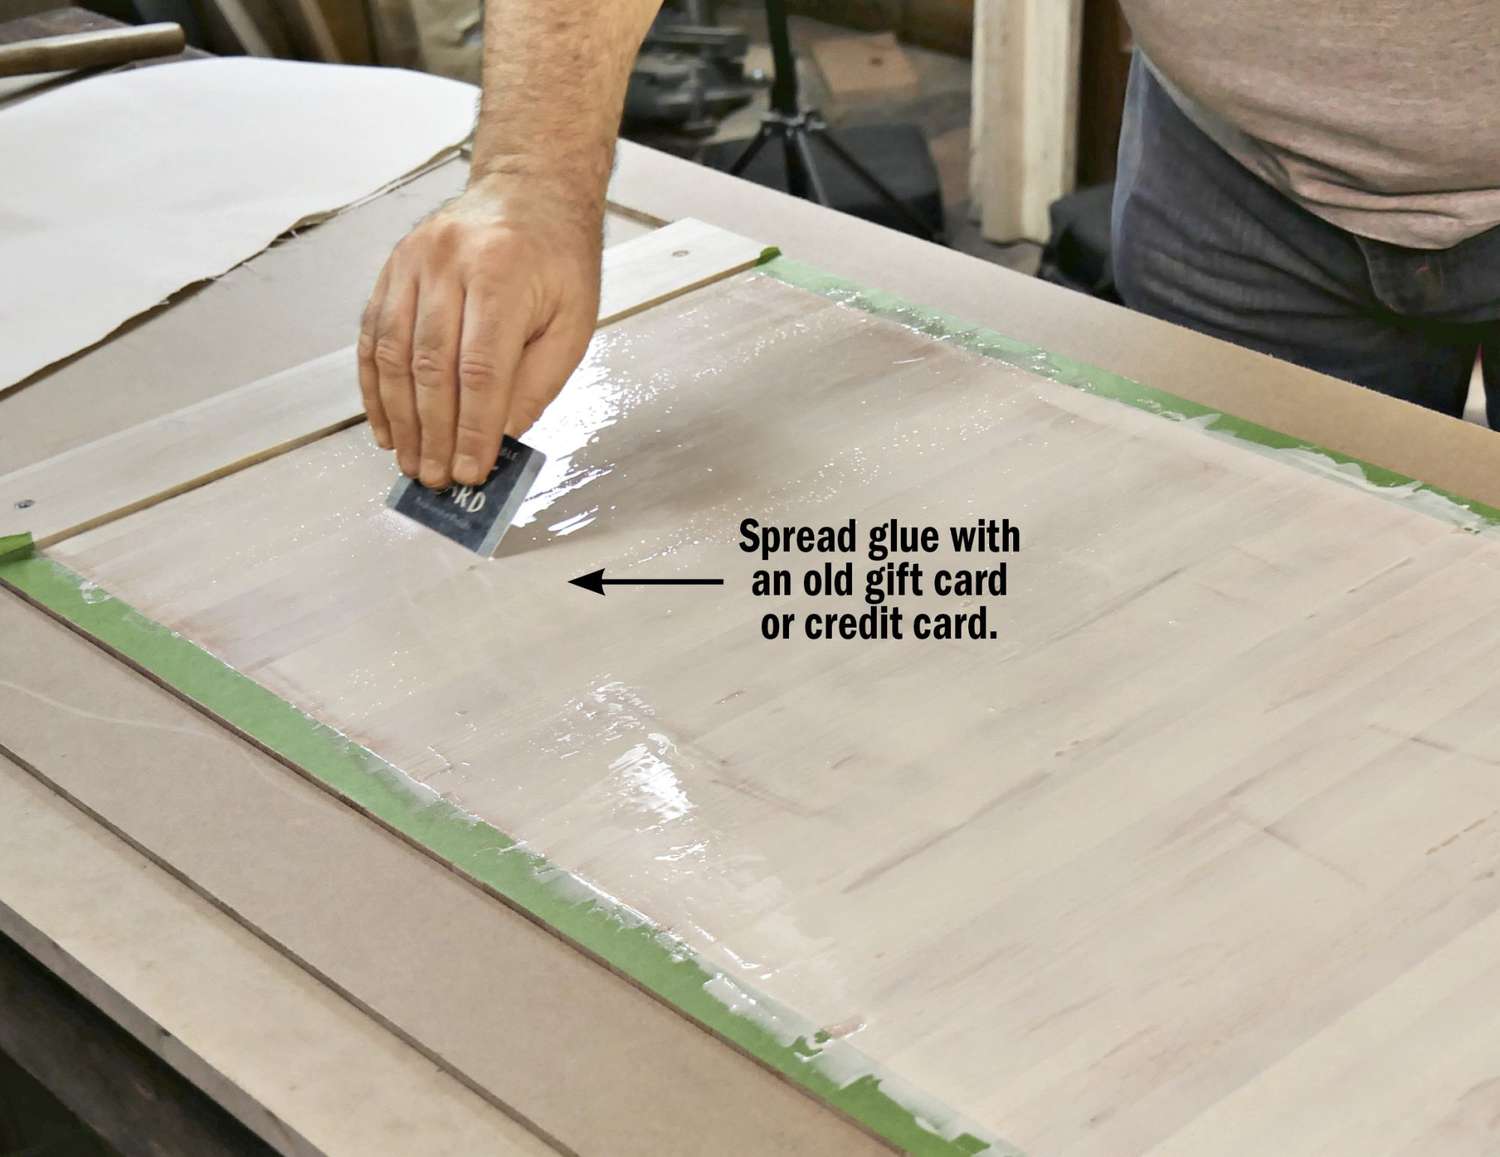
Cut a piece of canvas wide enough to cover the masked edges and at least 6" longer than the overall length of the tambour. Iron the canvas to remove any wrinkles. Spread yellow glue or liquid hide glue evenly on the slats (photo, above). With the canvas folded in half, place it along one edge of the tambour assembly and unfold it to cover the entire surface.

Smooth out any wrinkles (photo, above).

After allowing the glue to set up for about an hour, take the tambour out of the assembly frame and carefully flex the panel to separate each slat from its neighbor, ensuring none of them are glued together (photo, above).

Lay the panel flat again and allow the glue to dry completely. Leave a 6" flap of canvas at one end of the tambour for attaching a lead strip later. Trim away the remaining unglued canvas edges and remove the masking tape (photo, above).
Fitting and adjusting
Fitting the tambour to the case starts with forming tongues on the ends of the slats to fit in the track. Do this by cutting or routing a rabbet along the ends of the slats. (Typically, the back of the tambour receives the rabbet, but rabbeting the front face allows the tambour to conceal the track.)

Sizing the tongue accurately plays an important role in the fit of the tambour. To prevent the shoulder of the rabbet from rubbing against the case, make the tongues 1⁄16" to 1⁄8" longer than the depth of the track. Sneak up on the rabbet depth so the resulting tongue fits easily in the track (photo, above). Test the fit of the tambour in the tracks and reduce the tongue thickness with a shoulder plane if necessary to get a smooth, sliding fit. Sand the end grain of the tongues smooth and chamfer the ends with a block plane to prevent the tambour from binding in the track. The tambour should open and close with the pressure of one or two fingers.
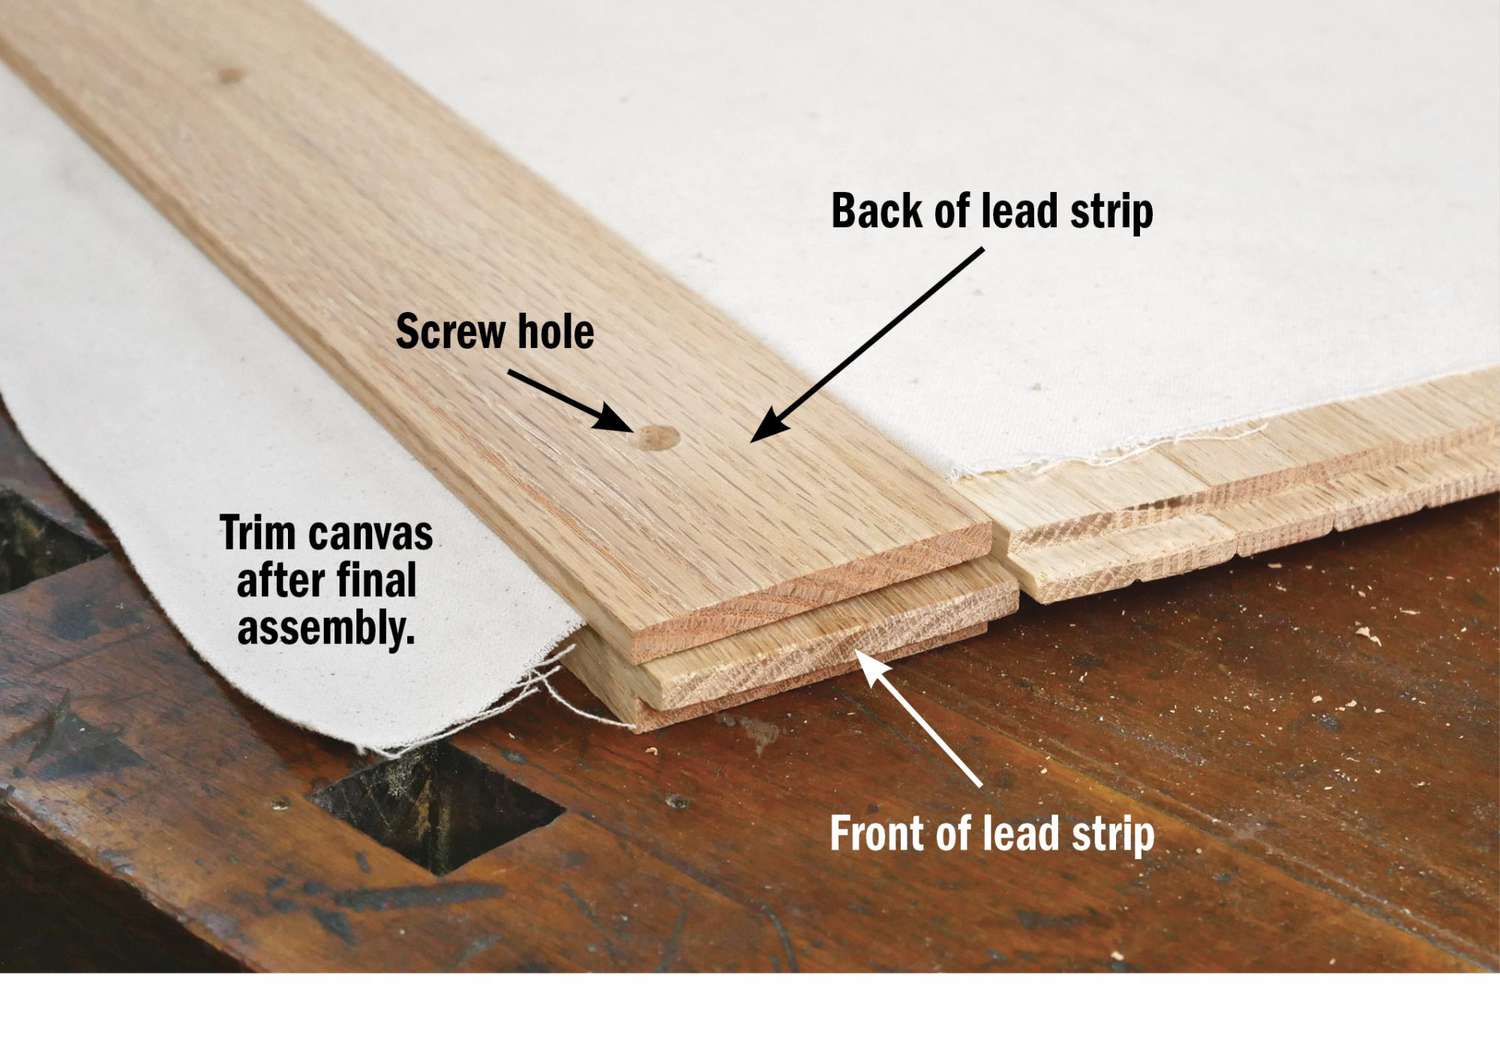
A strip at the leading end of the tambour provides a place for incorporating a finger pull or attaching a handle. For heavier doors, after installing the tambour panel, screw together a two-piece lead strip, sandwiching the canvas in between (photo, above). Make the lead strip detachable in order to remove the tambour in the future for repair. In some cabinets, the lead strip also serves as a stop to limit the tambour's travel into the case. Another option: add a small removable stop into the track at the back of the case.
Finish the tambour before installing it in the cabinet. To finish the edges of the slats, bend the tambour slightly by draping it over a five-gallon bucket lying on its side or some other cylindrical object. When finishing the case, mask off the tracks to keep finish out. Before installing the tambour for the final time, apply paraffin wax on the tongues. Then slide the tambour in place, screw the lead strip to the end, and let the fun begin.
Go the canvas-free rout(e)
Ditch the glue and canvas and make tambour panels using a router bit set from Amana (no. 54314, amanatool.com). The bits create a ball-and-socket joint between the slats, allowing them to travel around convex or concave curves as tight as 31⁄2" radius. One bit routs the profile of the slats as well as the ball portion of the joint while the other bit creates the socket.
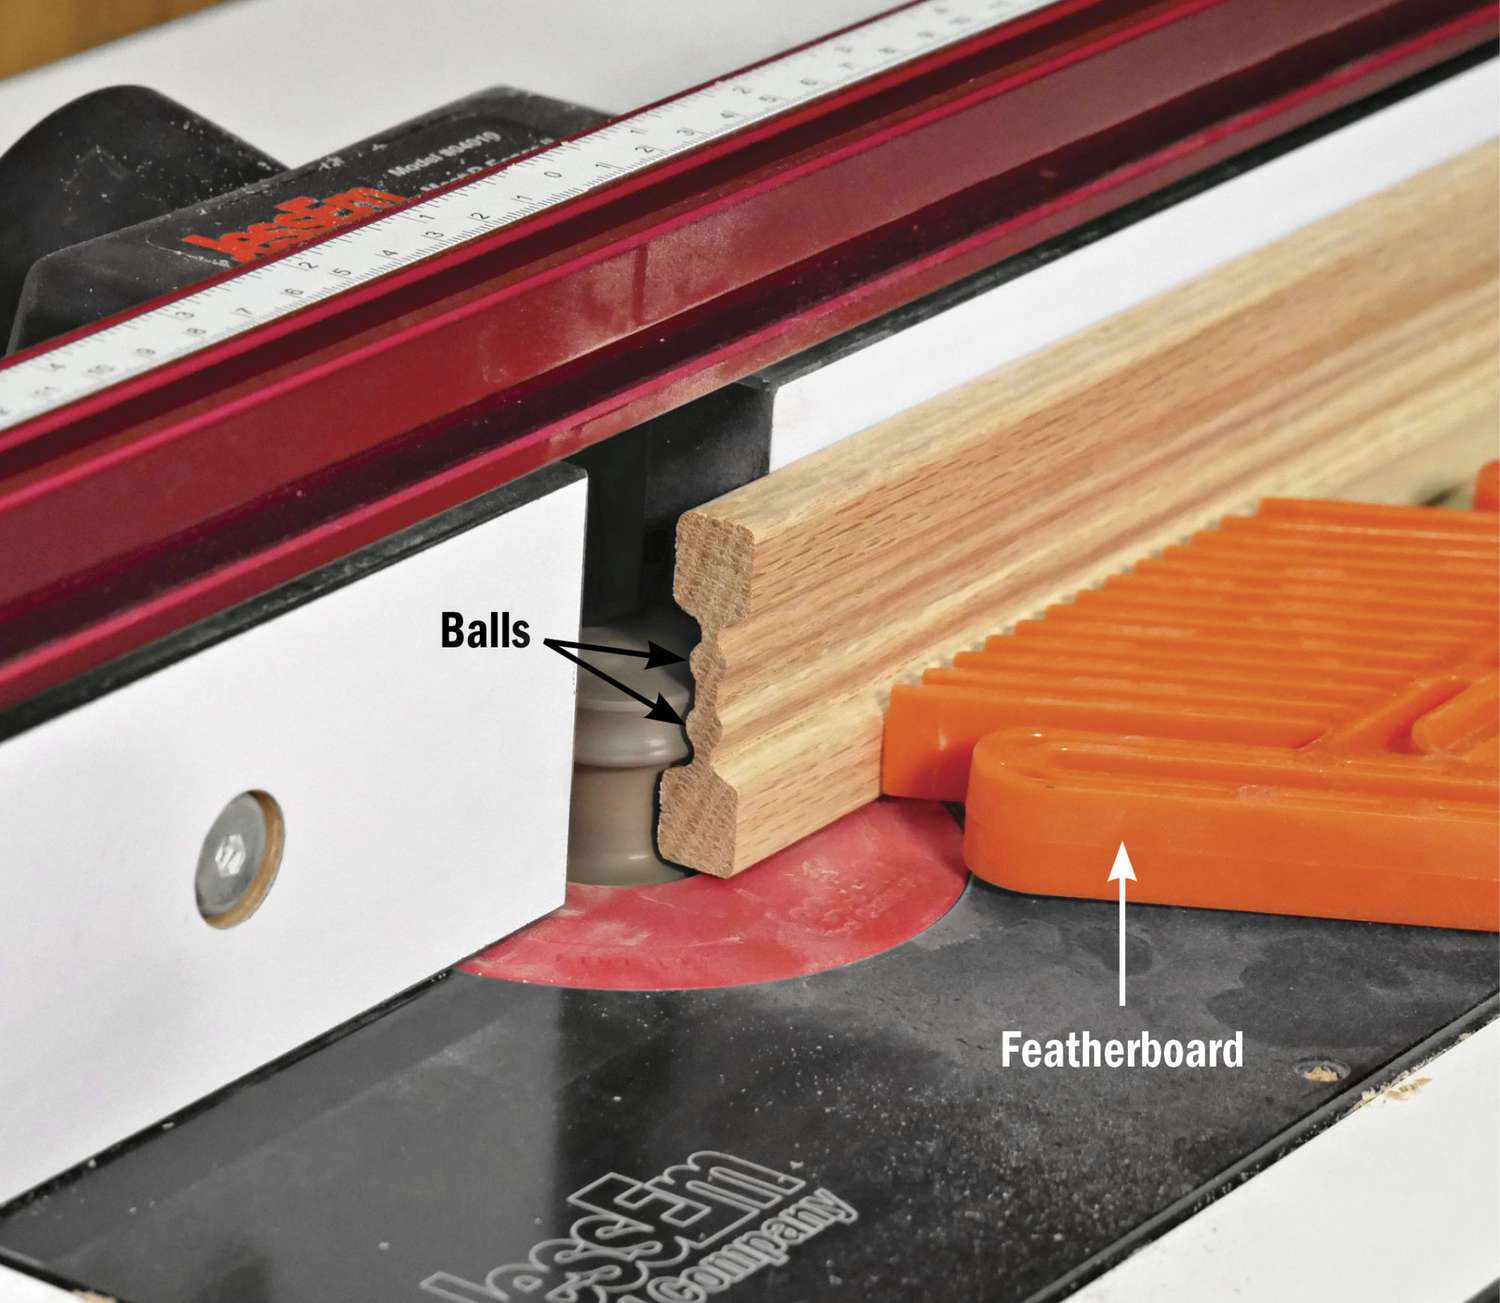
To use the bits, mill slat stock to 1⁄2" thick and rip it into 1-15⁄16"-wide strips. (Each strip yields two tambour slats.) Rout the profile and ball portion of the joint on all four corners of the strips (photo, above).

Rout the socket half of the joint using the second router bit (photo, above). Then rip the strip down the middle to create two slats, each with a ball profile on one edge and a socket on the other.

The result is an interlocking joint that allows the tambour to bend and flex (photo, above).
The bit set delivers excellent results, but requires careful milling of the stock and adjustment of the router-table fence. To dial in a good fit, rout a socket in a test piece before routing the ball portion of the joint. Then make as many test cuts as necessary to achieve a proper fit.
A featherboard ensures consistent results when routing the slats. Once you've fine-tuned the setup, routing and cutting the slats goes quickly. To assemble the panel, leave the glue bottle on the shelf and simply slide the slats together.