Mastering the handsaw


Even for the most seasoned woodworkers, cutting with a handsaw can be intimidating. Without a miter gauge, fence, or jig to guide the cut, you depend on your eye-hand coordination to cut true. Improving that skill is easy: The old saw (sorry) about practice making perfect applies. Cutting tenons helps you develop the muscle memory for making accurate rips and crosscuts. Plus, you'll learn a new skill for cutting joinery on oversize workpieces, and angled tenons that a router or tablesaw may not be able to tackle.
Cut a mortise in a piece of scrap and use it to help you gauge the thickness and squareness of your practice tenons, and you'll quickly identify where to improve your technique. Practice on a soft wood, such as pine or birch, to build confidence, and because you can more easily correct a line that drifts while you perfect your technique.
Choosing a saw
Backsaws come in many sizes and varieties, below, and get their name from the spine along the top edge that stiffens the blade. This reduces the blade's tendency to buckle, so it cuts truer. And while it may seem counterintuitive, a larger backsaw can help you best develop your skills. The longer blade wanders less, and its weight helps you cut with less downward effort.

Make your marks
Note:
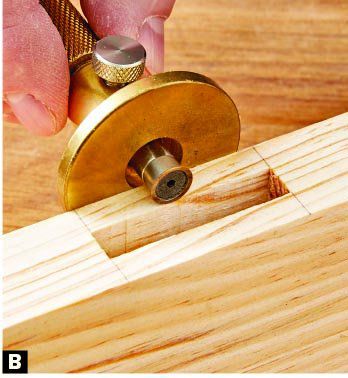
The end of your workpiece must be square to get accurate lines using a marking gauge.
Cutting precisely starts with sharp layout lines for the length and thickness of the tenon. A marking gauge severs wood fibers, creating thin lines [ Photos A–C]. Darken the cuts with a fine pencil lead if you need to improve their visibility.


See what you saw
Secure the workpiece in a vise, angled away from you, so you can easily see the adjoining layout lines on the end and edge of the workpiece. Grip the saw with your index finger extended along the handle and pointing to the end of the blade [opening photo, top]. Use the tip of the thumb or a knuckle on your free hand to guide the saw as you start the cut with short, light, back-and-forth strokes [Photo D, below].

Keep the spine of the saw horizontal, sight along the edge of the blade and kerf to the marked cutlines, and apply only light pressure as you work. Saw until you reach the shoulder line on the near edge [Photo E, below]. Watch the lines closely on the end and edge—if you begin drifting away from either, back up, angle the saw to guide it back to the line, and resume.

Flip the workpiece face for face, and use the kerf to guide the saw as you cut to the opposite shoulder line. Pivot the saw parallel to the end and shoulder line, and square up the bottom of the cut [Photo F, below].

Cut the other cheek in the same fashion.

Make a bench hook and learn its many uses beyond sawing.
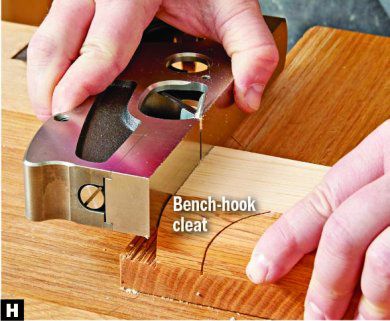
Use a bench hook when cutting the shoulders. Pressing the saw blade against the bench-hook cleat helps keep the blade vertical. Align the shoulder line with the end of the bench-hook cleat so the saw kerf just leaves the knife mark [Photo G, above]. After cutting away the waste, a few strokes with a shoulder plane or a sanding block with square edges smooths the cheeks, providing a good glue surface. Clean up to the knife marks with the shoulder plane as well [Photo H, below].

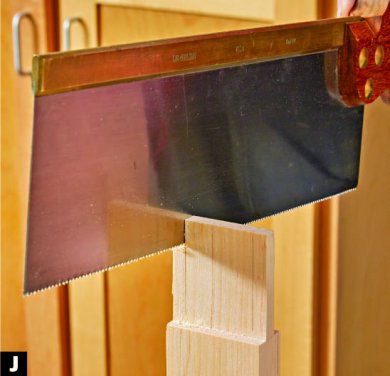
Strike marks for the tenon width [Photo I, above], then cut to the lines [Photo J, below]. Work down to just short of the shoulder. Repeat for the opposite mark.
View a video of cutting a tenon with a handsaw.
Grip the workpiece horizontally in the vise and trim a shoulder, [Photo K, below] leaving a tiny amount of waste to pare away with a chisel. Repeat for the opposite shoulder. Test the fit of the tenon in your mortise and give it a close inspection. Even if you find a satisfactory fit (and congratulations, by the way), cut another tenon while the methods are fresh in your mind and work for an even better fit. You'll soon find the motions becoming second nature—and that's what you're after.
