Minimize Shop Noise

Reducing the howl of power tools to acceptable levels outside the shop goes a long way toward keeping the peace in your household and the neighborhood. Whether you are planning a new shop, or working in an existing space, you can improve walls and ceilings to make your shop far friendlier to outside ears.
Note: These strategies mitigate sounds down to about 125Hz (the 2nd B below middle C, if you have a keyboard), but most shop noise falls above that.
But just as auto racers have the saying, "How fast can you afford to spend?" one can ask about sound reduction, "How quiet can you afford to build?" By not shooting for recording-studio-level soundproofing, you can achieve meaningful levels of noise reduction at a reasonable cost. Choose and combine the strategies outlined here to best suit your budget and shop space, and make sure your planned modifications meet local building codes before you begin.
You make a lovely decouple
Note: Many of these strategies require removing existing drywall from at least one face of a wall so you can access the framing.
As you may remember from junior-high science class, sound consists of vibrations, and louder sounds contain more energy. Consider how this energy interacts with a typical interior wall of 1⁄2 "-thick drywall screwed to opposite edges of 2×4 studs [Drawing 1] —essentially, a taut drum. The studs join the two surfaces, creating one assembly. Noise striking one face vibrates this assembly, and the sound travels easily through the wall.

To reduce this "drum effect," you need to decouple the two wall faces. If you're planning a new home or an addition for your shop, consider placing lesser-used rooms between the living space and shop [Drawing 2]. But for an existing shop, try these strategies for decoupling walls.

With the first strategy—staggered-stud construction—drywall touches only one edge of the studs, not both [Drawing 3]. Sound transmission through the air cavity remains, but the two walls can't vibrate as one unit.

See Deal with doors and windows later in this article for additional important information about framing walls.
To stagger studs in a new wall, use a 2×6 sill plate and header with 2×4 studs. On an existing wall, remove the drywall from one face, add 2×2 furring strips to the sill plate, header, and around door and window frames, then toenail new studs centered between the existing studs and flush with the outside faces of each furring strip. (We'll address reinstalling drywall in a bit.)
Taking this approach one step further, double walls with an air gap between them provide fully separated framing, so the vibration of one wall can't transfer directly to the other [Drawing 4]. Of course, the extra wall eats up floor space as well as sound.

Tip!
Add two layers of drywall over hat channel for increased sound reduction.
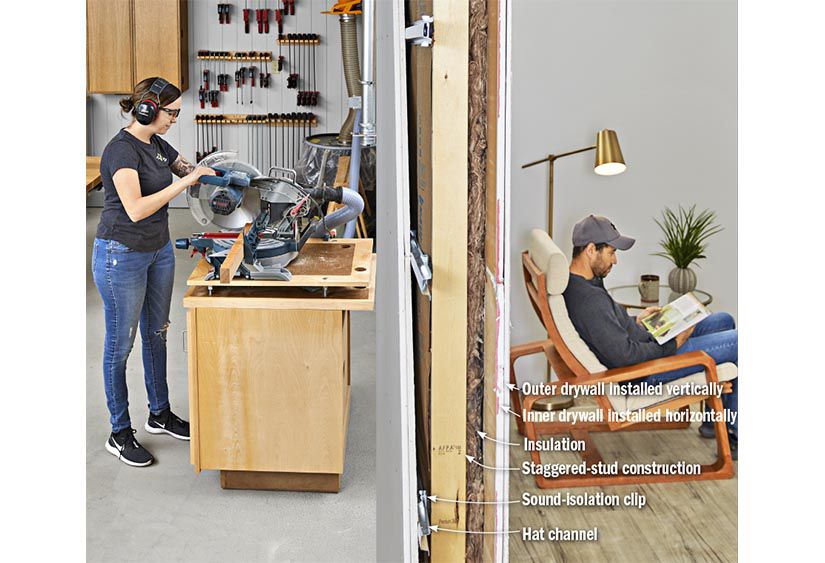
For further decoupling of walls and for ceilings, 25-gauge hat channel (also called drywall furring channel, and available in home centers), held by stud- or joist-mounted clips [Source], minimizes contact between the drywall and framing [Photo A, opening photo]. The downside: Using hat channel on walls prevents screwing heavy items, such as cabinets or tool racks, to the studs, as that defeats the purpose of the channel.


Dampen with more mass
The covering of a wall or ceiling also affects how much sound passes through. By using material that adds mass, sound energy can't move the surface as much.
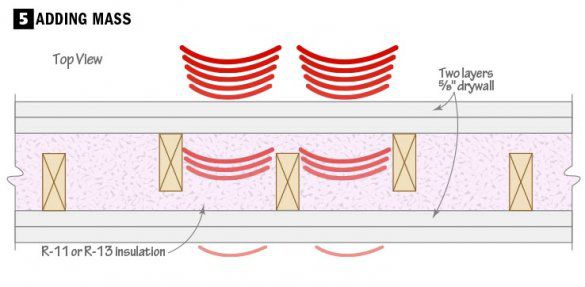
The simplest way to add mass to walls and ceilings is to install heavier drywall. Using 5⁄8 " sheets (70 lbs per sheet) instead of 1⁄2 " (50 lbs per sheet) knocks down some sound, as shown in Drawing 3, show above. Applying two layers to each side of a wall further increases mass [Drawing 5, opening photo]. Sound will leak through gaps where drywall sheets meet, so use the longest panels practical to reduce the number of seams, then stagger those seams between layers. Save time and money by taping and mudding only the outer layer.
Although more expensive, replacing the inner drywall layer with 3⁄4 " oriented strand board (OSB, 73 lbs per sheet) or 1" plywood (80 lbs per sheet) allows you to drive a screw anywhere when hanging items on the wall.
After adding a layer to an existing wall, extend electrical boxes so switches and receptacles sit flush with the new surface [Photo B]. If you add hat channel to a wall, you may need to install deeper boxes.

Quiet the inside, fill the gaps
Acoustical sealant applies like caulking, but stays flexible to absorb sound vibrations.
Because sound moves efficiently through the air, any gaps in a wall or ceiling, such as electrical boxes, provide an easy pathway for noise. Wrap boxes with acoustical putty [Photos C, D], available at home centers and online sources. Seal the gap between boxes and drywall with a bead of acoustical sealant (available at home centers) from the front, rear, or both.


Tip!
You'll spot light leaks better with your peripheral vision, rather than by looking straight at a surface.
Before attaching drywall, apply acoustical sealant where the framing intersects adjacent walls, ceiling, and floor. To find remaining gaps, remove the faceplates from switches, outlets, and any HVAC ducts on both sides of the wall. Turn on all the lights in rooms opposite the shop or aim worklights at the walls, and turn off the shop lights and cover any windows. Allow your eyes to adjust to the dark, then scan the shared wall for light leaks. Inspect the length of the wall along corners, the floor, ceiling, and around any wall penetrations, such as ducts and pipes. Seal openings with acoustical sealant, then repeat the process on the opposite side of the wall.
The high-energy sound generated by power tools will still penetrate sealed, separated, and mass-added walls, so install material inside the wall to help dissipate the noise. Regular R-11 or R-13 fiberglass batt insulation between the studs proves the best and, pleasantly, the most affordable option [Photo E, Drawing 5].

Deal with doors and windows
Tip!
Consider prehung exterior-grade doors for interior walls—they come with tight seals between the door and frame.
If small gaps around electrical boxes and framing pose a noise-transmission concern, how do you address door and window openings? The same principles apply as for walls: add mass, decouple, seal openings, and dissipate energy.

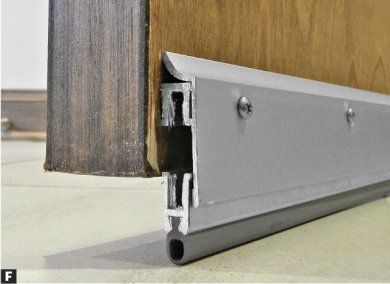
Increase mass by replacing hollow-core doors with solid-core doors. If aesthetics don't matter too much, a layer of mass-loaded vinyl [Take this vinyl for a spin, above] secured to the door can further reduce sound passage, as can screwing a sheet of MDF to the door with a layer of Green Glue between the door and MDF [What is Green Glue?, below]. Seal gaps between the door and the stop with weather stripping and a threshhold, or add a self-retracting sweep [Photos F, G].


Tip!
Remove door trim and loosely stuff batt insulation in gaps between the rough opening and door frame.
Apply similar strategies to windows. Double- and triple-pane windows provide more mass than single-pane. Fixed-lite windows don't open, so they don't have the sound-leaking gaps of windows that do open. And fill gaps behind trim with insulation, as recommended for doors.
Staggered-stud and double walls provide enough depth for installing two doors or windows facing each other in the same frame, providing additional mass and decoupling. Prehung doors will mount as usual in a double wall; the shallower depth of a staggered-stud wall requires more creative framing and trimming methods that may involve hanging the second door on the jamb of the first, or installing prehung doors to stand proud of the finished surface. Consult a contractor or finish carpenter if needed. Because the doors fit close to one another, the two interior faces may require low-profile knobs.
Tip!
Eliminate a hole in a door by replacing a traditional doorknob and latch with a handle, and adding a closer or self-closing hinges.
Overhead garage doors prove problematic, especially if you want them to remain operable. An insulated door without windows absorbs sound better than a thin metal or fiberglass door. Attaching a layer of foam insulation board to the interior helps dissipate sound, without adding excessive weight. Chamfer the mating edges so they don't bind as the door panels round the bend in the track. Installing a movable curtain of heavy moving blankets or mass-loaded vinyl near or against the door further reduces noise, and still allows access. If you can live with reduced or no access, add a wall just inside the door, either of temporary or permanent construction, using the methods previously discussed.
Containing the whine of tools ensures that those around you will look forward to the projects that come out of your woodshop rather than dreading the noise.
Source: Resilient sound isolation clips no. RSIC-1, box of 50, Acoustical Solutions, 844-960-1114, acousticalsolutions.com.