Nailed It


It's been more than 30 years since Norm Abram popularized the use of pneumatic nail guns on "The New Yankee Workshop," and these helpful tools have grown in functionality and affordability ever since. These days, you not only have multiple sizes of nailers (and fasteners) to choose from, but battery-powered versions have also joined the traditional pneumatics. Here, we help you get more from those nailers.
1. Although nailers seldom fire stray fasteners, they can launch chips or fastener fragments. As Norm himself would have admonished, always wear safety glasses, just in case.


2. Fasteners, especially 18-gauge and larger, have chiseled tips (photo, above) that help them punch through wood, but tend to follow the grain, blowing out the side of the workpiece. To avoid this, rotate the nailer to place the fastener tip perpendicular to the workpiece's grain direction.


3. If a wire nail blows out (photo, above), pull the nail through from the back side to minimize damage to the good face.

4. Keep your hands clear of the area being nailed (photo, above), in case of accidental blowouts. This includes any portion of the adjoining workpiece within the length of the fastener.

5. Avoid nailing into a workpiece where the fastener will likely follow the grain direction and blow out the side (photo, above). If you need a nail in this situation, use a hammer and an old-school finish nail instead.

6. Most manufacturers mark clips of 23-gauge pins with arrows to indicate the sharp (or down) end. But some fasteners have only one arrow that disappears when the stick gets short. In these cases, mark across each new stick near the sharp end (photo, above) so you always know which end points down.

7. Set your air compressor's hose pressure according to the specs in your nailer's owner's manual; usually, that's 90–100 psi (photo, above). Too-low pressure leaves fasteners proud of the wood; a higher pressure setting sinks the nail too deep, leaving a larger hole in the wood, and possibly damaging the gun.
Nailers by the Numbers
| Type of nailer | Fasteners | Best uses |
| 15-gauge finish nailer | Angled, 1 -- 2 -½" | Large, heavy trim, windows, and doors |
| 16-gauge finish nailer | Straight or angled, 1 -- 2- ½" | Trim and molding, case projects |
| 18-gauge brad nailer | Straight, 5⁄8 -- 2-1⁄8" | Small trim and molding, case projects, shop jigs |
| 18-gauge narrow- | Straight, 3⁄8 -- 1-½" | Securing back panels to projects |
| 21-gauge pinner | Straight, ½ – 2- 3⁄16" | Small trim and molding |
| 23-gauge pinner | Straight, ½ – 2" | Small, delicate trim and molding; securing flush-trimming templates |

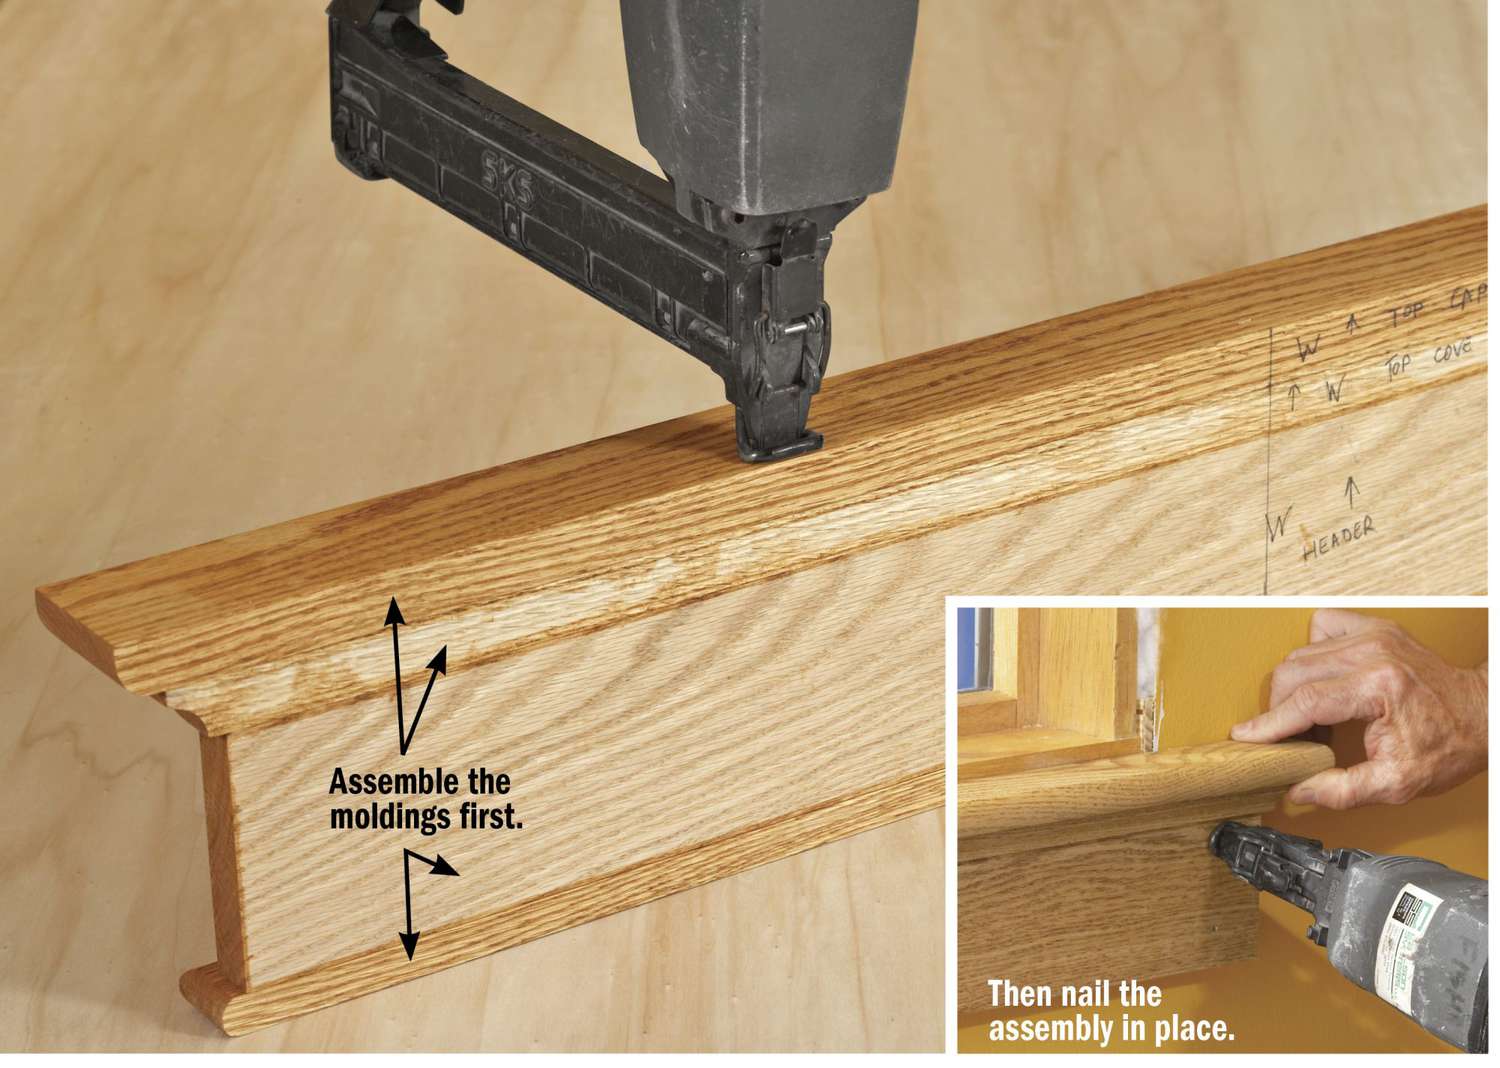
8. When nailing stacked moldings to a wall, around doors or windows, or to a project, nail and/or glue the parts together before attaching them to the wall or project (photo, above). This eliminates nailing in tight spaces where you might not be able to achieve the desired angle.

9. When working with wood species that have pronounced coarse grain, such as oak, ash, or hickory, drive nails in that coarse grain, when possible, so the nail holes blend in and might not need filling. Or nail into recessed areas (photo, above) where the shadow helps hide the nail holes.

10. Use the protective nose tip that comes with your nailer to prevent damage to wood. Pressing the nailer too hard on the workpiece can also create bounce that results in indentations (photo, above).
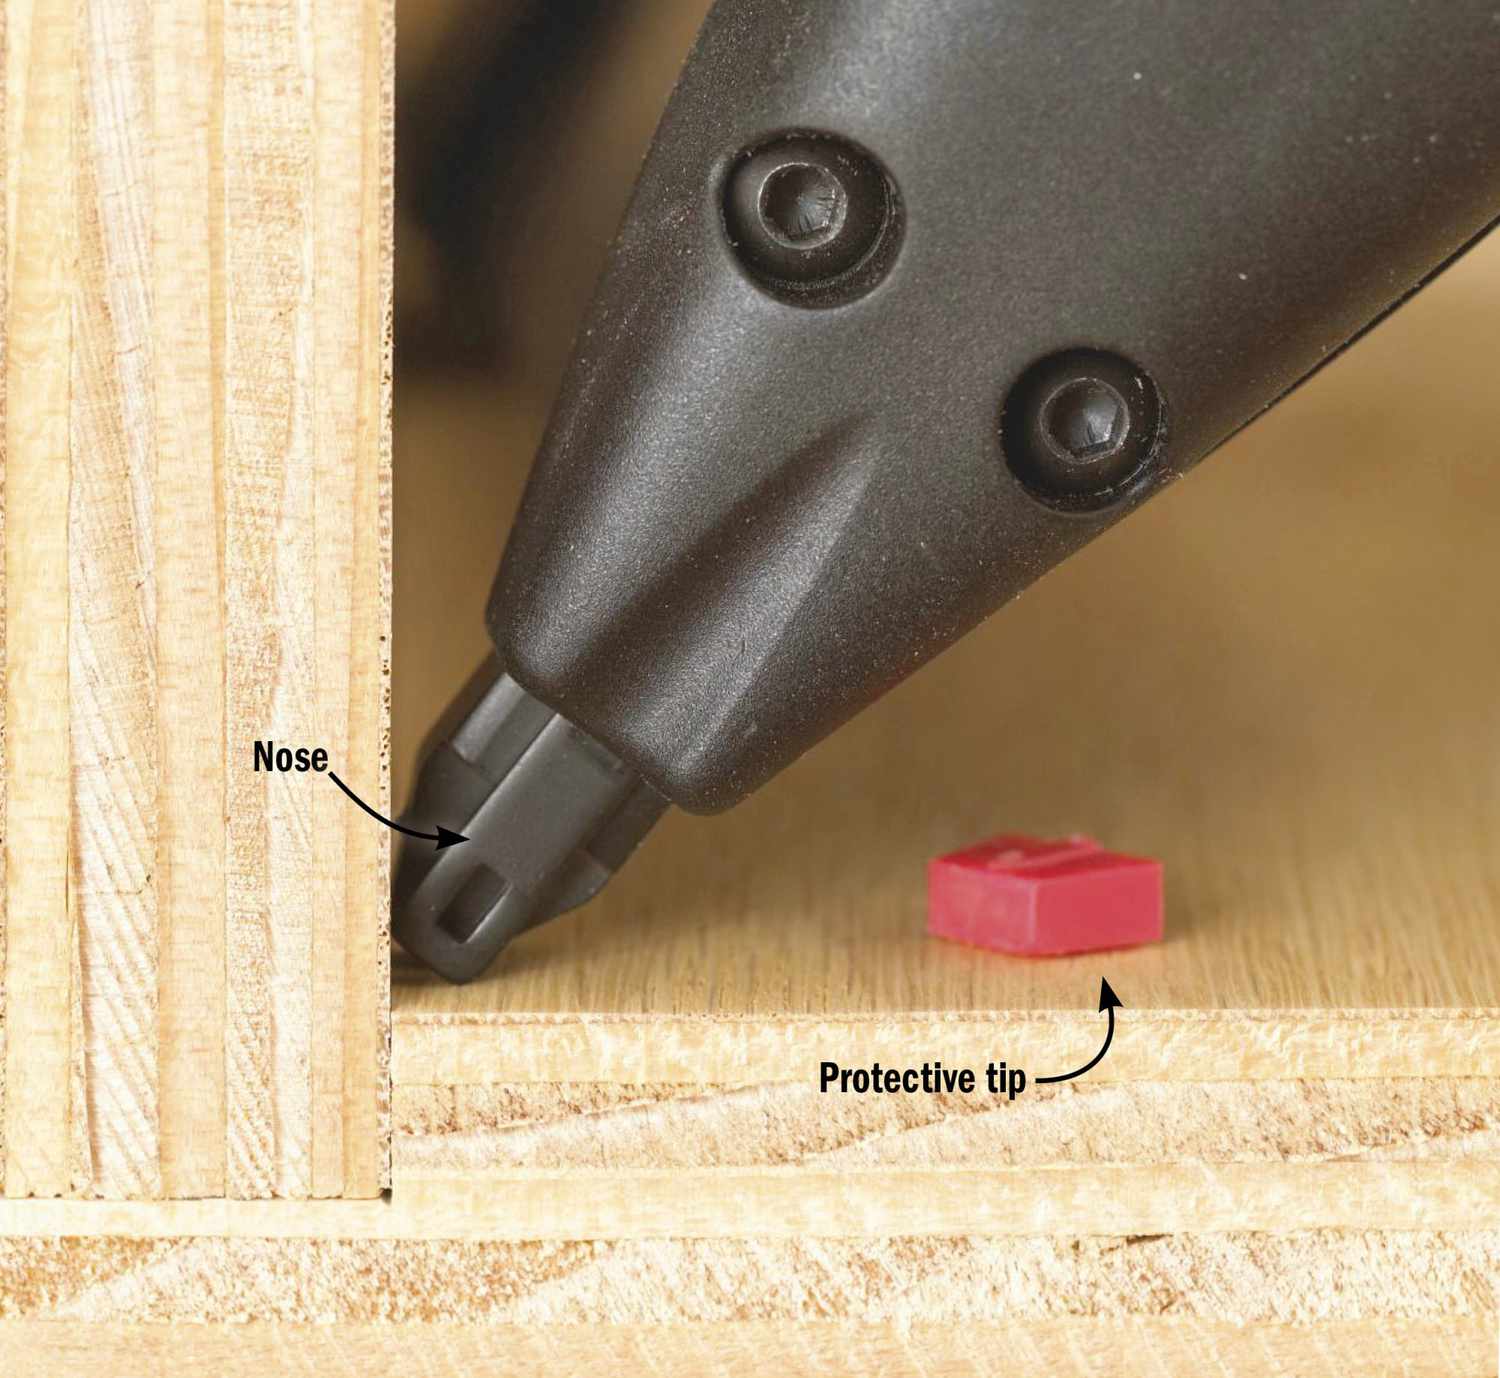
11. An exception to no. 10: To nail into tight corners, remove the nose tip (photo, above). Or look for a nailer with a fine nose that works in close quarters, even with the protective tip in place.

12. Before nailing trim to a wall, mark the stud locations with masking tape above or below the trim locations (photo, above); this ensures your fastener hits a stud. When splicing joints, cut pieces to length so the splice takes place on a stud.

13. When pattern routing with a flush-trim or pattern bit, attach the pattern to the back face of the workpiece with headless 21- or 23-gauge pins (photo, above). After routing, simply pry the pattern off and pull the pins with pliers.

14. When tacking glass or mirror stops into a frame, insert a thin cardstock buffer between the nailer and glass (photo, above) to prevent scratches.

15. To cleanly fill nail holes with putty or filler, apply masking tape to the area and drive the nail through the tape. Then fill the hole with the tape in place, and peel it away. This prevents putty smear on the adjacent wood surface and minimizes discoloration when stain is applied.
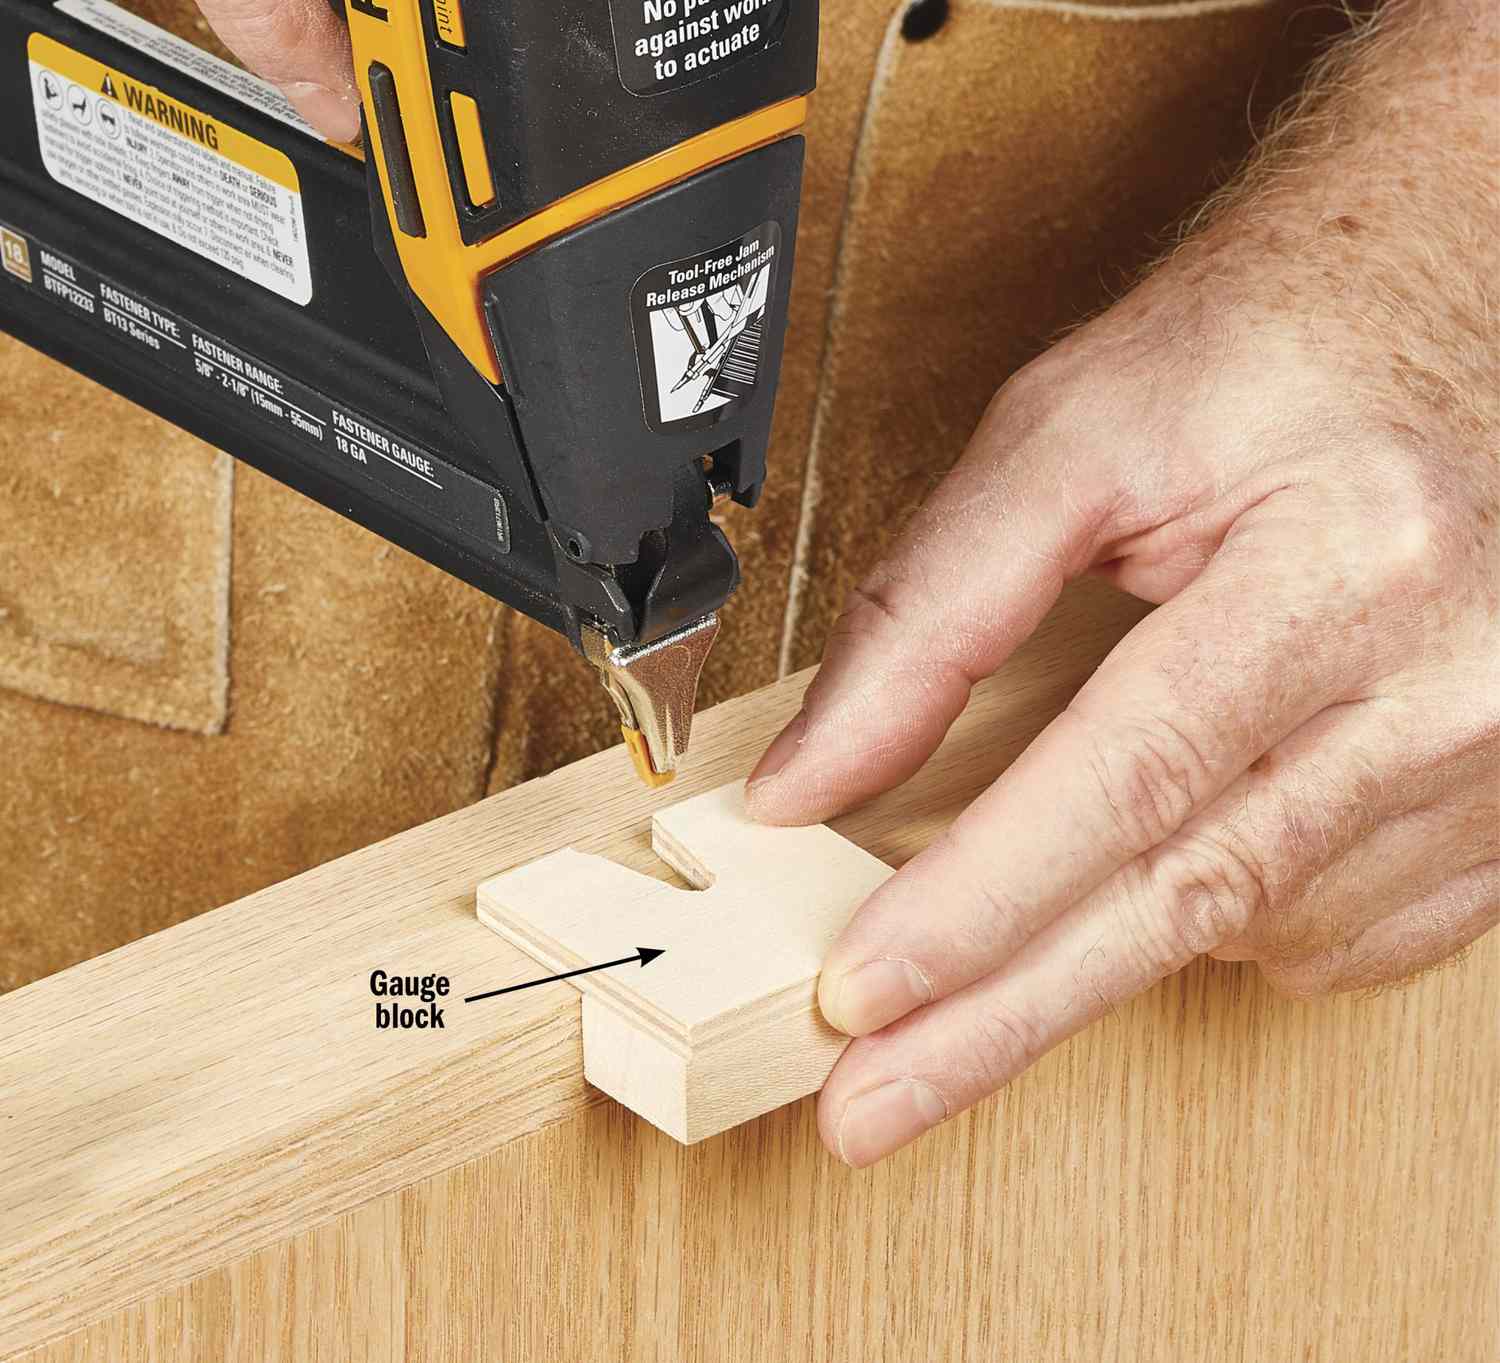
16. A gauge block that fits the nailer's nose ensures accurate, consistent nail placement, especially when driving fasteners into 3⁄4" or thinner stock. Hold the block against the workpiece (photo, above), position the nailer into the gauge pocket, and fire with confidence.