(Not So) Dangerous Curves Ahead


As woodworkers, we spend a great deal of time making sure our projects end up straight, flat, and square. But not all woodworking is rectilinear. Bends and curves help break up straight lines, adding variety to design. Incorporating these elements into your projects definitely ups your woodworking game.
Tip!
To save time, purchase pre-kerfed MDF, available in 2x4' sheets.
Traditional steam-bending involves special equipment and handling piping-hot workpieces in a hurried approach, often with unpredictable results. Thankfully, the following techniques and materials make it possible to create bent-wood projects while skipping the steam. Take a look at these approaches to throwing wood a curve and see if you can apply one of them to a future woodworking project.
Kerf your enthusiasm
Use an online calculator for determining kerf spacing.
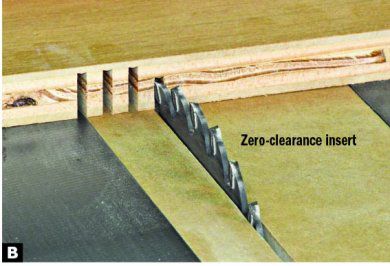
Kerf bending involves cutting a series of evenly spaced cross-grain kerfs on the back of a piece of wood or plywood. The kerfs stop just short of passing all the way through the thickness of the workpiece, allowing you to bend the piece. Unlike with some other bending techniques, a kerf-bent piece won't retain its shape on its own and must be attached to a substructure, such as the apron being added to a demilune table, as shown above.
Kerf bending works best with narrow pieces that you can comfortably crosscut on the tablesaw. The kerf spacing and depth determine how tightly you can bend the workpiece. The closer the kerfs, the tighter the radius you can achieve. To determine the appropriate spacing and depth, make a series of cuts in a test piece first.

View a video on kerfing plywood.
Cut the first kerf on the tablesaw, right where you want the bend to start. Then cut subsequent kerfs using an auxiliary miter-gauge fence with an indexing pin [ Photos A, above, B, below]. After cutting the kerfs, try bending the piece into the desired shape. If the test piece breaks, raise your blade to cut the kerfs a little deeper. If you can't bend the piece into a tight enough radius, or if you notice facets (flat spots) between the kerfs, space the kerfs closer.
After determining the proper depth and spacing, kerf your workpiece and bend it around your project's substructure to check the fit. Use clamps and cauls to hold the piece in position while you glue or fasten it in place.
Play with pliable plywood
Tip!
Manufacturers offer bending plywood in both 4×8' and 8×4' sheets depending on the bending direction. A 4×8' sheet bends into a tall, narrow column-like cylinder. An 8×4' sheet bends into a wide, short, barrel-like cylinder.
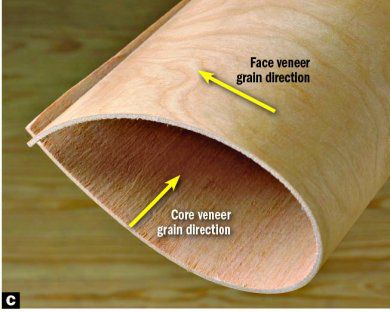
At first glance, bendable plywood looks like regular plywood. But instead of multiple plies glued up in alternating grain directions, bendable plywood consists of one or two core plies with the grain running in the same direction, with perpendicular face veneer [ Photo C, below]. Bendable plywood comes in multiple thicknesses, with 1⁄4 " and 3⁄8 " being the most common. Some home centers carry it or you can order it online.

See how bending plywood is used to make a demilune table.
Use a single layer of plywood to wrap a smooth skin around a frame or substrate, such as when making a decorative column or the curved front of a bar or kitchen island. For structural parts, like the curved apron of a table, glue multiple layers around a plywood or MDF form, adding a veneer of your choosing on the outside layer. Once the glue dries, the plywood layers maintain the shape of the form with little or no springback.
To create an assembly from multiple layers, cut the plywood layers several inches longer (or wider) than needed to account for the bend and allow for trimming afterward. Cut an extra layer of bendable plywood to use as a caul during clamping. Mark the centerline of all the layers on their edges and make a corresponding mark on your form to help align the parts during the glueup.
Use a slow-setting glue (such as Titebond III or Titebond Extend) to give yourself more working time. Spread an even coat of glue on each layer with a foam roller, stacking each layer on the previous one as you go, lining up the center marks. Glue the veneer on last.
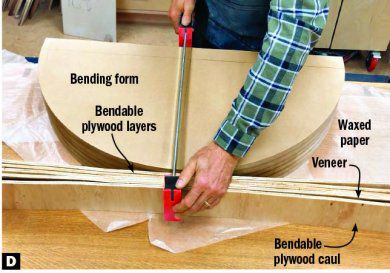
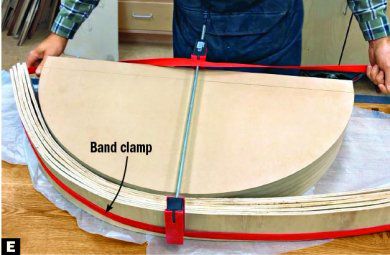
Clamp the layers to the form at the center to hold them in place [Photo D, above]. Depending on the size and shape of your form, use band clamps, bar clamps, or a combination of both to pull the layers tight against the form, working from the center out [Photos E, F, below].

Learn about using a vacuum press.
With the clamps in place, check that the layers didn't shift out of alignment. If necessary, use a mallet and a block of wood to force the layers flush. After the glue dries, remove the assembly from the form and scrape off any squeeze-out. Trim the workpiece to final width and length.
Bendable plywood lends itself to working with a vacuum press as well. Follow the same procedure as above, but instead of clamps, place the glued up layers and form in a vacuum bag.
Rip 'em and wrap 'em
See bent lamination in action.
It's no secret that a thin piece of wood bends easier than a thick one. Bent lamination builds on this principle by laminating several thin layers of wood around a form. Once the glue dries, the combined strips hold the shape of the form, while maintaining the structural strength of solid wood.
Start by making a bending form out of solid wood or by gluing up layers of MDF, particleboard, or plywood. Unlike bendable plywood, laminations made from solid wood have a tendency to spring back slightly after glue-up. To counteract this, you may want to tighten the curves of your form slightly. Sand the edges of the form smooth and cover them with packing tape to prevent glue from sticking to the form. Add holes or openings to the form as needed for clamps, as with the form for the kerf-bent table apron shown in the opening photo.
When it comes to the laminations, choose a wood species that bends easily, such as oak, ash, walnut, or mahogany. Look for straight grain that runs parallel to the faces of the board to minimize the chances of the strips breaking as you bend them. Cut strips from an extra-long and extra-wide blank, as you'll trim the assembled lamination to size after glue-up.
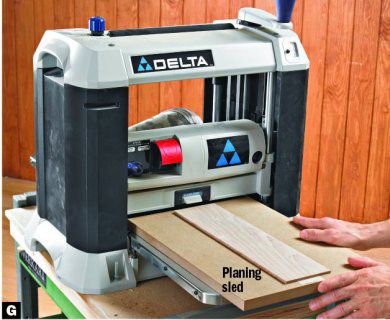
Bandsaw the laminations from the blank, using a rip fence to keep them a consistent thickness. (Cut extra in case some break.) Determining the correct thickness for the laminations depends on how tight the bend is and how many laminations you're bending at once. Thicker laminations require more clamping pressure and will have greater springback. In general, laminations between 1⁄16 " and 1⁄8 " thick work best, but after cutting your first strip, try bending it around your form. If it breaks, cut a thinner strip and repeat the test. After bandsawing all the strips, smooth the sawn faces with a drum sander or thickness planer [Photo G, below].
Before breaking out the glue bottle, make a dry run by stacking up the laminations, bending them around the form, and clamping them in place. Pre-bending the strips helps you anticipate any problems, as well as makes the strips a bit more pliable for the real thing.
Tip!
Moisten the laminations with water just before glue-up to provide extra open time during assembly.
For the glue-up, choose a slow-setting glue or epoxy to give yourself plenty of working time. Apply the adhesive to the laminations, stack them up, and place them on the form. Clamp the stack at the center of the form, then add additional clamps working toward the ends [ Photo H, below]. Make sure the clamps press the laminations together tightly all along their length without any gaps. If the laminations begin to slip out of position, use a clamp or a mallet and a block of wood to realign them.

If you're unable to bend all the laminations around the form at one time, or for large glue-ups with lots of laminations, work in stages. Glue up just a few strips at a time, allow the glue to dry, and then add additional strips.
Leave the laminations in the form until the glue is completely dry (typically overnight). Then remove the assembly from the form and scrape off excess glue. Plane or sand the edges if necessary and trim the ends to length.
Bend it out of the box
Until recently, about the only way to bend thick, solid wood was to steam it until it became pliable. But a relatively new product known as Cold-Bend hardwood can be bent by hand at room temperature [Photos I–K, following].


See how easily this product bends.
Cold-Bend hardwood is made and sold by Pure Timber LLC. The process starts by carefully selecting straight-grained timbers and steaming them in an autoclave. Then, the wood is compressed lengthwise to about 75-85% of its original length, while maintaining the original width and thickness. This process compresses the wood cells in an accordion-like fashion, similar to a flexible drinking straw.
After removing the wood from the press and allowing it to cool, it's wrapped and shipped in wet form. Bandsaw a piece from the block and simply bend it into the desired shape, either around a form or freehand. Once dry, it retains its shape. Store the remaining wood wrapped in plastic and it retains its elasticity for several years, according to Pure Timber.
Purchase Cold-Bend hardwood in five common domestic species: red oak, white oak, ash, maple, and cherry. (Other species are occasionally available as well.) Although somewhat expensive (prices start at about $40 per board foot and go up depending on the species and plank size), it allows you to bend wood in ways that you can't easily do with any other method.