Not the same old saw


Perhaps you rediscovered the forgotten handsaw your dad used. Or seeing a saw at a yard sale stirred an urge to try back-to-roots woodworking.
These instructions pertain to Western-style handsaws that cut on the push stroke.
Whatever the motivation, any handsaw you acquire on the secondhand (and beyond) market probably needs refurbishing to become a usable tool again.
Take a good first look
Not every old saw deserves rehabbing. The best candidates show evidence of careful use and maintenance during their lives—even teeth and undamaged blades and handles. Saws that were high-quality tools when new usually prove the best rehab subjects.
Note: Many handsaws from the recent past feature induction-hardened teeth, usually identified by blackened tips. Generally, these require pro sharpening.
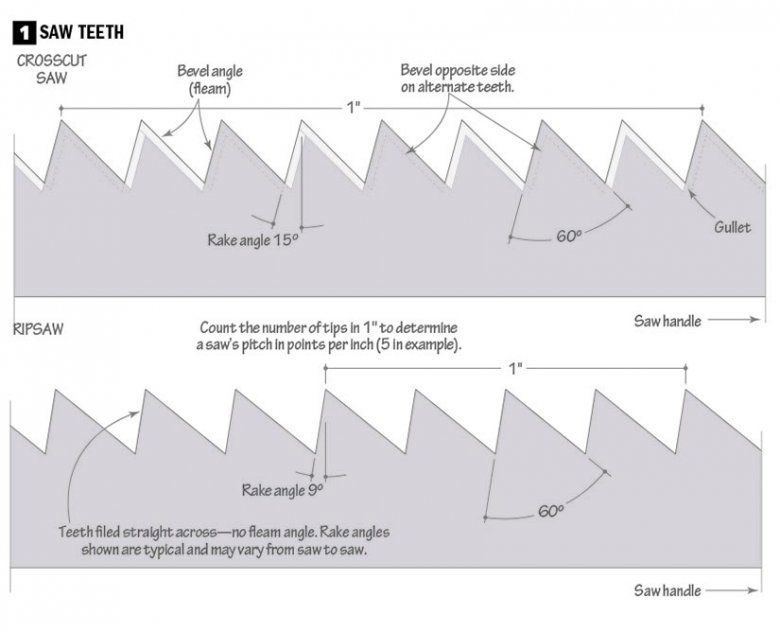
Triangular files for saw sharpening come in regular, slim, extra-slim, and double-extra-slim styles. For saws with 6–7 teeth per inch (tpi), use a 6" slim taper; 8–9 tpi, 6" extra-slim; 9–10 tpi, 6" double-extra-slim; and 11–14 tpi, 5" double-extra-slim.
You can readily deal with a rusty blade, a missing handle screw, or dull teeth. But avoid any saw with a deeply scratched, corroded, kinked, or bent blade. Likewise, reject one with uneven teeth, a wavy cutting edge, or many missing teeth. (A saw still cuts all right with a few missing teeth.)
Note: A slight, constant curve from toe to heel (handle end) along the cutting edge is acceptable. Called "crown," it makes sawing easier.
Set up your saw shop
Tip!
Files are sold without handles, but you should buy separate handles and install one on any file you use for better control and to prevent hand injuries.
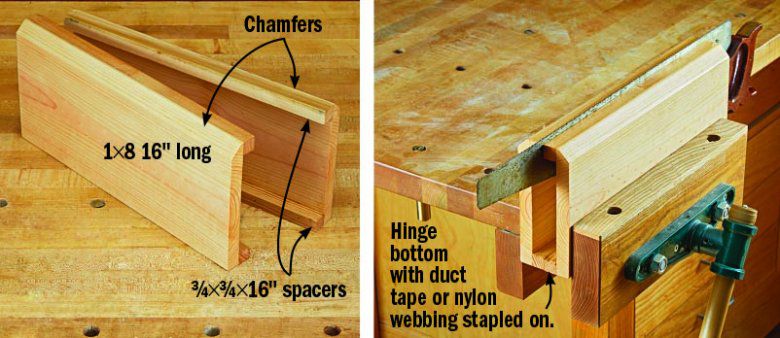
Refurbishing a handsaw calls for some triangular files plus three specialty tools, chief among them a saw vise [Photo below] for holding the blade solidly. Once fairly common, these now show up at yard sales and junk shops. You can find new and used ones on the internet, too. Or, make a substitute [Shop Tip at end of article].

A file guide [opening photo, Source at the end of the story] makes it easier to hold the triangular file at the correct angles for rake and fleam [Drawing below] as you sharpen the teeth. And, you'll need a saw set [Source] to set the teeth (bend the tips for kerf clearance) accurately and evenly.

First, get rid of rust
Wipe down the blade with a citrus cleaner/degreaser. Then, remove rust with a rotary wire brush and a drill or angle grinder [Photo below], steel wool, a nylon abrasive pad, or fine sandpaper. On a blade with only light surface rust, clean up around the handle with small detail wire brushes. Remove the handle if there's heavy rust on the blade right up to it. Turn to chemical rust removal only as a last resort—usually, it isn't necessary. Before immersing the saw in a liquid rust remover, take off the handle.

Joint the saw
Tip!
The angle grinder and wire brush fling around a lot of fine dust. Wear a respirator and safety goggles, and work outside, if you can .
The tips of the teeth should stand equally tall along the blade edge. If not, the saw is said to be out of joint. To test the saw, file one pass along the tips of the teeth with a 10" or 12" second-cut or smooth-cut mill file [Photo below]. Keep the file perpendicular to the plane of the blade and slide it along the tips of the teeth. (Jointing jigs are available, but you don't need one to fix up a saw or two.)

Close inspection should reveal a slight flat at the tip of each tooth, all relatively equal in size. If some teeth have flats and some don't, or the flat sizes vary widely, you may need to joint the saw and file the teeth several times. This may prove more work than the saw is worth. (Worst case: A professional saw sharpener may need to recut the teeth.)
Set the teeth
Setting the blade—bending alternate teeth to the right and left—slightly widens the cutting edge and prevents the saw from binding in the kerf.
Set can have a greater effect on a saw's performance than tooth sharpness. Inadequate set leads to binding, while excessive set makes the saw harder to push. Unevenly set teeth make cutting straight difficult.
The amount of set a saw needs depends in part on the kind of wood being cut (softwood, hardwood, dried, green). A saw for cutting dried hardwood requires less set than a saw for green softwood.
Note:
Blades made from the late 19th century into the late 20th century were taper ground to make them thicker at the tooth edge than at the back, so they require less set than a constant-thickness blade .
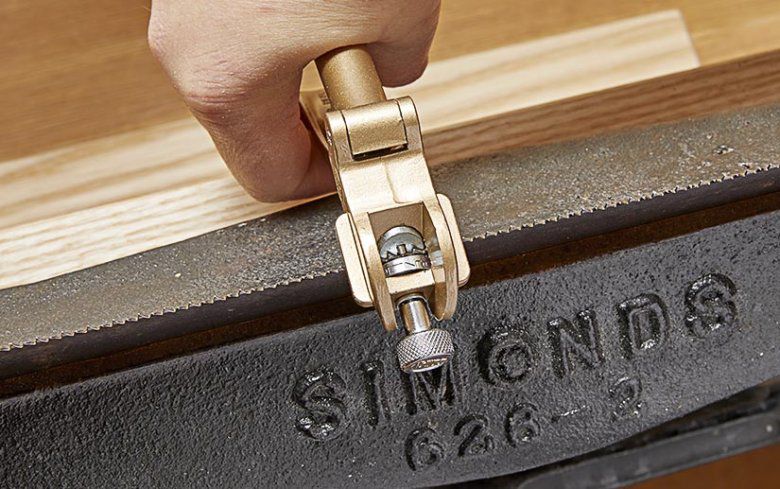
Saw sets usually establish the amount of set based on the number of teeth per inch. Adjust the tool for the pitch of your saw; then, set alternate teeth to one side first [Photo below]. Reverse the saw in the vise and set the teeth to the other side. Make a test cut; if the saw binds, adjust the tool for a slightly lower pitch (more set) and reset the teeth.
Sharpen the teeth
Tip!
Gauge existing rake and fleam from teeth at the heel of the blade (nearest the handle); they're less likely to be worn because they see less sawing than teeth in the middle of the blade.
File the teeth to the existing rake and fleam angles. A usual rake for crosscut saws is 15°; for ripsaws, 9°. Fleam varies, with 20°–25° common for crosscut saws. Ripsaws have no fleam. On crosscut saws, shallow fleam angles around 15° result in durable cutting edges that produce a slightly rough cut and take more effort to push. Steeper angles give a smoother, easier cut, but require more frequent resharpening.
Attach the file guide [opening photo] to the proper file for your blade pitch. Adjust the guide to your saw's fleam and rake angles according to the manufacturer's instructions for the device.
Ripsaw: Place the file in the gullet nearest the handle. File straight across that tooth, making light, precise strokes only until the flat spot left by jointing disappears. Continue to the next tooth, and file each in turn.
Crosscut saw: Place the file in the first gullet near the handle in which the tooth to the right of the file is set away from you. File that tooth until the flat spot disappears. Skip the next gullet and file the next tooth. Continue filing alternate gullets to the toe of the saw. (Each stroke files the front of one tooth and the back of the adjacent one.) Then, turn the saw around in the vise and file the remaining teeth the same way.
After filing either type of saw, make a test cut. Then, clean the blade and apply a rust protectant, such as Boeshield T-9. Add a nonsilicone dry lube, such as Bostik BladeCote, for easier sawing.
Source
Saw file holder, no. 05G46.01, Lee Valley (800) 871-8158.