Peek Into Hollow Turning


Hollow vessel turnings often show off beautiful woods and elegant shapes better than they serve as functional pieces. The focus is on the exterior; much of the interior is removed simply to reduce weight and minimize cracking, so it only needs to be refined as far as you (and your friends) can see and feel.
Here lies the challenge: By making the opening smaller, you can hollow the interior more crudely (because inspecting eyes and fingers won't get as far), but smaller openings increase the difficulty of turning. On the next few pages, I'll cut away the mysteries of hollowing by giving you an inside peek at the shaping in action.
Choose the right tools
Most hollowing tools consist of a scraper (high-speed steel or carbide) attached to a mild-steel shaft, below. The hard cutter retains a sharp edge, while the softer shaft withstands the rigors of overhanging the tool rest without breaking. Use straight tools to remove most of the waste, then switch to a bent tool to reach otherwise inaccessible undercuts. A thick shaft can extend farther beyond the tool rest, while thinner tools fit into smaller openings. The cylindrical shaft can be rotated counter-clockwise for finer cuts. I recommend a set of 5⁄8 " tools from Trent Bosch [photo below; Sources]. These two tools won't break the bank, have a small learning curve, and suit turning most forms up to 8" in depth and diameter.
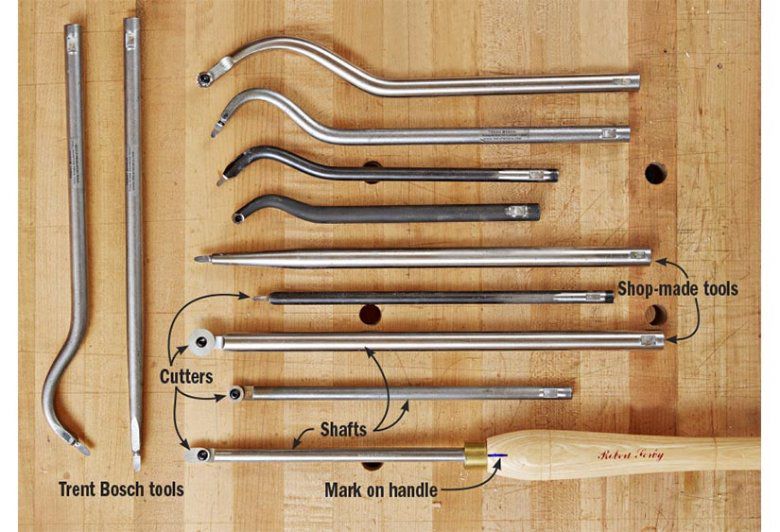
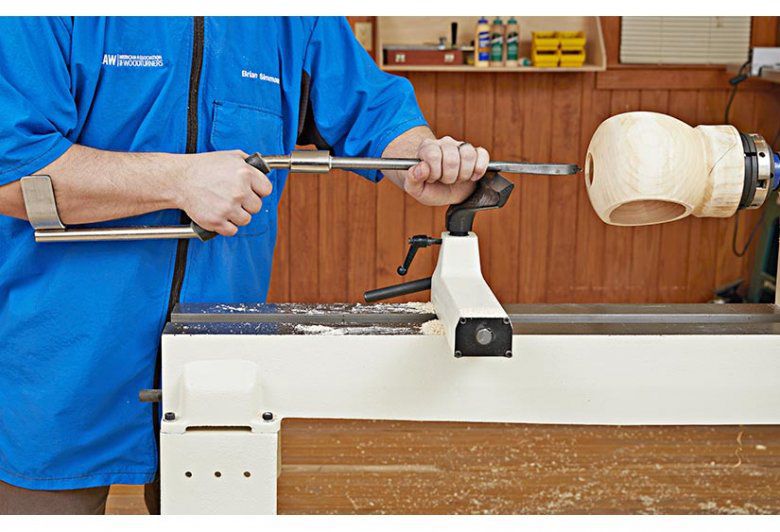
I prefer fitting my hollowing tools to an arm brace photo below, but you can buy a variety of interchangeable handles, or turn your own. Regardless, always make a mark perpendicular to the cutting edge on the handle photo above for orientation when the cutter is hidden inside the form.
Practice on scrap
Always start the lathe before inserting the tool. Placing the tool into a form before switching the machine "on" may result in a catch that ruins your vessel.
Before embarking on a closed hollow form, learn how to make cuts with the tools. Mount a scrap blank between centers, turn the outside round, and form a tenon on one end. Grip the tenon in a 4-jaw chuck, then drill a centered 1⁄2 " hole a few inches deep.
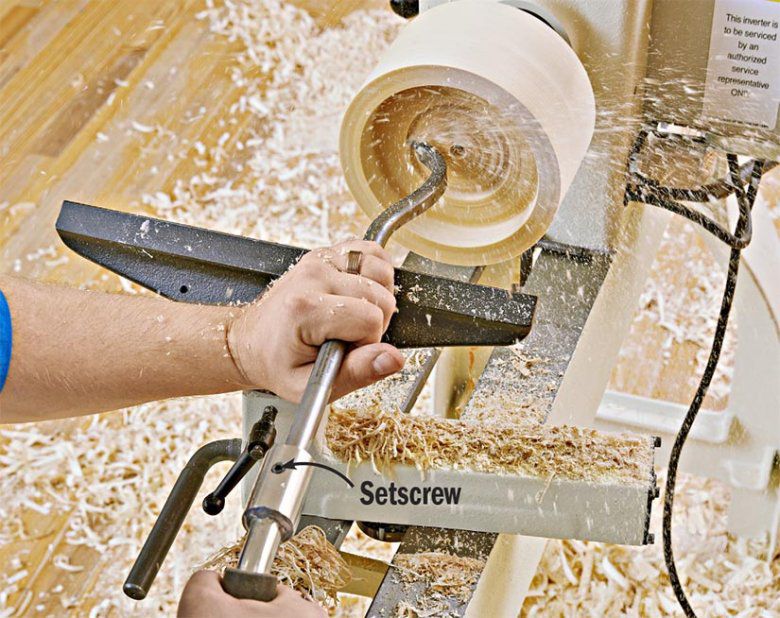
Use the straight tool to enlarge the opening. To do this, keep the handle level, and the edge of the cutter rotated between 8 and 9 o'clock. Never rotate the cutter above 9 o'clock. A catch will result! Place the cutter at the edge of the drilled hole and take 1⁄8 "-deep cuts, increasing the opening's diameter to about 2" , photo below. Continue making 1⁄8 "-deep cuts until you've hollowed about 2" deep. To simulate a deeper form, pull the tool rest a few inches away from the piece and experience a greater overhang.


When you're comfortable with the straight tool, switch to the bent tool and experiment in the same manner, photo below. While practicing, feel free to enlarge the opening to allow you to see the tool working as you examine your progress.
Try it for real
Machine the largest tenon your chuck will accept. This ensures maximum grip and stability while hollowing.
With some practice under your belt, select a suitable green log (we choose soft maple) and try completing a piece. Begin shaping the exterior of the blank mounted between centers [Drawing below]. To ensure adequate support while hollowing, shape the base to no less than one-half of the vessel's largest diameter. Form a tenon on the base end and grip the tenon in a 4-jaw chuck. Now you're ready for hollowing.

Hollow it out
Don't try to hollow with a Forstner bit. Burrowing deep into end-grain with one creates lots of smoke. Instead, let the hollowing tools do the hard work for you.
Begin hollowing by drilling a hole to the finished depth—it serves as a starting point for hollowing, as well as indicating final depth, photo below. The size of the hole isn't critical; I use a 1⁄2 ×12" twist bit [Sources]. Then, use the straight tool to form the opening that's about 30 percent of the vessel's largest diameter. Use the tool in the same manner you practiced earlier, working from the center out, about 1⁄8 " at a time, until you complete cavity 1 [Drawing above]. Stop the lathe frequently and remove the shavings with blasts of compressed air.

After completing cavity 1, pull the tool out slowly to clean up any ridges left from the incremental cuts. Then switch to the bent tool and begin working on cavity 2. The straight tool works best for cavities 4, 5, 7, 8, and 9 while the bent tool is best suited for cavities 3 and 6. (Note: The order, placement, and tool selection for each cavity will vary based on form shape.)
Watch Brian demonstrate hollow-turning techniques woodmagazine.com/hollowturning
To get your bearings when you can't see the cutter in action, slide the tool into the opening with the lathe running, and gently rub the cutter across the cavity to feel its bottom and side. For instance, after completing cavity 4, rub the cutter against the side of 4 and the bottom of 2 to determine where to start cavity 5. And if you need to stop in the middle of cavity 5 to remove the shavings, begin again by feeling where you left off across the bottom and along the side. To avoid turning through the bottom, don't hollow any deeper when you reach your drilled-hole depth.
Measure wall thickness
The goal with a hollow form is creating a consistent wall thickness, with a slightly thicker bottom to steady the form as it stands. You'll find dozens of calipers in various sizes to measure wall thickness. I use manufactured calipers [Sources] and also make my own, photo's below. A specific wall thickness isn't required, so simply adjust calipers to a predetermined dimension, then rub one leg against the inside wall and visually gauge variances between the outside wall and the opposing leg. With shop-made calipers, such as the one shown, rebend the shape as needed to provide clearance and maintain the 90° angle.

Finish up
With the hollowing complete, return to the exterior and finish shaping the base to about 30 percent of the vessel's largest diameter [Drawing] before parting off the waste and tenon. After the form dries (see Dry advice, below), hand-sand the exterior and apply your desired finish.
Dry advice
Improve your turning skills with more videos and plans woodmagazine.com/turning.
How do you determine when a green turning has dried enough for finishing? A moisture meter works, but use one without pins that leave marks in the vessel. Another method is weighing the object every few days. With either approach, look for similar measurements over a period of several weeks. That indicates that the moisture level has stabilized and the turning is ready to accept finish.
Sources
Hollowing tools: 5⁄8 " Total Access 2-piece hollowing tool set,
Trent Bosch, trentbosch.com
Arm brace: Robert Sorby arm brace no. RS206,
Packard Woodworks, packardwoodworks.com.
Drill bit: 1⁄2 ×12" no. 01430321, MSC, mscdirect.com
Thickness calipers: 9" no. 05N22.01; 16 1⁄2" no. 05N22.03, Lee Valley, leevalley.com.