Plan a Whole-shop Dust-collection System


Collecting dust at its source not only makes you a tidy woodworker, it can keep you a healthier one, too. A well-planned dust-collection system traps the tiniest of particles—the ones that can cause the most lung damage—before they become airborne. Consider these pointers to keep your shop and your lungs in great shape.
Start with a layout
The first step in setting up an effective whole-shop system involves selecting the dust-collector location and from there, laying out duct runs to each tool, providing the air a path with the least resistance possible. Every foot of ductwork adds friction to the airflow, creating resistance, as do changes in duct direction, a reduction in duct diameter, and the rough surfaces of flex hose. So, plan your layout with short duct runs, minimal turns, and the least flex hose needed to connect tools to the ductwork. Typically, one or two main trunk lines should cover most of the shop with branches to individual tools.
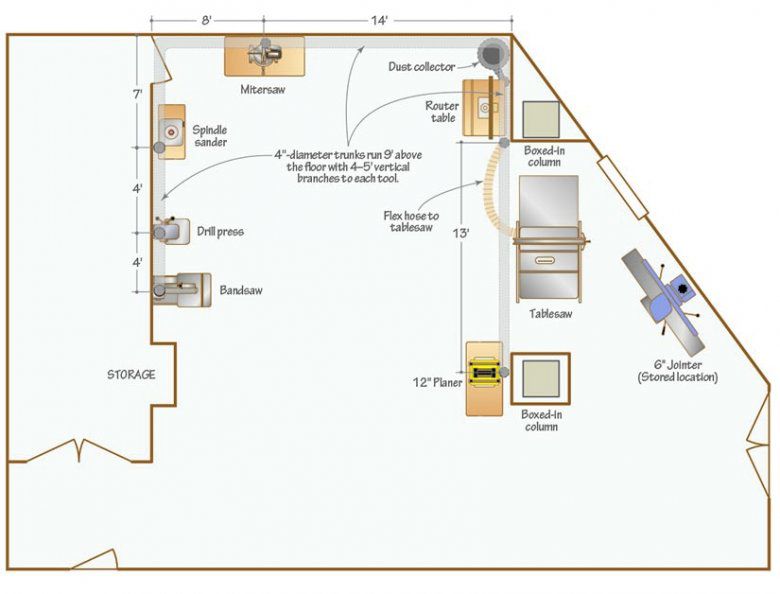
Locating the collector centrally in the duct run, rather than at one end, helps minimize duct-run lengths. In the WOOD photo studio shop, we placed the collector in a corner with two trunks running from it [above]. This puts it out of the way, yet close to the chip-producing tools that demand the most of a dust collector: the tablesaw and planer. (In our shop, the jointer, another chip-producer, rolls into position to use the planer's port, when needed.) The bandsaw, a less-demanding tool, sits at the end of the longest trunk.
Placing tools that require the greatest airflow closest to the collector reduces the amount of ductwork, allowing faster-moving air that better collects dust and debris.
Just as a car can negotiate a large-radius curve faster than a sharp corner, a gradual transition in direction allows air to keep moving quickly, preventing dust from falling out of the flow. So when placing turns and connecting branches, opt for elbows that provide the longest-radius turn possible. That may mean a wye or two 45° elbows rather than a 90° fixture with a tighter turn.
Overhead trunk lines keep ducts out from underfoot. But running ductwork up before routing it back down increases a run's length, adding resistance. A single-stage collector with a low inlet [below] will benefit from ductwork placed at floor or knee level. But if this puts ducts in walking paths and work areas, vertical branches may be required.
Oneida Air Systems, which provided technical advice for this article, provides a free design service for customers.
Run the largest pipe you can as close to the tool as possible. For example, to connect a 5" duct to a 4" tool port, place a reducer on the tool port rather than between the duct and a length of 4" flex hose. Or better yet, modify the tool port to match the duct size.
Every layout involves compromises. For example, in our shop, a diagonal trunk to the bandsaw and router table would have reduced duct length and eliminated two elbows. But we had to route the duct along the walls because the shop's drop ceiling provides no solid structure from which to hang the ductwork.
Find the right-size collector
Manufacturers determine cfm in a variety of ways. Our testing shows that in most cases, halving the claimed cfm provides a truer measure of performance when attached to ductwork.
The typical method for determining what size dust collector to purchase involves finding the static pressure (sp) of your ductwork, the airflow in cubic feet per minute (cfm) required to move dust from your tools, and plotting those two numbers on the fan curve for a given dust collector. The problem is finding a fan curve: Most manufacturers don't provide them. However, most list a cfm number. Our recommendation is to find a collector with a minimum of 2 hp, a 12" or larger impeller, and a rating of at least 1,300 cfm. If you have more than 20' of ductwork in any one run, you plan to open more than one branch at a time, or use lots of flex hose, bump up to a higher cfm, which may mean a 3–5 hp model. This may inflict a temporary hit on your budget, but a too-weak collector simply won't do the job.

Some 2-hp dust collectors run on 110-volt circuits. Anything larger requires 220 volts.
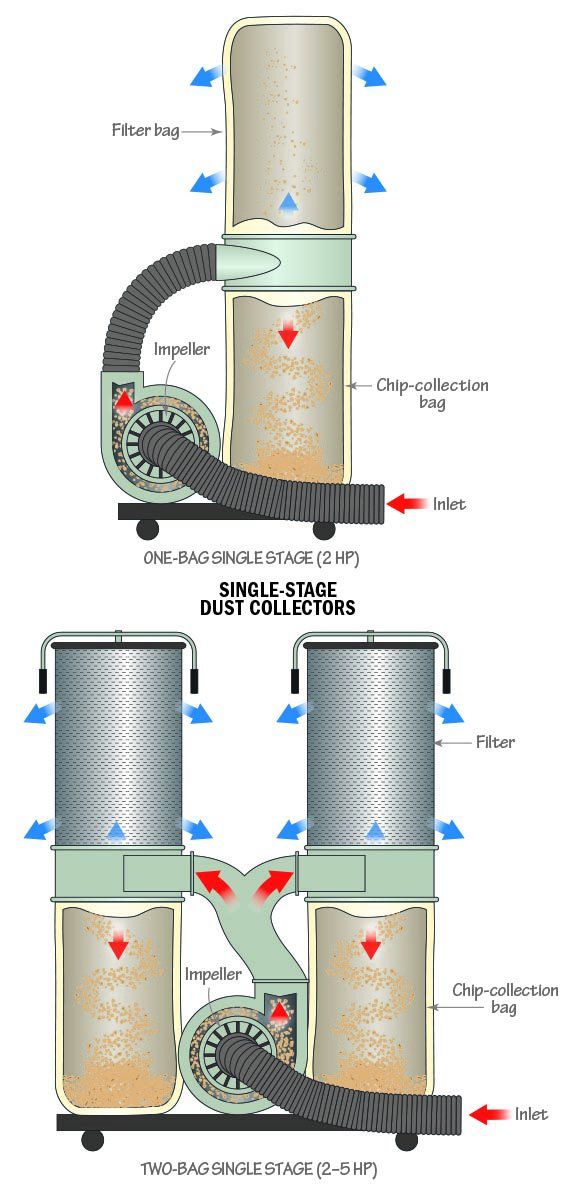
Dust collectors come in two types: single-stage, above, and cyclone, below. Either can serve a whole-shop system. In both styles, a motor-driven impeller pulls debris-laden air through an inlet. In a single-stage collector, the debris passes through the impeller before the heaviest waste drops into a collection bag, while the filter bag captures smaller particles as the air exhausts. Airflow drops as dust coats the filter bag interior, but filtration typically improves. Wood chunks or metal debris drawn into the airflow can damage the impeller as they pass through. Two-bag collectors typically have more power and airflow than a single-bag.
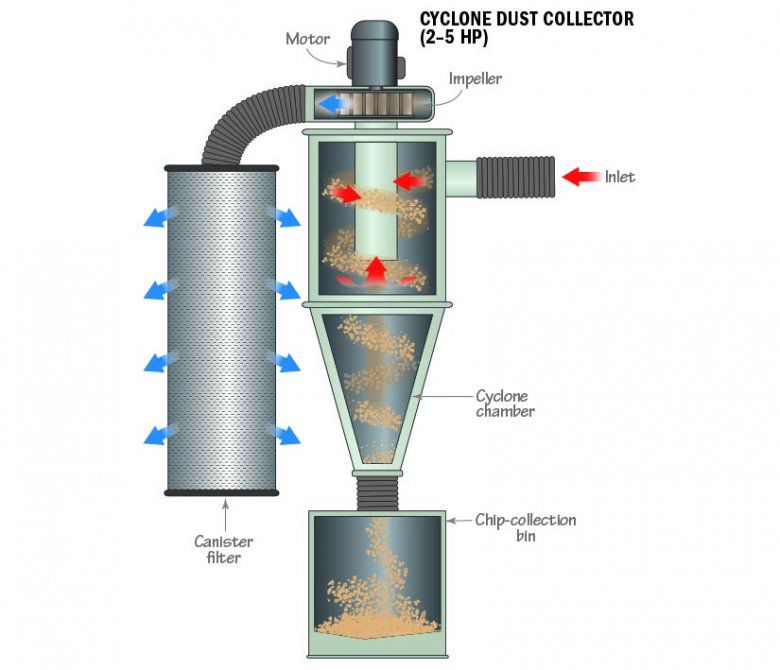
In a cyclone, the airflow pulls dust into a conical chamber where it spins around, gradually losing velocity so the majority of the material falls into a collection bin. Only the smallest particles pass through the impeller and on to the filter, so the filter stays cleaner, and airflow remains constant.
The importance of the filter

It takes 1300 .3-micron particles side by side to span 1⁄64 ".
If a collector spews fine dust back into the air, it's doing more harm than good [ above]. To protect your health, seals throughout the system must be tight and the filter must trap the smallest particles. Look for filters labeled HEPA (high-efficiency particulate air). They have been certified by a third-party tester to trap at least 99.97 percent of .3-micron particles. Avoid filters labeled "HEPA-type" or "HEPA-like," or that make vague claims such as "removes up to 99 percent of the smallest particles." Upgrading to an aftermarket filter [below, Sources] can improve a collector that offers sufficient cfm but poor filtration.

Tip!
Eliminate raising dust with a broom by using a shop vacuum with a floor-sweep attachment and a HEPA filter.
The chicken-or-egg conundrum: Until the dust collector is in use, you don't know how effective it truly is at capturing dust. A simple test device [ Photos below] measures air quality in real time. Consistently high readings indicate you should inspect your system for leaks. After sealing them, you'll know whether the dust-collector filter does its job well or requires an upgrade.

Ductwork and connections
Get more info about the types of ductwork.
Choose ductwork in a diameter that matches the inlet on your dust collector [ below]. Options for ductwork include PVC and several types of metal piping. When calculating the full cost of a system, save money on ductwork, if needed, to invest in a better collector and filter.

Of the options shown here, PVC pipe [below] costs the least and many home centers stock it. The 4" and 6" diameters match the inlets on many collectors, but collectors with 5" inlets require adapters, and the mismatched duct reduces system performance. Wye fittings with 45° branches are suitable, but the tight radii of 90° elbows reduce system efficiency. Attaching flex hose requires adapters.

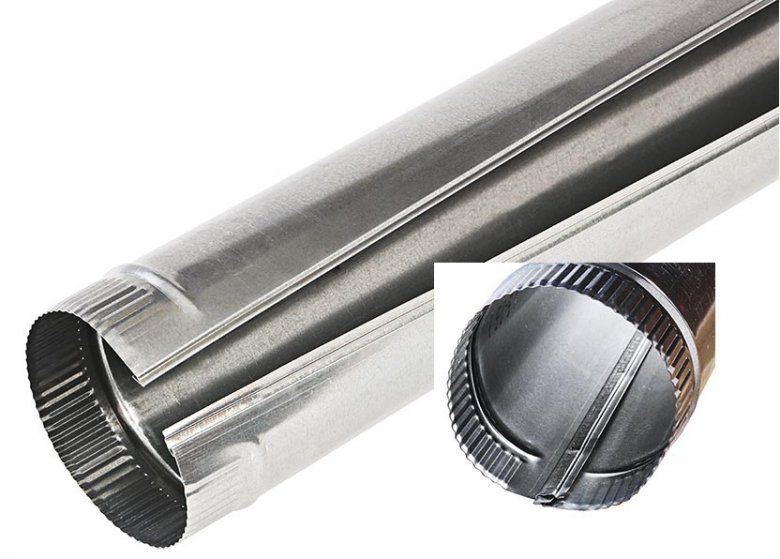
Snap-lock pipe [below], typically used in home heating and cooling applications, offers elbows that can be adjusted to create broader radii, but the joints need to be sealed with tape.

Spiral duct [above] and Quick-Clamp pipe [below] and their fittings are purpose-built for dust collection. Diameters of 4" and up ensure that you find the size best suiting your system. Elbows have smooth interiors and large radii, and heavy-gauge construction ensures durability.

Buy or make hangers to secure duct from walls and ceilings. WOOD® magazine Design Editor John Olson fabricated a holder [below] to secure vertical duct runs.

Blast gates control airflow to branch lines, directing airflow to only the tool in use, helping the dust collector operate most efficiently. Operate gates [below], whether shop-made or purchased, by pulling or pushing the gate open or closed.

Connecting most stationary tools is straightforward. Clamp a short section of flex hose to the tool port and then to the duct. If the port doesn't match the hose, use an adapter [Sources].
Collecting dust from mitersaws, radial-arm saws, and lathes can prove difficult because their open design lets material fly all over. Large hoods, purchased or shop-made, can corral and direct dust to your collector [below].

Handheld tools, such as random-orbit sanders and routers, don't easily connect to the large ductwork of a whole-shop system, and the small dust port on such tools chokes off airflow. Instead connect them to a shop vacuum or dust extractor with HEPA filtration [below].

Super suction moves lots of air fast
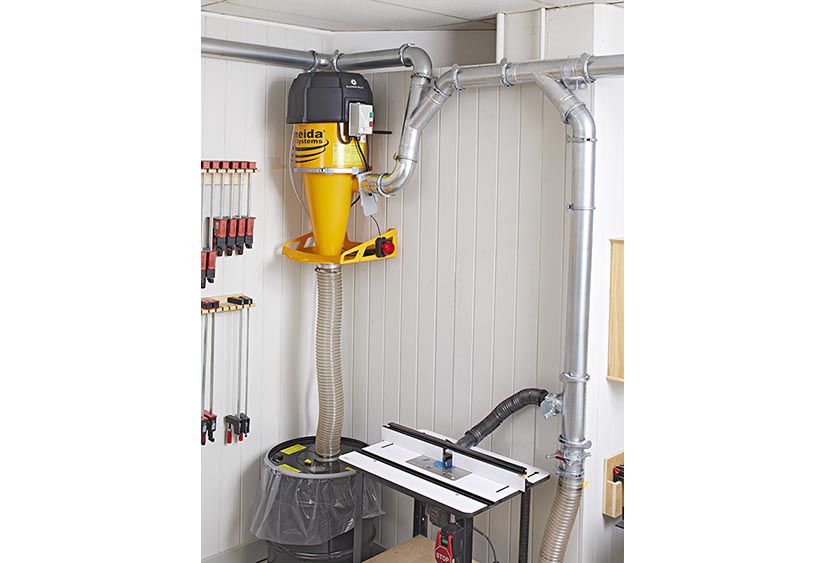
As we worked with Oneida Air Systems to design a dust-collection system for our photo shop, they asked us to try the Supercell cyclone [opener photo], a new, small-shop approach to sucking up dust. Rather than a 3,450 rpm induction motor spinning a vaned impeller, three high-speed universal motors [below], like those found in a shop vacuum, sit atop the unit, pulling air through a HEPA filter rather than pushing. Our initial testing shows that the three motors create nearly ten times the suction of a standard collector, and two to three times the cfm of a shop vacuum.

The higher cfm proves sufficient for drawing dust through 4" duct connected to stationary tools. The high suction provides plenty of velocity through 2 1⁄2 " hose connected to smaller ports, such as on a router table or random-orbit sander. It also overcomes far more resistance, reducing the need to minimize sharp turns, duct length, and flex hose.
The Supercell requires 220 volts. Look for a more complete review in an upcoming issue.
Sources:
Filters:
American Fabric and Filter, 877-742-3653, americanfabricfilter.com.
- Metal duct:
- Oneida Air Systems, 800-732-4065, oneida-air.com;
- Rockler, 800-279-4441,
- rockler.com.
Dust-collection fittings, adapters, and accessories:
Woodcraft, 800-225-1153, woodcraft.com, Rockler.
Freud 1⁄8 ″-radius flute bit no. 99-029, Woodcraft.
Dylos DC-1100 Pro air quality monitor, woodmagazine.com/dylos.