Plumb Your Shop for Air


Tip! Need more air storage? Add a companion tank to your network. Simply plumb it into the system as you would a pass-through filter.
No matter the size of your shop, you'll enjoy the benefits of having a piped network of compressed air. Rather than snaking a single long air hose around obstacles and trying not to trip over it, install your own custom system with hose connections right where you need them. You can then install shorter hoses and the tools you need at each station. Read on to learn the how-to as well as the why-to.
Select a strategy first
Start by planning what you want to achieve with a system. Do you just need to blow dust off projects and use a brad nailer occasionally? Do you want to spray-finish projects? Or do you want to use other pneumatic tools, such as sanders or impact wrenches? Each need requires a different airflow volume, so choose an air compressor capable of supplying the needed cfm (cubic feet per minute) for the tools you plan to use. (See below.) In addition to airflow, your compressor needs sufficient tank size so its pump won't run constantly.

Next, lay out the locations of the compressor and hose connections. To cut down on noise, consider locating the compressor in a closet or adjacent room, and then run the pipe through the wall. But remember, a compressor needs fresh intake air, so make sure the location has adequate ventilation. Place hose-connection stations where you'll use them most. For example, one near the workbench provides quick access for nailers, and another by the overhead garage door makes it easy to inflate a low tire on a vehicle parked outside. If you plan to spray finish, install a connection near an exhaust fan or overhead door.
Tip! To alter or expand your system, simply cut a pipe and install a new tee, or loosen an existing tee by heating it with the torch and making your changes.
Connecting an air compressor to the pipe system with a short, flexible hose lets you disconnect it should you need to take the compressor elsewhere. This hose also isolates compressor vibration, blocking it from transferring into the pipe network. A pass-through filter near the compressor traps most contaminants and water to keep the lines clean. To drain moisture from the tank, either take the compressor outside, or attach a small tube to the drain valve that reaches outside. Install a shut-off valve above the filter so you can unhook the compressor without discharging the entire pipe network.


Now for the pipe
Warning! Do not use PVC pipe, or PEX and similar plumbing fittings for compressed air. They're not rated for high pressure and can fracture or explode under pressure.
Choose from steel, copper, or aluminum pipe to plumb a system, or even semiflexible rubber tubing approved for high pressure. Each has advantages and disadvantages and requires a different method of installation, but they all function well. We chose copper because it doesn't rust, is readily available at hardware stores and home centers, costs about the same as steel pipe, and can be easily modified later, if needed. Granted, you'll need to learn to sweat/solder joints—the heart of copper plumbing—but with a little practice it becomes second nature.
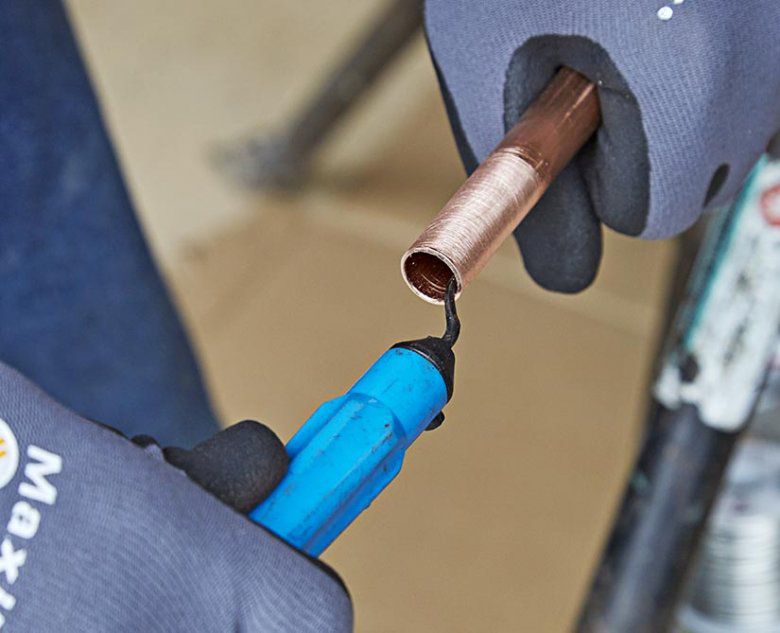
How to sweat copper joints
A typical propane torch works fine for sweating copper pipe, but an oxy/acetylene or MAP-gas (methylacetylene-propadiene) torch gets the job done a lot faster. Buy a complete copper-sweating tool kit.
1. Cut pipe sections to length with a tubing cutter, and then clean the ends. Clean the outside of the pipe with sandpaper or emery cloth.


2. Use a deburring tool to remove the raised burr from inside the pipe.
3. Using a wire bristle brush, clean the inside of the fitting.

4. Apply flux to the pipe end as well as the fitting. Slide the fitting onto the pipe, making sure to align it as needed to correspond with other fittings already installed.

5. Using a torch, heat the joint. When flux bubbles out, touch solder to the joint. As the solder melts, capillary action sucks it into the joint. Be sure to apply solder all around the joint.

6. When finished, wipe off excess flux, which can corrode the pipe over time. Allow the pipe to cool before installing.

Fixtures fill out the field
Tip! Sweat together subassemblies, such as a hose-connection drop, before connecting them to the pipe network already in place on the wall. This reduces the amount of work done on a ladder or overhead.

In addition to pipe, you'll need a number of readily available fixtures to outfit the system. Tees and elbows let you turn, branch off, or add other fixtures. Wall-mounted stand-off brackets hold the pipe securely and leave 3–4" between the pipe and wall, necessary for attaching some fixtures and for soldering without burning the wall, above. You'll need valves for turning on or off the air pressure at various places along the network. And quick-connect fittings provide the link between pipe and air hose, below.
You'll also want a pressure regulator at each drop, which allows you to control the air pressure at each hose separately without having to change the setting for the whole system at the compressor. For example, most finish nailers work best at 90 psi, but a sprayer might require only 40–50 psi.
Save money by making your own hose hangers.
You can also add inline filters at each drop, but one at the main line near the compressor should be sufficient. In addition to filters, another (less-expensive) way to combat moisture is to install "drip legs." These valves below tees provide straight paths for water to drain [Photos below]. We recommend installing one at every drop. Don't skimp on the regulators and filters. You don't want to risk damage to a tool or water in your sprayed finish, so opt for better quality components.


We've made it easy to get all the air-system accessories (not including the copper fittings) in this article in one place. Go to woodmagazine.com/plumbshop, update the quantities you need, and purchase them securely.
Sources
Hose reels: Flexzilla 3⁄8 8" × 30', no. L8230FZ; 3⁄8 " × 50', no. L8250FZ, amazon.com.
Regulator: ARO 1⁄2 " NPT 250 maximum psi, no. R37341-600-VS, amazon.com.
Inline filter: ARO 1⁄2 " NPT 150 maximum psi, no. F35341-400-VS, amazon.com.