Prepping Stock with Hand Tools


Even in a shop full of power tools, preparing stock using hand tools proves a valuable skill. For a workpiece too small to run through the planer or jointer, hand tools can get the job done. All you need is a solid workbench, a few common hand planes, a saw, and a shooting board or shop-made bench hook. With these simple tools, you can true up a workpiece in no time. This process takes some practice, so hone your skills on scrap woods easy to plane, such as walnut, mahogany, clear pine, or poplar, before tackling woods with wild grain, such as maple.
Rough it, then flatten one face
Get plans for a bench hook.
Start by cutting your workpiece about 1⁄8 " oversize in width and length [Photo A, below, left]. You'll trim to final dimensions as you plane the piece later.


Tip!
Put a bit of wax on the sole of the plane to help the plane move more smoothly.
Check the rough-cut workpiece for cup or twist by placing it on a flat surface and looking for gaps [Photo B, below, left]. Contact points indicate high spots on the face where material needs to be removed. Mark the general location of the high spots on the bottom face to provide a visual guide when shaving them down with a plane.

Learn how to tune and set up a hand plane.
Before you begin planing, make note of the grain direction along the edge of the board. Orient the workpiece so the grain runs "uphill" with regard to the direction of the plane to eliminate tear-out that can occur when planing into the grain.
Ensure your planes are SHARP.
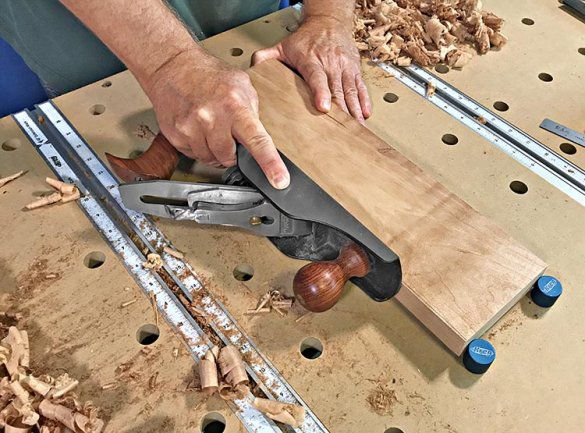
Secure the workpiece, marked side up, using bench dogs that act as a planing stop [Photo C, below, left]. For narrow pieces, a thin strip of wood between the workpiece and the dogs provides more bearing surface. Or clamp the workpiece using a tail vise.
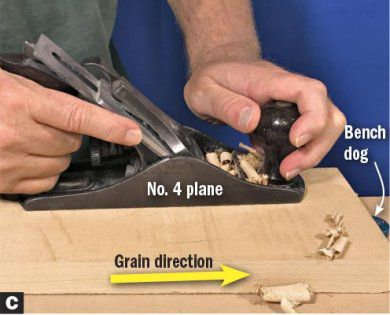
Using a sharp hand plane, begin paring down the high spots. A no. 3 or no. 4 smoothing plane proves ideal for this job. Its smaller size makes it easy to concentrate short strokes in just the high areas. Check your progress periodically with a straightedge or by sighting along the corner of the plane's sole [Photo D, below].

When the face nears flatness, switch to a hand plane with a longer body, such as a no. 5 jack plane. The longer sole contacts more of the board's surface, acting like the bed of a power jointer to ensure a flat surface.
As you make overlapping strokes with the grain, working your way across the width of the board, you'll eventually see the shavings becoming longer and wider until you create full-width shavings the entire length of the board. At this point, you have flattened the face of the workpiece. Mark this face [Photo E, below] to identify it as the reference surface for squaring the edges and planing the opposite face smooth, parallel, and to final thickness.

Square up one edge

Tip!
Place a good light source behind the square to more easily see the light as it passes between the square and the board.
To smooth and square the edge to the reference face, choose a no. 5 or longer plane. Make a couple of passes with the plane until you generate a full-width shaving down the entire edge, using your hand to keep the plane square to the reference face [Photo F, above, left]. Periodically check for square [Photo G, below, left]. Make additional passes if needed, checking your progress, and either tilt the plane or cant the blade to compensate for any error. As before, mark this edge [Photo H, following].


Parallel edges at final width
Square edges easily with a shop-made edge guide for your plane.
Next, plane the opposite edge parallel as you trim the workpiece to final width. Start by marking the width with a line down the reference face [Photo I, below, left].

Planing this edge follows the same process as squaring up the first edge, with one notable exception: Keep your eye on the layout line and make passes parallel to it. If you start to see a taper, concentrate more of the planing on the wider portion, making a longer stroke with each pass until the edge becomes parallel to the layout line.
As before, check your progress with a square, making sure you reference off of the original flat face. Work your way down until the plane just splits the line.
Let's face it
Tip!
When using a marking gauge along the grain, be careful the grain does not "push" your gauge. Avoid this by making several light passes to ensure the fibers are scored true to the reference face.
With one face flat and two edges square to it, plane the remaining face parallel to the first and bring the workpiece to uniform thickness. Mark the final thickness along both edges and both ends [Photo J, below].

For this task, start with a no. 5 plane. Depending on the amount of material to be removed, you may want to set the plane to take a thicker shaving. As you did on the reference face, check for high spots and flatten them first, being mindful of the grain direction. Gradually take longer strokes, eventually working across the width of the board. Watch the scribed lines and adjust accordingly to keep the face parallel to them.
For the last few passes, switch to a no. 3 or no. 4 smoothing plane set for a thin shaving. Make overlapping strokes with the grain to create a glass-smooth surface. Take this opportunity to also dress the other surfaces with the smoother if needed.
The means to the ends
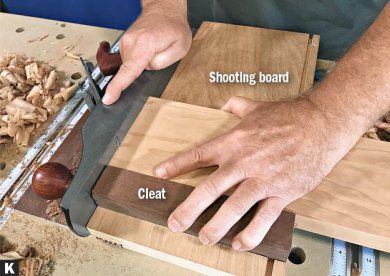
With the faces and edges flat and square, it's time to square up the ends. As when cutting the board to rough length, a shooting board makes this job simple and precise. If you don't have a shooting board, a bench hook works just as well if the cleat is square to the edge where the plane will be used. The cleat of the shooting board holds the workpiece square to the sole of the handplane as it shaves the end grain [Photo K, below]. With a sharp hand plane, it doesn't take long to square up the ends and leave a smooth finish.
Squaring up a workpiece using hand tools can be quite a rewarding experience—it just takes a little practice. And it eliminates the noise and dust that power tools generate.