Reface cabinets for a new look


If you like the layout of your kitchen or bathroom, refacing the built-in cabinets maintains that arrangement while making the room look like new. And because refacing costs less than new cabinets, you can use the savings to add new touches of luxury, such as self-closing drawers and soft-close doors.
Evaluate the current cabinets
We worked with Hartman Construction of Des Moines, Iowa, to get expert advice on refacing. Look for their "Pro Tips" throughout this article.
Not every set of cabinets is worthy of refacing, so don't waste time and money trying to rejuvenate excessively out-of-square boxes, or ones that have moisture damage, split frame members, or broken joints that can't be repaired. Dings, deep scratches, and chip-out on the face frame can be filled in before applying the new veneer. Ignore damaged doors and drawer fronts as you'll build new ones to match the revitalized face frames. Broken drawer boxes can also be replaced. If your cabinet boxes pass muster, move on to evaluating your hardware.
Hardware: Upgrade? Reuse?
Learn more about types of slides and how to install them.
Although it's economical to stick with the existing hardware, upgrading hinges and drawer slides can make refaced cabinets feel as new as they look. Full-extension ball-bearing slides allow easy access to a drawer's full depth. Bottom-mounted slides provide a clean, uncluttered look with the drawer open. With self-closing slides, you give the drawer a gentle push, then it slows the last inch or so of travel and softly closes on its own. Soft-close hinges do the same for doors, preventing slams.
Build drawers with a simple, strong lock rabbet, or with dovetails.
Side-mount slides require 1⁄2 " of clearance on each side between the face frame and drawer box, and bottom-mount slides typically require drawer sides that extend 5⁄8 " below the drawer bottoms. Either of these choices may require building new drawer boxes to accommodate them. Build the boxes before you begin refacing to minimize your kitchen or bath downtime.
Mounting doors with hidden 35mm hinges provides three-way adjustability for aligning door fronts. (See below for more about selecting 35mm hinges.)
Reusing pulls and knobs can save you money, but choosing new (or no) hardware will update the look even further. You'll find a wide selection of pulls and knobs online and at home centers.
Finish before you start
Pro Tip!
Overlay doors and drawer fronts hide slight out-of-square discrepancies in a cabinet box.
To determine door and drawer-front sizes, measure each opening and add 1" to allow for a 1⁄2 " overlay all around. Measure the face-frame rails and stiles and add 1⁄4 " to their widths and 1" to their lengths to determine how much veneer you'll need. Then measure the exposed end panels and toekick faces; purchase enough 1⁄4 " plywood to cover them. If you can't find a good color match between your veneer and plywood, buy extra veneer and apply it to birch plywood.
Using these measurements, build doors and drawer fronts to suit your desired style. For this job, we made doors with stub-tenon-and-groove joinery, and 1⁄4 " plywood panels. Lightly sand the sharp edges of the doors and drawer fronts. Drill 35mm holes for hinges, but drill holes for pulls only after installing the doors. This ensures the pulls align and eliminates drilling a hole in the wrong end.
Dress up flat-panel doors to look like raised panels.
Cut the end panels to length, and at least 1⁄4 " overwidth to allow for scribing to the wall if needed. Cut overlength pieces of cove molding to finish the tops of wall cabinets, and base shoe to fit along the floor. Then apply any stain and finish to the moldings, panels, doors, drawer fronts, and full sheets of veneer in your shop before taking them to the job site. We refaced our cabinets in cherry, and applied Minwax Cherry stain topped with precatalyzed lacquer.
Time for a breakdown
Pro Tip!
Construction adhesive won't run or drip and provides an instant tack.
With all the components ready, remove the old doors and drawer fronts. If you'll be reusing the pulls, bag them up and set them aside. Empty the cabinets so the contents don't get dusty or damaged. If you are upgrading slides, remove and discard the old ones from the cabinets and drawers. Store the drawer boxes you'll reuse inside the cabinets to reduce workspace clutter.
Pro Tip!
Apply a strip of painter's tape to walls and appliances next to the cabinets to avoid scuffing them while sanding.
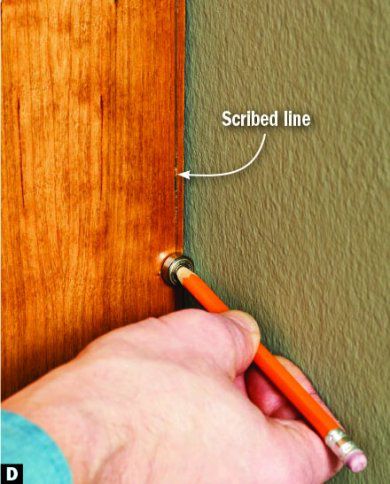
Install the end panels first to allow covering their exposed edges with veneer later. To get started, hold an end panel in position, and scribe the back edge of the panel [ Photo D, below]. With a belt sander, shape up to the line. For base cabinets, hold the scribed panel in place, trace the outline of the toekick, jigsaw it, and sand it smooth.

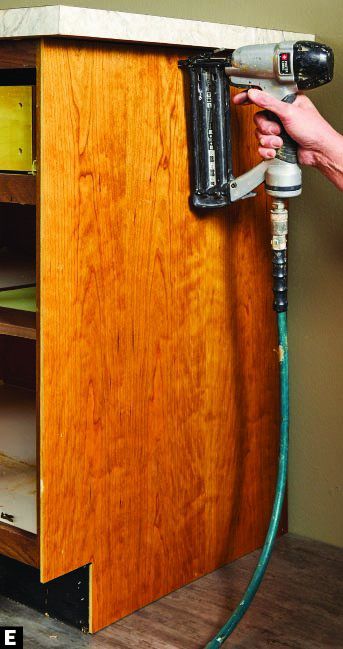
Glue and pin-nail the side panel in place [Photo E, above]. Flush trim the front edge of the panel [Photo F, below], and square up the inside corners [Photo G, following].


Pro Tip!
Provide plenty of ventilation and remove pets from the area while applying lacquer.
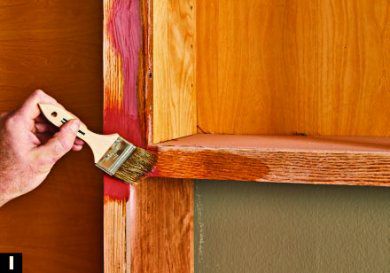
Using 100-grit sandpaper on a random-orbit sander, sand the face frames to remove contaminants, such as built-up grease, and any loose finish. (You do not need to remove all of the old finish.) Hand-sand with a sanding block next to walls and appliances, and under countertops. To prevent transmitting old imperfections through the new veneer, fill chips, holes, or dents [Photo H, below], and sand them smooth. Then, apply a lacquer finish to the faces of the rails and stiles only [Photo I, following].

Now, the facelift

Pro Tip!
After peeling off the protective backing, handle the veneer only by its edges to avoid contaminating the adhesive and compromising its bond.
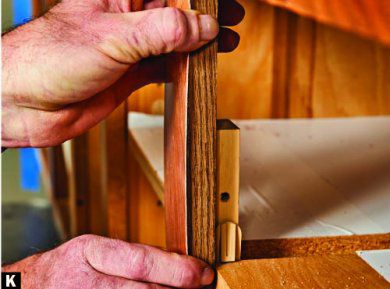
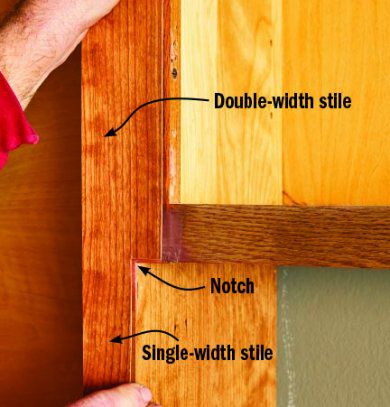
Rip strips of veneer about 3⁄16 " wider than the width of the face-frame stiles. Then crosscut them about 1" longer than each stile [Photo J, above]. Where two stiles butt together, cut one piece of veneer wide enough to cover both. Apply the veneer to each stile [Photo K, above]. Where a short cabinet butts against a tall one (as in Photo H, above), cut and apply an L-shape veneer strip [Notching eliminates seams, below]. The PSA backing allows you to peel off and reposition a strip if it gets applied slightly off kilter, but aim to get it right the first time. On outside stiles adjacent to an end panel, leave as little overhang as possible along the panel to reduce sanding later, minimizing your chances of marring the panel.
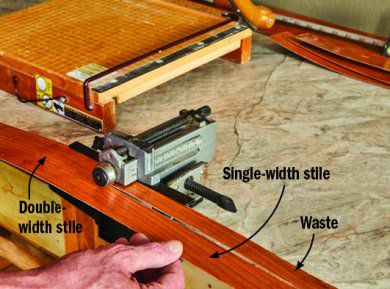
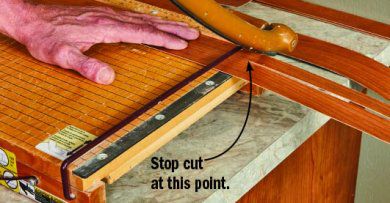
Notching eliminates seams
With a double-width stile at the top and a single-width stile to the bottom, you might consider butting two strips side by side, one for each stile. However, notching one piece to cover the full length of both stiles provides a seamless fit [Photos below].

Pro Tip!
A gap up to 1⁄64 " at each end can be filled with putty.
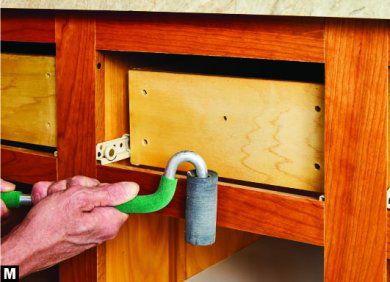
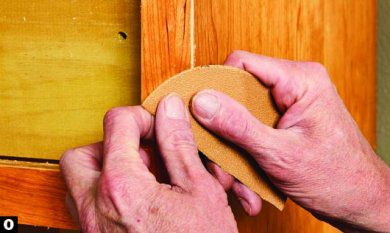
Next, fit and apply the rail veneers [Photo L, above], and press all the veneers against the face frame [Photos M, N, below]. Using a laminate bevel-trim bit, rout the overhanging veneer flush with the face frame, except by the end panel, where you should hand-sand a chamfer [Photo O, following]. With a sharp utility knife, remove excess in any areas the bit couldn't reach.

Touch up the exposed veneer edges with the same stain used on the veneer. Fill any small gaps between rail and stile veneers with colored putty [Photo P, below].

Install doors and drawers
Note:
The pressure-sensitive adhesive takes several days to reach full strength.
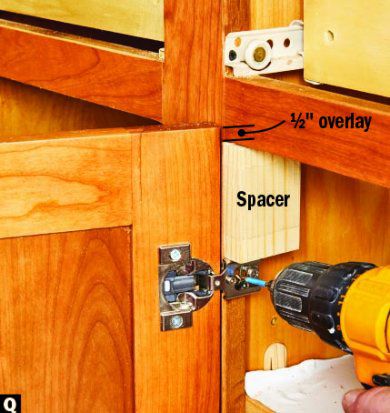
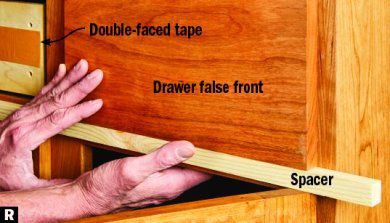
Retrieve the doors and drawer fronts. Install the doors first [Photo Q, above], aligning their top edges. Apply double-faced tape to the front of each drawer box and install the false fronts next [Photo R, below]. Miter-cut and pin-nail cove molding to the top of the wall cabinets [Photo S, following]. Cut and pin-nail 1⁄4 " plywood to the toekicks, then complete the cabinet boxes with base shoe along the floor to hide gaps. Putty the nail holes, then step back and admire your "new" cabinets.

Specialty tools ease the job
View a short video of cutting veneer with the laminate-slitter fixture.
The veneer used to reface cabinets comes in 24×96" sheets in a variety of species and with a pressure-sensitive adhesive (PSA) backing [Sources, below]. To accurately cut sheets this long, use a laminate slitter [Photo A, below, Sources]. Slide the veneer along the fence and between two bearing-mounted cutters. Adjust the distance between the bearings to accommodate sheets of different thicknesses, and set the fence to cut strips of different widths.

You can use the trimmer handheld, or purchase a clamp that secures it to the edge of a bench or countertop. But for best control and accuracy, make a simple fixture like the one used by Hartman Construction [Photo B, below] that both secures the tool, and provides a larger worksurface and longer fences.

For crosscuts, a guillotine-style paper cutter creates clean, square cuts and makes it easy to trim off small slivers when fine-tuning the length of a strip. Find paper cutters at office supply stores. A small one suffices.
A laminate bevel-trim bit [Photo C, below, Sources] routs away overhanging edges and creates a slight chamfer on the installed veneer. Its small diameter allows it to reach almost fully into corners, minimizing the need to square them up after routing.

Sources:
24×96" PSA-backed veneers, price varies by species, veneersupplies.com.
Tridon AT-109 laminate slitter, tools4flooring.com.
Freud 66-100 bevel-trim router bit, no. 49466, J-roller $20, no. 43174, 800-279-4441, rockler.co