Router 101


Often thought of only for its ability to add a decorative edge to any surface, a router can also easily create strong and attractive joinery or eye-catching inlays. Once you know the basics of its operation, you open up a world of uses.
A map of the router
In a router, a motor spins a collet that grips the shank of a router bit. We'll talk more about collets and bits in, er, a bit.
View much of the info from this article in action here and here.
Routers come in one of two base styles: fixed, where you set the cutting depth once and lock it in for the task; and plunge, where two spring-loaded rods support the motor and allow for lowering and raising the spinning bit into and out of a workpiece. This plunging action makes it easier to start a cut in the middle of a field, such as for a stopped dado. Many manufacturers offer both bases in a kit with a single router motor that swaps between them [Photo A, below].

Routers range in power from 1-hp trim routers to 2- and 2 1⁄4 -hp midsize routers, and powerful 3-plus-hp machines. To further add to the variety available, many manufacturers now offer battery-powered models [Photo B, below]. This gives you a truly portable tool for use in the shop or on a job site.
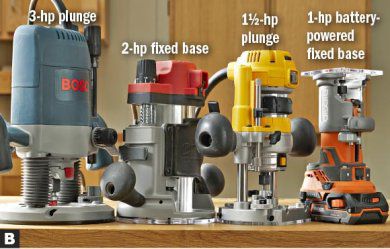
Learn about the differences so you choose the right machine for you.

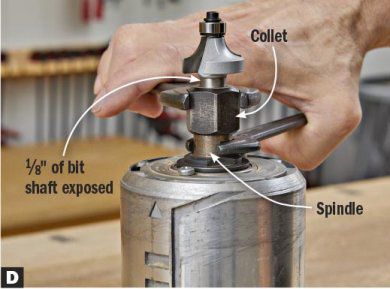
In all routers, a collet, tightened by a wrench, compresses around the bit shank to hold it in place [ Photo C, above]. To secure a bit in the collet, insert it until it bottoms out, then raise it to expose about 1⁄8 " of the shaft above the collet. Then tighten the collet [Photos D, E, below].


A bit about bits
At the heart of routing is the bit [Photo F, below], with cutters of either high-speed steel or carbide. High-speed steel bits cost less but dull quicker than carbide bits.

A bit for shaping a workpiece edge [Photo G series, below] or following a template secured to the workpiece has a bearing at the end. The bit spins inside the bearing, reducing friction, which causes burn marks.

Setting up for a cut
Find the proper speed for any bit.
After securing the bit in the router, follow these steps before hitting the "on" switch. Though early routers ran at fixed speeds around 25,000 rpm, most newer models come with variable-speed motors [Photo H, below]. Run small-diameter bits at high speeds; use slower speeds for large-diameter bits.

Next, set the cutting depth. A good rule of thumb is to remove no more than 3⁄16 " in any one cut. This reduces strain on the bit and motor, and reduces chip-out on the workpiece [Stop chip-out, below].
Stop chip-out
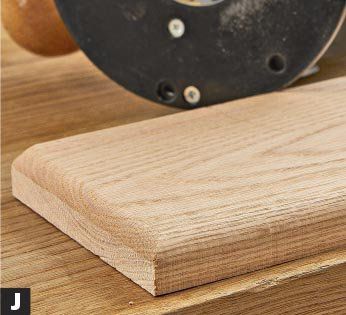
Routing across end grain can cause chip-out at the end of the cut [ Photo I, below]. A pass along the adjacent edge removes minor chip-out [Photo J, following]. To prevent chip-out from happening in the first place, back up the cut [Photo K, beneath]. Use this technique if you won't be routing a profile on the adjacent edge.


Before touching the bit to wood, you need to understand how bit rotation affects the direction you move the router. In a handheld router, the bit spins clockwise when viewed from above. When routing an edge, moving the router counterclockwise around the workpiece helps keep the bit bearing against the wood edge as you push the router along [Drawing 1, below].

Note: Routers are loud. Wear hearing protection.
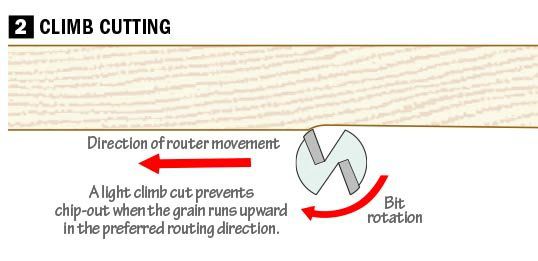
When routing clockwise—called climb-cutting—the bit bites into the edge and pulls the router along, like a car tire when you mash the gas pedal. Because deep cuts increase this tendency, resulting in ragged cuts, only climb-cut with very shallow depth, and only when necessary [Drawing 2, below].
Routing direction confuses even experienced users, especially when it comes to routing the inside edges of a frame. A simple way to think of it: Look at each member of the frame as a single workpiece, and begin routing counterclockwise around it [Drawing 3, below]. You'll automatically start off in the correct direction.

Now that you know which way to move, follow the steps in Photos L—N, below, to rout an edge.
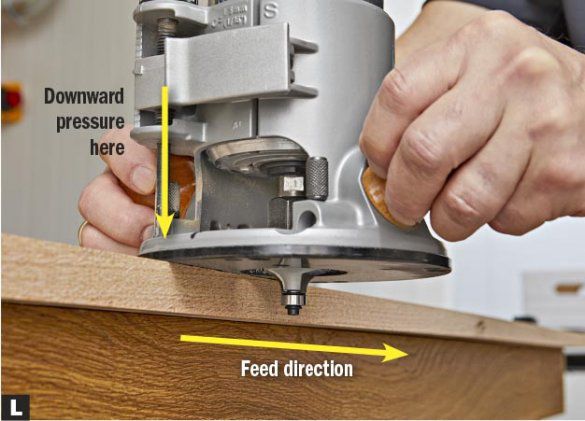
(Above) start with the router base on the workpiece, and the bit away from the wood. Turn the router on, grip both handles, and push the bit into the wood until the bearing makes contact as you also begin moving the router along the edge. You should hear the motor's pitch change slightly as it works. That's just what you want.

Keep the router base pressed against the top of the workpiece. Don't worry if the bearing drifts away from the edge at times (above); you can clean up inconsistencies with another pass (below).

Tip! Remove just a "whisper" of material on the last pass to reduce friction and remove burn marks. If you've already routed to finished depth, lightly trim the burned edge with a hand plane, jointer, or tablesaw and rout the last pass again.
Proper feed speed is something you develop with experience, and it varies with wood species, so practice on scrap for your first passes. Too fast, and you increase chances of chip-out. Too slow, and you may burn the edge [Photo O, below]. Slowing as you prepare to turn a corner is a common cause of burn marks.

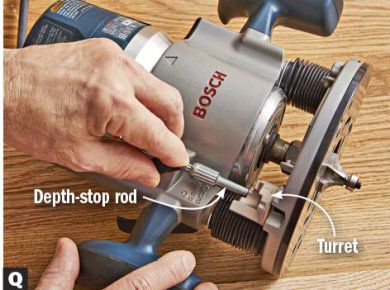
If you need to rout deeper than 3⁄16 " using a fixed-base router, take several passes, lowering the bit no more than 3⁄16 " between each pass to reach the final depth [Photo P, below]. A plunge router offers an easier way, using the depth-stop turret [Photos Q, R, following].


Get guidance
Using a bit without a bearing requires some method of guiding the router. Mount an edge guide to the router base [Photo S, below], or clamp a straightedge to the workpiece [Photo T, following].


Mastering the use of a router opens up a world of decorative project possibilities as well as time-tested and functional joinery solutions.
Get a plan for a shop-made edge guide.