Roy King and his Scrollsawn Marquetry


Like most of us, WOOD® magazine reader and scrollsawyer extraordinaire Roy King has always found traditional marquetry methods, which require you to precisely cut and fit lots of tiny veneer pieces by hand, tricky and frustrating. Then he hit upon the idea of doing marquetry on his scrollsaw with beveled cuts in two 1⁄8 "-thick pieces sandwiched together. Eureka! The technique yielded great-looking designs, and proved easy to master.
Of course, Roy, who was featured in our February 1993 issue, couldn't wait to share his newest results with us. We were so impressed that we recently got together with Roy in our shop for a session of scrollsawn marquetry. Here's what happened.

A few pattern pointers
In this article we'll show you how to make the rose design featured in this hand-mirror project. This technique requires multiple patterns (called plates) to make a single design.
If you would like to try your hand at making your own plates from line art you find in clip-art books or other sources, see the information in the sidebar "How to make your own plates" at the end of this article.
Let's get started
The oval rose design is about 4x6" in size, so begin by resawing and thickness planing 1⁄8 -thick workpieces, each just larger than 4x6", in three woods: curly maple (for the background panel), chakte kok, also spelled chakte coc or called red heart (for the rose petals), and cherry (for the stem and leaves). see our Sources at the end of this article if your local supplier doesn't carry these woods.
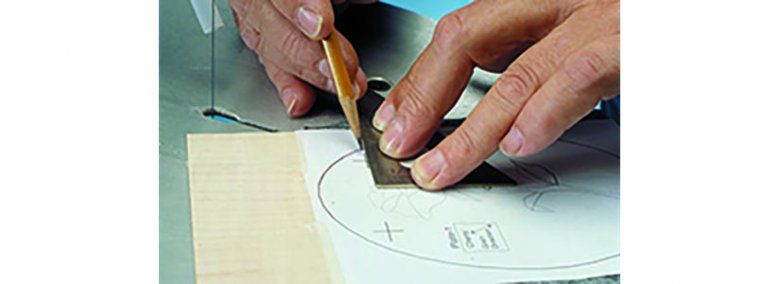
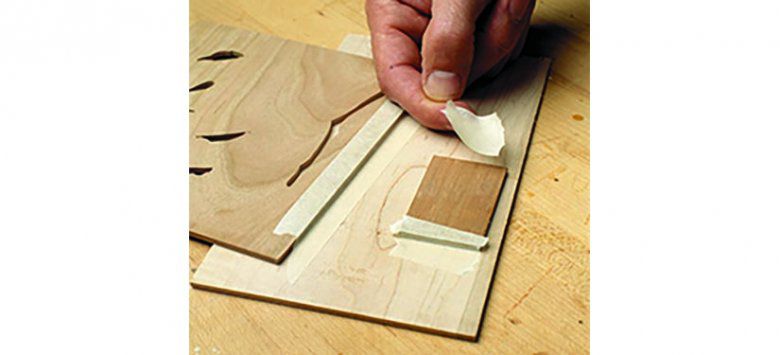
Now, make an extra copy of plate 1 and set it aside for later. Tape the top edge of one of your plate 1 patterns onto the maple background panel, slip a sheet of carbon paper between the plate and panel, and precisely trace the cross-hair registration marks, as shown below. Remove the tracing paper, and tape all four edges of the plate to the panel.
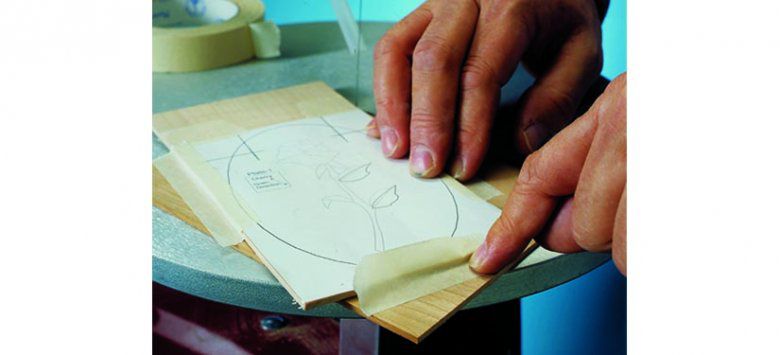
Place the inlay stock (cherry for plate 1) beneath the background panel, aligning its grain direction with the arrow on the plate. Do this by holding the stack as shown below. This helps you choose the best grain direction and color for the inlay pieces marked with heavy lines.

Set down the stack and secure the background panel to the inlay stock with masking tape. Be careful to press the tape firmly into the corner formed by the edge of the panel and the inlay stock as shown below. This prevents the stack pieces from shifting.
Test your cutting setup
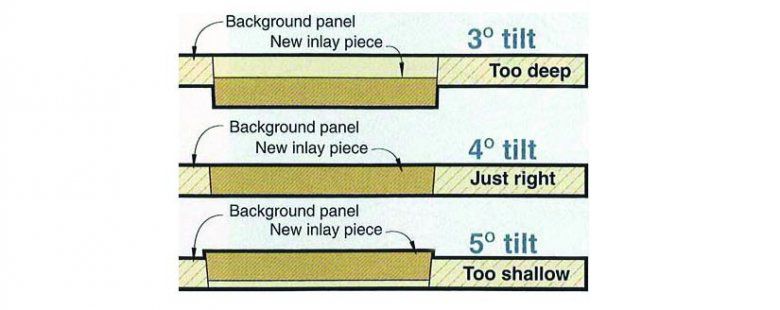
For proper-fitting inlay pieces, take a moment to check the angle of your scrollsaw table by making test cuts in two pieces of 1⁄8 " scrap stock taped together. First, tilt your table 4° to the left, install a 2/0 blade, and chuck a No. 67-72 wire-size bit into a hand drill. Make a blade-start hole in the middle of this stack, thread your blade through it, and cut out a circular shape, being careful to cut in a counterclockwise direction. Keep the circle you cut from the bottom piece of stock. Take the stack apart, place the top piece of stock front face down, and place the cutout from the bottom piece of stock into the hole in the top piece of stock. It should fit as shown in the 4°-tilt exampleillustrated above. If the test piece slips too far through the hole, you need to increase the tilt angle. If the test piece goes into the hole but doesn't come flush with the face of the top piece of stock, you should decrease the tilt angle slightly.
It's time to scroll

On every plate you will find three types of lines, as shown above. This illustration tells you what you need to know about each type of line.
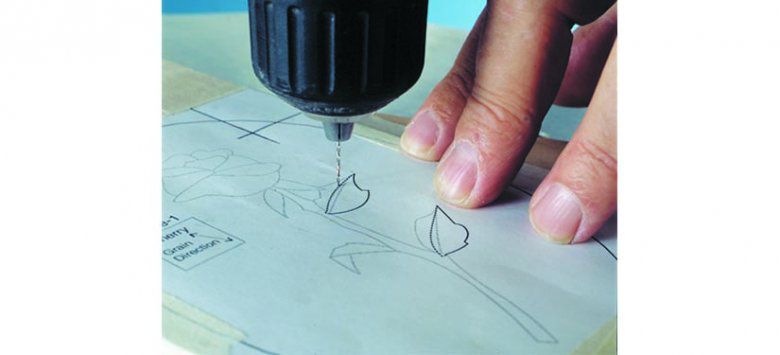
To get started, drill a hole through the stack at any point along both of the heavy dashed lines on the leaves, as shown above. Thread the scrollsaw blade through either hole in your workpiece, and cut in a counterclockwise direction along the heavy dashed and heavy solid lines, as shown below. Cut out the other leaf in the same fashion. Save the cutouts from the bottom (inlay) stock. For best cutting control, set your scrollsaw for slow speed.

For a really hot look, toast the inlay pieces with sand
To give your project a realistic three-dimensional appearance, it pays to shade the inlay pieces with hot sand. First, pour a 1" layer of sand into a shallow pan (preferably one that's outlived its usefulness in the kitchen). Finer grades of sand work best; we purchased a bag of fine silica sand from a local home center.
Next, place the pan and sand on a burner set for high heat. The sand may take up to an hour to become hot enough. Test the temperature of the sand with 1⁄8 "-thick scrap; it should darken slightly after being in the sand for 15–30 seconds. Be careful not to touch the edge of the inlay piece to the pan; that will bum the edge but leave the rest of the piece unshaded.
Use a tweezers to hold the pieces in the sand, as shown below. It also works well to hold small pieces by stabbing the point of an X-acto knife into their edge. You will have to shade each piece just after sawing it and prior to placing it Into the background, as described in the next step. The shading should show a light-toast color through the thickness of the piece so it won't sand away when you smooth the completed design later.


Glue the inlay pieces into the background panel
Discard plate 1, then remove the masking tape from the cherry inlay stock and set the stock aside. Lay the background panel front face down on a worksurface, apply white glue to all edges of the inlay piece, and drop it into the matching hole in the background panel, as shown below. For ease of application and neatness, Roy prefers to apply the glue with a glue injector. Tap the piece down firmly (a nail set comes in handy for small pieces) to seat it lightly in its hole.

Flip the background panel front face up and examine the inlay pieces for a tight and flush fit. Wipe away any excess glue with a rag or sponge dampened with water. If necessary, rub a drop of white glue into any tiny openings and lightly hand-sand these areas with 150-grit paper to mix sawdust into the glue. Again, wipe away excess glue.
And now, the rest of the plates

With scissors, cut through the registration marks on plate 2 so you can align them with the registration marks on the background panel, as shown above.Tape: the plate to the background panel, and tape this assembly to the inlay stock as described earlier. You may run into the situation where this stack becomes tipsy on the scrollsaw table because one side of the stack is not fully supported by the inlay stock. In that case, support the stack by taping a piece of 1⁄8 " scrap to the back of the background panel, as shown below. Repeat all of the previously mentioned steps for each plate in numerical order.
As you cut and glue each inlay piece into position, notice how each piece overlaps the waste area of an adjoining piece you previously inserted into the background panel. Of course, you can't overlap the final piece on plate 14 with another succeeding piece, so you will have to treat this last inlay piece differently.
Because the last piece in the design has no waste area to drill the start hole into, you will have to drill it just inside the heavy solid line. To do this, hold your drill at an angle, as shown below, with the bit angled away from the inlay piece. The bit should pass through the waste areas of both the background panel and inlay stock. Cut along the solid line as before.

The final touches
After you glue all of the inlay pieces into place, you'll find that they form an uneven surface slightly proud of the background panel. To flatten things out, Roy runs a random-orbit sander with 150-grit abrasive over the surface, as shown below. He then moistens the surface to raise grain hairs, allows the surface to dry, and goes over it again with a 150-grit disc.

Finally, use the extra copy of plate 1 to cut the background panel to an oval shape. Scissor a "window" roughly 23" in size out of the center of the plate. Use this window to align the pattern on the plate with the outline of your design, as shown in thephoto below. Tape down the plate, adjust your scrollsaw table for a perpendicular cut, and saw along the oval. You're done!

How to make your own plates
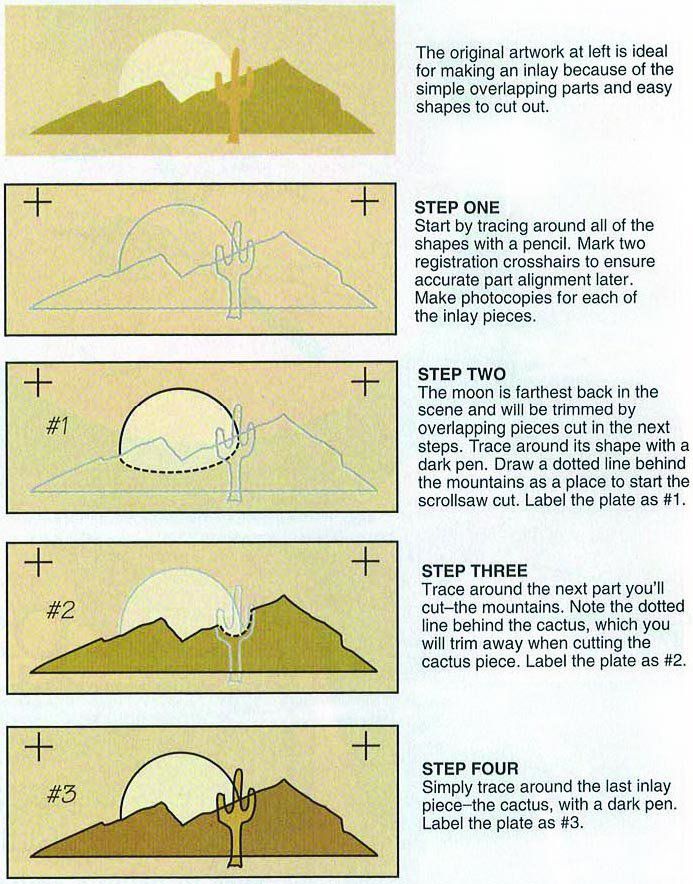
Turning a piece of line art into a set of plates is simple once you get the hang of the general theory. In a nutshell, you need to plan the order of cuts so that each succeeding inlay piece overlaps the waste area of the piece cut before it. This typically means that you cut the pieces farthest in the background of the design first, then work your way toward the foreground.
As shown in this simple example, you cut the object farthest in the background (the sun) first. We positioned the waste area of the sun cut so that the next object you cut, the mountains, overlaps it. Finally, the cactus in the foreground overlaps the mountain waste area.

Sources
* Exotic woods, most 3⁄4 " thick. Woodworkers Source, 5402 S. 40th St., Phoenix, AZ 85040. Phone 800/423-2450.