Russ Filbeck's award-winning oil finish


We first got to know Russ back when his Appalachian ladderback youth rocking chair earned WOOD® magazine's Excellence in Workmanship Award at the 2001 Design in Wood Show at the Del Mar Fair near San Diego. After one look at his winning entry, we asked Russ if he would share his finishing procedure with our readers. He was more than glad to help.
Explore Russ Filbeck's work at his website.
Of course, the sharing of knowledge comes natural to Russ, who retired from his job working aboard nuclear submarines in 1985. He operated a furniture restoration business after his Navy days, and became a woodworking instructor in 1989. Today, he teaches courses on beginning finishing, advanced finishing, and various aspects of woodworking, such as making rocking chairs, at Palomar College in San Marcos, California.

Here's what you'll need
- Liberon Finishing Oil
- Wet/dry siliconcarbide abrasive paper in 220, 320, and 400 grits
- Hard paste wax with carnuba wax (Russ prefersLiberon Black Bison Clear Fine Paste Wax)
- Wax applicator (Russ prefers old shoulder pads)
- Clean, white, cotton rags
Wet-sanding is your first step to success
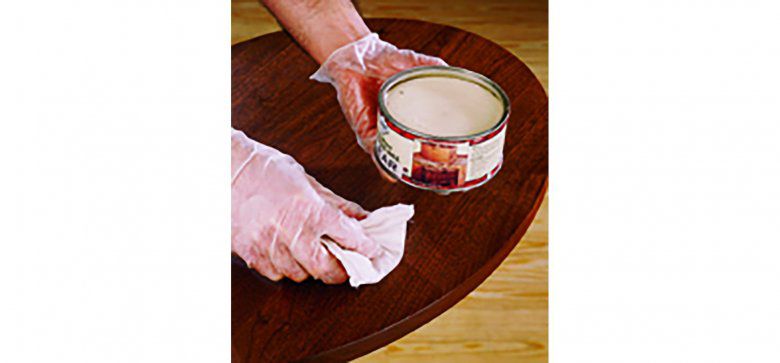
1. Prepare your project by sanding all surfaces to 220 grit or hand-scraping them. Place a drop cloth under your project. Saturate the wood surface with oil. Russ uses a small squirt bottle to dispense the oil in a controlled way.
Tear a sheet of 220 wet/dry abasive into 1⁄4 -, 1⁄8 -, or 1⁄16 six-sheet pieces. Use the 1⁄4 -sheet pieces for large projects, such as tables, and the 1⁄16 -sheets for small projects or tight areas. Fold those pieces to a size that feels comfortable in your hand. Use the abrasive to create an oil/wood slurry, as shown below. Sand with the grain until the oil is absorbed and the wood pores fill with the paste-like slurry.

Allow the slurry to thicken. Russ prefers Liberon Finishing Oil because it contains some alcohol to help it dry in about 20 minutes. Other oils, such as Minwax Antique Oil Finish, work fine, but may take 45–60 minutes to dry. Thoroughly wipe off all excess slurry with a rag, using a pointed stick with cloth wrapped around it to get slurry out of tight spots.
Do large projects in manageable sections. You can stop anywhere, wipe off the excess slurry, and start up again in an adjoining area with no lap marks.
Note: For enclosed containers such as jewelry boxes or hope chests, apply the finish described here to the outside of the container only. "Oil finishes leave a musty, long-lasting smell on the inside of boxes, so I use shellac on the inside," Russ recommends. "Any fast-drying finish, such as lacquer, works well, too."
2. Inspect the piece once an hour for 6 hours or as long as necessary to wipe off any "bleed-back," the term for oil that seeps back out of the wood pores as it dries. (See photo below.) Then, allow the first coat to cure for 48 hours.

Note: You do need to be careful when disposing of the oil-soaked rags and abrasives. Immediately after use, place them in a water-filled or airtight metal container. Or, spread them out flat on concrete until dry. Never ball them up and toss them into the trash—the heat from the drying could cause spontaneous combustion.
3. Repeat Steps 1 and 2 using 320-grit wet/dry abrasive. Allow this second coat to cure for 24 hours.
4. Repeat Steps 1 and 2 using 400-grit wet/dry abrasive. Allow 2–7 days of final curing time.
5. Apply two or more thin coats of a hard paste wax and buff to bring out the sheen of the oil finish. At this stage, Russ says most people tend to put wax on too thick. For thin coats he applies the wax with his wife's old shoulder pads, as shown below, and buffs after only 5 minutes instead of the 20 minutes cited on some product labels. Old white, cotton T-shirts work great for buffing.
How to maintain your beautiful finish
Russ suggests you replenish the finish with wax, not more oil. Do this no more than once a year, and make sure to wipe all dust off the surfaces before applying and buffing the wax.